Combining World and Face
You're able to create Lenses with unique content on both the front and rear camera. This guide will walk you through how to combine a front and rear facing template together. In addition, this guide also includes a helper script which enables and disables objects based on front and rear camera.
Using World and Face Templates
The Animated Object rear facing template and Sunglasses front facing template provided in Lens Studio are good building blocks to create more complicated Lenses. You can combine two projects by exporting a scene object from one template and importing it into another.
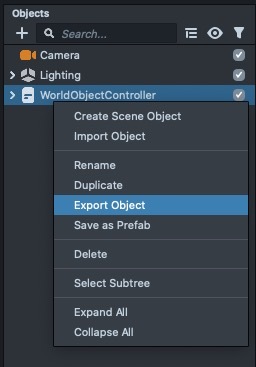
First, export the Lighting object and WorldObjectController object from any world templates you are working on. Right Click on the object in the Objects panel and select Export Object.
Import the Lighting object and WorldObjectController object you just exported into the face template you are working on. You can do this by dragging and dropping the .iso file into the Objects panel. Alternatively, you can right click in the Objects panel and select Import Object.
Next, add Device Tracking Component under the Camera Scene Object in your combined project. Face templates by default do not have Device Tracking component, which is required for surface tracking of 3D World Objects. Select the camera Object in the Inspector panel and the select Add Component -> Device Tracking.
![]()
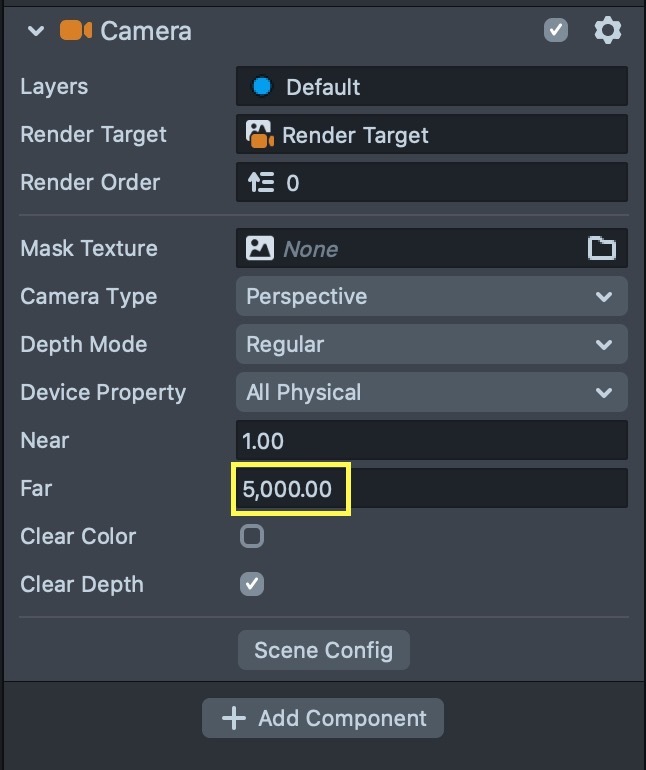
Additionally, with the Camera object selected, increase the Far clipping plane in the camera settings to 5,000 or higher.
If your face template has the Orthographic Camera as the main camera (usually for billboard and sprites), change the camera input for the Interaction Component under WorldObjectController to the Perspective Camera in the project.
Also make sure that Device Tracking on the WorldObjectController script is linked to the Device Tracking component on your camera.
You have now successfully combined your face and world templates. Objects from the world template will be disabled on front camera while the face effects will be disabled on rear camera.
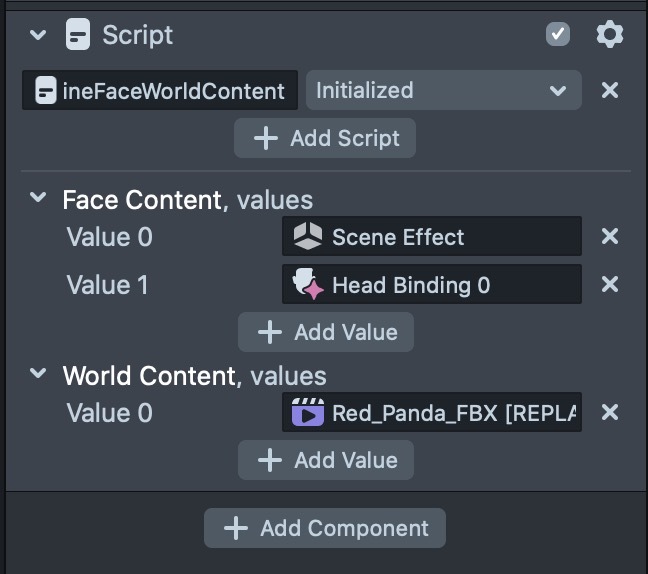
CombineFaceWorldContent.js
We have also provided a helper script that hides and shows face and world content on camera switching. Create a new script named CombineFaceWorldContent.js and add below to the contents.
// CombineFaceWorldContent.js
// Version: 0.0.1
// Event: Lens Initialized
// Description: Hides the face content on rear camera and world content on front camera
// @input SceneObject[] faceContent
// @input SceneObject[] worldContent
function onFrontCamEvent(eventData) {
  for (var i = 0; i < script.faceContent.length; i++) {
    var faceObject = script.faceContent[i];
    if (faceObject) {
      faceObject.enabled = true;
    }
  }

  for (var i = 0; i < script.worldContent.length; i++) {
    var worldObject = script.worldContent[i];
    if (worldObject) {
      worldObject.enabled = false;
    }
  }
}
var cameraFrontEvent = script.createEvent('CameraFrontEvent');
cameraFrontEvent.bind(onFrontCamEvent);
function onBackCamEvent(eventData) {
  for (var i = 0; i < script.faceContent.length; i++) {
    var faceObject = script.faceContent[i];
    if (faceObject) {
      faceObject.enabled = false;
    }
  }

  for (var i = 0; i < script.worldContent.length; i++) {
    var worldObject = script.worldContent[i];
    if (worldObject) {
      worldObject.enabled = true;
    }
  }
}
var cameraBackEvent = script.createEvent('CameraBackEvent');
cameraBackEvent.bind(onBackCamEvent);
Create a new object by selecting + -> Empty Object in the Objects panel. With this new object selected, add a new Script Component and set it to the CombineFaceWorldContent script. Make sure the event dropdown is set to Initialized. Input the face and world content accordingly. The script will hide world content on front camera and show world content on rear camera, vice versa for face content.