Ray Tracing in Lens Studio
Ray Tracing improves the quality and realism of virtual objects placed in the real world through accurate lighting simulation, which reflects your real world environment, and enhanced lighting controls for developers.
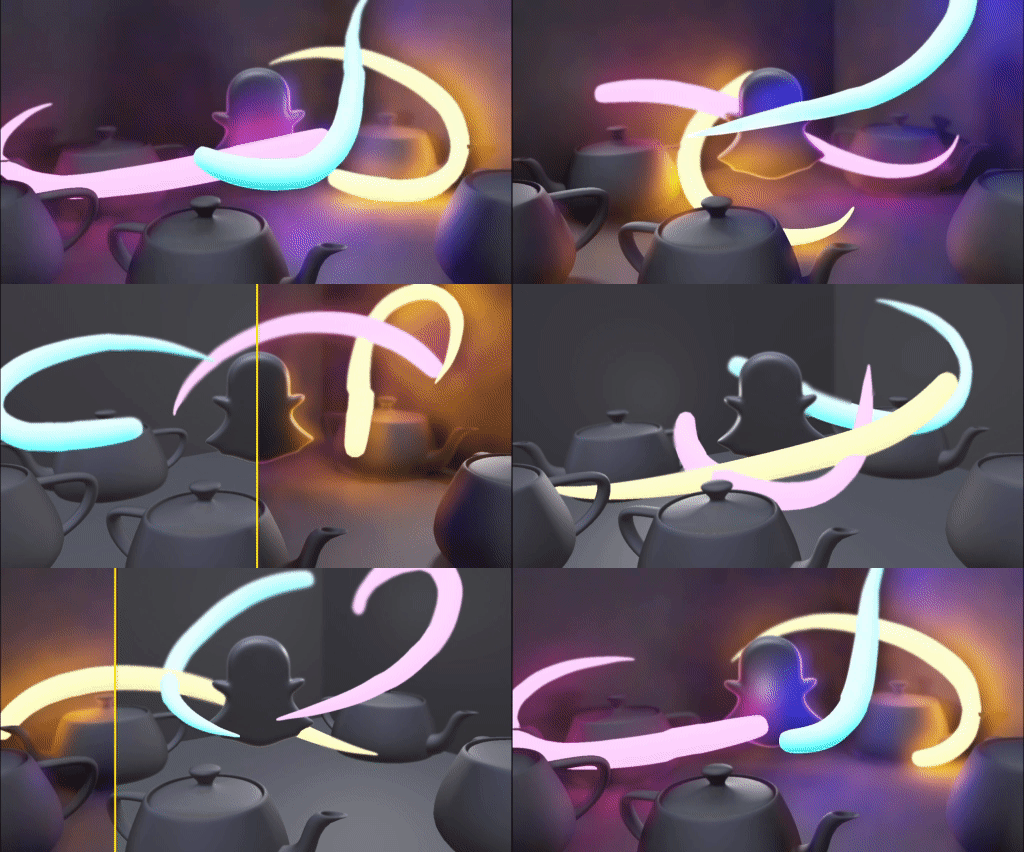
This technology improves the quality of any Lens which features scenes and objects where lighting bounces and is reflected on their surface. For example, the inclusion of fabrics that are metallic or polished along with materials such as metals, stones, glass, polished surfaces.
Because of the importance of light reflections across a vast number of AR experiences, the use of Ray Tracing is leveraged in many use cases, including Lenses that feature:
- Virtual Products (jewelry, handbags, eyewear, electronics, metallic apparel fabrics)
- Gaming & Sports (automotive, courts, helmets)
- Architecture & Entertainment (buildings, windows, rooms)
- Self-Expression (digital fashion, highlight, reflective and metallic textures applied to face meshes)
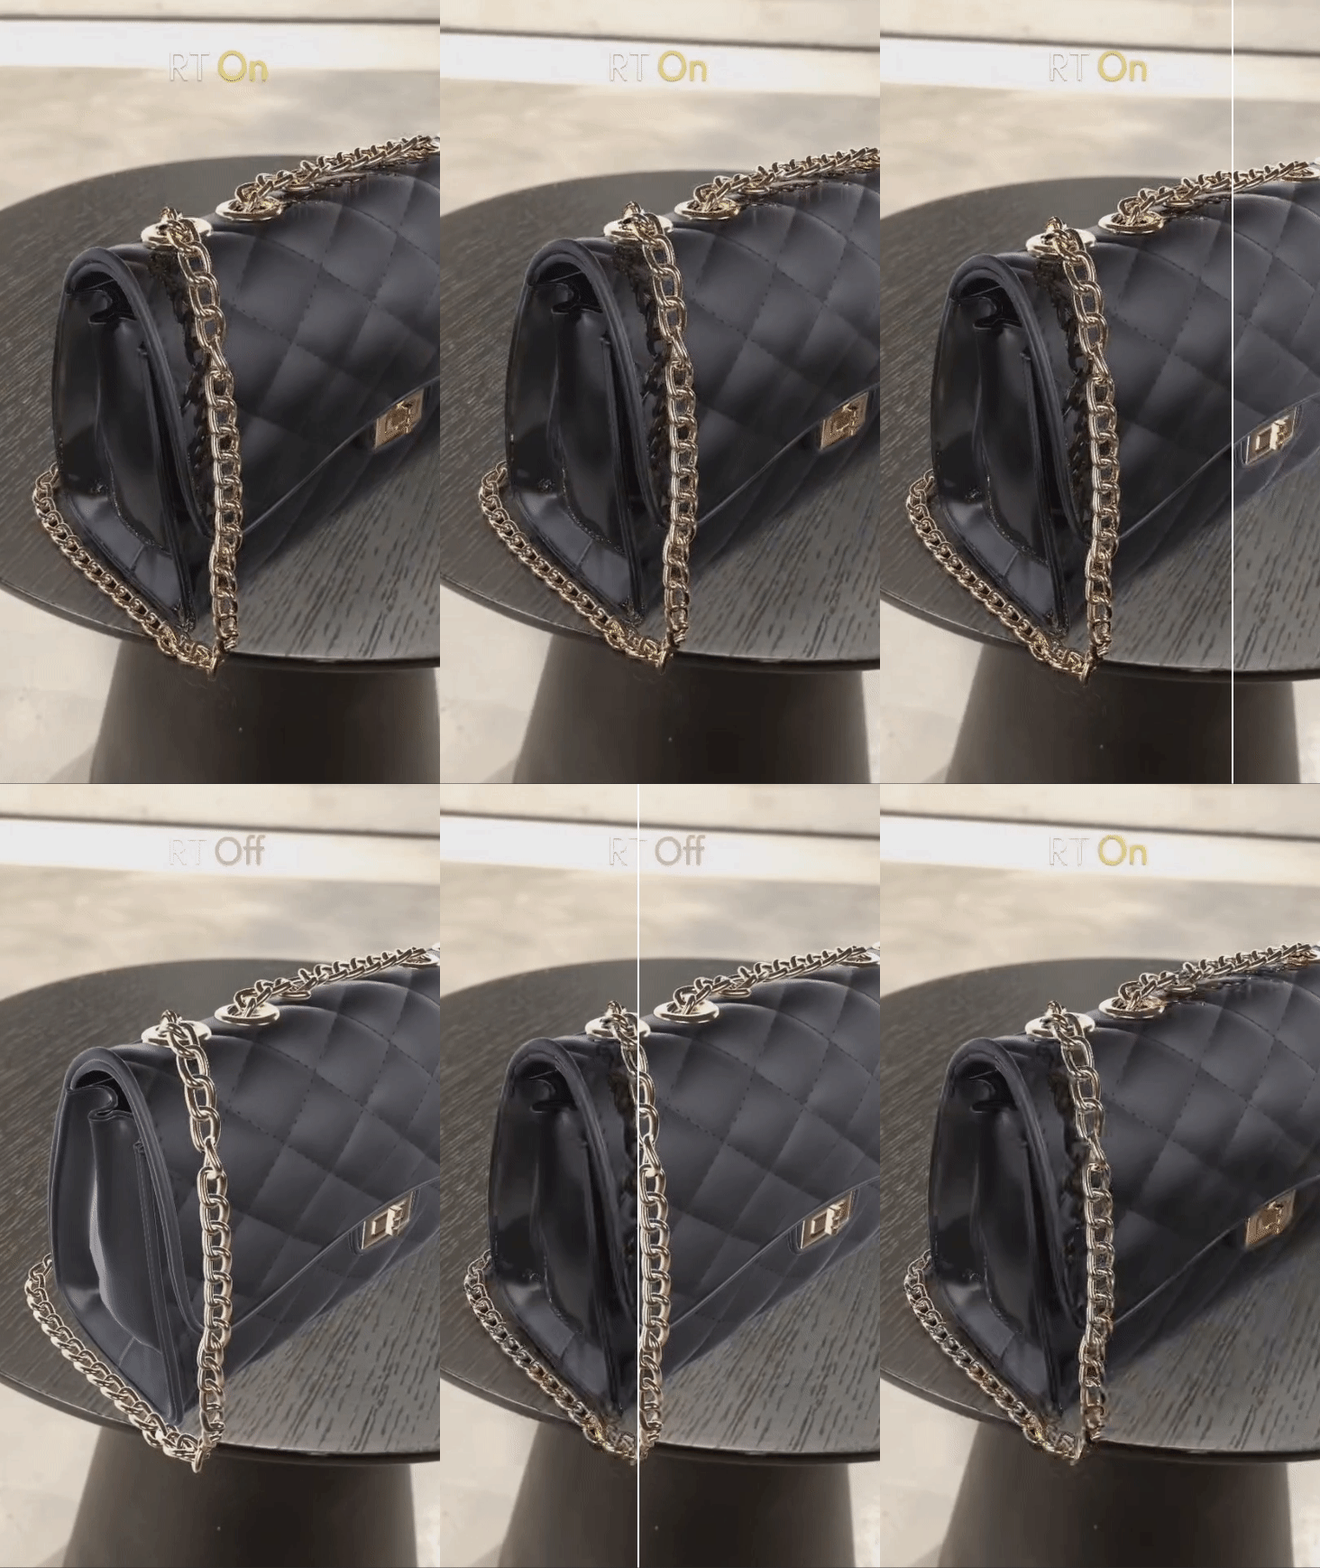

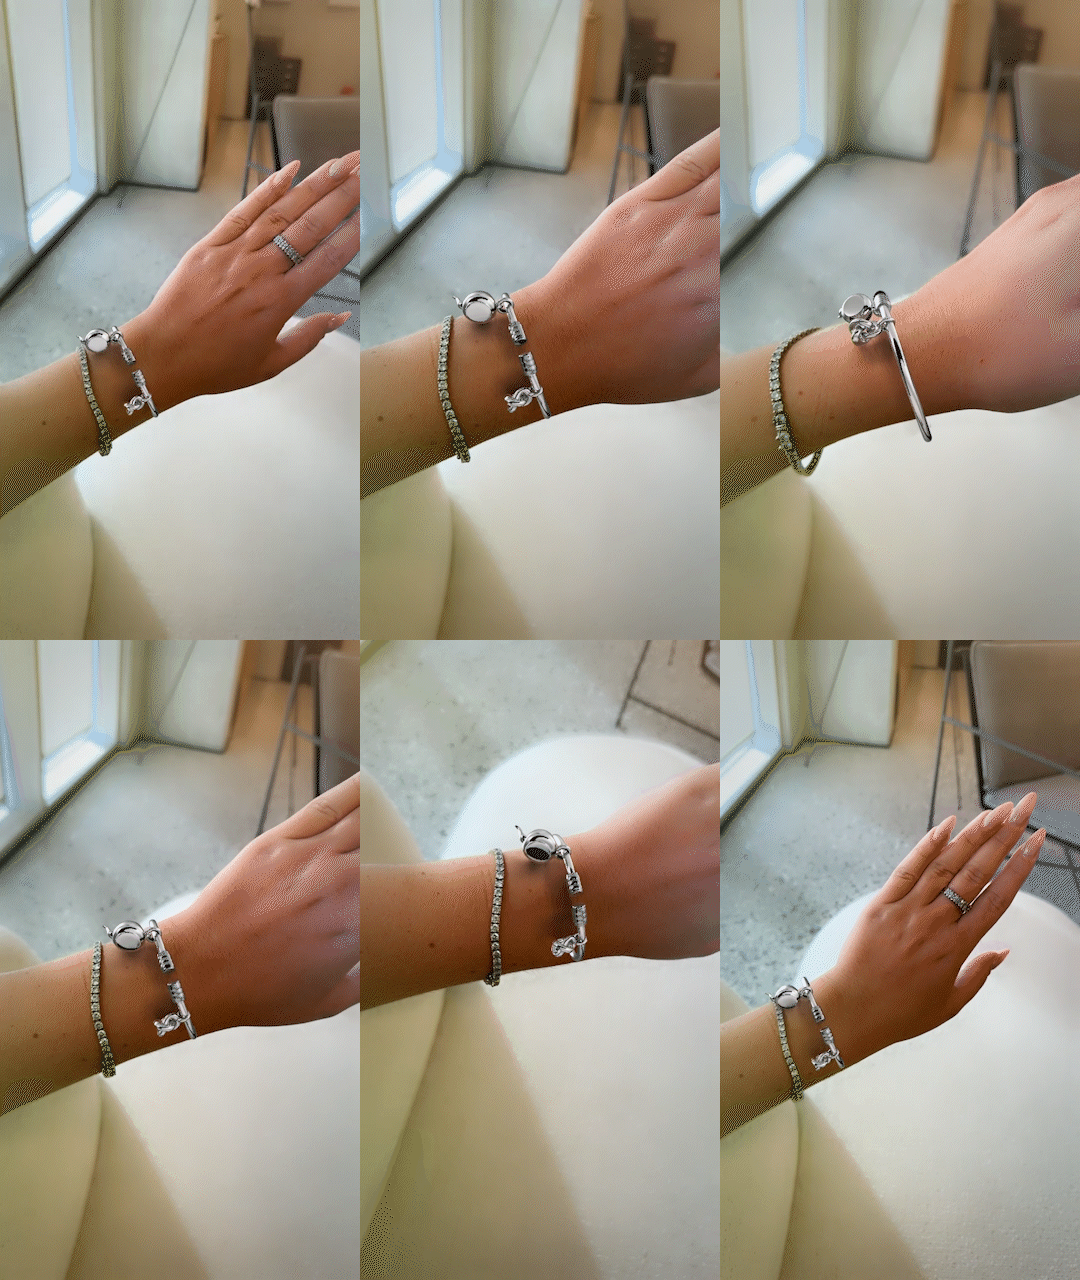
Ray Tracing comprises several features : Reflections, Indirect Lighting, Shadows, Ambient Occlusion and Refraction. The latest release adds Ray Traced Indirect Lighting with additional features following in future releases.
Ray Tracing Features
Ray Traced Specular Reflections
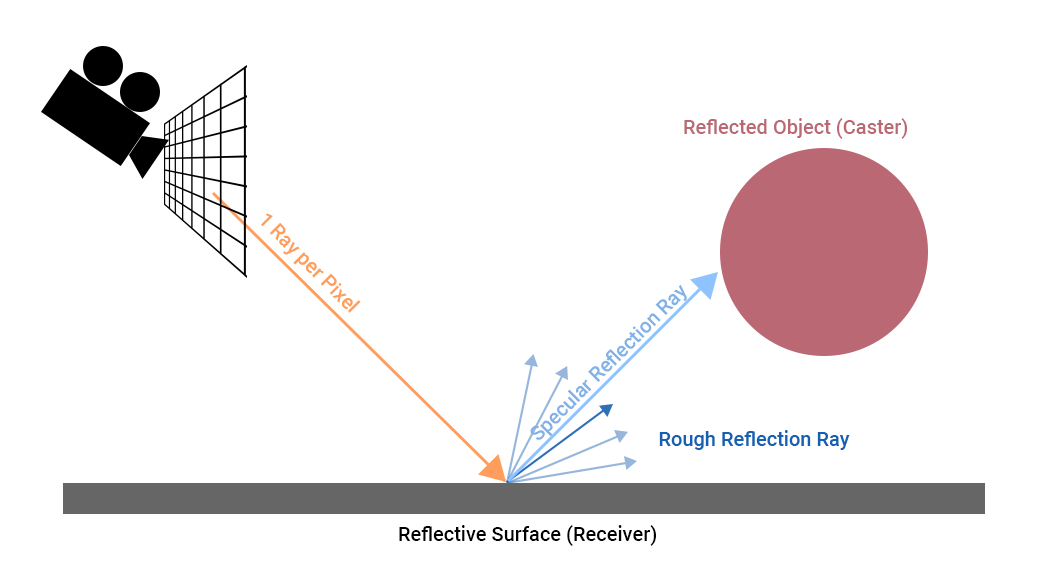

Ray Trace Specular Reflections simulates how light interacts with reflective surfaces. By tracing the path of rays from the reflective surface and accurately depicting the objects that should be reflected on those surfaces. This effect adds depth and authenticity to the visual representation of a scene and enhances its realism.
Ray Traced Indirect Diffuse Lighting
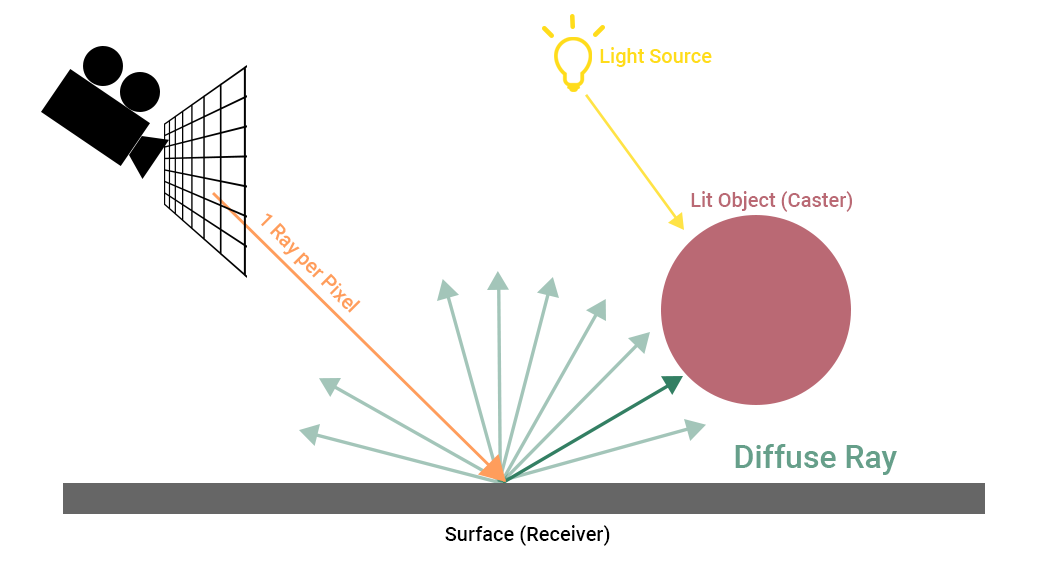
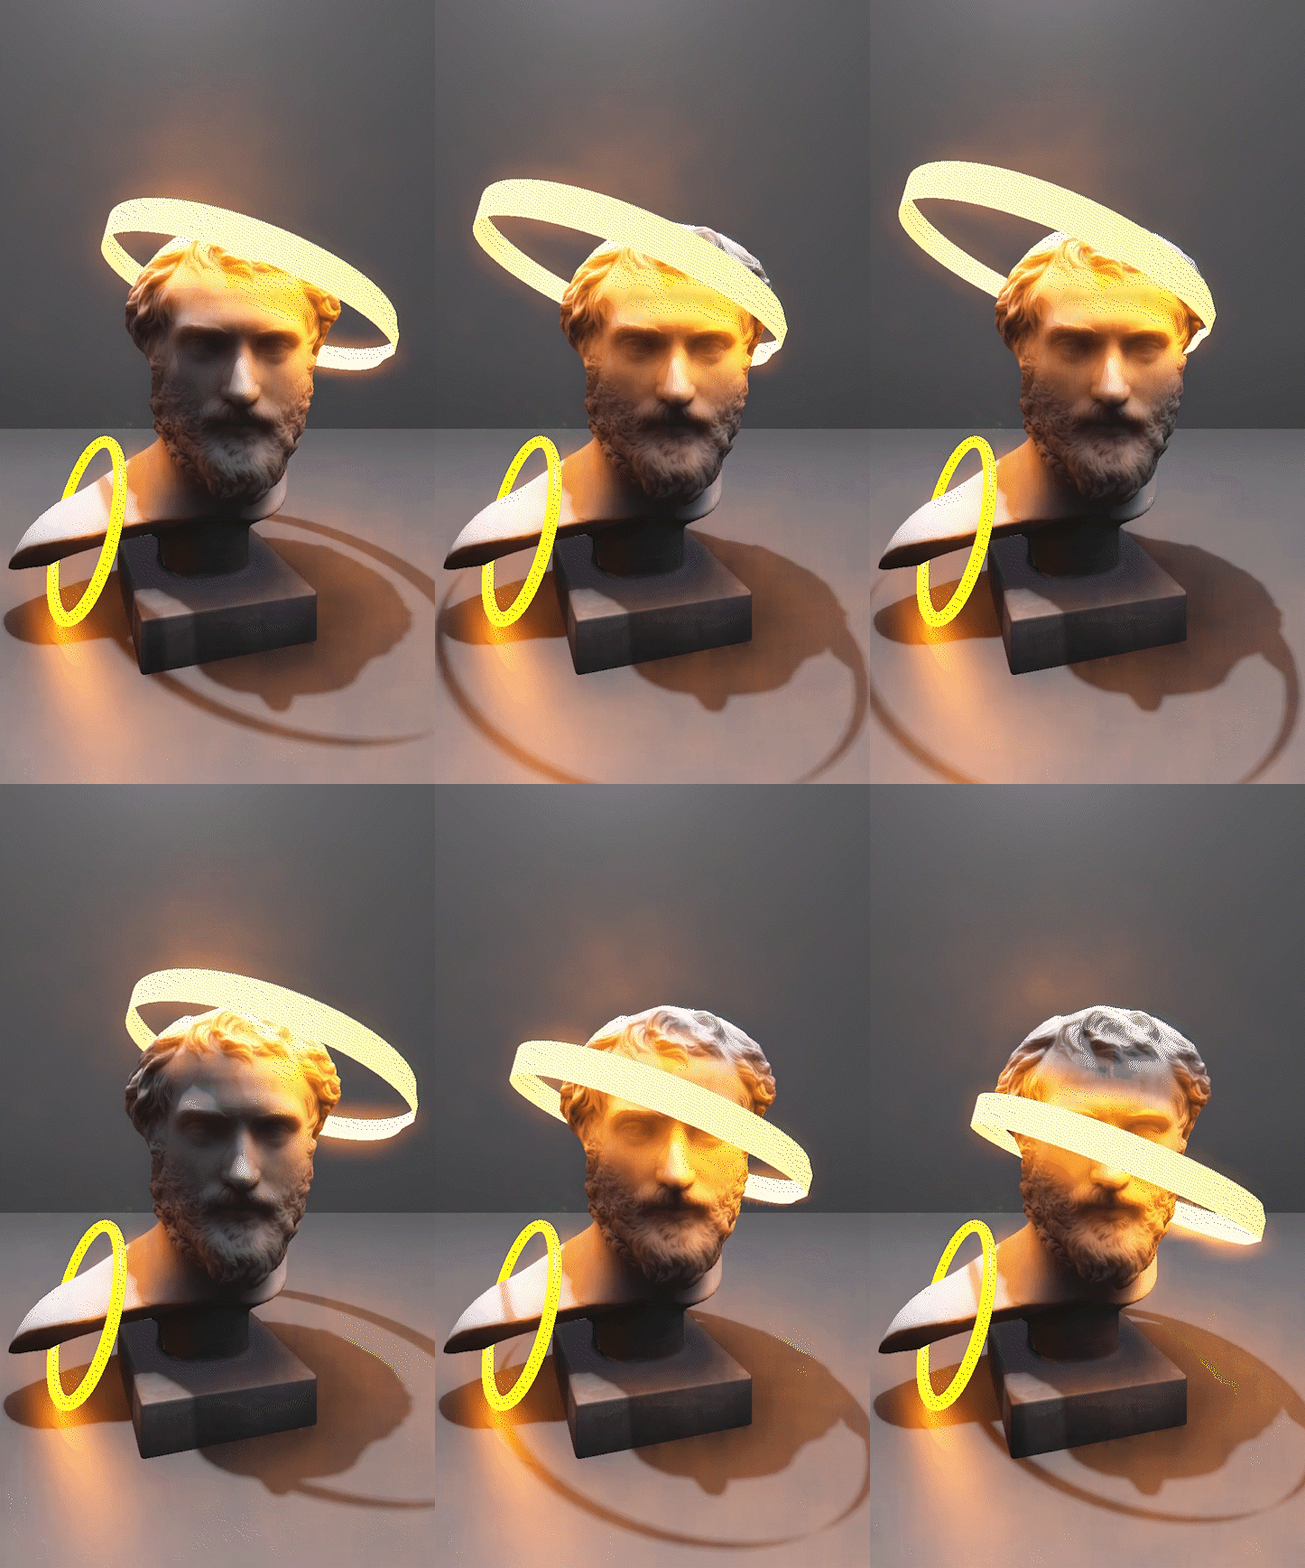
RT Indirect diffuse illumination simulates the way light bounces off surfaces in a 3D environment by tracing rays reflecting off one surface and indirectly illuminating another, thus creating a soft, natural looking ambient light that is not directly from a light source. This effect enhances the realism of a scene by providing gentle realistic indirect lighting and subtle color interactions.
Getting Started with Ray Tracing
To get started with Ray Tracing in Lens Studio, your project needs to use Advanced Graphics Features. This can be set in the Project Info window.
Before enabling Advanced Graphics Features, which unlock Ray Tracing, you should know it will not work on the following system configurations:
- On macOS devices with Intel Iris GPU's.
- On macOS devices with High Sierra(10.13) and Mojave(10.14).
- On devices with OS Windows with Intel GPUs which are lower than Intel HD6xx series.

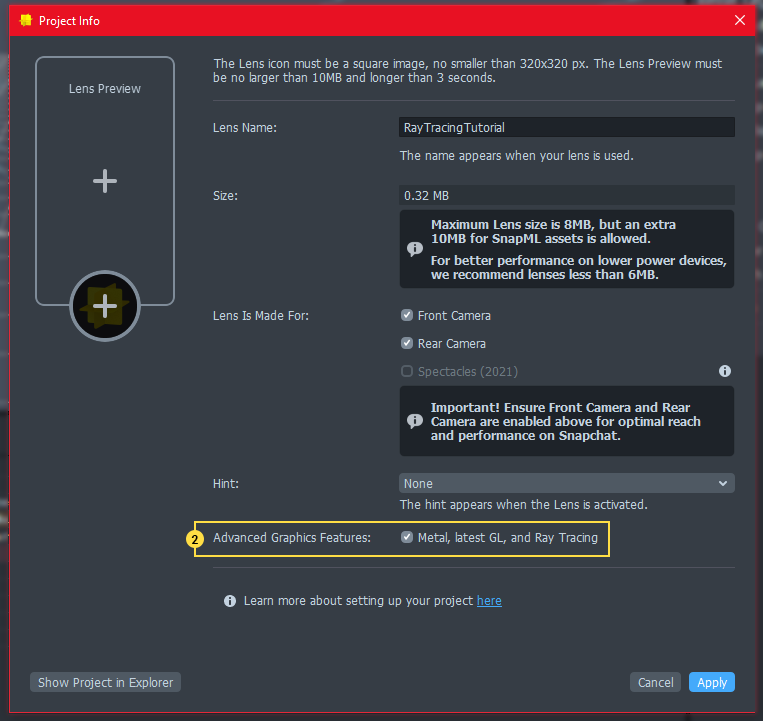
It's recommended to save your project before enabling this feature as your project will restart upon enabling.
Advanced Graphics Features switches your current Lens to use a newer graphics API in Lens Studio and in Snapchat. Because of this change, legacy materials will not function properly and require updating to newer graph-based materials. For this reason, It is recommended to create a backup of your project before making the switch.
List of Supported Devices
Below is a list of all available devices that currently support Ray Tracing.
| Operating System | Device Name |
|---|---|
| iOS | IPhone 15/Plus/Pro/Pro Max |
| iOS | IPhone 14/Plus/Pro/Pro Max |
| iOS | IPhone 13/Pro/Pro Max |
| iOS | IPhone 12/Pro/Pro Max |
| Android | Samsung S23:** Adreno 740 All Variants |
| Android | Samsung S23+:** Adreno 740 All Variants |
| Android | Samsung S23 Ultra:** Adreno 740 All Variants |
| Android | Samsung S22:** Adreno 730 All Variants |
| Android | Samsung S22+:** Adreno 730 All Variants |
| Android | Samsung S22 Ultra:** Adreno 730 All Variants |
| Android | Samsung S21 5G:** All Variants |
| Android | Samsung S21+ 5G:** All Variants |
| Android | Samsung S21 FE 5G:** All Variants |
| Android | Samsung S21 Ultra 5G:** All Variants |
| Android | Samsung S20:** All Variants |
| Android | Samsung S20 FE:** All Variants |
| Android | Samsung S20 5G:** All Variants |
| Android | Samsung S20 FE 5G:** All Variants |
| Android | Google Pixel 7/7 Pro |
| Android | Google Pixel 6/6a/6 Pro |
| Android | One Plus 10** All Variants |
| Android | One Plus 9** All Variants |
| Android | One Plus 8** All Variants |
Implementation
In the next few sections, you will learn about the specific Ray Tracing settings that will apply to the camera and objects within your project.
Global Settings: Camera component
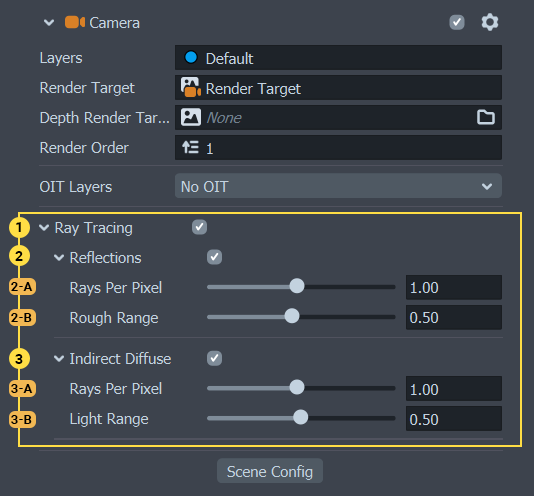
- Ray Tracing: Enables/Disables RT for the camera. This is the main switch to toggle RT in the scene.
- Currently limited to one active RT camera per scene.
- Reflections: Enables Ray Traced Reflections for this camera.
- Rays Per Pixel: Controls the Ray Tracing fidelity for the camera, and is set to
1by default. Changing this value can increase/decrease quality in favor of performance. Setting a higher Rays Per Pixel value will lead to sharper higher quality reflections, but will translate to a higher performance cost. - Rough Range: Controls the distance (in percentage of scene dimensions) after which the reflections will receive the maximum blur. Reflection of objects in the range will blur gradually.
- Rays Per Pixel: Controls the Ray Tracing fidelity for the camera, and is set to
- Indirect Diffuse: Enables Indirect Diffuse Illumination for this camera.
- Rays Per Pixel: Controls the Ray Tracing fidelity for the camera, and is set to
1by default. Changing this value can increase/decrease quality in favor of performance. Setting a higher Rays Per Pixel value will lead to sharper higher quality reflections, but will translate to a higher performance cost. - Light Range: Controls the maximum distance (in percentage of scene dimensions) after which ray hits will be counted as misses. This means color bleed is only visible from objects at a distance of up to Light Range from the receiving pixel.
- Rays Per Pixel: Controls the Ray Tracing fidelity for the camera, and is set to
Object Settings: Render Mesh Visual component
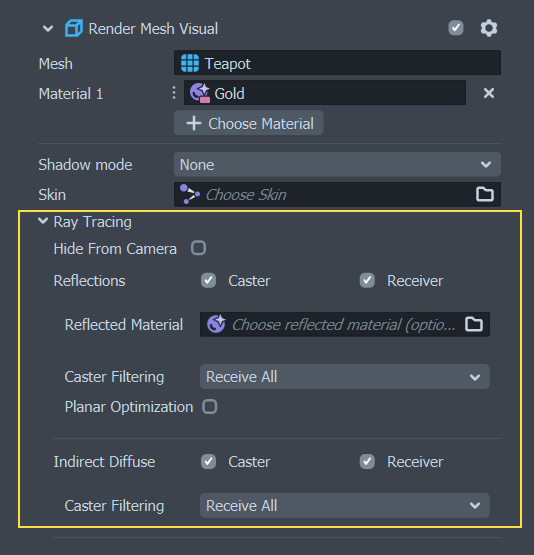
Ray Tracing is applied as the relationship between objects in the scene. Currently, Ray Tracing is only supported with meshes (Static and skinned meshes). The relationship is split to: Caster and Receivers. The behavior is set directly from the Render Mesh Visual component.
Each RT feature has its own Caster and Receiver checkboxes to allow for more granular control of visuals and performance.
- Casters: The Traced meshes seen in the Ray Tracing results and contribute to the calculations for reflections or indirect diffuse. Can be toggled via the
Castercheckbox. - Receivers: The tracing meshes from which rays will be traced. Receiver meshes will add the Ray Tracing texture result in the material.
- Caster Filtering: Optimization setting. Allows for more granular control in the relationship between this receiver and other casters in the scene. Relates only to casters of the same RT feature.
- Receive All: Interacts with all casters in the scene under the same RT feature.
- Include List: The receiver will only interact with the specified casters from the list.
- Exclude List: The receiver will not interact with any of the caster specified on this list.
Please note that this feature currently does not support an object with multiple render mesh visual components. Please attempt to break the object to multiple sub objects if you intend to use this optimization technique.
Please note that caster objects may lead to high performance costs based on their complexity. It is advised to use a lower LOD mesh as a caster using the Hide From Camera setting. In the case of more complex scenes, it is also recommended to use ‘Caster Filtering’ to further fine tune performance based on need.
- Hide From Camera: Hides the mesh from being rendered in the camera, while still being used for Ray Traced results. Used mainly for performance optimization.
The Hide From Camera setting is a great way to create unique and interesting visuals for Ray Tracing. Its main use is to use low poly versions for Caster and hiding them from the camera. However, another great use case is to add hidden visuals that can greatly customize the lighting effects. For example, using a bright and emissive mesh as a light source.
Because tracing objects (Receivers) only impact performance based on their pixel size on screen, you can use high poly meshes as Receivers and enjoy high quality reflections.
- Planar Optimization: Only works on planar surfaces. Optimizes rendering for flat, planar surfaces by using a different and faster ray tracing method. Please note that using this method only works well for surfaces with low roughness values, and is aimed for mirror-like reflections on flat surfaces.
Materials
In the next section, you will learn about the new Ray Tracing Materials that are built with the existing Physically Based Render materials within Lens Studio.
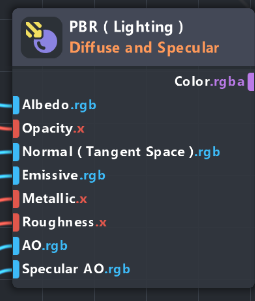
Caster Materials
While Ray Tracing should work with any material used in the project, Ray Tracing is built mainly to work with PBR-based materials, using the available PBR materials in the Resource panel.
Snap is actively working on expanding support for all available material nodes in the material editor, but some nodes might not behave as expected in reflections. Please alert us if you find a bug with any of the nodes.
In case of custom materials not working as expected in reflections, it is suggested to create a simplified replica material and place it in the “Reflected Material” override setting on the Emitter.
Receiver Materials
While Ray Tracing will still calculate the results on Receiver objects, it mainly requires a PBR-based material to display that result.
If you want to use a custom material, you will need to manually attach the result textures to your material.

For reflections, please use the reflections texture directly using the ‘Ray Traced Reflections’ node in the Material Editor. Note that this will only transfer Ray Traced hits, and will draw a black (0,0,0,0) color for where the ray misses. You can mix that with the “Environment Sample” node to get the environment as well.
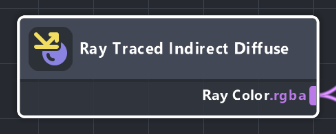
For Indirect Diffuse, please use the ‘Ray Traced Indirect Diffuse’ node in the Material Editor. Note that using this texture directly may result in an incorrect looking result, it is then advised to split the alpha and use it in a mix node to only get the hit indirect results.
For examples on custom materials, please see the Ray Tracing Template example.
Reflections in AR might not anchor as well because Ray Traced Reflections only interact with the 3D meshes in the scene, meaning, it doesn’t intrinsically see the camera feed. A good solution for this would be to use reprojection techniques for a hidden Emitter (either on the ground, background, or even a 360 dome) that way the Receiver object will receive the camera feed texture as reflection information.
- For faces, you can use the face reprojection asset in the Asset Library. Setting the face as an Emitter object will allow the object to “see” the face in reflections.
- Additionally, you can use the “Reflections Texture” node to get just the reflection data and construct a transparent material. This can be very useful to create the illusion of a 3D object reflecting on top of a real world surface.
Performance Consideration
Performance in Ray Tracing is controlled by 3 main factors:
-
Number of Rays: By default, Ray Tracing is using one ray per reflective (receiver) pixel in the screen. For performance heavy scenes, consider lowering the RPP (rays per pixel) value in the camera settings. Alternatively, consider resizing your reflective objects or distancing the camera.
-
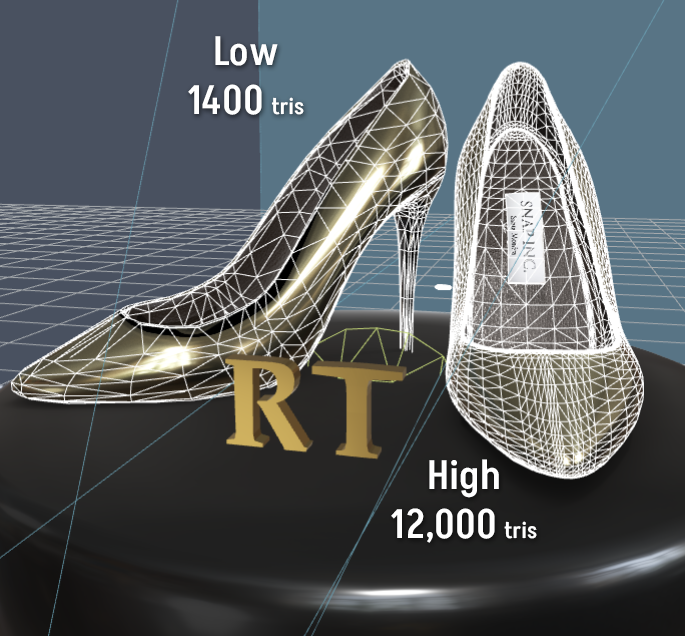
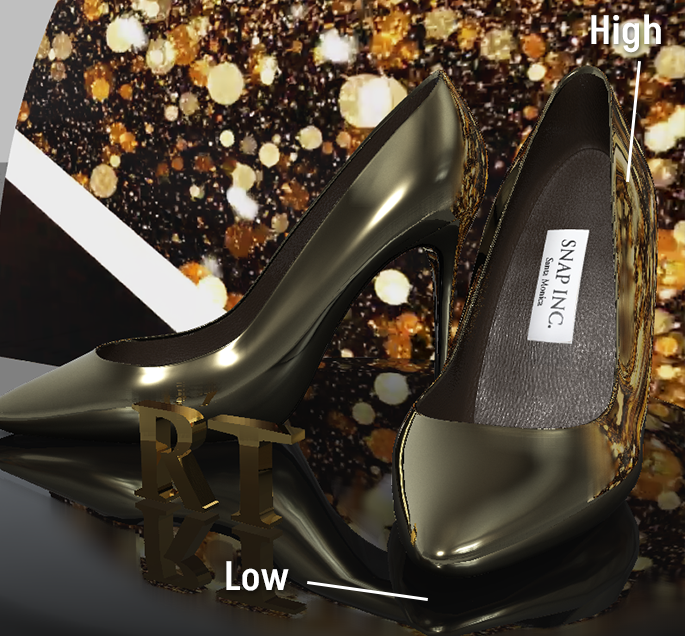
Complexity of caster meshes: High poly meshes used as casters could result in significant performance costs, please consider adding a lower level of detail (LOD) version of the mesh and using that as an caster instead. Once placed in the scene, you can hide it from the camera by enabling the Hide From Camera setting on the caster.
-
Number of casters in the scene: While Ray Tracing uses a number of techniques to optimize the scene automatically, performance could still be impacted by the number of casters each ray interacts with. To improve performance and further optimize the scene, you can use Caster Filtering which allows controlling specific caster/receiver interactions, use this to remove unnecessary interactions.
Additionally, please consider that adding new caster meshes to the scene forces Ray Tracing to rebuild itself which can take a couple of seconds. To avoid “hiccups” in user experience, it’s recommended to have all your objects already existing in the scene and turn on/off as needed.
Limitations and Known Issues
Listed below are some of the currently known issues and limitations with Ray Tracing.
Limitations
- Ray Tracing is enabled through the camera settings and can only be enabled on one camera at a time. We suggest setting up a coherent and unified 3D space for your 3D objects so they all sit under one camera.
- Ray Tracing currently does not support transparency depth of more than one emitter/caster. With Reflections - emitters with transparency will appear as the envmap reflection, ignoring emitters placed behind the first transparent object.
- Meshes are limited to 65k triangles, meshes exceeding this will not function properly in Ray Tracing.
- Sub-meshes are currently not supported.
- Planar Optimization is not supported on iPhone 11 devices.
- Caster filtering currently does not support selection of objects with multiple render mesh visuals. Please consider breaking the object into individual sub objects.
Known Issues
- Using two sided materials with RT Reflection materials might cause self intersection reflection artifacts at small object scales.