Cheat Sheet
This cheat sheet serves as a quick reference guide to help you begin your journey with Spectacles development. However, if you're not familiar with the Lens Studio environment or haven't previously developed on Spectacles, we recommend starting elsewhere. Think of this guide as a shortcut to some of the most empowering code snippets.
Accessing Components: TypeScript vs JavaScript
These code snippets will help you understand how to access JavaScript and TypeScript variables and functions in Lens Studio. If you would like to see a whole project example where the equivalent is provided in both languages, check out the AI Assistant Sample. You can also access the full documentation regarding the relationship between TypeScript and JavaScript here.
Accessing JavaScript from JavaScript
To access properties and methods of a Component created with JavaScript, the property or method must be declared to a predefined object which all ScriptComponent have called script. In the example code below script.numberVal is declared and made available for other scripts to access it.
script.numberVal = 1;
script.printHelloWorld = function () {
  print('hello');
};
//@input Component.ScriptComponent refScript
print(script.refScript.numberVal);
script.refScript.printHelloWorld();
Accessing TypeScript from JavaScript
To access properties and methods of a Component created with TypeScript, the property or method must be declared within the scoped TypeScript defined Class. Properties and methods defined in a TypeScript file are by default public members. In the example code below numberVal is declared within the scope of the class TSComponentA and made available for other scripts to access it.
@component
export class TSComponentA extends BaseScriptComponent {
  numberVal: number = 1;

  onAwake() {}
  printHelloWorld() {
    print('Hello, world!');
  }
}
//@input Component.ScriptComponent refScript
print(script.refScript.numberVal);
script.refScript.printHelloWorld();
Accessing TypeScript from TypeScript
ScriptComponent created with TypeScript can be accessed directly with the Class type. In the example below, TSComponentA is created and being referenced by TSComponentB. To access the TSComponentA’s property and methods, a reference property @input with the typeof TSComponentA is declared in TSComponentB.
@component
export class TSComponentA extends BaseScriptComponent {
  numberVal: number = 1;

  onAwake() {}
  printHelloWorld() {
    print('Hello, world!');
  }
}
import { TSComponentA } from './TSComponentA';

@component
export class TSComponentB extends BaseScriptComponent {
  @input
  refScript: TSComponentA;

  onAwake() {
    print(this.refScript.numberVal);
    this.refScript.printHelloWorld();
  }
}
Accessing JavaScript from TypeScript with Type Completion:
TypeScript enhances coding by providing automatic code completion. To ensure this feature works consistently when using JavaScript files, it’s advised to create a declaration file. This file describes the JavaScript code structure so that your TypeScript components can recognize and work with it seamlessly. After setting up a declaration file, you can access a JavaScript component in TypeScript using the @input decorator.
Please refer to the example code below.
script.numberVal = 1;
script.printHelloWorld = function () {
  print('hello');
};
export interface JSComponentA extends ScriptComponent {
  numberVal: number;
  printHelloWorld: () => void;
}
import { JSComponentA } from './JSComponentA_Declaration';

@component
export class TSComponentB extends BaseScriptComponent {
  @input('Component.ScriptComponent')
  refScript: JSComponentA;

  onAwake() {
    print(this.refScript.numberVal);
    this.refScript.printHelloWorld();
  }
}
Accessing JavaScript from TypeScript without Type Completion:
To access properties and methods created from JavaScript Components in your TypeScript Component without a declaration file, use the @input decorator and set the type to any.
script.numberVal = 1;
script.printHelloWorld = function () {
  print('hello');
};
@component
export class TSComponentB extends BaseScriptComponent {
  @input('Component.ScriptComponent')
  refScript: any;

  onAwake() {
    print(this.refScript.numberVal);
    this.refScript.printHelloWorld();
  }
}
SIK Interactables Events
When starting to develop on Spectacles using SIK on of the first tasks you'll face will be hooking up events to your interactables. Here's a quick reference guide to help you get started. If you want to hook up via script, you can use the following code snippet from the Spectacles Interaction System:
- TypeScript
- JavaScript
import { Interactable } from 'SpectaclesInteractionKit/Components/Interaction/Interactable/Interactable';
import { InteractorEvent } from 'SpectaclesInteractionKit/Core/Interactor/InteractorEvent';
import { SIK } from 'SpectaclesInteractionKit/SIK';

@component
export class ExampleInteractionScript extends BaseScriptComponent {
  onAwake() {
    this.createEvent('OnStartEvent').bind(() => {
      this.onStart();
    });
  }

  onStart() {
    let interactionManager = SIK.InteractionManager;

    // This script assumes that an Interactable (and Collider) component have already been instantiated on the SceneObject.
    let interactable = this.sceneObject.getComponent(
      Interactable.getTypeName()
    );

    // You could also retrieve the Interactable component like this:
    interactable = interactionManager.getInteractableBySceneObject(
      this.sceneObject
    );

    // Define the desired callback logic for the relevant Interactable event.
    let onTriggerStartCallback = (event: InteractorEvent) => {
      print(
        `The Interactable has been triggered by an Interactor with input type: ${event.interactor.inputType} at position: ${event.interactor.targetHitInfo.hit.position}`
      );
    };

    interactable.onInteractorTriggerStart(onTriggerStartCallback);
  }
}
const SIK = require('SpectaclesInteractionKit/SIK').SIK;
const interactionManager = SIK.InteractionManager;
const interactionConfiguration = SIK.InteractionConfiguration;

function onAwake() {
  // Wait for other components to initialize by deferring to OnStartEvent.
  script.createEvent('OnStartEvent').bind(() => {
    onStart();
  });
}

function onStart() {
  // This script assumes that an Interactable (and Collider) component have already been instantiated on the SceneObject.
  var interactableTypename =
    interactionConfiguration.requireType('Interactable');
  var interactable = script.sceneObject.getComponent(interactableTypename);

  // You could also retrieve the Interactable component like this:
  interactable = interactionManager.getInteractableBySceneObject(
    script.sceneObject
  );

  // Define the desired callback logic for the relevant Interactable event.
  var onTriggerStartCallback = (event) => {
    print(
      `The Interactable has been triggered by an Interactor with input type: ${event.interactor.inputType} at position: ${event.interactor.targetHitInfo.hit.position}`
    );
  };

  interactable.onInteractorTriggerStart(onTriggerStartCallback);
}

onAwake();
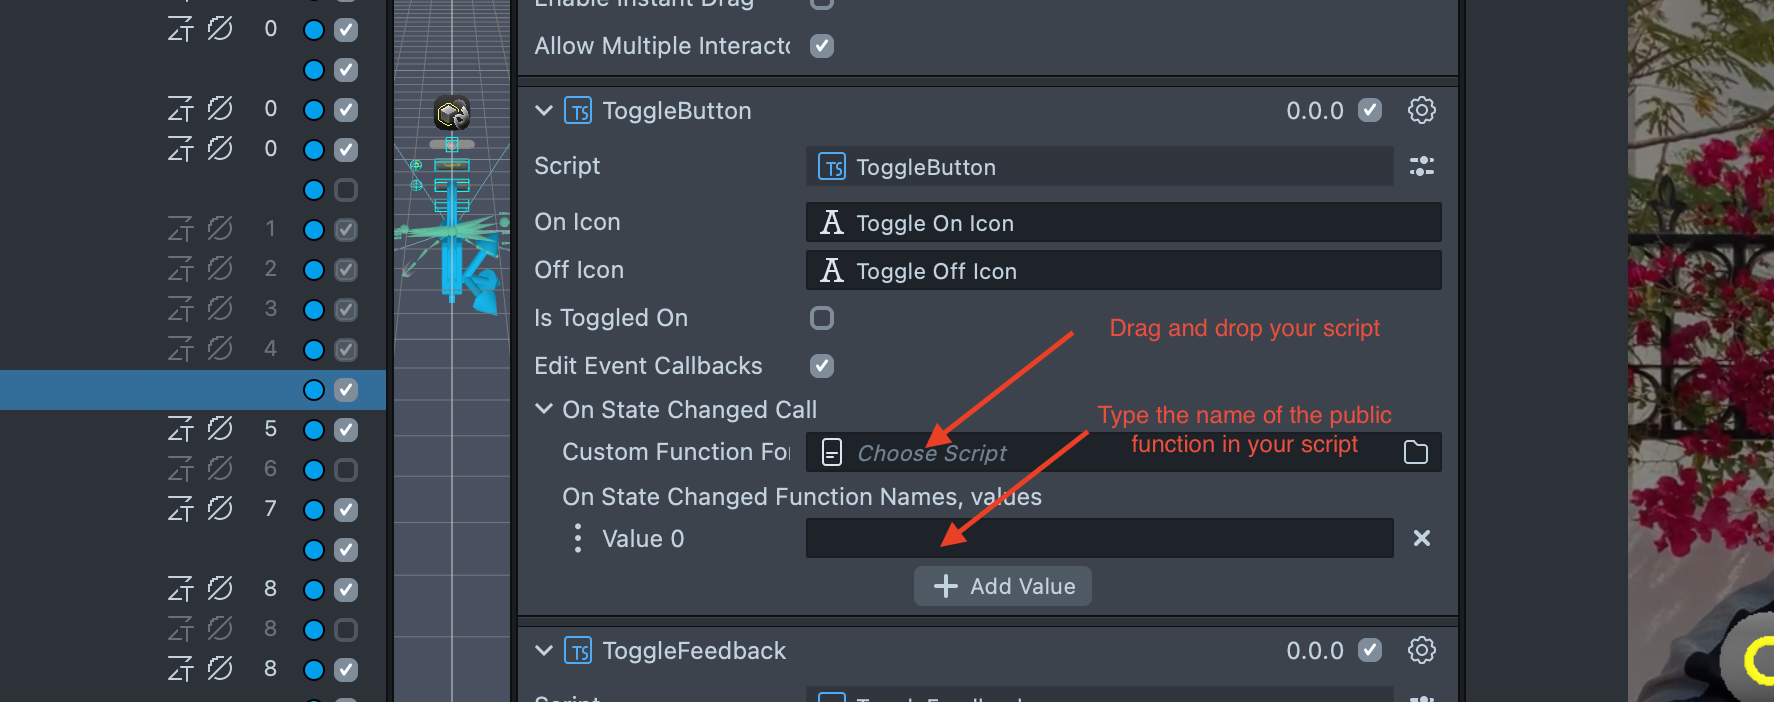
If you prefer hooking up events via the Inspector, you drag and drop the scene object with the script component into the Interactable field in the Inspector. Then, you can select the event you want to hook up, writing its name in the event input field.
Access Camera Information
See the following code snippet to access camera information in Lens Studio from CameraAPI:
- TypeScript
- JavaScript
@component
export class ContinuousCameraFrameExample extends BaseScriptComponent {
  private cameraModule: CameraModule = require('LensStudio:CameraModule');
  private cameraRequest: CameraModule.CameraRequest;
  private cameraTexture: Texture;
  private cameraTextureProvider: CameraTextureProvider;

  @input
  @hint('The image in the scene that will be showing the captured frame.')
  uiImage: Image | undefined;

  onAwake() {
    this.createEvent('OnStartEvent').bind(() => {
      this.cameraRequest = CameraModule.createCameraRequest();
      this.cameraRequest.cameraId = CameraModule.CameraId.Default_Color;

      this.cameraTexture = this.cameraModule.requestCamera(this.cameraRequest);
      this.cameraTextureProvider = this.cameraTexture
        .control as CameraTextureProvider;

      this.cameraTextureProvider.onNewFrame.add((cameraFrame) => {
        if (this.uiImage) {
          this.uiImage.mainPass.baseTex = this.cameraTexture;
        }
      });
    });
  }
}
let cameraModule = require('LensStudio:CameraModule');
let cameraRequest;
let cameraTexture;
let cameraTextureProvider;

//@input Component.Image uiImage {"hint":"The image in the scene that will be showing the captured frame."}

script.createEvent('OnStartEvent').bind(() => {
  cameraRequest = CameraModule.createCameraRequest();
  cameraRequest.cameraId = CameraModule.CameraId.Default_Color;

  cameraTexture = cameraModule.requestCamera(cameraRequest);
  cameraTextureProvider = cameraTexture.control;

  cameraTextureProvider.onNewFrame.add((cameraFrame) => {
    if (script.uiImage) {
      script.uiImage.mainPass.baseTex = cameraTexture;
    }
  });
});
Process a Texture via Fetch API
Keep in mind that depending the endpoint you are pinging, service you are using the way images are processed can vary. For a full example look at the following samples,:
- Learn how to use the Fetch API Sample.
- See an example implementation of the Fetch API for the [AI Assistant Sample] (https://github.com/Snapchat/Spectacles-Sample/tree/main/AIAssistantSample).
- See documentation about Encoding Base 64.
- TypeScript
- JavaScript
  async handleTriggerEnd(eventData) {
    if (!this.textInput.text || !this.image || !this.apiKey) {
      print("Text, Image, or API key input is missing");
      return;
    }

    try {
      // Access the texture from the image component
      const texture = this.image.mainPass.baseTex;
      if (!texture) {
        print("Texture not found in the image component.");
        return;
      }

      const base64Image = await this.encodeTextureToBase64(texture);

      const requestPayload = {
        model: "gpt-4o-mini",
        messages: [
          {
            role: "system",
            content:
              "You are a helpful AI assistant that works for Snapchat that has access to the view that the user is looking at using Augmented Reality Glasses." +
              " The user is asking for help with the following image and text. Keep it short like under 30 words. Be a little funny and keep it positive.",
          },
          {
            role: "user",
            content: [
              { type: "text", text: this.textInput.text },
              {
                type: "image_url",
                image_url: {
                  url: `data:image/jpeg;base64,${base64Image}`,
                },
              },
            ],
          },
        ],
      };

      const request = new Request(
        "https://api.openai.com/v1/chat/completions",
        {
          method: "POST",
          headers: {
            "Content-Type": "application/json",
            Authorization: `Bearer ${this.apiKey}`,
          },
          body: JSON.stringify(requestPayload),
        }
      );
      // More about the fetch API: https://developers.snap.com/spectacles/about-spectacles-features/apis/fetch
      let response = await this.remoteServiceModule.fetch(request);
      if (response.status === 200) {
        let responseData = await response.json();
        this.textOutput.text = responseData.choices[0].message.content;
        print(responseData.choices[0].message.content);

        // Call TTS to generate and play speech from the response
        if (this.ttsComponent) {
          this.ttsComponent.generateAndPlaySpeech(
            responseData.choices[0].message.content
          );
        }
      } else {
        print("Failure: response not successful");
      }
    } catch (error) {
      print("Error: " + error);
    }
  }

  // More about encodeTextureToBase64: https://platform.openai.com/docs/guides/vision or https://developers.snap.com/api/lens-studio/Classes/OtherClasses#Base64
  encodeTextureToBase64(texture) {
    return new Promise((resolve, reject) => {
      Base64.encodeTextureAsync(
        texture,
        resolve,
        reject,
        CompressionQuality.LowQuality,
        EncodingType.Jpg
      );
    });
  }
}
async function handleTriggerEnd(eventData) {
  if (!script.textInput.text || !script.image || !apiKey) {
    print('Text, Image, or API key input is missing');
    return;
  }

  try {
    // Access the texture from the image component
    const texture = script.image.mainPass.baseTex;
    if (!texture) {
      print('Texture not found in the image component.');
      return;
    }

    const base64Image = await encodeTextureToBase64(texture);

    const requestPayload = {
      model: 'gpt-4o-mini',
      messages: [
        {
          role: 'system',
          content:
            'You are a helpful AI assistant that works for Snapchat that has access to the view that the user is looking at using Augmented Reality Glasses.' +
            ' The user is asking for help with the following image and text. Keep it short like under 30 words. Be a little funny and keep it positive.',
        },
        {
          role: 'user',
          content: [
            { type: 'text', text: script.textInput.text },
            {
              type: 'image_url',
              image_url: {
                url: `data:image/jpeg;base64,${base64Image}`,
              },
            },
          ],
        },
      ],
    };

    const request = new Request('https://api.openai.com/v1/chat/completions', {
      method: 'POST',
      headers: {
        'Content-Type': 'application/json',
        Authorization: `Bearer ${apiKey}`,
      },
      body: JSON.stringify(requestPayload),
    });

    let response = await remoteServiceModule.fetch(request);
    if (response.status === 200) {
      print('step 1');
      let responseData = await response.json();
      script.textOutput.text = responseData.choices[0].message.content;
      print(responseData.choices[0].message.content);
      print('step 2');
      // Call TTS to generate and play speech from the response
      if (script.ttsComponent) {
        script.ttsComponent.api.generateAndPlaySpeech(
          responseData.choices[0].message.content
        );
        print('step 3');
      }
    } else {
      print('Failure: response not successful');
    }
  } catch (error) {
    print('step 4 error');
    print('Error: ' + error);
  }
}

function encodeTextureToBase64(texture) {
  return new Promise((resolve, reject) => {
    Base64.encodeTextureAsync(
      texture,
      resolve,
      reject,
      CompressionQuality.LowQuality,
      EncodingType.Jpg
    );
  });
}