Introduction to Code Nodes
The Code Node is an advanced feature that allows custom shader code to be written directly in Material Editor and VFX Editor, unlocking new effects and performance enhancements that were previously impossible. It seamlessly integrates into the graph editor, creating a hybrid system that brings the best of both worlds.
Code that is written in the Code Node will be almost entirely native GLSL. In the background, code is analyzed for reserved functions and keywords which define the node’s primary function, including input and output ports. It is then sent through our cross compiler to produce device-safe shader code.

Create a Code Node
To create a Code Node:
- While hovering over an empty portion of the graph, press Tab on the keyboard to open a pop-up.
- In the pop-up window, type in the word
code. - Select Custom Code from the list.

Code nodes can also be created for each container type in a VFX asset- Spawn, Update, and Output. The method to create a Code Node here is the same as before, except hover over the container instead of an empty portion of the graph and press tab
Code Nodes are created with a default function that outputs the product of two vec4 inputs.
Writing Code
You can start writing custom shader code by directly writing in the Code Node's editing field. When you are ready to apply your changes, you can do one of the following:
- Hit the shortcut cmd + enter on MacOS or ctrl + enter on Windows.
- Click the Apply Changes button below the field.
- Click on an empty space around the node to deselect and apply.

Autocomplete
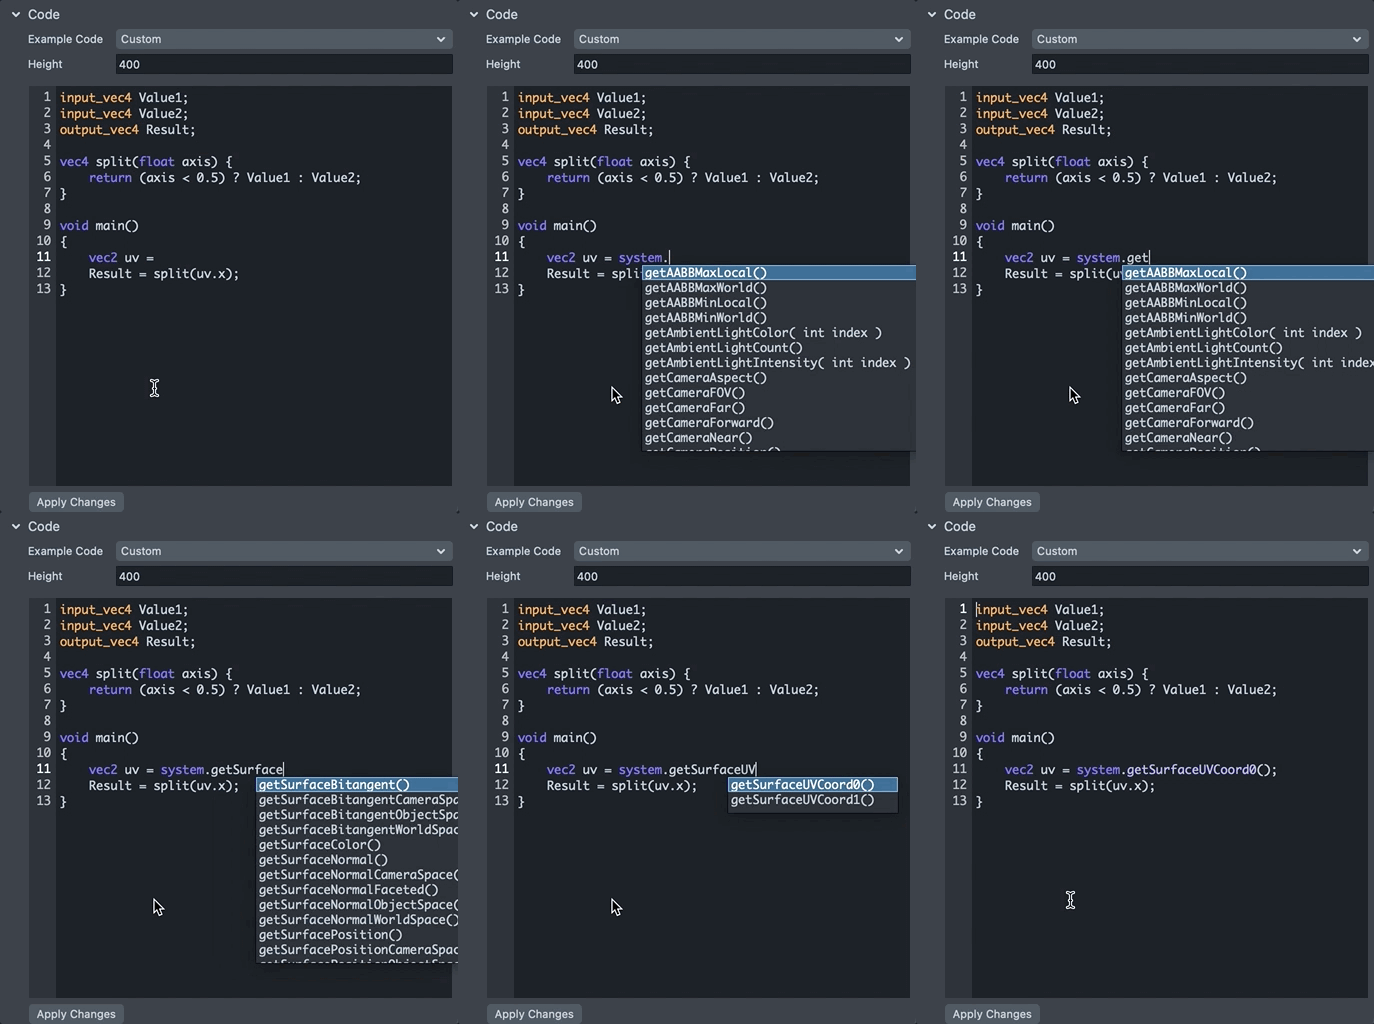
The Code Node features an in-line autocomplete window that suggests methods and variables as you type.
You can use the up and down keys on your keyboard to make a selection from the suggestions list. Then press Tab to fill in the rest of the characters.

Example Code Snippets
On the Code Node’s properties, changing the dropdown selection for Example Code will overwrite the current node’s contents with a pre-made example. This is an easy way to find common use cases, and is particularly useful to use as reference to built-in system variables and all the available input and output types.
Selecting an example code snippet will erase what you have written in the code window!

Creating Input and Output Ports
To interface with the rest of the graph, you will need to create inputs and outputs for receiving and sending values.
To create inputs, Code Node looks for special declarations in the form of input_ followed by the type, for example input_float or input_vec4. The name you write after the input type is the variable you can use in your shader code, and it is displayed on the node’s input port.
Creating output ports is similar to inputs, except the prefix is output_ followed by the type and name.

For Code Nodes that are attached to VFX containers, the creation of output ports is blocked. Nodes stacked in VFX containers are endpoints for modifying particle attributes, so sending arbitrary data out of the right side is not allowed.
A complete list of supported Input and Output types can be found by selecting the Inputs/Outputs/Global Types value from the Example Code dropdown on the Code Node.
All built in functions can also be found in the Code Node Reference guide.
Entrypoint and Extra Functions
The main() function is the entrypoint for Code Node to evaluate your shader code. It must be present or the material won’t be compiled.
Extra functions outside of main() are allowed. Inputs can be accessed implicitly by any function defined in the Code Node and do not need to be passed as arguments from main().
input_vec2 Input;
input_vec2 Bias;
output_vec2 Output;

vec2 myBiasFunction()
{
   return Input * 2.0 - 1.0 + Bias;
}

void main()
{
   Output = myBiasFunction();
}
More examples of defining and using extra functions can be found in the Example Code droplist.
Global Variables and .evaluate()
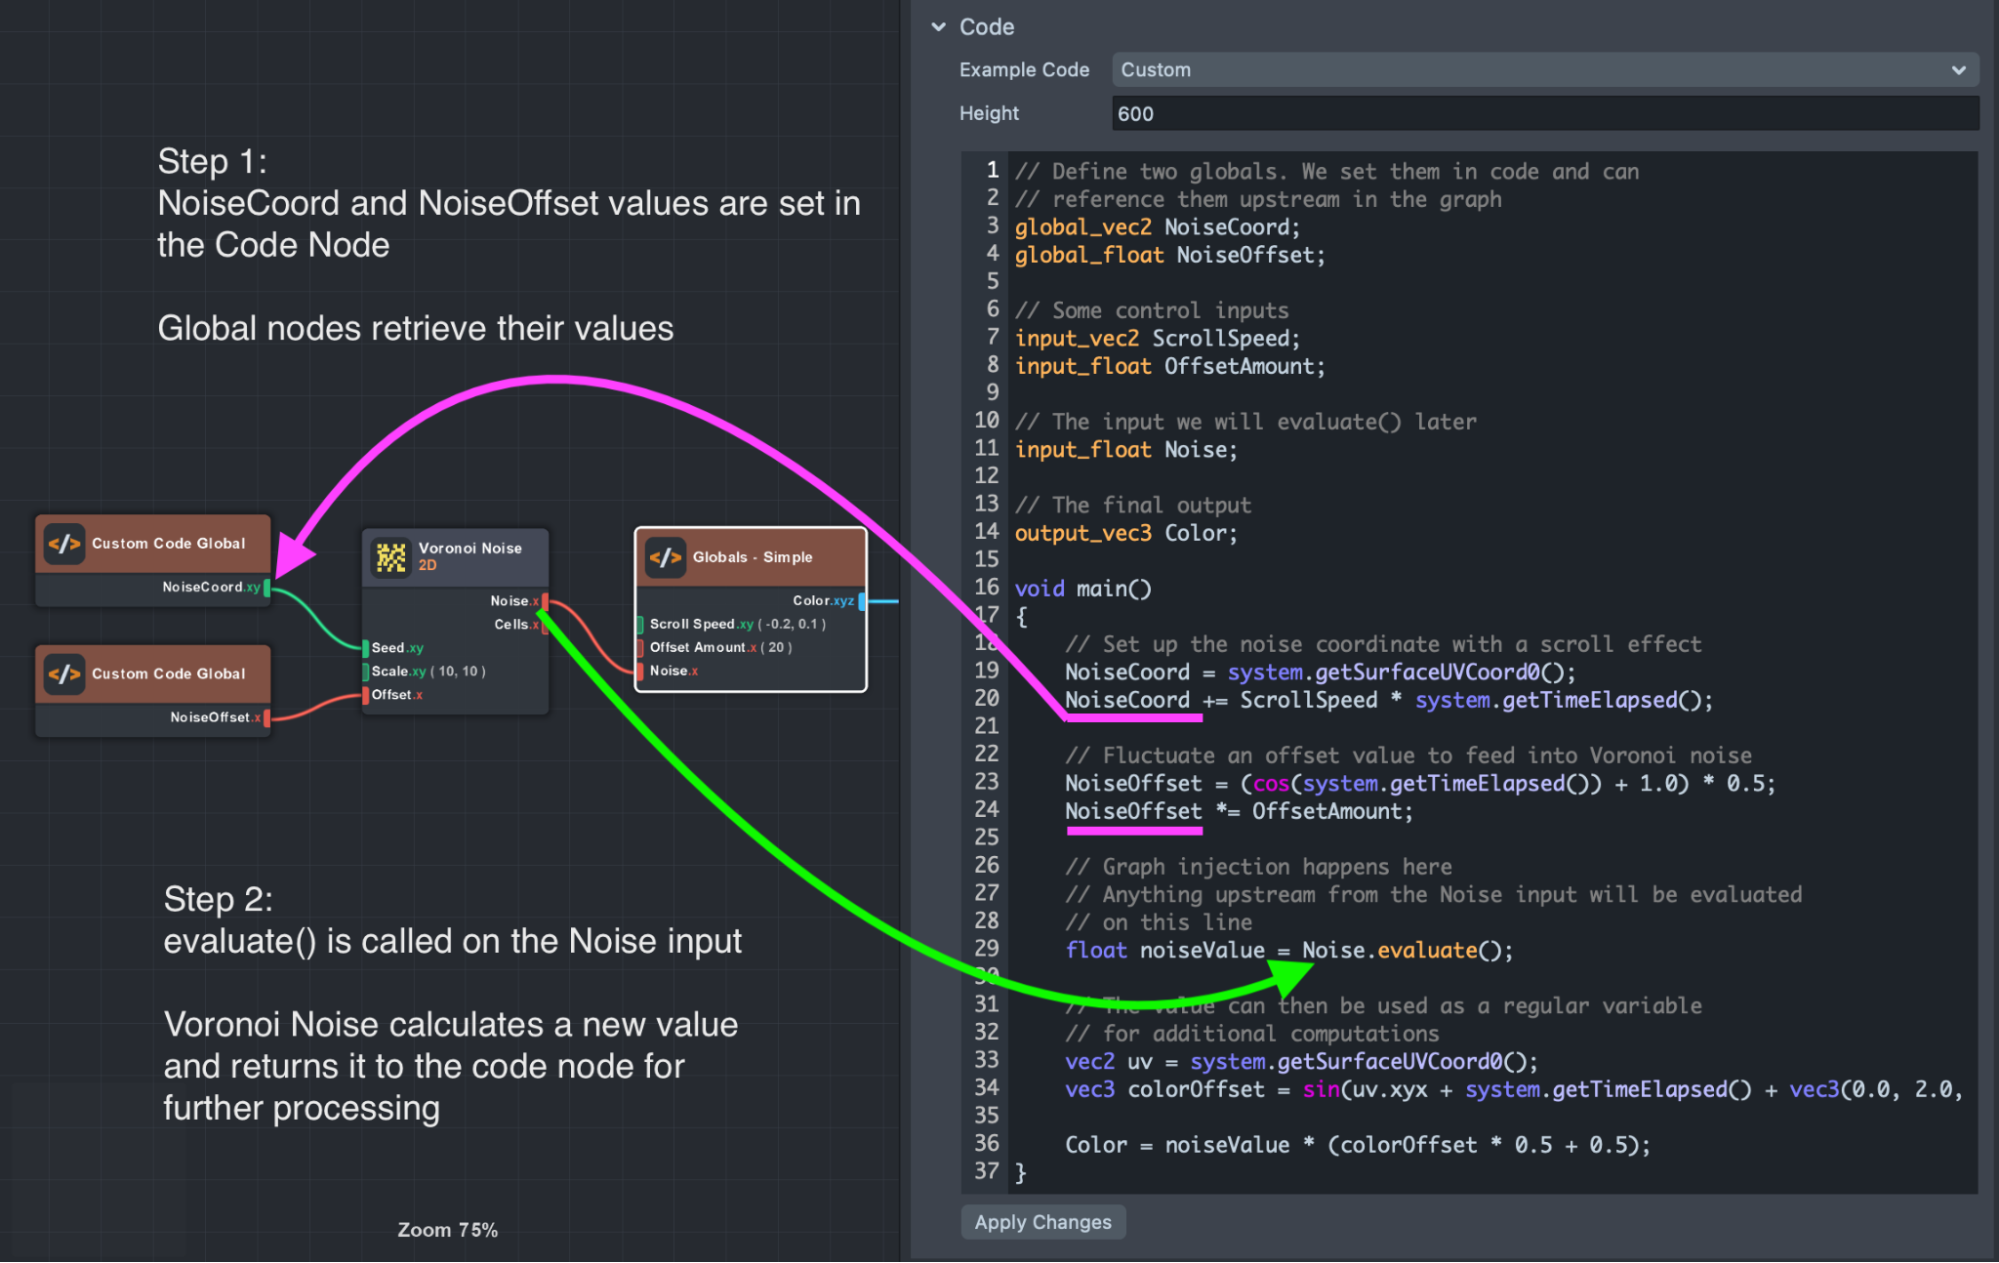
The Code Node provides a mechanism for declaring and operating upon custom variables that can then be referenced in the graph system, upstream from the Code Node itself. These variables are called Globals and can be accessed in the graph by adding a Code Global node. This node’s dropdown will be populated with global variables defined from Code Nodes in the same subgraph level.
When a Code Global node is a dependency of one of the inputs on your Code node, evaluate() can be called on the input variable name to inject the graph logic from that input into the section of code. This makes it a powerful tool for merging graph and code logic.

Check out the Code Node Globals examples in the Code Node Template to see Globals in action.
System Uniforms and Varyings
For convenience, we have included a number of commonly used uniforms and varyings can be accessed with the system struct. For example, to get the first UV coordinate attribute, you would write system.getSurfaceUVCoord0().
System values appear in autocomplete suggestions when typing in the Code Node window.
Every system function has a node-based counterpart. A quick way to find documentation on a specific system function while in Lens Studio can be done by the following:
- Create the Node version of the system you want.
- Left-click the i at the top right corner of the node.
- follow the link to the node’s full documentation page.
A complete list of system values can also be found by selecting the System Built-In Values/Functions snippet from the Example Code dropdown on the Code Node.
Textures and Float Arrays
Several texture objects and float array input types exist for sampling within Code Node. This makes it easy to do all your UV calculations and procedural texture sampling all in one place.
To sample a texture, you will just need to call sample(vec2 uvCoord) after the input you defined at the top. For example:
input_texture_2d baseTexture;
output vec4 color;

void main()
{
      vec2 uv = system.getSurfaceUVCoord0();
      color = baseTexture.sample( uv );
}
A complete list of sampling methods can be found by selecting the Inputs/Outputs/Global Types snippet from the Example Code dropdown on the Code Node.
VFX Editor
Code Nodes can be created in both Material Editor and VFX Editor. The Code Node in VFX Editor inherits all the functions from Material Editor, but adds additional getters for VFX settings and particle attributes, and functions for generating per-particle random numbers.
In VFX Editor, the standard free-floating Code Node exists, as well as a version which sits directly in the vertical stack, similar to Container Subgraphs:

Code Nodes that sit in the vertical stack also allow for setting particle attributes, making them effective replacements for Container Subgraphs and Modify Attribute nodes. However, currently custom particle attributes can not be set by the Code Node, only standard attributes such as Position, Velocity, Force, etc.
Known Issues
Listed below are some of the common issues you may run into when working with Code Nodes.
Undo/redo
Undo and redo is currently unreliable. It works, but the undo state is about 5 “undos” removed from the most previous action. To undo, click somewhere else in the graph then hit undo 5 times. This introduces another issue where it’s not possible to actually see the undo action take effect since after clicking away from the node, the code is no longer visible in the graph properties panel.
This is currently being worked on and will be addressed in a future update.
Setting custom particle attributes
For Code Nodes placed on a VFX Spawn or Update container, there is currently no way to set a custom particle attribute. A workaround is to use a regular floating Code Node and set the custom attribute with a Modify Attribute container node. All other built-in particle attributes may be set directly in a container Code Node by system.setParticle[attributeName]() commands.
See the Code Node Reference guide for more information.
General code window improvements
We are working hard to improve the code editing window. Some improvements to look out for in the future include:
- Preserve indentation on new line
- Multi-line comment with ctrl + /
- Shift + tab to unindent
- Auto-resize code window height
- Remember widget scroll state
- External editor support
What's Next?
To continue to learn more about Code Nodes and the Material Editor, please take a look at the following guides: