Digital Goods Blueprint
Digital Goods for Lenses are no longer supported, as Tokens are being discontinued. Please see this help article for more details.
This project is a technical demo of digital goods. It shows examples of how to implement basic durable and consumable good UI using the global functions and events defined by the provided InventoryManager.js script.
The most important takeaways you should understand from this project are:
- How to implement a user interaction (i.e., button press) for unlocking digital goods and spending consumables.
- You must refresh the UI after a digital good is successfully purchased or spent. This does not happen automatically.
Project Structure
The diagram below illustrates the project structure. The left side is common to all Lenses with digital goods via the provided universal scripts. The right side is project-specific.

Digital Goods Universal Scripts
DigitalGoodsAPIModule.js, EventModule.js, InventoryManager.js
Together, these scripts handle the digital goods logic common to all Lenses. They are responsible for making API calls, handling responses, and syncing inventory on Lens start. InventoryManager.js provides global functions and sync events that are used by project-specific scripts to update the UI based on inventory information.
Refer to the Digital Goods API documentation > Scripts section for more details.
Digital Goods Configuration
The example durable and consumable goods are registered in the Digital Goods Configurator. The Digital Goods Configurator can be accessed in the Inspector panel by clicking on Digital Goods API [EDIT_ME] in the Resources panel.


Digital Goods Demo
Each digital good has its own script that links the item’s SKU, Lens UI, and content.
Durable Good Demo
The Durable Good Demo is controlled by the DurableController.js script. The script takes the durable good’s SKU, UI elements (Unlock Button, Locked Icon, and Unlocked Icon), and a content placeholder (the pink square) as inputs.

On awake, the script initializes by disabling interaction with the Unlock button and adding an onSyncSuccess callback function to the Inventory Manager’s global syncSuccess event.

When InventoryManager.js triggers the syncSuccess event, onSyncSuccess() calls refresh(), which updates the durable good UI based on the isUnlocked state of the durable good. For example, if the item is locked, the Unlock button is enabled, the Locked Icon is enabled, the Unlocked Icon is disabled, and the Content is disabled.
It is critical that you update the Lens UI after inventory has synced successfully to reflect the locked / unlocked state of digital goods.

The script also defines a script API that is called when the Unlock button is pressed to unlock the item. The refresh() function is passed to global.inventory.purchaseItem() as the success callback, which gets called when the user successfully unlocks the item and dismisses the Snapchat purchase tray.
It is critical that you update the Lens UI after a durable good is unlocked to reflect the digital good’s unlocked state.

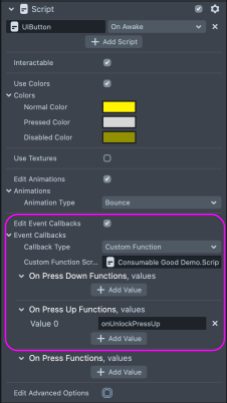
The Unlock button callback is configured in the Unlock Durable Button Inspector panel. The onUnlockPressUp function is added to the On Press Up callback.


Consumable Good Demo
The Consumable Good Demo is controlled by the ConsumableController.js script. The script takes the item’s SKU, UI elements, and spend quantity as inputs. Spend quantity is the amount deducted from the item’s balance each time the consumable good is used. In most cases, spend quantity should be 1.
The consumable demo also shows how digital good metadata (i.e., title) can be retrieved and displayed in the Lens UI.

On awake, the script initializes by disabling interaction with the Unlock and Spend buttons. It also adds an onSyncSuccess callback function to the Inventory Manager’s global syncSuccess event.

When the syncSuccess event is triggered, onSyncSuccess()sets the button labels and consumable title text. Next, it calls refresh(), which enables interaction with the Unlock button and updates the balance. If the balance is less than the spend quantity, interaction with the Spend button is disabled. If the balance is greater than the spend quantity, interaction with the Spend button is enabled.
It is critical that you update the Lens UI after inventory has synced successfully to reflect the locked / unlocked state of digital goods.

The script also defines script APIs that are called when the Unlock and Spend buttons are pressed to purchase and spend digital goods. On purchase and spend success, the consumable good UI is refreshed.
It is critical that you update the Lens UI after a consumable good is unlocked or spent to reflect the digital good’s unlocked state and balance.

The unlock and spend callbacks are configured in the Inspector panel for the Unlock Consumable Button and Spend Consumable Button objects under On Press Up.


Error Message
The Error Message is controlled by the ErrorMessageController.js script. The script takes the error message scene object as input and has the option to set a display duration.

On awake, the script initializes by disabling the error message and adding an showErrorMessage callback function to the Inventory Manager’s global syncFailure event.

If the syncFailure event is triggered, showErrorMessage() enables the error message for the display duration in seconds if set.
