Custom Segmentation
The Custom Segmentation template demonstrates an example of how you can apply an effect to a certain part of the screen based on a mask. The template comes with an example model for creating a mask on Pizzas, as well as a Graph Material which makes the pizza appear hot.
Unlike the Segmentation template, which utilizes the built in Segmentation Texture to mask things like the sky, hair, and background, the Custom Segmentation template gets its segmentation mask from a machine learning model through the ML Component.
Video Walkthrough
Template Walkthrough
If you have your own segmentation model , you can skip down to the Importing Your Model section below.
You can also skip to the Customizing Your Lens Experience section if you want to use the existing pizza segmentation texture.
Creating a Model
While the template comes with a pizza segmentation model for the ML Component, you can make any kind of segmentation mask by importing your own machine learning model. We’ll go through an example of what this might look like below.
To learn more about Machine Learning and Lens Studio, please visit the ML Overview page.
Prerequisites
To create a model, you will need the following
- Machine learning training code: The code that describes how the model is trained. This is sometimes referred to as a notebook. You can download our example notebook if you want to follow along.
- Data set: A collection of data that our code will use to learn from (in this case we will use the COCO data set).
This dataset comes with multiple labels that you can modify in order to change what type of mask is used. You can try creating different ones.
Training Your Model
There are many different ways you can train your model. For our example, we will use Google Colaboratory. To see other ways of training, take a look at the ML Frameworks page of the guide section.
Head over to Google Colaboratory, select the Upload tab, and drag the python notebook into the upload area.
The notebook is well documented with information about what each section of the code is doing. Take a look at the notebook to learn more about the training process itself!
Once your notebook has been opened, you can choose which labels you want the model to segment out. Then, you can run the code by choosing Runtime > Run All in the menu bar. This process may take a while to run, as creating a model is computationally intensive.

Downloading your Model
You can scroll to the Train Loop section of the notebook to see how your machine learning model is coming along.
Once you are happy with the result, you can download your .onnx model.
When using a data set to train your model, make sure that you adhere to the usage license of that dataset.
Importing your Model
Now that we have our model, we’ll import it into Lens Studio.
You can drag and drop your .onnx file into the Resources panel to bring it into Lens Studio.
Next, we’ll tell the template to use this model. In the Objects panel, select ML Component. Then, in the Inspector panel, click on the field next to Model, and then in the pop up window, choose your newly imported model.
You should now see the Preview panel showing the heat effect on the area that is segmented by the model.
Customizing your Lens Experience
You can see in the ML Component, that it has an Output Texture of Segmentation Texture. This Texture can be used in any way that textures are used.
Using the output texture in material editor
In the case of this template, the texture is being used as input to the Material Editor to create the heat effect.

The blur_material takes in the segmentation texture and applies a gaussian blur to it using the gaussian blur subgraph.
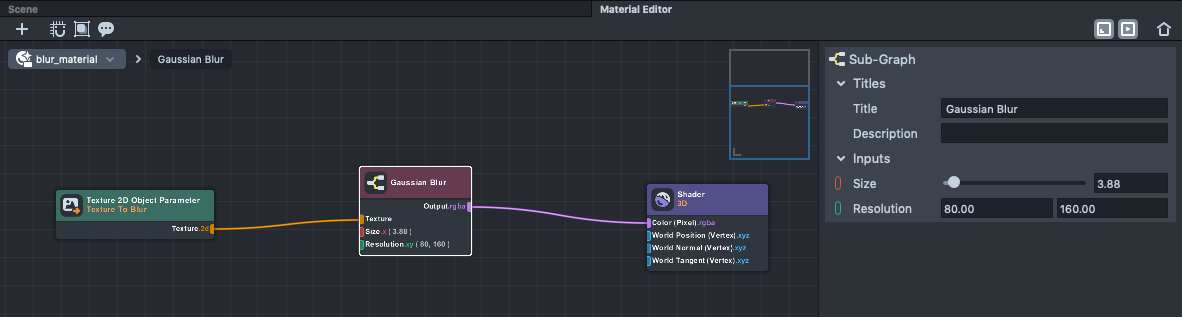
The segmentation texture is passed in to the material using the Texture 2D Object Parameter node to allow your material to access inputs:
Please visit the Material Editor guides for more information.
Then, it applies this post effect on the Blur Camera, which has the Render Target of Blur Target (resulting in a blurred segmentation texture).
Next, to create the heat effect, the blurred segmentation texture, as well as the original segmentation texture is used as input to the head_distortion material. Play around with some of the parameters of heat_distortion and check out the graph to see how it works!
the heat_distortion material uses the segmentation mask to determine where the area should be grayscale (pixel is not pizza), and then uses the blurred segmentation mask so that the smoke noise can appear on top of the pizza.
Using Segmentation Texture to cut things out
You can also use the Segmentation Texture directly on a camera to mask what it renders.
For example, let's say we added a color correction object to make our image be sepia toned.
Then, you can select the Camera object, and use the Segmentation Texture from the ML Component as the Camera’s Mask Texture.
Please visit the Fullscreen Segmentation guide to learn about how you can use segmentation textures to cut out parts of an object or image.
Previewing Your Lens
You’re now ready to preview your Lens! To preview your Lens in Snapchat, follow the Pairing to Snapchat guide.
Related Guides
Please refer to the guides below for additional information: