Multi Class Classification
The Multi Class Classification Template enables you to create your own Multi Class Classification Machine Learning model, quantize it and use it to trigger different effects in Lens Studio. This template comes with a Flower Classification model that allows users to classify flowers images into one of 103 classes, visualize the topK classes and their probabilities and trigger some effects once certain class is found.
Guide
You can skip to the Customizing Template section if you’d like to use the Flower Classification Model. Or, if you already have a multi class classification model, you can skip down to the Importing Your Model section below.
Creating Machine Learning Model
This template relies on a machine learning model to predict the probability of a certain class. To create a model, you’ll need a machine learning training code: code that describes how the model is trained (this is sometimes referred to as a notebook).
Example notebook provided with this template allows you to:
- Train an image classification model with Keras and TFLite model maker.
- Transfer weights pre-trained on ImageNet and add data augmentation, normalization and dropout to make our model more robust.
- Learn about different types of quantization, such as post training quantization and quantization aware training, and apply them to the model.
In this template, we are going to use the oxford_flowers102 dataset. It contains 102 common flower categories commonly found in the UK. Notebook will download dataset and all the necessary libraries for you.
Training Your Model
There are many different ways you can train your model. For our example, we will use Google Colaboratory.
To see other ways of training, please take a look at the ML Frameworks page for more information.
Download notebook from snapml-templates repository. Then head over to Google Colaboratory, select the Upload tab, and drag the downloaded python notebook into the upload area.
Importing Model
After you successfully run the notebook from the previous chapter you should have these 3 files downloaded to your machine:

Let’s see how to import them into the Lens Studio project. Open the Multi Class Classification template from the Lens Studio home screen or create a new Lens Studio project. Then drag these files into the Resources panel:
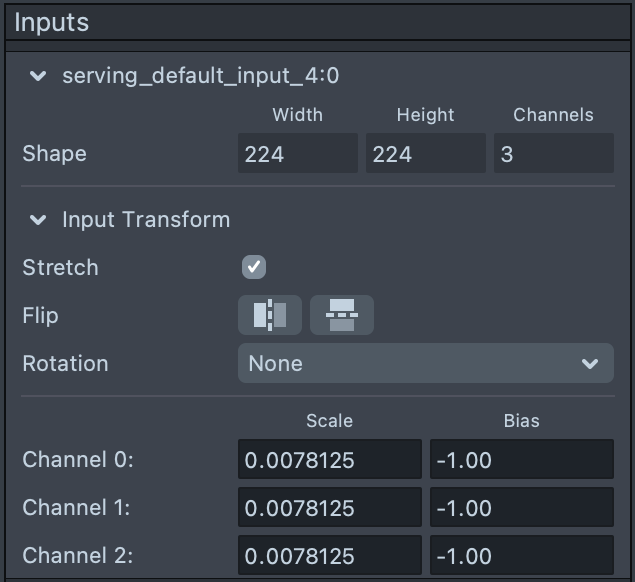
Please note that Lens Studio reads pixel values between 0 and 255 and our model uses range [-1, 1] we need to set the scale and bias when importing our model. To transform [0, 255] range to [-1, 1] we need to divide 1 by 128 and subtract to, that results in the next setting:
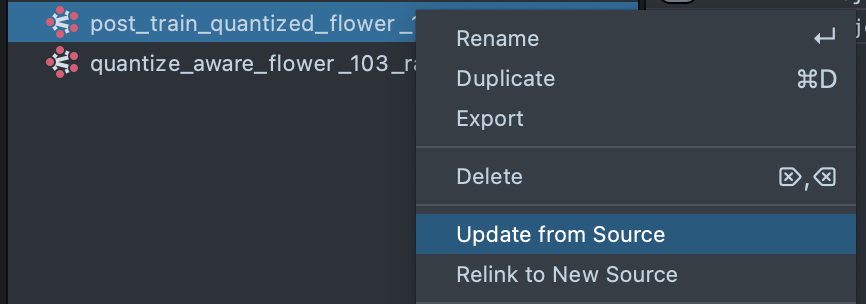
If you need to change scale and bias after the model was imported, right click on the model asset and select Update From Source. Then modify settings to your liking.
We will explain how to replace labels and set up MLComponent in the next section.
Customizing Template
Let’s open a template from the Lens Studio Home screen. You can see some scripts under the Helpers Scene Object. Read more about TweenManager and Behavior.
SquareTextureCrop
The SquareTextureCrop script allows modifying a Screen Crop Texture asset in a certain way. Specifically, it allows you to cut out a square piece of the input texture as displayed on a picture below. It allows to pass an image of an aspect 1:1 to the ml model that is often a kind of input image the model is trained on.
Crop Texture is a Screen Crop Texture to apply crop to.

Type:
- Screen Center: Crops square from the center of the screen.
- User Tap: Crops square around the user tap.
- Scale Multiplier: a crop region scale multiplier.
Use the Rectangle Setter component on a Screen Image that displays your crop texture to place it to the same screen region it was cropped from.
Now we can use the modified ScreenCropTexture asset in components ans materials as any other texture.
Setting up Model and Labels
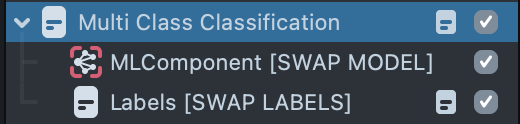
The MultiClassClassification script contains references to two main components that contain our setup:
ML Component that controls a multi classification machine learning model.
Labels is a script that contains our classes labels.
If you don’t specify labels - indices will be used instead.
Let’s take a look at these components before we go to the further settings and see how we can replace models and labels with the ones generated in the previous part of the guide.
At this point you should have two models imported to the resources panel:

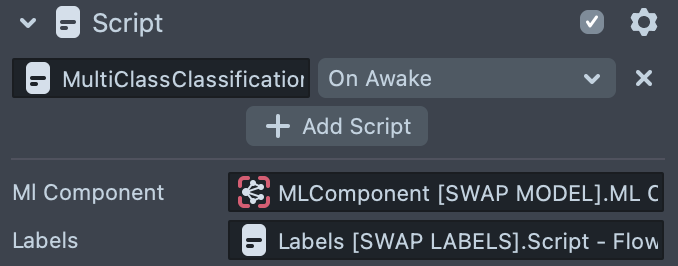
Select the MLComponent scene object, set the model by clicking on the Model field of the MLComponent component and selecting the model of your choice in the popup dialog.
Click on the Inputs, select Texture field and select the Screen Crop Texture asset as it gets reset after swapping a model.
For this example we are going to use auto settings:
- Auto build: means that the model will be built as soon as the lens is loaded.
- Auto run: means that the model will be run on every frame before the script update event.
Learn more about how you can run 'MLComponent' on different events (for example using a Behavior script) and with different settings in MLComponent Overview.
Modifying labels
Along with the model files you have a .json file with labels downloaded. Open the FlowerClassificationLabels [OPEN ME].js file in the script editor, copy and paste the contents of the downloaded json file as shown below:
script.labels = [contents of the .json file]
Save your file.
Now that we have the model and labels configured, let's get back to the MultiClassClassification script.

- Threshold is a value that has to be passed in order for the class to be detected.
- TopK is the number of the classes with the highest probability to display.
Setting up Responses
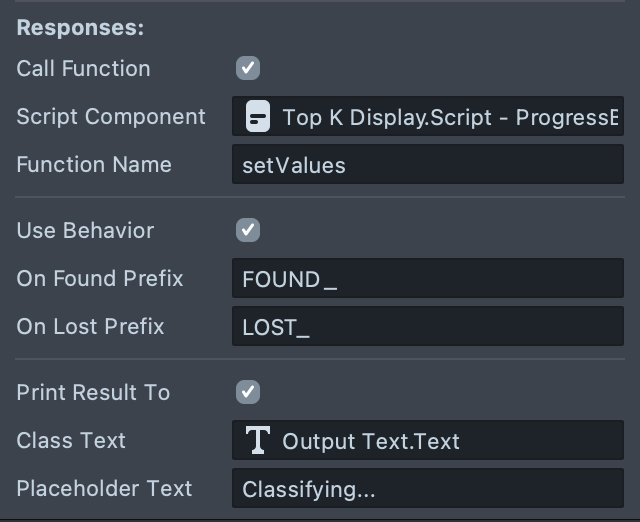
Call function: enable this checkbox to call the function of another script and pass in probabilities and labels of topK classes with highest probabilities.
- Script Component: script component with a function.
- Function Name: a name of the function.
Example
script.printValues = function (values, labels) {
  for (var i = 0; i < values.length; i++) {
    print('Label:' + labels[i] + ', prob:' + values[i]);
  }
};
See ProgressBasPanel script for more examples.
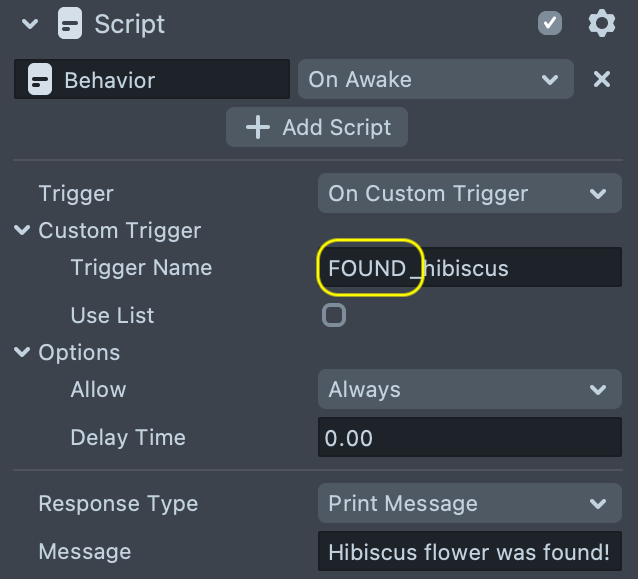
Use Behavior: enable to call custom Behavior script trigger.
- OnFoundPrefix: a string added to the name of a found class to form a custom Behavior trigger name
- OnLostPrefix: a string added to the name of a class that was lost to form a custom Behavior trigger name.
Example - print text once flower was found
Print Result To: enable to simply print the found class to the Text component.
- Class Text: Text component to use.
- Placeholder Text: text to display when none of the classes' probability is passing the probability threshold.
Progress Bar and Progress Bar Panel
Select the Top K Display Scene Object under the Orthographic camera.
ProgressBarPanel script allows user to instantiate a certain number of objects that visualize label and probability and update them via script API.
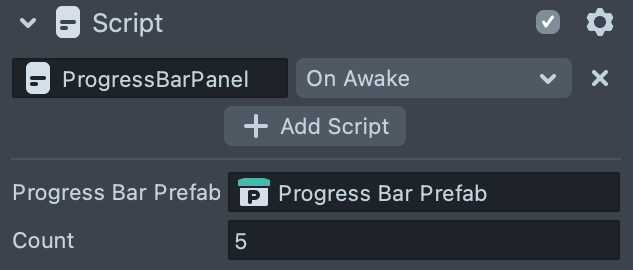
Progress Bar Prefab: an object prefab that contains several Scene Objects and a ProgressBar script.
The ProgressBarPanel setup can be used outside of the template for easy visualization of your data. Simply pass in an array of labels and values using this function:
/**
 *
 * @param {float[]} values
 * @param {string[]} labels
 */
function setValues(values, labels) {
  for (var i = 0; i < Math.min(progressBars.length, values.length); i++) {
    progressBars[i].value = values[i];
    progressBars[i].label = labels[i];
  }
}
Previewing Your Lens
You’re now ready to preview your Lens! To preview your Lens in Snapchat, follow the Pairing to Snapchat guide.
Related Guides
Please refer to the guides below for additional information: