Hand Segmentation
The Hand Segmentation Template let’s you easily segment your hand and replace it with an image or a custom material.
This template shows how you can use the hand segmentation to occlude an object as it goes behind the hand. Additionally, there are other examples for placing an image on a hand and placing images with a parallax effect.
This template also shows the other features of the Lens Studio like hand gestures, hand orientation as well as behavior to create a unique interaction.
Video Walkthrough
Template Walkthrough
Scene Set up
Hand segmentation uses 2D space (Screen Space) to apply the segmentation effect to users' hands. This template comes with a scene set up that utilizes the Hand Segmentation mask to create different types of effects related to the hand:
- Segment an image within the hand.
- Segment images within the hand with a parallax effect.
- Use the hand as an occluder for 3D objects.
Feel free to skip to the relevant sections to find what you need!
Learn more about how Hand Segmentation works on its guide page.
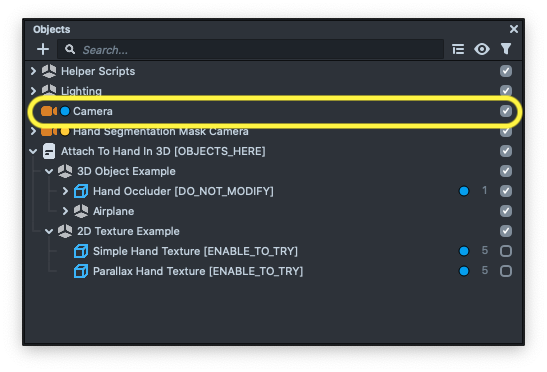
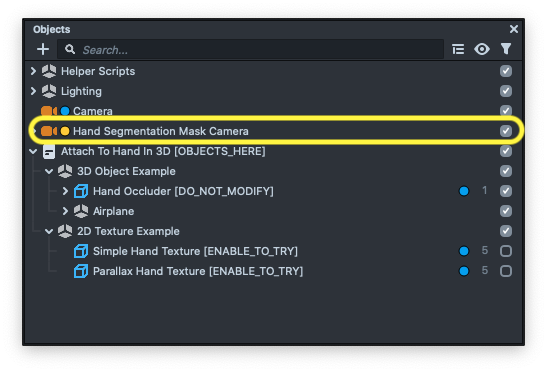
In the Objects panel, you will see two cameras in the template.
Camerawhich is responsible for rendering all the visuals in the scene.Hand Segmentation Mask Camerawhich is responsible for rendering the hand segmentation texture.
The Hand Segmentation Mask Camera generates a texture that shows what is the hand and not the hand (Mask Camera Render Target in the Resources panel) that is used by objects visible in the Camera to determine where some visuals should be shown or not shown.
Camera
In this template, for the most part we only have to deal with the visual aspects of the Lens since the scene is already set up. Notice how the examples and visuals in this template are visible in the blue (Default) layer--which is the same layer as the Camera object.
If you don’t see the layer indicator, press the Eye icon in the top right of the Objects panel and enable it.
Hand Segmentation Mask Camera
However, feel free to open the Hand Segmentation Mask Camera which contains objects used in the yellow layer to see how the hand segmentation mask is created. This camera also contains the Hand Tracking object which we use to get the position and rotation of the hand in the screen space so we can convert that into 3D space for use in the world space Camera.
This means that the camera uses a render target to render the hand segmentation to it. You can find the Render Target in the Resources panel, under the Textures folder, called Mask Camera Render Target.
To learn more about this set up, check out the Camera and Layers guide to learn more about render targets and camera.
With our understanding of the scene, let's take a look at how the visuals in this template is set up!
Attach To Hand In 3D
The Attach To Hand helper allows you to attach any objects, regardless of whether it’s 2D, 3D, Text and more to your hand.

To make sure objects appear on the hand, just place any content as a child of the Attach To Hand In 3D [OBJECTS_HERE] in the Objects panel.
To customize, select the Attach To Hand In 3D [OBJECTS_HERE] object in the Objects panel and adjust it’s setting in the Inspector panel.
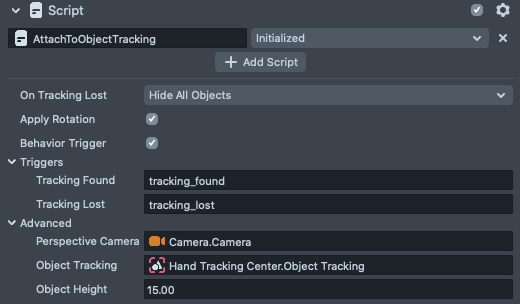
On Tracking Lost
This option allows you to either keep or hide all the child objects as soon as hand tracking is lost.
Apply Rotation
This option will apply rotation data from the hand tracking object to all the child objects.
Behavior Trigger
This script can send triggers to the behavior script as soon as hand tracking starts tracking or lost tracking.
To use this trigger and make a custom action without coding, you need to import the behavior script into your project. To learn more about how to import and use behavior script please refer to the Behavior guide.
Advanced
To make sure the script is working properly, please assign a perspective camera (Make sure it's NOT an orthographic camera). Also make sure to assign an Object Tracking. This script can be used for other Object Tracking for example cats or dog tracking.
Examples
This template comes with 3 examples. Take a look below for a description of each example and information about their settings
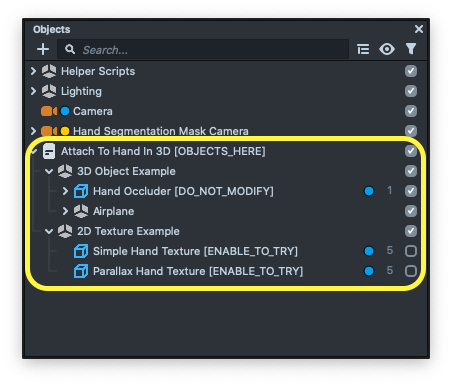
2D Texture Example
These two examples are showing how you can assign an image to get displayed only on hand.
To see the example make sure to enable the object in the Objects panel.
Simple Hand Texture
This example uses a simple custom graph to apply a texture to hand segmentation.
To see how it works, select the object and then in the Inspector panel, right click on the material and press Select.
This will automatically select the material which is applied to the Mesh Renderer.
To see how the custom material works on this example, just double click on the material itself and it will open the material in the Material Editor panel.
Parallax Hand Texture
Parallax Hand Texture example, uses the position data from the Hand Object Tracking to create a parallax effect look applied to the hand.
This example uses a helper script called ScreenTransformToMaterialProperty to get a position data from Hand Object Tracking and then convert that data into a screen point.
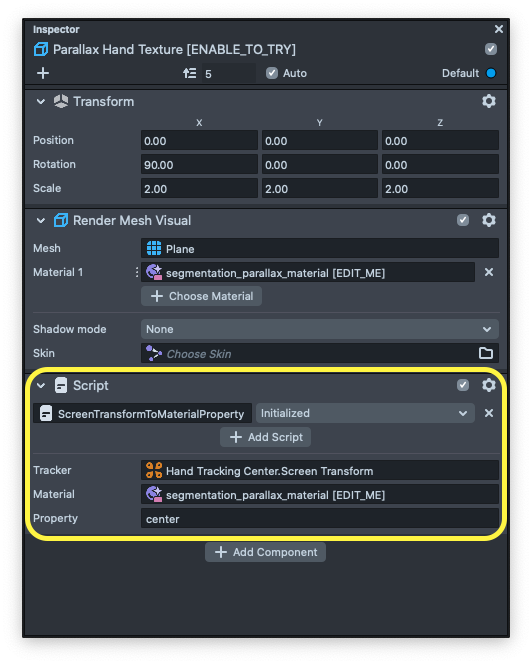
After converting the data to screen point, this will pass the data to a material pass which is defined by the user. In this case it passes the data to the center property.
To customize the material, select the Parallax Hand Texture [ENABLE_TO_TRY] object in the Objects panel, and then like before, in the Inspector panel, right click on the material and press Select. This will select the material, allowing you to customize its properties.
Similarly. to see how the custom material works on this example, just double click on the material itself and it will open the material in the Material Editor panel.
3D Object Example
The main example in the Hand Segmentation template is the 3D Object example which shows how you can use an occluder in 3D space so you can have an object to move around a hand and as soon as it goes behind the hand it will get occluded.
Hand Occluder [DO_NOT_MODIFY] has a material which contains Render Target from the mask camera. You can use this object to occlude any objects that go behind the object. You can use a gizmo provided by the template to see where the object gets occluded in the Scene panel.
The gizmo is just an image of the hand and can be used as a reference in the Scene panel. It is not actually displayed in the scene.

The Airplane object uses a Tween script to rotate around the hand.
Effects (Helper Scripts)
This example comes with some helper scripts to help create a more immersive experience through interactivity.
You can find these effects in the Object panel, under the Attach To Hand In 3D [OBJECTS_HERE] -> 3D Object Example -> Airplane -> Effects Controllers.
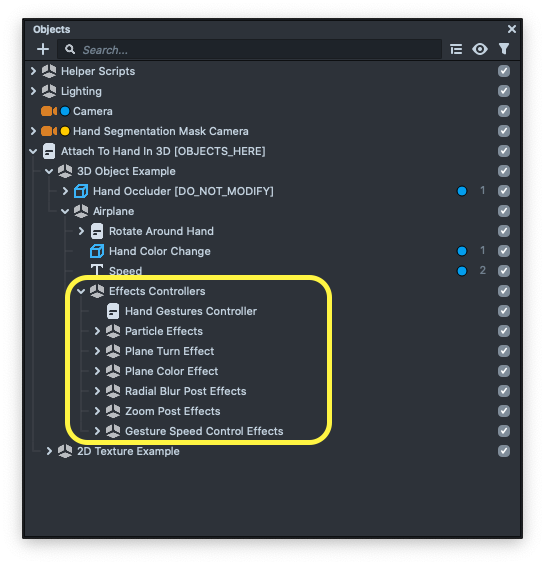
Let’s take a look at all the effects as well as helper scripts listed below.
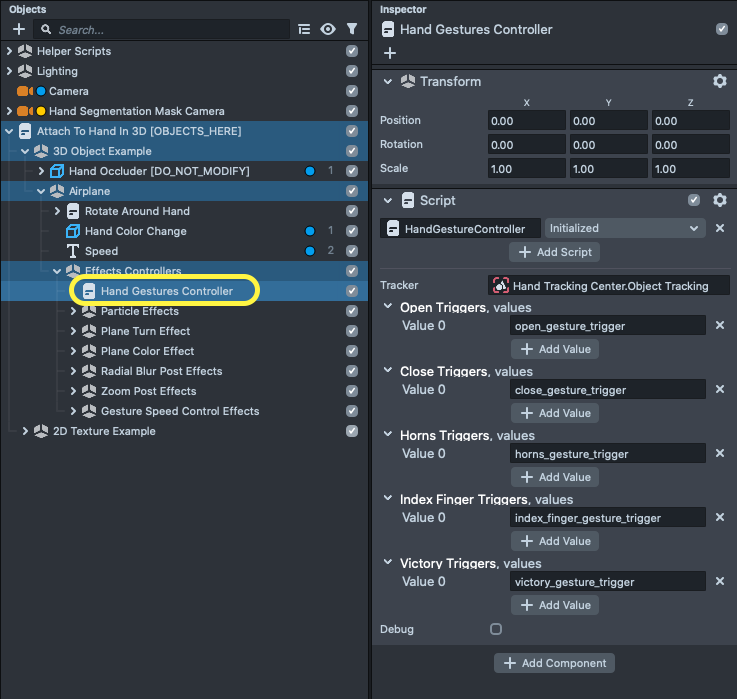
Hand Gesture Controller
The Hand Segmentation template uses hand gestures to create unique effects. This is the same script which is used in the Hand Gesture Template. To learn more about how the Hand Gesture Controller is working please refer to Hand Gestures Template guide.
World Particle Controller
The template comes with world particles. These particles are set to simulate in world space.
With the help of the world particles we can create a trail of smoke in the scene.
The way world particles work is that we used the same particle system which comes with the Lens Studio. Then we have a helper script in the template called WorldParticleController. With this helper script you can assign your particles effect and then this script creates copies of the same particle and places it in the scene.
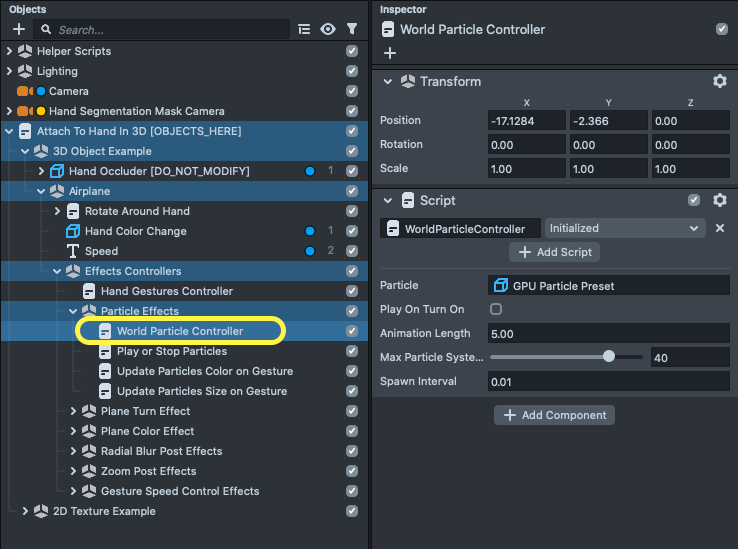
This helper script exposes some APIs so you can update the particles in run time. You can use Behavior to call these APIs with no coding at all.
Take a look at the following examples below to see how they work:
Play or Stop Particles
To start or stop the particle you can call script API using behavior script and call the function to play or stop.

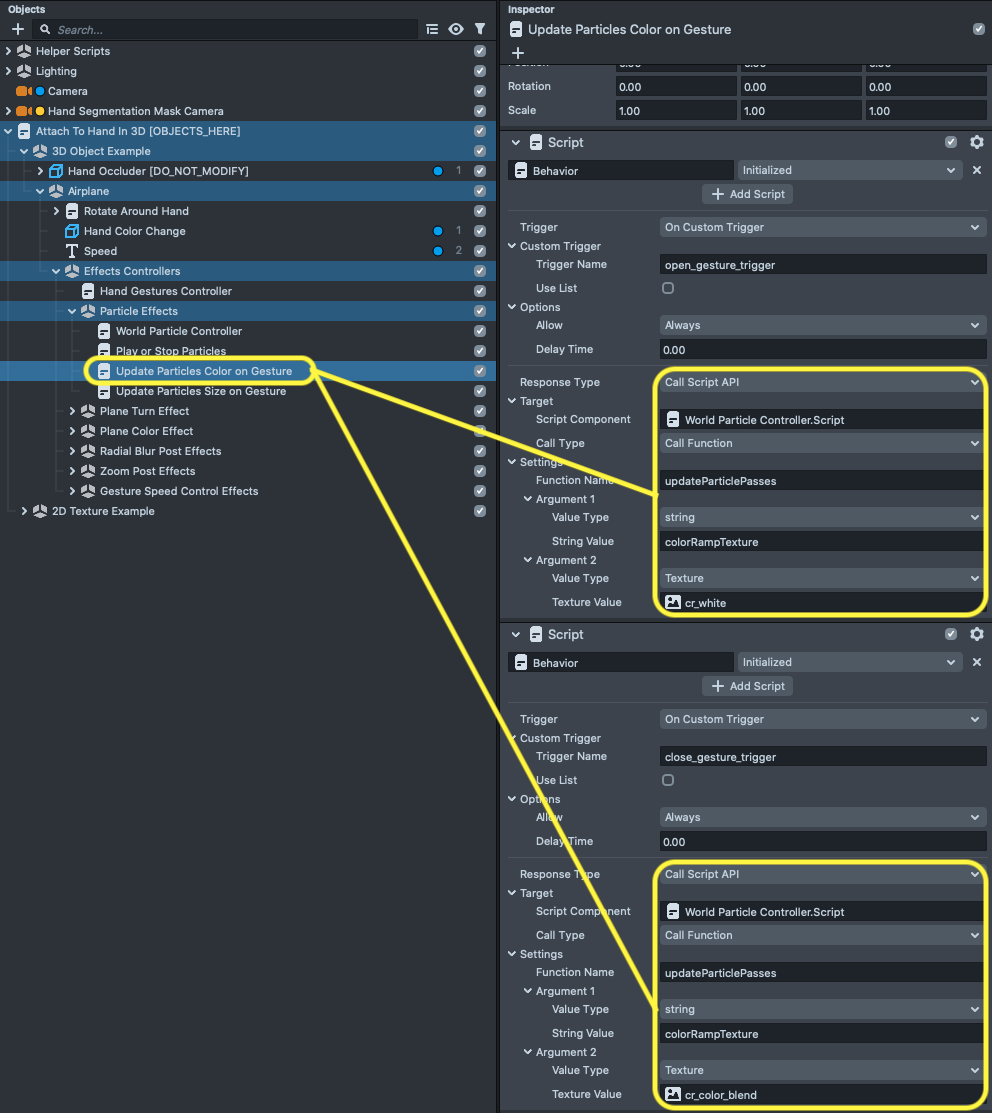
Update Particles Color on Gesture
To change the color of the particles you can use a behavior script and call the updateParticlePasses function. When you call this function make sure to pass a pass name as well as a value related for the pass you want to change. In our example, we modify the colorRampTexture of the particle material.
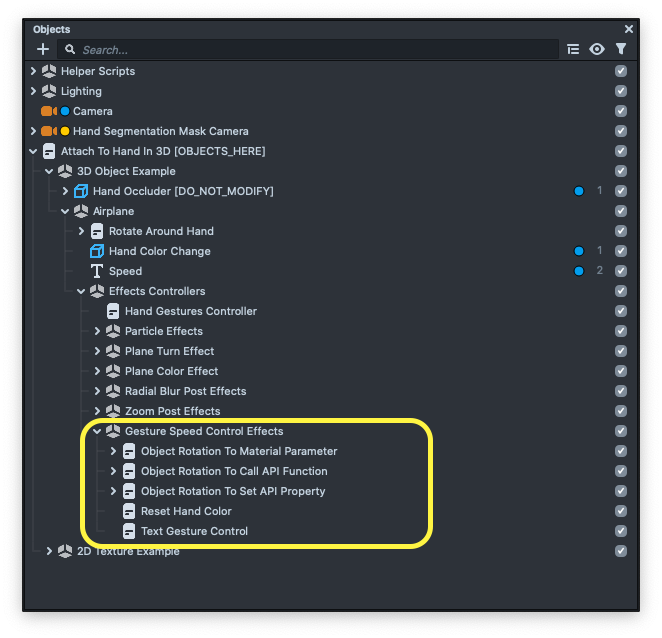
Gesture Speed Control Effects
Another example provided by the template is using the rotation of the hand and applying an effect based on the rotation value. In this template we use rotation angle to change the speed of the plane, as well as changing the hand color as value increases.
This effect starts working as soon as the user does the One Finger gesture and then can change the speed.
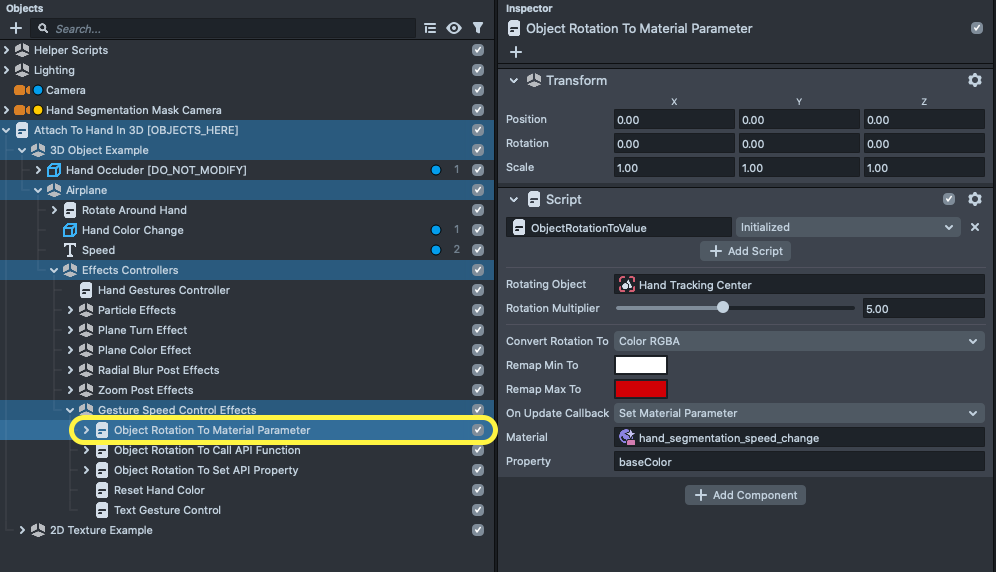
For example, in the Objects Rotation to Material Parameter example, we get data from the Hand Tracking Center Object and then we convert that into RGBA data. With use of this script we can change the color on the user's hand to turn to white on the lowest value and turn red on the max value.
There are a couple more examples using Object Rotation which you can find under the Gesture Speed Control Effects object in the Objects panel. Feel free to play around with these as you did above.
Exporting the template to use in another project
You can also use this template in an existing project as well!
As mentioned before, the project contains the hand segmentation under the Hand Segmentation Mask Camera, as well as the Attach To Hand In 3D [OBJECTS_HERE] object which contains the actual visuals. You’ll need to export both pieces in order to export the template. In addition the animations are run through the Tween system found under Helper Scripts object.
To export the effects in this template to use in another project, First create an Empty Object by pressing the + button in the Objects panel and selecting Empty Object.
Then place the Attach To Hand In 3D [OBJECTS_HERE], Hand Segmentation Mask Camera as well as Helper Scripts as a child of newly created objects.
Finally, right click on the new scene object and select Export Object.
This will create a .lso file which you can import to your own project.
Learn more about exporting and importing object in this guide.
After importing into a new project, make sure to place the helper scripts on top of the hierarchy in the Objects panel.
Previewing Your Lens
You’re now ready to preview your Lens. To preview your lens in Snapchat, follow the Pairing to Snapchat guide.
Related Guides
Please refer to the guides below for additional information: