Substance Texturing
Using Substance Painter
Lens Studio supports high quality physically based rendering (PBR). Adobe's Substance 3D Painter is a tool built for creating PBR textures. The below guide will walk through how to configure Substance Painter for Lens Studio use. This allows you to visualize your model in Substance Painter as it would appear in Lens Studio and Snapchat. And then, how to export your PBR textures to be easily loaded into Lens Studio.
The Mesh
You should import the exact same mesh file into Substance Painter that you will import into Studio. In order for normal maps to look as intended, the tangent space on the mesh must match in both packages.
New Project, Lens Studio
When creating a new Substance project, use the Lens Studio template.

If you are not starting a new project, but have an existing project:
- Select
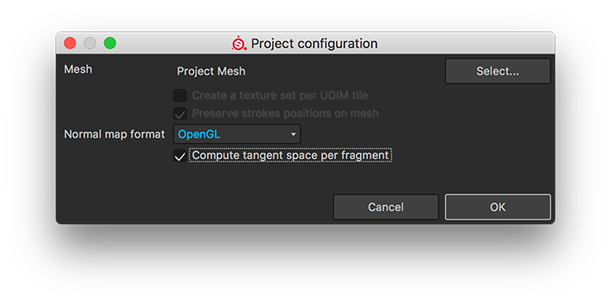
Edit -> Project Configuration...and verify that theNormal map formatdrop down is set correctly toOpenGL. Additionally, make sure theCompute tangent space per fragmentcheckbox is checked.

- Switch the preview shader to the Lens Studio shader in
Window -> Views -> Shader Settings.

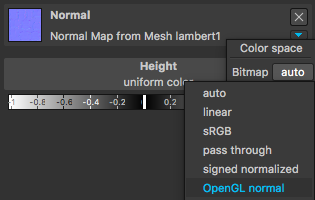
If you are importing a normal map texture into Substance, you need to make sure your normal map's Color space setting is set to OpenGL normal and not auto.

Export Textures
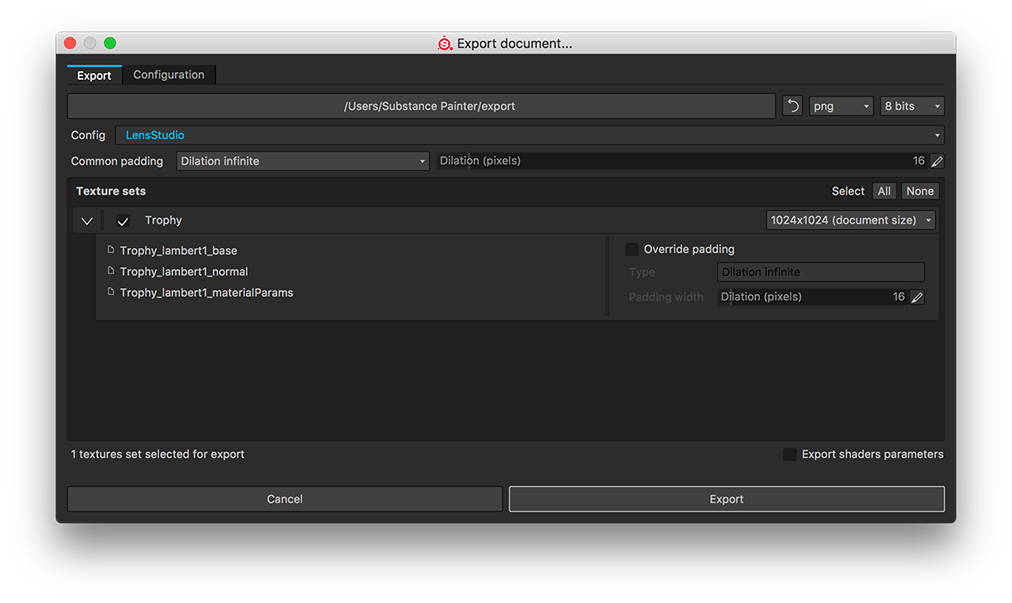
To export your textures, go to File -> Export Textures.... This will open the Export window. Select Lens Studio in the Config drop down. Finally, select your desired export directory and click the export button.

This will export three textures that are ready to be added to Lens Studio.
-
One of the textures is your
Base Texture -
Another is your
Normal Map -
Finally, the
Material Params Textureis unique to our engine. It is a single texture that represents Metallic, Roughness and Ambient Occlusion in the red, green and blue color channels respectively.
Lens Studio PBR Material
To use your PBR textures in Lens Studio, first import them to the project by dragging them into your Asset Browser panel. Next, create a new PBR material by selecting + -> Material -> PBR in the Asset Browser panel.

With your new material selected, link all three textures to the appropriate channels in the Inspector panel.

Now, assign your material to an imported mesh. For more information on importing meshes, follow the 3D Object Import guide.

You now have a high quality PBR material with textures inside Lens Studio!

Environment Maps
Environment maps enhance the effect of PBR lighting. If you use the same environment map in Substance and in Lens Studio, your rendering should look identical in both packages. Lens Studio uses a particular environment map by default, but you may choose from several built-in environment maps, or import your own.
To import your own environment map, make sure it is an .hdr or .exr image in latitude/longitude (latlong) format. Simply drag the file to the resources tab in Lens Studio. Substance uses the same environment map formats, so you can import the same environment into Substance, and vice versa.
If you would like to use a built-in environment map, you may choose it from Asset Browser -> + -> Texture

After import, two textures will be generated: a diffuse and a specular environment map. Select the Envmap light source and replace the textures with your newly generated diffuse and specular textures.

Debugging High Res to Low Res Normal Map Baking
It is notoriously difficult to bake high res to low res normal maps and have the results match in different software packages. The vertex normals and tangents must match exactly (see notes at the top of this document), but sometimes various packages drop the tangents and calculate their own tangents, or use mikktspace tangents, etc. DirectX normal maps have the green channel inverted versus OpenGL normal maps (Lens Studio expects OpenGL format). The normal map baker even needs to take into account whether the target engine computes tangents in the pixel shader or in the vertex shader (Lens Studio computes them in the pixel shader). Having a mismatch anywhere along the line will cause strange lighting, including seams. We find it useful to validate the full pipeline with a simple test scene.
The simplest test case is to bake a high res cube with hard normals onto a low res cube with soft normals. The low res cube with soft normals lights like a sphere, but once the normal map is baked to it, it will look like a cube again. It should look like a cube in Substance, and once it's imported into Studio, it should still look like a cube with flat sides. If your result looks like a cube in Lens Studio, you can be confident that your workflow is correct. If the sides of the cube look warped, revisit all of the points above to find the source of the mismatch.
