Audio Output
The Audio Output template enables you to generate audio data using JavaScript and play it on a device. It provides simple examples that respond to touch input.
These examples can be easily modified to support different kinds of interactions - hand tracking, face landmarks, etc.
Please note that this template requires basic scripting knowledge. Please refer to this Scripting Overview for more details
Let’s open the template and look at the Scene Hierarchy panel:
Audio Output
TheAudioOutput.jsscript attached to the Audio Output [KEEP AT TOP] scene object controls writing audio samples to the Audio Output audio track asset.
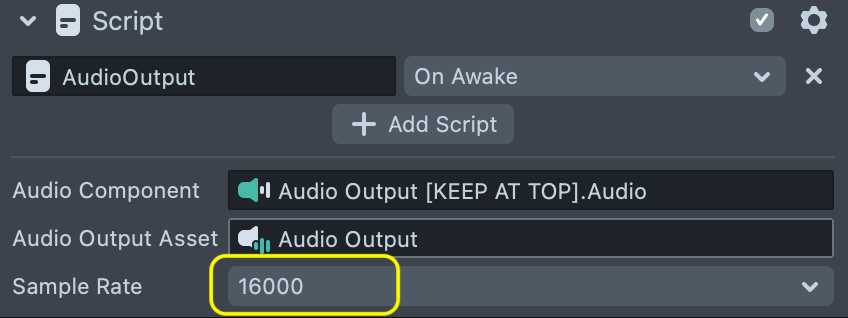
Script inputs are next:
- Audio Component: the audio component used to play the Audio Output Asset
- Audio Output Asset: type of Audio Track asset that allows you to obtain a preferred audio frame size for the current frame and write raw data into it.
- Sample Rate: sample rate used throughout the project.
This project is set up to use 16K sample rate to optimize calculations in JavaScript.
This script creates aglobal.audioOutput object which can be accessed from other scripts. This object keeps track of the connected players, iterates through them on every frame, adds all audio samples to the single buffer and finally enqueues them to the audio output audio track.
A "player" in this case is any JavaScript object with the getSamples(data, numSamples) function implemented. This function should generate numSamples values and add them to the data array.
Example:
MyPlayer.prototype.getSamples = function (data, numSamples) {
   for (var i = 0; i < numSamples; i++) {
       Var sample = …//generate sample
       data[i] += sample;
   }
};
Please use next lines of code to add or remove a player:
global.audioOutput.connect(player);
global.audioOutput.disconnect(player);
Audio Helpers
The Audio Helpers script creates a global.AudioHelpers object with useful functions and classes that provide simple examples of players. Use them directly or as a reference for your own players.
- AudioHelpers.Oscillator: allows to create a waveform function with specified frequency, amplitude, sample rate.
var oscOptions = {
  sampleRate: output.sampleRate,
  form: 'Sin',
  frequency: 440,
  amplitude: 0.5,
};
var osc = new global.AudioHelpers.Oscillator(oscOptions);
- AudioHelpers.Noise: allows to generate different types of noise
var noise = new global.AudioHelpers.Noise();
noise.type = 'White';
Noise.amplitude = 0.5;
- AudioHelpers.Envelope: allows to create an ADSR envelope
var envOptions = {
  attack: 0.1,
  decay: 0.2,
  sustain: 0.8,
  release: 0.1,
};
var env = new global.AudioHelpers.Envelope(envOptions);
env.on();
- AudioHelpers.BufferPlayer: allows to create a player from the array.
var audioBuffer = new Float32Array(MAX_SAMPLES);
var samplePlayer = new global.AudioHelpers.BufferPlayer(audioBuffer);

output.connect(samplePlayer);
samplePlayer.play(1);
AudioTrackPlayer: AudioTrackPlayer,
- AudioHelpers.AudioTrackPlayer: allows to create stream audio track player
var player = new global.AudioHelpers.AudioTrackPlayer(script.audioTrack);
player.amplitude = 0.1;
player.play(1);
noteToFreq: noteToFreq,
- AudioHelpers.noteToFreq: converts a string representation of note to frequency.
var freq = global.AudioHelpers.noteToFreq('A4');
- AudioHelpers.midiToFreq: converts a midi value to frequency.
var freq = global.AudioHelpers.midiToFreq('69');
Please check out the JavaScript source files for your reference.
Examples
Each example includes an example script that creates a player and connects it to the audio output.
Each example script has a set of api functions that can be called either from behavior script or from the UI widgets (Please refer to the Scripting guide for the details).
Open each example script in the script editor to find more details in the comments.
This template comes up with some custom UI widgets such as Knob and Slider. They are 3D controls and can work in world space as well. They are described at the end of this page.
Toggle the examples one by one but make sure to refresh the preview panel after enabling the next one
Oscillator
This example allows you to generate a sound wave with a certain form, amplitude and frequency. Drag knob and slider controls in the Preview Panel to change parameters.
Open the OscillatorExample script:
var WaveTypes = ['Sin', 'Square', 'Triangle', 'Sawtooth'];
var output = global.audioOutput;
//create oscillator default values
var osc = new global.AudioHelpers.Oscillator();
// connect to the output
output.connect(osc);
//public api functions (to call from control helper scripts)
script.api.setForm = function (idx) {
  osc.form = WaveTypes[idx];
};
script.api.setAmplitude = function (v) {
  osc.amplitude = v;
};
script.api.setFrequency = function (v) {
  osc.frequency = v;
};
Enable the Oscillator Example scene object and expand its children. Select the Knob - Waveform scene object, and find the Knob child scene object.
In the Inspector panel you cab see Knob Helpers script. Notice how the setForm api function defined above is being connected to this UI control:
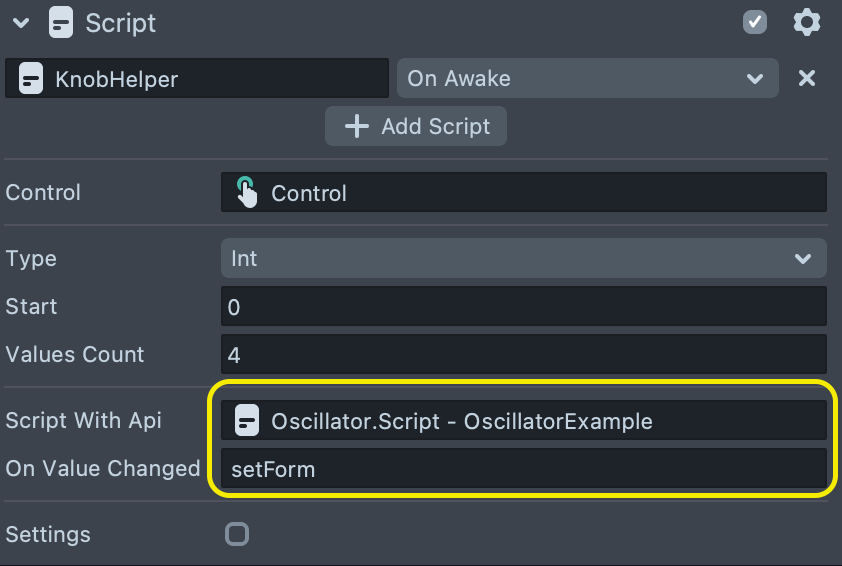
Sliders call functions setAmplitude and setFrequency correspondingly.
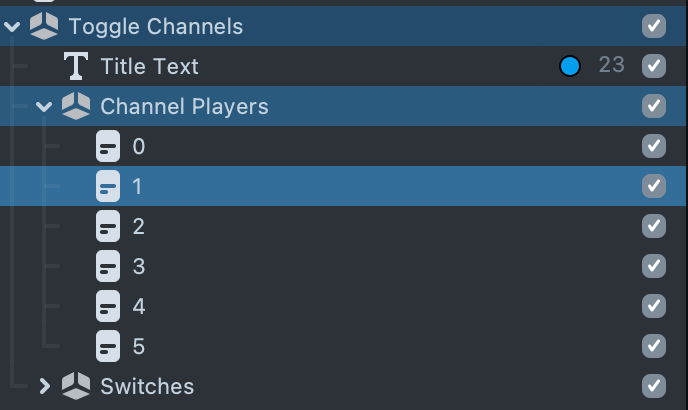
Toggle Channels
This example allows you to read audio samples from multiple audio track files and play them simultaneously. This example solves a problem of aligning audio clips perfectly.
This example is using AudioTrackExample.js script and a Behavior script to respond to user touch.
Swap audio tracks to the ones of your choice on the ChannelPlayer scene object’s children:
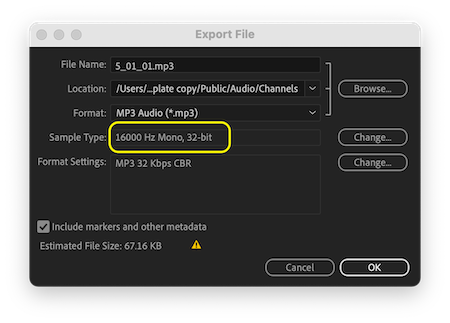
Please note that audio track assets provided in the template have a 16000 sample rate.
You can find out the sample rate of the audio track in the file properties in Finder/Explorer or by opening it in any Audio Editor. You can also export audio files with different sample rates. For example in Adobe Audition:
If you decide to use different sample rate you can adjust it on the AudioOutput scene object:
Noise
This example generates different types of noise that can be switched using a KnobHelper. Check out NoiseExample.js for more details.
Record Sample
Record sample showcases how to read audio data from the microphone, save it to the array and playback with the BufferPlayer.
In order to use this example please enable Microphone Input by clicking the button at the bottom-left corner of the Preview Panel.
Envelope
This example shows how to modify the amplitude of the oscillator using the ADSR envelope.
Knob Helper
Knob and Slider helper scripts create 3D UI elements and allow you to set an api function to be called when the value is changed.
Although in the template these controls are attached to the screen they would also work just fine anywhere in 3d space. Just make sure to set Camera input to the camera used to render these scene objects (see image below)
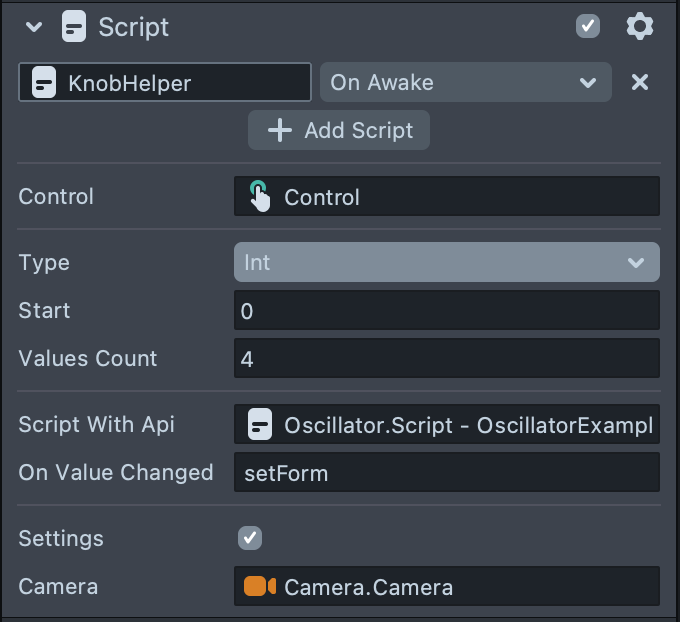
- Control: a scene object with the Interaction Component that contains visuals that should be rotated with a knob.
- Type: can be either Float or Int, based on this knob either rotates freely or snaps to the certain values.
- Start: start value
- Value count: amount of divisions in case of the Int type
- Min: minimum value
- Max: maximum value
- Script with API: a script component with an api function
- On Value Changed: a name of the api function to be called
- Camera: a camera that renders this scene object.
Slider Helper
Slider Helper has very similar inputs:
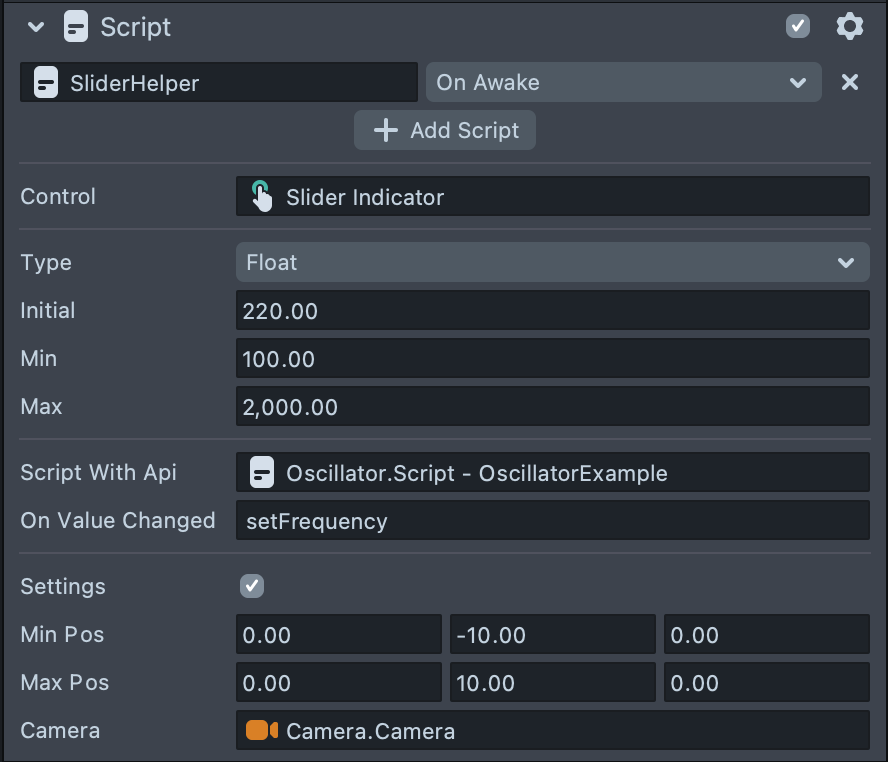
- Control: a scene object with the Interaction Component that contains visuals that represent a slider indicator.
- Type: can be either Float or Int, based on this knob either snaps to the certain values or rotates freely between them.
- Start: start value
- Min: min value for the
- Max: maximum value
- Script with API: a script component with an api function to call
- On Value Changed: a name of the api function to be called
- Camera: a camera that renders this scene object.
Previewing Your Lens
You're now ready to preview your Face Lens. To preview your Lens in Snapchat, follow the Pairing to Snapchat guide.