Playing 3D Animation
Introduction
This guide will walk you through playing 3D animations imported into your Lens Studio project. Lens Studio supports the following types of animation:
- Joint Animation
- Transform Animation
- Blendshape Animation
Related Guides
This guide touches on concepts in the following guides:
Project Setup
To follow this guide, you'll need to set up a Lens Studio project with an imported 3D animated mesh. For more information on how to import a 3D mesh, please refer to the 3D Object Import guide.
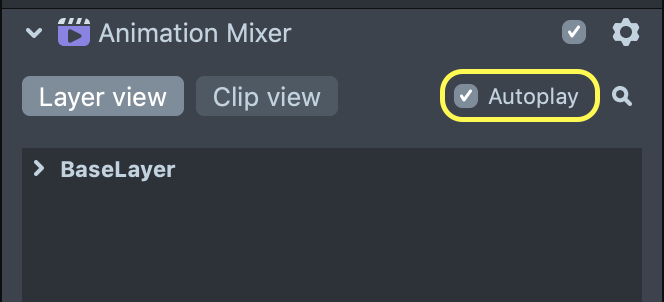
Autoplay Animation
For simple animation playback, the Animation Mixer component has an Autoplay checkbox. When enabled, Autoplay will automatically play a looping animation.
Scripting Animation
Animation playback in Lens Studio can also be controlled by script. The following script can be used in most cases when your scene has an imported animated mesh.
Create The Script Resource
Create an empty Script in the Resources panel.
Copy the PlayAnimation.js code below into the Script you just created:
Script: PlayAnimation.js
// PlayAnimation.js
// Version: 0.0.3
// Event: Lens Turned On
// Description: Plays a single animation on an animated mesh. If an AnimationMixer is not set, the script will attempt to find one on the SceneObject.
//@input Component.AnimationMixer animationMixer
//@input string animationLayerName = "BaseLayer"
//@input float animationWeight = 1.0 {"widget":"slider", "min": 0, "max": 1, "step": 0.01}
//@input float animationStartOffset = 0.0
//@input int numberOfLoops = -1
if (!script.animationMixer) {
  script.animationMixer = script
    .getSceneObject()
    .getFirstComponent('Component.AnimationMixer');
}
if (script.animationMixer) {
  script.animationMixer.setWeight(
    script.animationLayerName,
    script.animationWeight
  );
  script.animationMixer.start(
    script.animationLayerName,
    script.animationStartOffset,
    script.numberOfLoops
  );
}
For a detailed guide on creating a Script Resource, visit the Scripting Example.
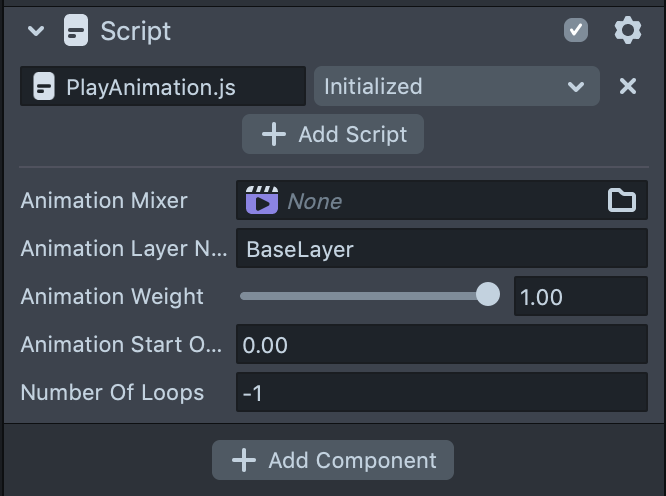
PlayAnimation.js Properties
PlayAnimation.js defines properties that can be customized for your Lens.
Animation Mixer
This is a reference to the Animation Mixer Component controlling playback of the mesh's animation. All animated meshes imported into Lens Studio automatically have an Animation Mixer. If this property is left undefined in the Inspector, the script will try to use the AnimationMixer on the Scene Object (if one exists). Defaults to None.
Animation Layer Name
The name of the Animation Layer to be played on the Animation Mesh. To learn more about setting up Animation Layers, please refer to the 3D Object Export Guide. Defaults to "BaseLayer".
Animation Weight
A float from 0 to 1 that indicates the blend weight of the current Animation Layer. Defaults to 1. The default value should be used in the majority of cases.
Animation Start Offset
The time offset in seconds at which the animation should start playing. Defaults to 0.
Number Of Loops
An integer indicating the number of times the animation should loop. A value of -1 will make the animation loop infinitely. Defaults to -1.
Set up the Script Component
Add a Script Component to your imported Scene Object.
In the Inspector panel, select Add Component -> Script.
On the Script Component you just added, select Add Script.
In the selection dialog that pops up, select the PlayAnimation script you created earlier.
Using the Script Component's event dropdown, set the script's event to Lens Turned On.
In the Inspector panel you should see the Script Component updated with the properties from the PlayAnimation script.
Animation Clips
If you prefer to animate your objects on a single timeline, the Animation Mixer component supports the ability to define clips directly inside of Lens Studio. This allows you specify a start and stop time and name for each clip. When you create an animation clip, it creates a new layer called whatever you named the clip. You can then play the animation layer just like you would an imported animation layer by referencing the layer name in the above PlayAnimation script or in the various Interactive templates.
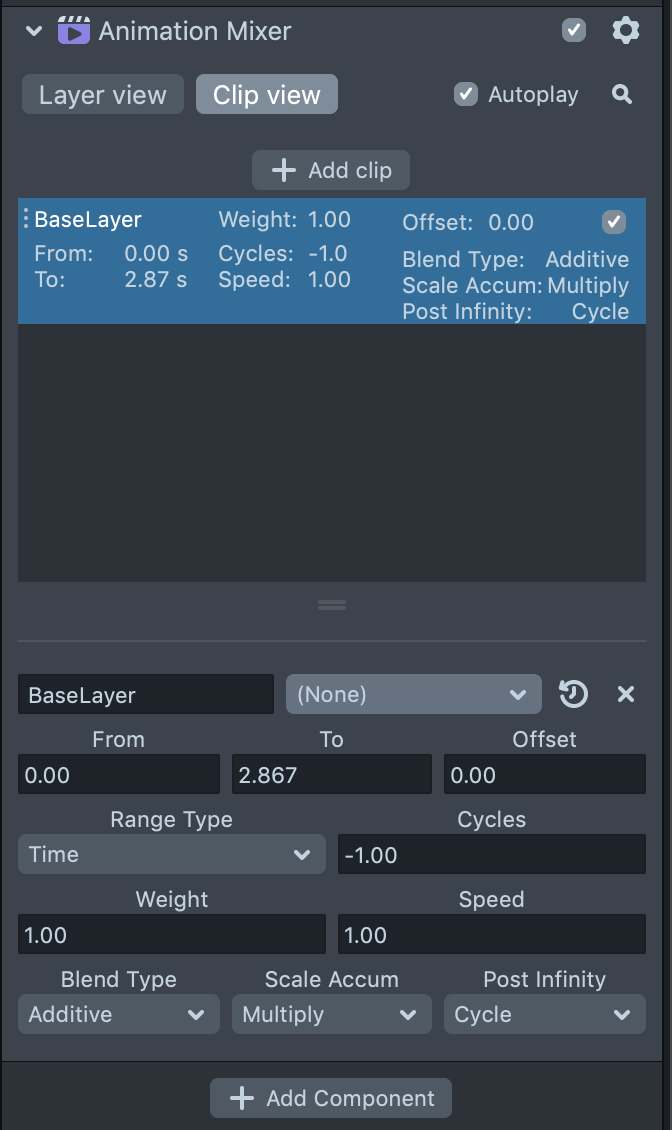
- Clip View - This is where you can create, remove and edit clips
- From / To / Offset - Here you can define the start and stop times for you clip as well as an offset if you'd like to shift the entire animation start and stop times
- Range Type - This allows you to specify your animations time in frames or seconds
- Cycles - How many times you'd like the animation to play
- Weight - This value determines the amount of influence the animation will have on the objects joints where a value of 0.0 = 0% and a value of 1.0 = 100%
- Speed - How fast will the animation playback where a value of 0.0 = 0% and a value of 1.0 = 100%
- Blend Type - When blending multiple animations you can specify how you would like this blend to be applied
- Override - Completely overrides any influence on the joints this animation will be applied giving this animation priority
- Additive - The weight of this animation will be added to any current animation influence already being applied to the joints this animation is being applied to
- Scale Accum - This value determines how you want the animation values to be applied to the joints
- Multiply - Multiples the values to each joint effectively scaling values currently applied
- Additive - Adds the desired animation's values to the currently applied values on joints
- Post Infinity - When an animation clip reaches it's last frame this value determines how the animation will continue
- Cycle - The animation will start over at the first frame and continue on
- Oscillate - The animation will play in reverse when it reaches it's final frame and vice versa effectively giving a "ping pong" effect
Previewing the Animation
Press the Reset Preview button in the Preview panel to see your 3D mesh play its animation.