Landmarker Guide
The Landmarker Template allows you to create unique Lens experiences at selected locations around the world. Similar to Marker Tracking, Landmarker Tracking tracks the specified physical location's landmark. The template shows you how to utilize Landmarker tracking to create a 3D experience tightly tracked to the location's architecture. It also includes debug features that allow you to test your Lenses without actually being at the location.
Landmarkers are a part of Lens Cloud, a collection of backend services, built on the same infrastructure that powers Snapchat.
To learn more about Lens Cloud and how to power a new generation of AR experiences that are more dynamic, useful, and interactive than ever before, please visit Lens Cloud Overview
Landmarker templates are not offered for commercial use. This includes advertisements and other promotional purposes. You are responsible for obtaining any necessary rights and permissions before using a Landmarker template commercially.
Tutorial
Locations
Lens Studio comes with twenty six locations around the world including;
- Buckingham Palace in London, UK
- Eiffel Tower in Paris, France
- Flatiron Building in NYC, US
- TCL Chinese Theater in Los Angeles, California, US
- US Capitol in Washington, D.C., US
You can view all available Landmarkers in the Download Landmarker Templates guide. Each location has a corresponding template. You can select the Landmarker templates for the locations where you want to base your Lens.
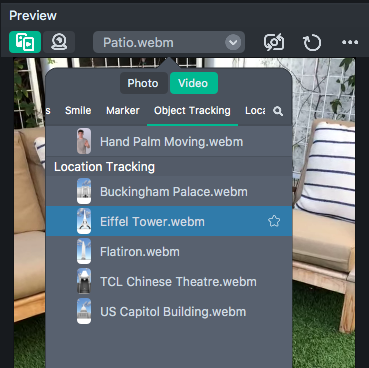
In the following guide, you will use the Eiffel Tower Landmarker Template.
Preview Landmarker Lenses
In the Preview panel, select the Location Tracking preview video for your chosen Landmarker. If you don't see the preview videos, flip the camera to back camera. These preview selections provide the tracking data needed to simulate the experience of being at the location.
The template also comes with debug features that allow you to preview your Lenses with more control, which will be explained in detail later in this guide.
3D Reference Model
Each Landmarker template comes with the 3D reference model of the Landmarker's architecture. You can download a reference model (FBX) for each Landmarker location below:
- Buckingham Palace in London, UK
- Eiffel Tower in Paris, France
- Flatiron Building in NYC, US
- TCL Chinese Theater in Hollywood, California
- US Capitol in Washington, D.C., US
The reference 3D model is built to align with the real Landmarker's physical features. For correct alignment, make sure not to scale or offset the mesh in your Scene
Adding Content
You can create your unique Landmarker Lenses by adding your own 2D and 3D content.
2D and 3D Content
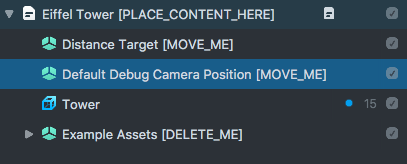
First, import your 2D or 3D assets into Lens Studio. Drag them under the Eiffel Tower [PLACE_CONTENT_HERE] and position it relative to the Landmarker reference model. The template comes with a few example assets to choose from.
You can download the Landmarker reference model and import it to your preferred 3D software for more precise content creation.
Graffiti/Custom Textures
By default, the reference model is used as an Occluder for your content. You can also apply custom textures onto the building to create a graffiti design, coloring effect, or entirely new look for the Landmarker.
Reference Textures
You can find the base textures of the reference models below.
- Buckingham Palace in London, UK
- Eiffel Tower in Paris, France
- Flatiron Building in NYC, US
- TCL Chinese Theater in Hollywood, California
- US Capitol in Washington, D.C., US
You can also import the reference model to your preferred texturing software to create custom textures.
Import Textures
Import your textures into Lens Studio. If you are only updating the base texture, click on the LandmarkerController Scene Object. In the Inspector panel, under Building Mode, select Custom Textures and add your custom base textures.
If you want to use a different material or have more control over the material setting, you can modify or replace the material on the reference model MeshVisual directly. Make sure you still select the Custom Textures option for the Building Mode in the Inspector panel to ensure LandmarkerController script is not overwritten that setting.
LandmarkerController
LandmarkerController is the main script that controls the Landmarker template. You can view its properties in the Inspector Panel by selecting the LandmarkerController[EDIT_ME] SceneObject.
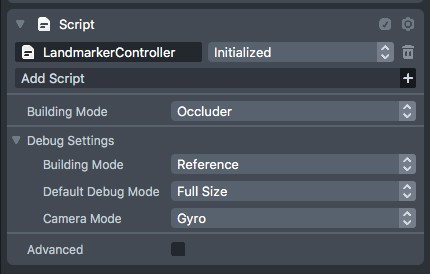
Building Mode
The Building Mode controls how the Landmarker model looks.
- Occluder: the reference model will not be visible and will occlude other visuals behind it.
- Semi-transparent: the reference model will be colored in semi-transparent red color.
- Custom Textures: the reference model will keep its current material and use the custom texture as its base texture.
- None: the reference model will be disabled.
Debug Mode
Debug Mode can be used to preview Landmarker Lenses without having to be at the physical location. You can unlock Debug Mode by scanning the default Lens Studio Image Marker. In the Preview panel, select the Image Marker Preview Video and you will enter Debug Mode automatically.
By default, the default the Debug Mode is set to use Gyro to view the Landmarker so that it would work well on the phone. If you are previewing on your computer, select the LandmarkerController [EDIT_ME] object, and set the Camera Mode to be Look at Distance Target so that you can change where your preview is looking by moving the Distance Target [MOVE_ME] object. See below for more information.
The Building Mode property found in the LandmarkerController Debug Settings controls how the reference model looks in Debug Mode. It does not change how it will look in the actual Lens.
There are two types of Debug Mode: Full Size and Birds Eye.
Full Size Mode
Full Size mode teleports you into a first-person Debug Scene that simulates physical distance and scale. You can use the navigation UI to move around the Landmarker.
You can set the starting position of the camera by moving the Default Debug Camera Position [Move Me]SceneObject.
There are two types of Camera Mode in Full Size Debug Mode. Gyro is useful when you want to test the Lens on your device. You can look around the scene and check out different angles.
The Look At Distance Target Camera Mode is useful if you are testing your Lenses using the Preview panel. This will make the Camera always look at the Distance Target. You can move the Distance Target in the 3D Scene panel to set up the desired camera angle. For example, in the Eiffel Tower template, it can be handy to move the Distance Target higher up to check out the top of the tower.
Birds Eye Mode
Birds Eye mode places the entire 3D scene on the Image Marker. This creates the effect of having a miniature scene you can physical manipulate. You can toggle between Full Size Mode and Birds Eye mode using the toggle button.
HintController
The HintController script controls all the different hints that guide users when playing with Landmarker Lenses. You can view its properties by selecting the HintController Scene Object in the Inspector Panel.
Loading
When the Lenses start, a loading hint is displayed. You can change the Landmarker graphic to your own 2D image by first importing it to Lens Studio and selecting it in the Inspector Panel.
Go To Hint
The Go To Hint is displayed if the user is too far away from the Landmarker. You can change the hint texture as well as the text hint in the Inspector Panel.
Point At Hint
The Point At Hint is displayed when the user is close enough to see the Landmarker, but is not looking at it. This hint texture and text can also be edited in the Inspector.
Selfie Mode
The Landmarker Template provides a Selfie Mode that allows users to take a selfies with Landmarker Lenses on the front camera. The entire scene is mirrored on the front camera to ensure the Lens's contents are correctly aligned with the actual Landmarker architecture.
The script FrontCameraMirror negates the X scale on front camera. A consequence of negative scale is that geometry is turned inside out. A single-sided material (default) will disappear when turned inside out. To counter this, the script also swaps the Cull Mode (e.g. Front to Back) of any Material in its hierarchy.
Outside of this hierarchy, a flipped Cull Mode could cause a visual to disappear. Since many mesh visuals can share the same material, take care not to use materials both in this hierarchy, where Cull Mode can be flipped.
Submitting Your Lens
You’re now ready to submit your Landmarker Lens! Follow the below guides:
- Pairing to Snapchat
- Creating an Icon
- Configuring Project Info
- Submitting Your Lens
- Sharing Your Lens
Related Guides
Please refer to the guides below for additional information: