Sync Framework
The current version of the Sync Framework for Spectacles is incompatible with mobile devices (iOS, Android). Please refer to the Spectacles Connected Lenses Documentation for more information when developing for Spectacles.
Snapchat offers Lens Developers a way to create AR experiences that friends can experience together at the same time and can return to over time called Connected Lenses. In order to help streamline and assist you in building Connected Lenses, we have introduced a new custom component called Sync Framework.
Sync Framework is a set of scripts and components designed to help you make Connected Lenses for building shared online multiplayer experiences, both synchronous and asynchronously. While building Connected experiences, it should be easy to synchronize any entity in a Connected Lens (like a SceneObject or Component) across the network.
With Sync Framework, you can now easily sync content across multiple users. So if you want to move a SceneObject around and have other users see that change, all you need is to attach a script to that SceneObject. If you want to instantiate a new object from a prefab and have it show up for all users, you can easily do that through a special Instantiator script.
Template Walkthrough
Open the Sync Framework template from the Lens Studio home page.
Testing In Lens Studio
In the preview panel, left-click the Launch Sync Framework button. This will connect Lens Studio to the server so it can operate the same way the lens would on your mobile device.
Connecting Mobile Devices to Studio
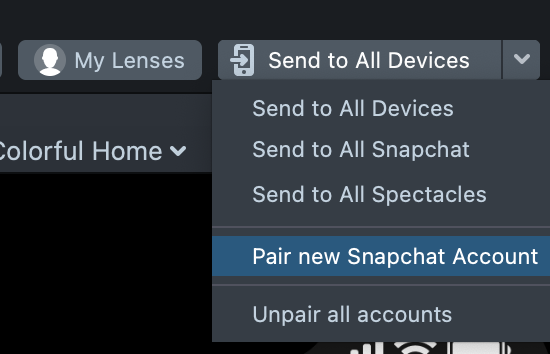
Before getting started, you will need to make sure your mobile device is paired with Lens Studio. If you are using Spectacles, verify that they are paired with your mobile device. Left-click the Send to All Devices button to send the Lens to all your paired devices.
Your device will be paired to the same session that Lens Studio is paired to. If you have clicked the Launch Sync Framework button in Lens Studio, the Lens will connect to the same session as Lens Studio and you can test the multiplayer interactions between them.
If you want to test using multiple devices, left-click the dropdown menu located next to the Send to All Devices button and select Pair new Snapchat Account. This will pair an additional account to your Lens Studio so that every time you push, it will show up on all devices, and will all be connected to the same multiplayer session.
Sync Framework Template Examples
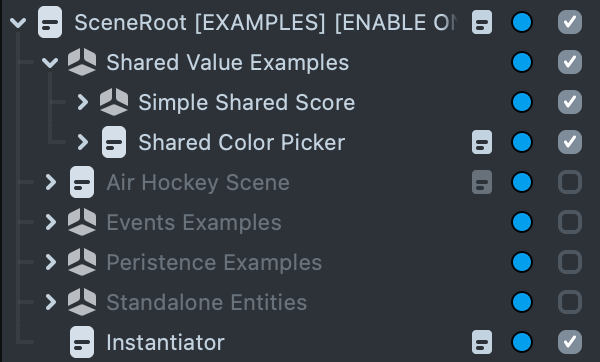
Included with Sync Framework are some examples to showcase different use cases and scenarios that take advantage of this framework. You can view them located under SceneRoot [EXAMPLES], and can enable them one-by-one to test them out.
Shared Value Examples
The following examples showcase how you can utilize Sync Framework to handle how to share values in a Lens across multiple users.
Simple Shared Score
This example showcases a simple numerical score shared between all users. If you tap the + and - buttons, the score will either increase or decrease respectively.
Shared Color Picker
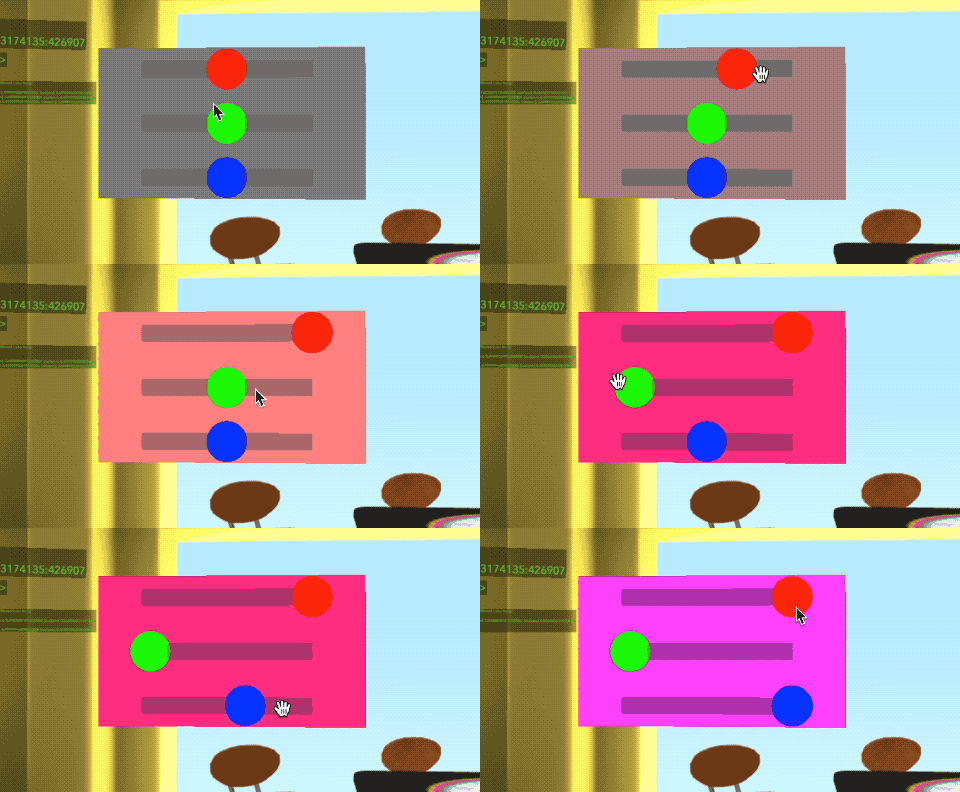
This example showcases Red, Green, and Blue sliders that can be touched and dragged to change a background color. The slider values are shared between all users.
Air Hockey Scene
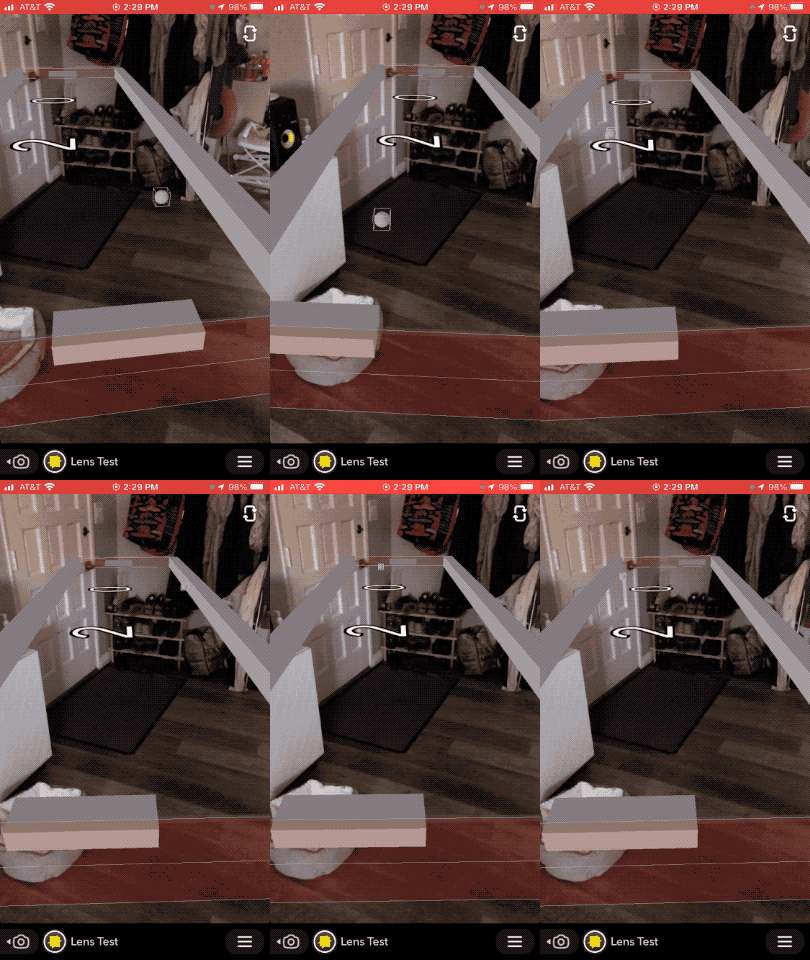
This example showcases an example of an AR Air Hockey game between two users. This example utilizes:
- Automatic host management
- Player roles
- Extrapolated positioning using dead reckoning
- Shared game state
Events Examples
Play Tween On Event
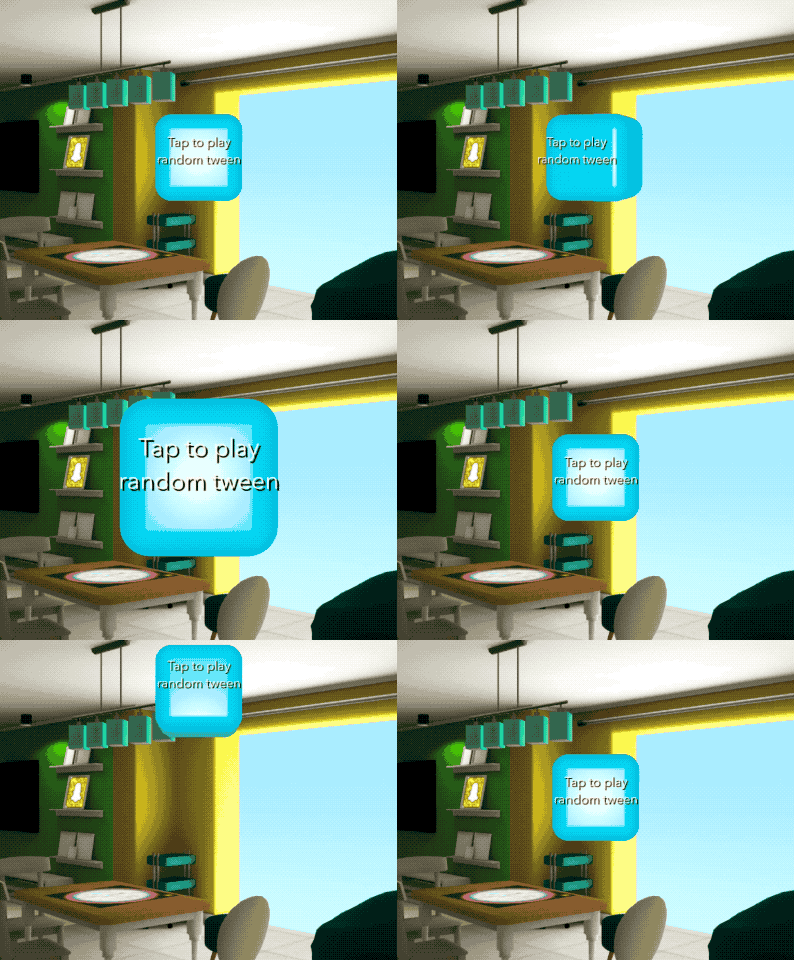
This example shows how you can send a network event to all users, and how it reacts to the event by playing a tween.
Complex Message Event

This example shows how to send a JavaScript object as part of event data. Users can type in a message, which gets sent to all other users, including the position of the message. Each message is ephemeral and only exists for a short period of time before disappearing.
Modification Events
This example shows how you can modify a value using an owner to manage the value, and clients sending events to request value changes. This is very similar to the Simple Shared Score example, but it’s much more robust since it can handle many players modifying the value at the same time without overwriting each other's changes.
Persistence Examples
Persistence examples showcase how Sync Framework can work together with Spatial Persistence to create persistent experiences across multiple users.
Simple Scene Entity Persistence
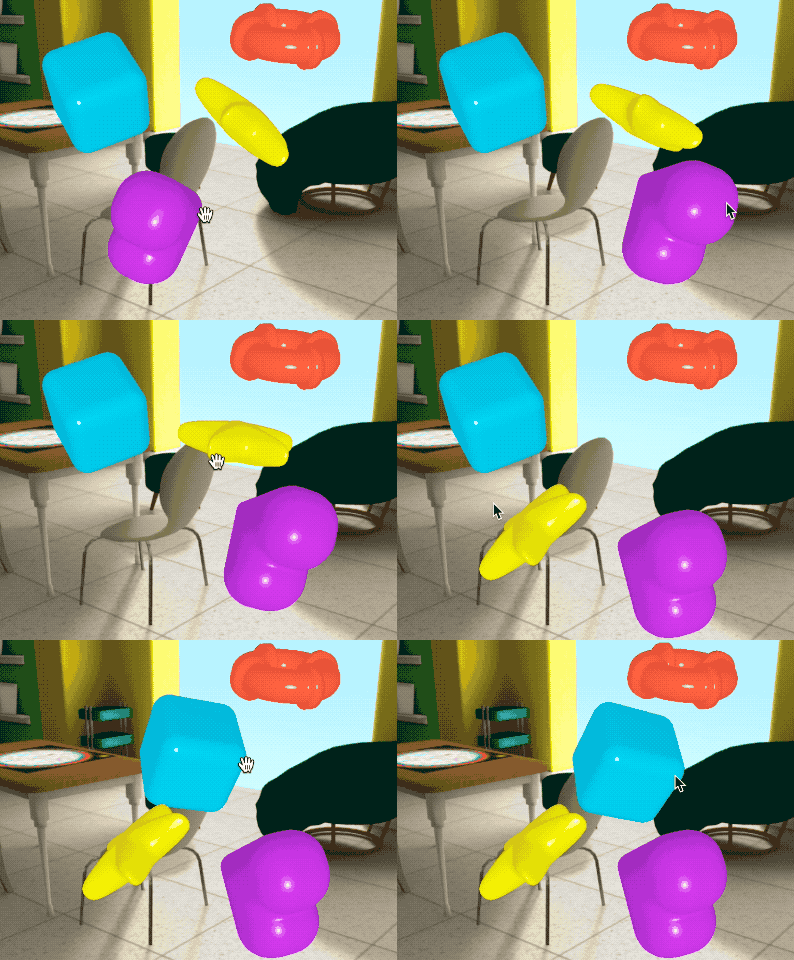
This example Shows how Persistence can work with simple SyncTransform scripts. The positional state of each object is persistent, so any changes made while the session is running will persist until the next time the session is opened. You can drag the objects with touch, or by clicking in Lens Studio, to move them around.
Instantiated Entity Persistence
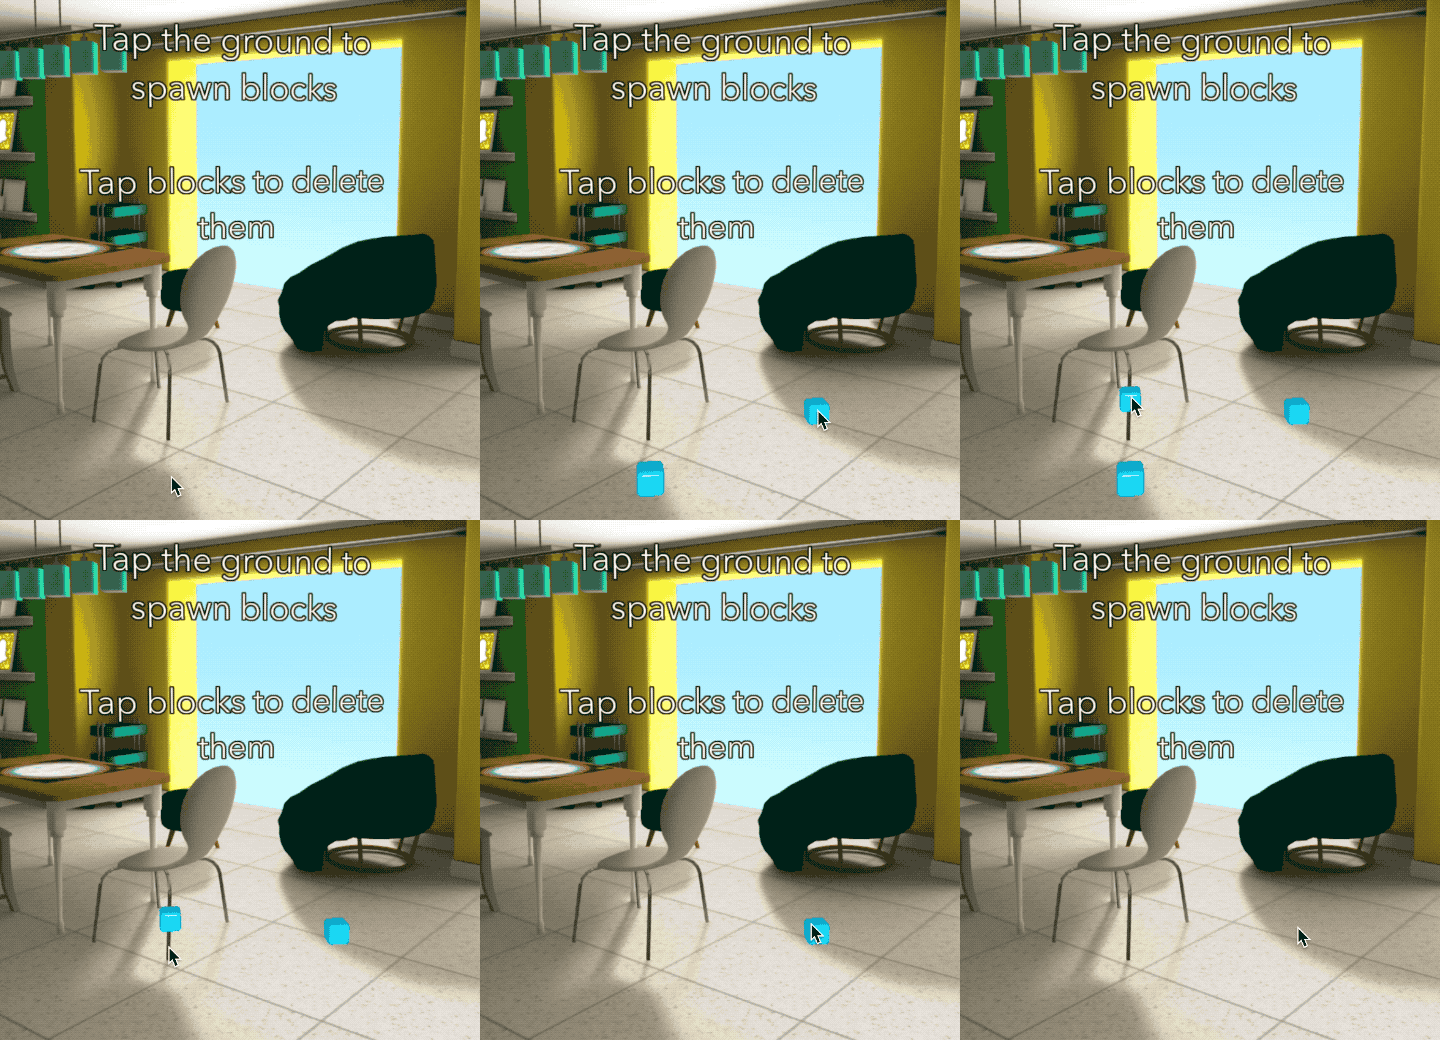
This example shows how a user can tap on the ground to spawn a block, or tap on a block to destroy it. All blocks will persist, so leaving the session and reopening will show the same state of blocks as when you left it.
Scoreboard
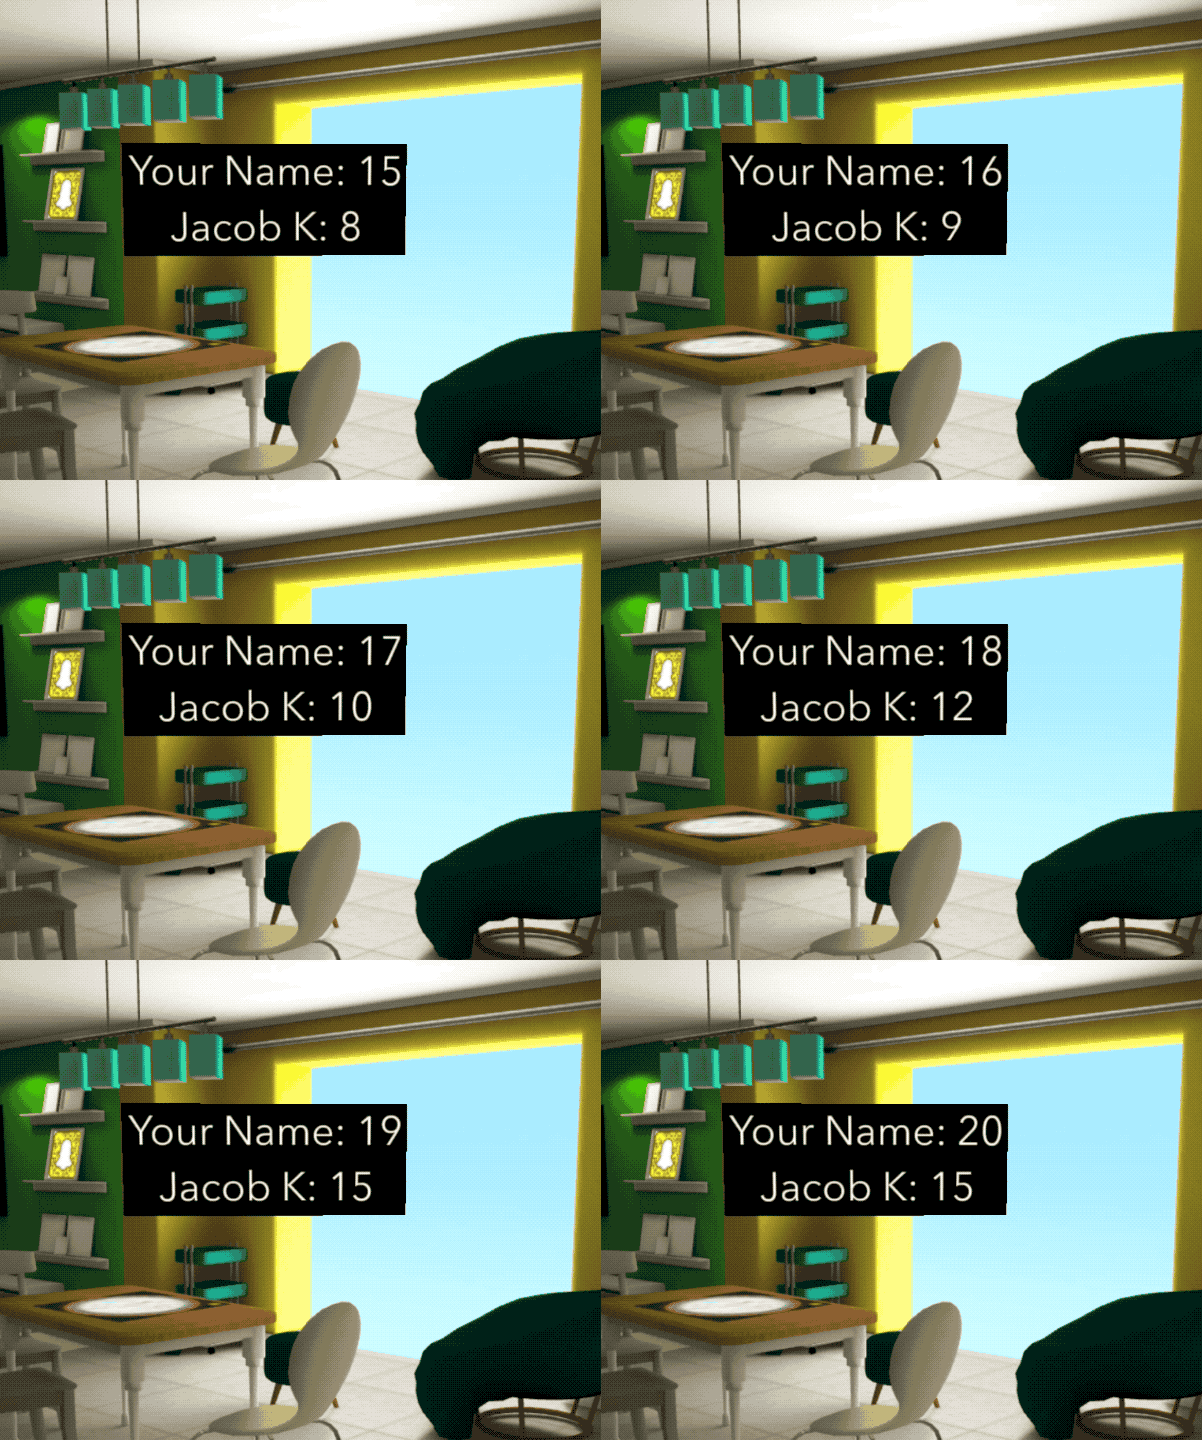
This example of a simple scoreboard implementation is using StoragePropLookup. Tap on the screen to increase your score. Each player who joins the session will have their score shown on the board. The scores are persistent meaning that you can leave and come back later without losing your score.
Persistent Player Owned
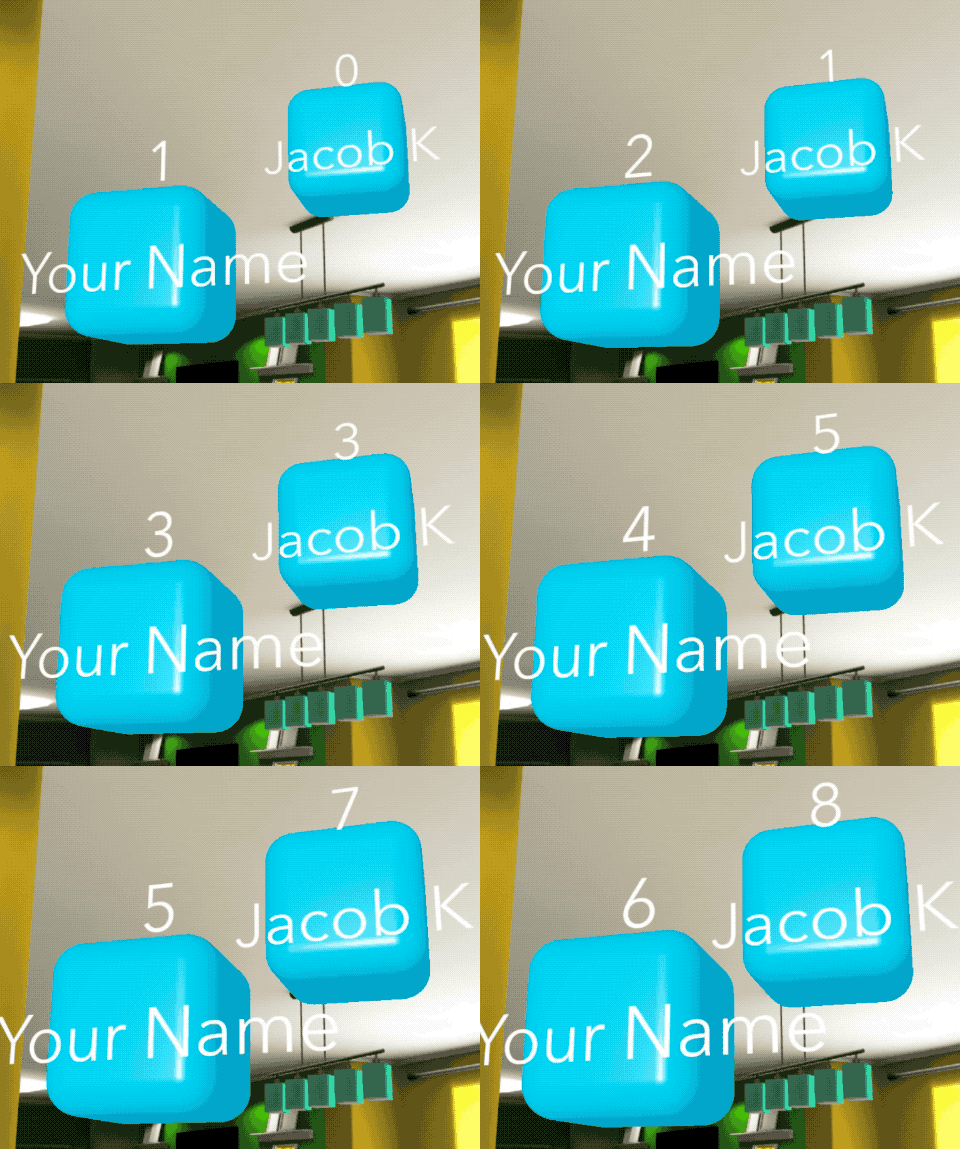
Each player owns their own persistent object that is instantiated into the world. Tapping will increase the score and size of your object. This is similar in concept to the scoreboard, but presented in a much different way. This shows how to specify the id of an object before instantiating it, so that if the object already exists it can be linked to instead of creating a new one.
Import Sync Frames into an Existing Project
If you want to import Sync Framework into an existing project, you can install it from the Asset Library.
- Left-click on the Asset Library button, located above the
Scene Hierarchypanel. - In the Asset Library Search Bar, type in "Sync Framework". Sync Framework should be visible in the Asset Library window. Click on Install.
This adds all the core scripts and objects needed for Sync Framework to function in your Lens.
It’s recommended to put it higher up in the Scene Hierarchy panel hierarchy than any object that will use Sync Framework, so that the scripts have a chance to initialize.
Building with Sync Framework
There are two ways to use Sync Framework:
Most projects will utilize a mix of both.
Drag and Drop
Drag and Drop includes some scripts, like SyncTransform, to automatically synchronize objects across the network.
You can make your own helper scripts as well. Please visit the Scripting section to learn more.
Synced Entities
These scripts turn their ScriptComponent into a Synced Entity, which means they are automatically synchronized across the network.
These will be converted into Custom Components in future releases.
SyncTransform
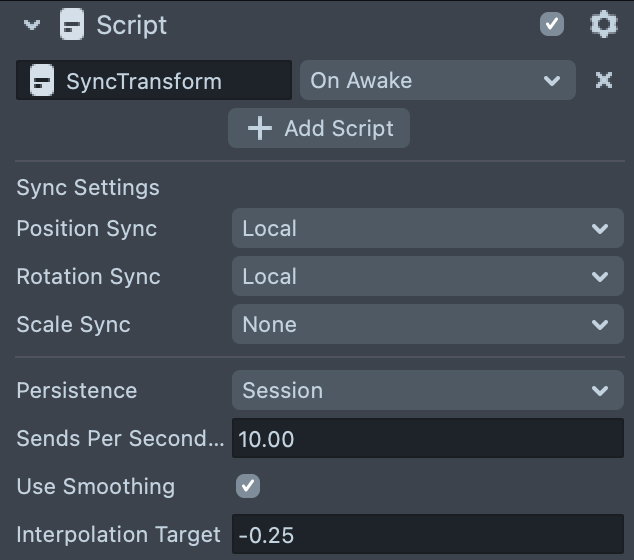
You can add SyncTransform to any SceneObject to automatically synchronize its position, rotation, and/or scale, depending on the settings.
You can set Persistence to Persist if you want the changes to be saved across sessions.If you were to move the object, leave the Lens, then rejoin the session later, the object will be restored to the same state you left it. This is also great for asynchronous experiences, where other users can join later and see any changes you’ve made, even if you’re not there.
You can set Sends Per Second to a value greater than 0 if you want to limit how many times per second the object’s state will be sent out to the network. This is useful for objects that change state almost every frame, like a player avatar. If there are too many updates sent out in a short amount of time, you can hit rate limiting and the server will disconnect us from the session.
A good default value for SyncTransform is 10 sends per second.
You can enable Use Smoothing if you want transform smoothing enabled.
Currently, smoothing only works on SyncEntities that are owned by another user. Smoothing is applied only on the receiver side based on updates we receive from the owner. This is recommended especially when the Sends Per Second limit is enabled.
The Interpolation Target controls the time offset that we are targeting for smoothing. For example, a value of -0.25 means that the Lens is trying to display the object as it was 0.25 seconds in the past. The further back in time the target is set to, the more likely you are to have values to smooth with.
SyncMaterials
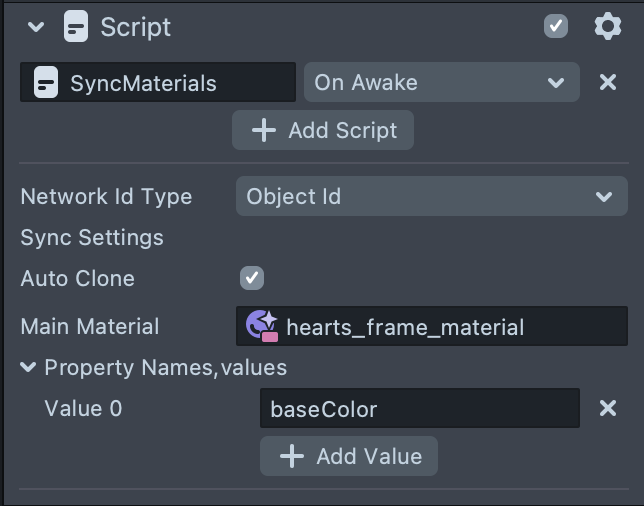
You can add SyncMaterials to a SceneObject and assign the material you want synchronized in Main Material. You can add each property name you want synchronized to the Property Names list. Any changes to these properties will be automatically synchronized across the network.
Supported property types are currently:
- float
- vec2
- vec3
- vec4
If Auto Clone is enabled, the Main Material will immediately be cloned. Next, this SceneObject and all of its children will be recursively searched to find any MaterialMeshVisuals that are using the assigned Main Material. Each of these will have their main material set to our new cloned material. This is useful when you want to instantiate a new object and assign it its own materials, so they won’t be shared with other instances of the prefab.
SyncRealtimeStore
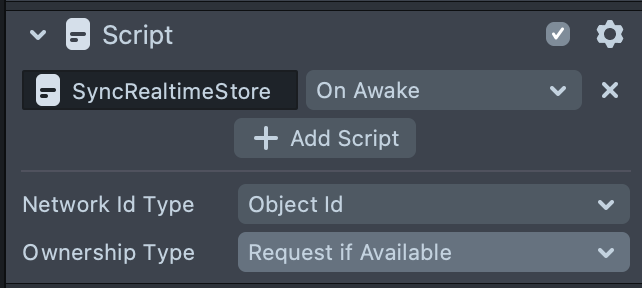
The SyncRealtimeStore is meant to be a very simple interface for a synced entity and its RealtimeStore. It doesn’t do any behaviors on its own, so it can be used just for storing and retrieving synced values.
Helper Scripts
Sync Framework’s included helper scripts are not synced entities, meaning they only work locally like you would expect from any normal script. They are designed to work with synced entities and help with common Sync Framework needs.
DisplayStorageProperty
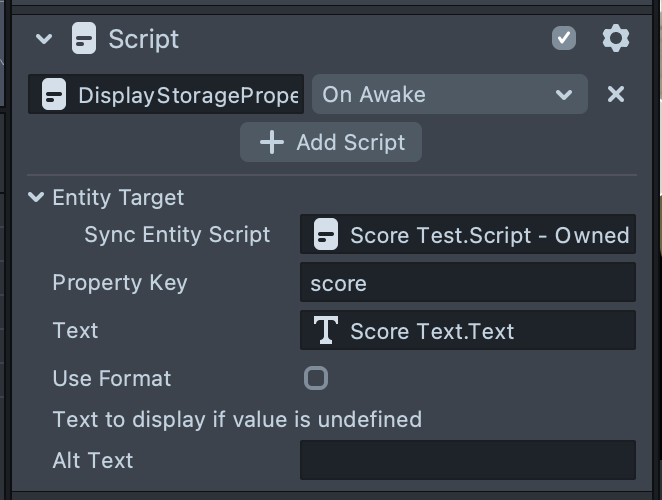
The DisplayStorageProperty displays a Storage Property value found on the specified Entity Target. The Property Key should match the one being used by the storage property.
Text is the Text component that will display the value text.
If Use Format is enabled, a formatting string can be specified instead of displaying the value directly.
An example would be Score: {value}
Alt Text will be displayed if the value is undefined, such as before the session has connected or the storage property hasn’t been defined yet.
SetEnabledIfOwner
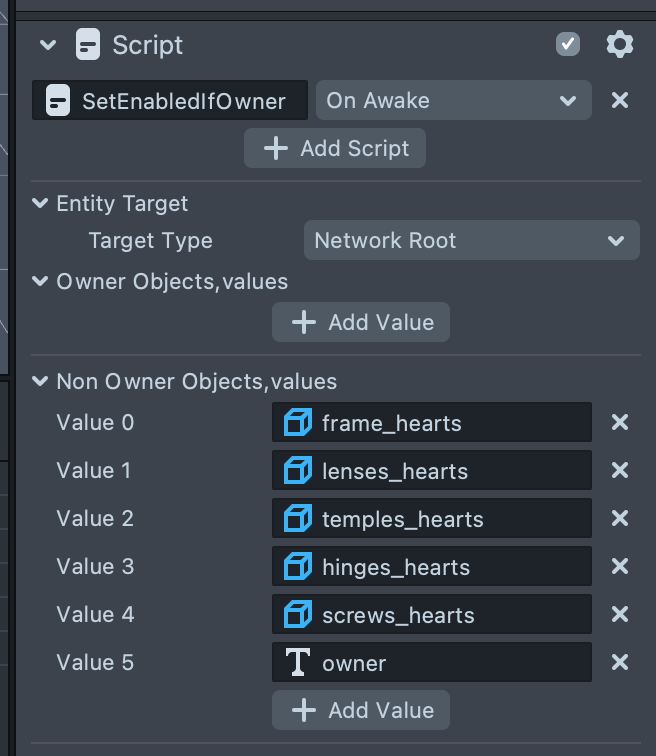
Entity Target can either be a Network Root, for use inside of prefabs, or a Sync Entity. If Network Root is selected, this script will automatically find its network root upon instantiation.
Whenever the target Entity becomes owned by the current user (or starts that way), each object in Owner Objects will be enabled, and each object in Non Owner Objects will be disabled.
Whenever the target Entity becomes not owned by the current user (or starts that way), each object in Owner Objects will be disabled, and each object in Non Owner Objects will be enabled.
SetEnabledOnReady
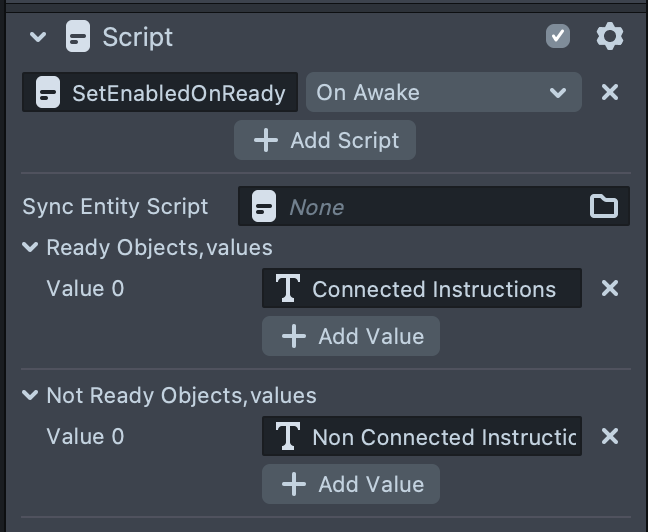
If Sync Entity Script is set to empty, the target will instead be the SessionController, in which case Ready means that the session has been connected and all synced entities can safely start their behavior.
At start, all objects in Ready Objects will be set to disabled, and all objects in Non Ready Objects will be enabled.
When the target becomes ready, all objects in Ready Objects will be enabled, and all objects in Not Ready Objects will be set to disabled.
Instantiator
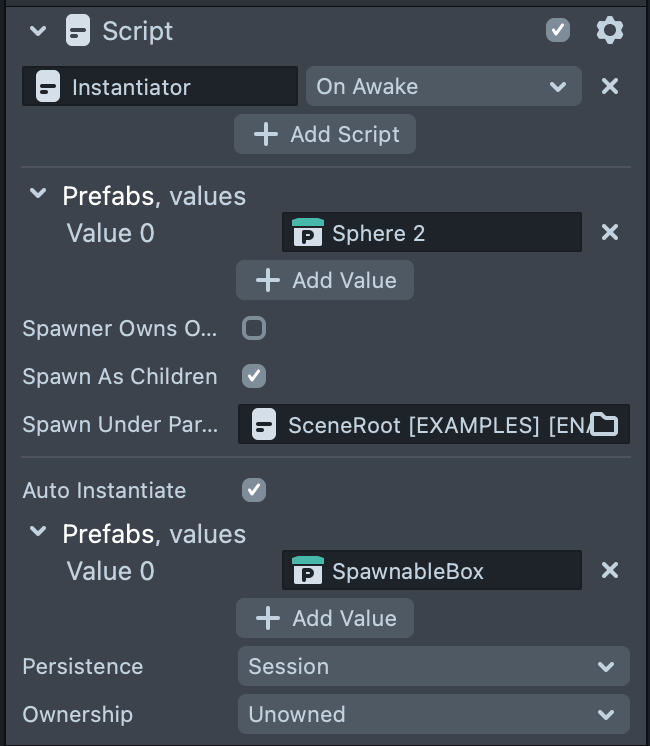
Instantiator helps instantiate objects across the network. Prefabs must be added to the Prefabs list or Auto Instantiate Prefabs list for them to be eligible for instantiation.
See the section on Prefab Instantiation below.
Add any prefabs to the Prefabs list that you would like to instantiate through script.
Enable Spawner Owns Object if you want all objects spawned through API to be owned by the caller by default.
If Spawn As Children is enabled, all objects spawned will be placed under the Spawn Under Parent object, or this SceneObject if that is left blank.
If Auto Instantiate is enabled, all prefabs listed in the following Prefabs list will automatically be instantiated when the Instantiator’s setup is completed. They will be instantiated using the following Persistence and Ownership settings.
Any prefabs in this list can also be instantiated through API calls, without needing to be added to the primary Prefabs list.
SyncEntityDebug
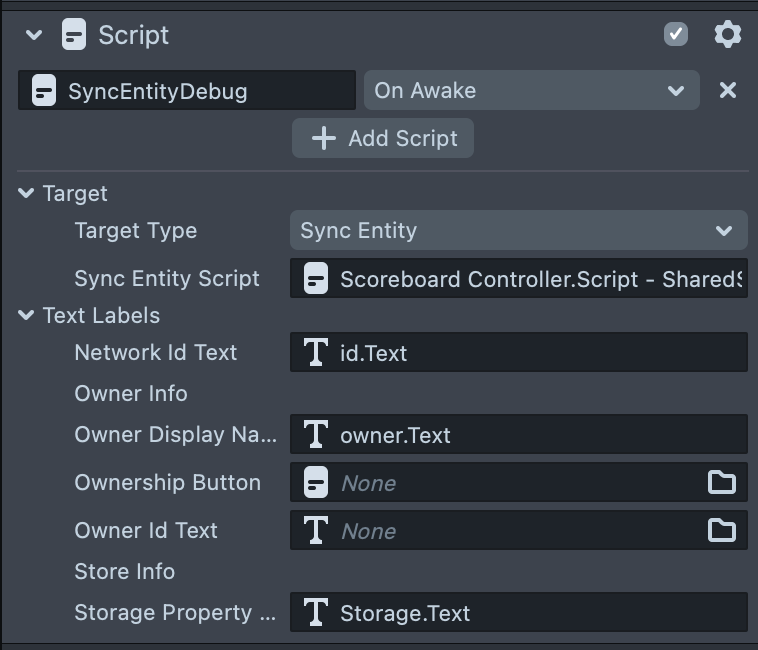
Displays debugging information about the target entity. See the Debugging section below.
Scripting
Scripting offers a more robust solution than Drag and Drop. If you are already familiar with scripting within Lens Studio, programming for Sync Framework won’t be too different.
Some parts of network programming require you to think and design your systems in very different ways from local programming. Sync Framework tries to make the transition as smooth as possible, but you should still expect some bumps in the road if this is your first time learning about networking concepts.
SyncEntity
The main point of entry for scripting is the SyncEntity class. You can easily turn any script into a synced entity by creating a new SyncEntity like this:
var syncEntity = new SyncEntity(script);
Each SyncEntity is built around a RealtimeStore, which is used to store and synchronize the entity state. It’s possible to access the store directly through the currentStore property, but it should be perfectly fine to ignore it.
Note: The currentStore is not available until the SyncEntity has completed setup with Notify On Ready.
Notify On Ready
Before a SyncEntity is fully available for use, it needs to finish its setup process. This includes:
- Waiting for the multiplayer session to connect.
- Connecting to its existing RealtimeStore, or creating a new one if none is found.
As a Lens Developer, you don’t need to worry about that process. You just need to wait until setup is finished before taking certain actions with the SyncEntity.
A quick way to see is using SyncEntity.notifyOnReady()
syncEntity.notifyOnReady(function () {
  print('The session has started and this entity is ready!');

  // Start your entity's behavior here!
});
This will run your setup function as soon as the SyncEntity has finished setup and is ready to go. If setup is already finished, the callback function will execute immediately.
You can also check if setup has completed by checking SyncEntity.isSetupFinished
if (syncEntity.isSetupFinished) {
  // Setup is finished
}
Many actions are completely fine to do before setup is finished, such as subscribing to events, adding storage properties, or subscribing to storage property changes. You can even preemptively request ownership before setup is finished. It’s generally good practice to wait until setup has completed before starting any entity behavior like sending out events, or allowing the player to modify StorageProperties.
Ownership
Each SyncEntity can either have an owner or be unowned. If an entity is owned, only the owner is allowed to modify its values. If an entity is unowned, any user can modify the values. Ownership follows the same rules as Realtime Store.
You can request ownership while constructing SyncEntity.
var syncEntity = new SyncEntity(script, null, true); // third argument is `requestOwnership`
If someone else already owns this entity, the ownership request will be added to a queue and tried again whenever the entity becomes unowned.
Request ownership for the local user at any time using SyncEntity.tryClaimOwnership(). This will immediately callback with success if the local user already owns it. Also note that this places the request in a queue, and the SyncEntity will continue to try gaining ownership whenever the entity becomes unowned. If the SyncEntity has not yet finished setup when this function is called, the ownership request will be put into the queue so that ownership can be requested as soon as possible.
syncEntity.tryClaimOwnership(function () {
  // We got ownership!
});
You can revoke ownership using SyncEntity.tryRevokeOwnership(). This will immediately callback with success if the local user doesn’t own the store.
syncEntity.tryRevokeOwnership(function () {
  // Ownership revoked!
});
Check if the SyncEntity is owned using SyncEntity.isStoreOwned()
if (syncEntity.isStoreOwned()) {
}
Check if the local user owns the SyncEntity using SyncEntity.doIOwnStore()
if (syncEntity.doIOwnStore()) {
}
Check if we are allowed to modify the store using SyncEntity.canIModiftyStore(), meaning it’s either unowned, or owned by the local user.
if (syncEntity.canIModifyStore()) {
}
To get the current owner’s UserInfo, use SyncEntity.currentOwner. You should keep in mind that this can be null, or be a UserInfo object with null fields, if the entity is unowned.
if (syncEntity.isStoreOwned()) {
  var currentOwner = syncEntity.ownerInfo;

  print(currentOwner.connectionId);

  print(currentOwner.displayName);
}
Use the SyncEntity.onOwnerUpdated event to be notified when ownership changes.
syncEntity.onOwnerUpdated.add(function () {
  print('do I own the store now? ' + syncEntity.doIOwnStore());
});
Persistence
Each SyncEntity has a persistence setting that is specified during construction. The argument can either be a RealtimeStoreCreateOptions.Persistence value, or just a string matching any of those value names.
var syncEntity = new SyncEntity(script, null, false, 'Persist'); // fourth arg is persistence
- Session: Default behavior, will be used if not specified. The SyncEntity’s state will be persisted as long as at least one user is in the session. If no users are in the session, the entity’s state will be reset the next time the session is joined by a user.
- Persist: The SyncEntity’s state will be persisted even after all users leave the session.
- Owner: This is meant to be used with SyncEntities that have an owner. If the owner leaves the session, the SyncEntity will automatically be destroyed.
- Ephemeral: This one is not suggested for use with SyncEntity.
Storage Properties
Storage Properties allow a value to be easily synchronized on your SyncEntity. For example, sharing a player’s current score, or display name, or the position of the object.
Adding Storage Properties to SyncEntity
StorageProperties will need to be added to a SyncEntity before they have any effect. You can add a storage property to SyncEntity at any time, but it’s recommended to do it as early as possible.
var syncEntity = new SyncEntity(script);

syncEntity.addStorageProperty(StorageProperty.manualInt("score", 0));

You can even add them during construction if you use a StoragePropertySet:

var syncEntity = new SyncEntity(script, new StoragePropertySet([

   StorageProperty.manualString("myString", "hello"),

   StorageProperty.forPosition(script.getTransform(), true)

]));
Automatic Storage Properties
Automatic storage properties are given getter and setter functions that automatically read and write to an external target. This is meant to be added and forgotten about so that you do not need to make any changes.
Example: A StorageProperty for localPosition automatically reads from a Transform’s getLocalPosition() to check the current local value, and writes to the Transform’s setLocalPosition() when receiving a network value. You can add the StorageProperty to their SyncEntity, and the local position is automatically kept synchronized.
Use built-in helpers to make automatic StorageProperties
var localPosProp = StorageProperty.forPosition(script.getTransform(), true);

var colorProp = StorageProperty.forMeshVisualBaseColor(visual);

var matProp = StorageProperty.forMaterialProperty(
  material,
  'propName',
  StorageTypes.float
);

var textProp = StorageProperty.forTextText(textComponent);
Create automatic StorageProperty using getter/setter functions
var localPosProp = StorageProperty.auto(
  'localPos', // property name

  StorageTypes.vec3, // value type

  function () {
    return script.getTransform().getLocalPosition();
  }, // getter

  function (val) {
    script.getTransform().setLocalPosition(val);
  } // setter
);
Create automatic StorageProperty using target object and function names
var localPosProp = StorageProperty.wrapGetterSetter(
  'localPos', // property name

  script.getTransform(), // target object

  'getLocalPosition', // getter function name

  'setLocalPosition', // setter function name

  StorageTypes.vec3 // storage type
);
Create automatic StorageProperty using target object and property name
var prop = StorageProperty.wrapProperty(
  'objectName', // property name

  script.getSceneObject(), // target object

  'name', // property name

  StorageTypes.string // storage type
);
Manual Storage Properties
These properties are handled by the developer and meant to be accessed through script. You will be responsible for changing the value and reacting to changes.
Example: A StorageProperty for a player’s score. You can get or set the current value however and whenever you want, and subscribe to callbacks about when the value has changed.
// Create integer storage property

var scoreProp = StorageProperty.manualInt('score', 0);

// Create string storage property

var nameProp = StorageProperty.manualString('name', 'hello');

// Create a matrix storage property using StorageTypes.mat4 to specify type

var matrixProp = StorageProperty.manual(
  'matrix',
  StorageTypes.mat4,
  mat4.identity()
);
Setting Storage Property Values
For manual StorageProperties, you will have to update them yourself manually. You can do this by calling setPendingValue() on the StorageProperty.
var scoreProp = StorageProperty.manualInt('score', 0);

scoreProp.setPendingValue(3);

var textProp = StorageProperty.manualString('myText', '');

textProp.setPendingValue('new text!');
This will set the pending value of the SyncEntity. At the end of every frame, if there is a new pending value and we are allowed to update it, the value will be sent to the network and become the new current value. This is an important distinction discussed in the next section.
In some rare situations, you might want to immediately set the current value of the property without waiting until end of frame, or going through the pending loop. You can do this by calling setValueImmediate() and passing in the SyncEntity’s currentStore and the new value.
scoreProp.setValueImmediate(syncEntity.currentStore, -1);
Only use this if you are confident that you have permission to change the store, for example after checking SyncEntity.canIModifyStore().
Getting Storage Property Values
StorageProperty.currentValue: The current value that we believe to be synced across the network. In most cases, this is what you want to read from.StorageProperty.pendingValue: The local value that can potentially be sent to the network. It may be the same as currentValue, but it may not be as well. This can be useful if you want your own local value distinct from the network value, in cases like simulating state on an unowned object while you wait for an update from the owner. It’s also useful if you want to access the locally changed value of a Storage Property in the time before it’s sent to the server during LateUpdate, at which point the currentValue is set to this.
pendingValue is only sent to the network if we are allowed to modify the SyncEntity.
StorageProperty.currentOrPendingValue: Either the current or pending value, whichever was set most recently. This is useful if you just want to use whichever value was updated last and do not need to care about where it came from.
In most cases, you probably want to use currentValue, since it’s safe to assume it’s the correct, synced value across the network. If you are doing something more intricate with local values that frequently change, you should use currentOrPendingValue.
Reacting to StorageProperty Changes
Use the onAnyChange event to be notified whenever the currentValue is changed by either a remote user or the local user.
scoreProp.onAnyChange.add(function (newValue, oldValue) {
  print('current value changed from ' + oldValue + ' to ' + newValue);
});
In most cases this is the only event you will need to subscribe to.
Use the onRemoteChange event to be notified whenever the currentValue is changed by a remote user.
scoreProp.onRemoteChange.add(function (newValue, oldValue) {
  print(
    'a remote user changed current value from ' + oldValue + ' to ' + newValue
  );
});
Use the onLocalChange event to be notified whenever the currentValue is changed by the local user. If send rate limits are enabled for the property, this won’t change until the value is sent out.
scoreProp.onLocalChange.add(function (newValue, oldValue) {
  print(
    'the local user changed current value from ' + oldValue + ' to ' + newValue
  );
});
Use the onPendingValueChange event to be notified whenever the pendingValue is changed. This is useful in cases where send rate limits are enabled on the property, and you would like to react to local changes before they are sent out to the network.
scoreProp.onPendingValueChange.add(function (newValue, oldValue) {
  print('pending value changed from ' + oldValue + ' to ' + newValue);
});
Limiting Send Rate
Set the sendsPerSecondLimit on a StorageProperty to a value greater than zero to limit how many times per second the property will send updates to the network about its value changing. This is useful to avoid rate limiting when a value updates very frequently, such as if a position of an object is changing every frame. When using this feature, currentValue will only be updated when the value is actually sent to the network. To get the most recent local version of a value, you can always check currentOrPendingValue.
// Limit this property to only send updates out 10 times per second

scoreProp.sendsPerSecondLimit = 10;
Smoothing Property Values
For properties that change very frequently, especially when the send rate is limited, it can be useful to smooth out the values we receive. Otherwise, the result will appear choppy and stilted since we only update the value as we receive it. To remedy this, you can enable smoothing on the property.
Currently, smoothing only works on SyncEntities that are owned by another user. Smoothing is applied only on the receiver side based on updates received from the owner.
Call setSmoothing() on a StorageProperty to configure smoothing for the property.
// Set this property to smooth using a target of 0.25 seconds in the past

scoreProp.setSmoothing({ interpolationTarget: -0.25 });
You can either pass in a SnapshotBufferOptions object, or a JS object with matching properties.
Here is the list of properties available. Remember that these are all optional, and even passing in an empty object like {} is enough to enable smoothing.
var options = new SnapshotBufferOptions();

options.interpolationTarget; // Time delta in local seconds to target (default = -0.25)

options.storageType; //Override the StorageType, if blank the StorageProperty's StorageType will be used

options.lerpFunc; // Override the function used for interpolating values, if blank one will be chosen based on StorageType

options.size; // Max number of snapshots stored (default = 20)
You can pass in SnapshotBufferOptions as an optional third parameter when constructing a StorageProperty:
var prop = new StorageProperty('prop', StorageTypes.float, {
  interpolationTarget: -0.25,
});
Or in any of the StorageProperty creation helpers:
var prop = StorageProperty.forPosition(transform, true, {
  interpolationTarget: -0.25,
});

var otherProp = StorageProperty.manualFloat('myFloat', 0, {
  interpolationTarget: -0.25,
});
Networked Events (RPC)
Sometimes you may need to send a one-time event or message instead of changing the state of a SyncEntity, such as if you are playing a sound effect, particle effect, or sending a message in chat. These are all things that you want other users to experience immediately on their side, but don’t need to be stored through StorageProperties.
You can think of this, in really simple terms, as calling a function on all versions of this SyncEntity.
This is also commonly referred to as RPC (Remote Procedure Call).
Simple Sending and Receiving
Use sendEvent() to send an event with the given name. All copies of this SyncEntity across all devices will receive this event.
syncEntity.sendEvent('sayHi');
Use onEventReceived to be notified when a Network event with the matching name is received.
syncEntity.onEventReceived.add('sayHi', function () {
  print('hi!');
});
Message Info
If you need more information about the event, like who sent it, or what extra data is included, the onEventReceived callback supplies a MessageInfo object that provides info about the event message.
syncEntity.onEventReceived.add('myEventName', function (networkMessage) {
  print('event sender: ' + networkMessage.senderUserId);

  print('event name: ' + networkMessage.message);

  print('event data: ' + networkMessage.data);
});
Including Event Data
It’s often useful to include data along with an event, just like you’d pass information into a function using parameters.
sendEvent() has an optional second parameter for event data that gets included in the MessageInfo object.
You can see an example of how to send a string as the message data.
syncEntity.sendEvent('printMessage', 'this is my event data!');

syncEntity.onEventReceived.add('printMessage', function (networkMessage) {
  print(networkMessage.data);
});
You can even use a simple object as your event data, as long as it’s JSON serializable. A special serializer is used to add compatibility for vec2, vec3, vec4, and quat.
var soundData = {
  clipName: 'bounce',

  volume: 0.5,

  loops: 1,

  position: new vec3(1, 2, 3),
};

syncEntity.sendEvent('playSound', soundData);

syncEntity.onEventReceived.add('playSound', function (messageInfo) {
  var soundData = messageInfo.data;

  print('clipName: ' + soundData.clipName);

  print('volume: ' + soundData.volume);

  print('loops: ' + soundData.loops);

  print('position: ' + soundData.position);
});
Using EntityEventWrapper
For more complicated scripts, it may be useful to use an EntityEventWrapper, an easy interface for both sending and receiving a specific event. Use syncEntity.getEntityEventWrapper() to create a wrapper for the passed in event name.
In the example below, we are using a JSDoc Annotation to tell our code editor that the event wrapper uses string as the message data type. While this is optional, it can be a very useful pattern for code hinting.
/** @type {EntityEventWrapper<string>} */

var printEvent = syncEntity.getEntityEventWrapper('printMessage');

printEvent.onEventReceived.add(function (message) {
  print(message.data);
});

printEvent.send('test data');
Prefab Instantiation
If you need to create new objects at run-time, use the Instantiator script. Any objects instantiated through this script will automatically be instantiated across the network.
Setup
Add the Instantiator script to a SceneObject and populate the Prefabs list with any prefabs you may want to instantiate.
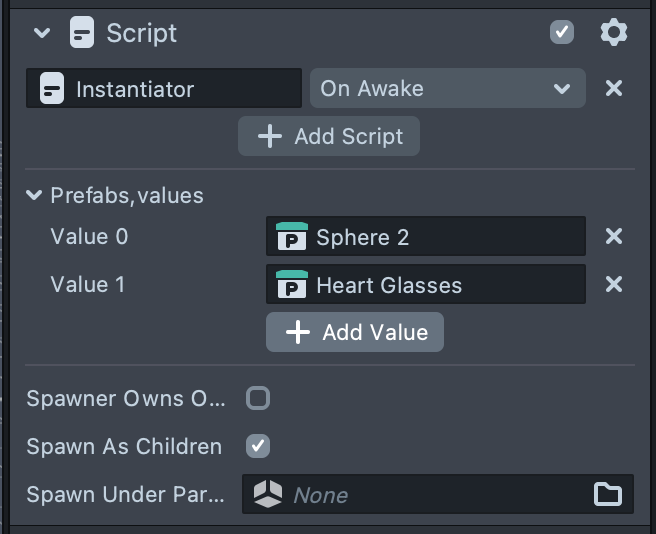
Now, you can call on the Instantiator from another script.
First you will need a reference to it:
//@input Component.ScriptComponent instantiator

/** @type {Instantiator} */

var instantiator = script.instantiator;
In the inspector for your script component, verify that the instantiator field is set to your Instantiator script.
Now you can add an ObjectPrefab input so you have a prefab to instantiate.
//@input Asset.ObjectPrefab prefab

/** @type {ObjectPrefab} */

var prefab = script.prefab;
Make sure the prefab field is assigned to a prefab.
Simple Instantiation
Now that you have a reference, we can use the Instantiator.instantiate() function to instantiate objects.
if (instantiator.isReady()) {
  instantiator.instantiate(prefab);
}
You should check Instantiator.isReady() before instantiating to make sure that it’s finished setting up. It’s similar to SyncEntity in that some functionality isn’t available until the session has been created and a few other things are taken care of.
You can also use Instantiator.notifyOnReady() to be notified when setup is finished, similar to SyncEntity.
instantiator.notifyOnReady(function () {
  instantiator.instantiate(prefab);
});
Advanced Instantiation Options
Use the InstantiationOptions class to define options for instantiation. Each of the options on this class is opt-in, meaning you only need to define the ones you want to use.
var options = new InstantiationOptions();

options.claimOwnership = true; // Local user will own this object

options.worldPosition = new vec3(0, 0, -100); // Starting world position

instantiator.instantiate(prefab, options);
You can also pass in a simple JS object instead of the class, if you prefer.
instantiator.instantiate(prefab, {
  claimOwnership: true, // Local user will own this object

  persistence: 'Persist', // This object will persist

  localPosition: new vec3(0, 0, -100), // Starting local position
});
Shown below is the full list of options. Remember that these are all optional and are not required.
var options = new InstantiationOptions();

options.claimOwnership = true; // Local user will own this object

options.localPosition = new vec3(0, 0, 0); // Starting local position

options.localRotation = quat.quatIdentity(); // Starting local rotation

options.localScale = new vec3(0, 0, 0); // Starting local scale

options.onError = function (error) {}; // Function to call on error

options.onSuccess = function (networkRootInfo) {}; // Function to call on success

options.overrideNetworkId = 'my_special_id'; // Overrides the generated id. Only use in special circumstances!

options.persistence = 'Persist'; // Persistence for the created object

options.worldPosition = new vec3(0, 0, 0); // Starting world position

options.worldRotation = quat.quatIdentity(); // Starting world rotation

options.worldScale = new vec3(0, 0, 0); // Starting world scale
Referencing the New Object
You may have noticed the onSuccess callback option. You’ll need to use this if you want a reference to your new object after it’s been instantiated. This callback passes a NetworkRootInfo object, which provides information about the instantiated object.
var options = new InstantiationOptions();

options.onSuccess = onInstantiate;

instantiator.instantiate(prefab, options);

/**

* @param {NetworkRootInfo} rootInfo

*/

function onInstantiate(rootInfo) {
  var newObj = rootInfo.instantiatedObject;

  print('instantiated new object: ' + newObj);
}
As a convenience, you can also specify the onSuccess callback as the third parameter in instantiate(). This will override whatever callback is set in the options object. This is nice to use in code editors with smart code hinting, since the rootInfo parameter type is inferred automatically.
instantiator.instantiate(prefab, {}, function (rootInfo) {
  var newObj = rootInfo.instantiatedObject;

  print('instantiated new object: ' + newObj);
});
In case you didn’t notice, the instantiatedObject property on NetworkRootInfo gives you a reference to the new object.
Any SyncEntity that’s been instantiated will also have a reference to its NetworkRootInfo.
if (syncEntity.networkRoot) {
  print("Looks like I've been instantiated!");

  if (syncEntity.networkRoot.locallyCreated) {
    print('I was created by the local user during this session.');
  } else {
    print('I was created by a different user or during a different session.');
  }
}
Instantiating Flow
If this is your first time using Sync Frameworks, It might not be obvious how exactly instantiation works. You can see a condensed recap on how Instantiation works:
instantiate()is called.- Empty SceneObject is created using the specified world or local transforms. NetworkRootInfo is attached to it.
- The new object is instantiated as a child of the NetworkRootInfo holder object.
- Immediately on Awake, all SyncEntities will look upward in their hierarchy to search for a NetworkRootInfo and determine if they are under a prefab.
- If one is found, they generate their network id in a special way in order to be tied to the prefab.
- Immediately after instantiating the object and after SyncEntities have found their network root, the onSuccess callback is executed.
The major thing to understand about instantiation is that the new object is spawned as a child of the empty root object. This was done to solve a few problems, mainly SyncEntities being able to immediately find their network root, as well as their transformations being immediately correct.
This should only really affect you as a Lens Developer if you want to use the instantiated object’s local transformation, since it will be a child object. You should be aware that the local position, rotation, and scales will be local to whatever transformations you specified in the InstantiationOptions.
SessionController
SessionController is a script that handles the Connected Lens session joining flow so the Snapchat user doesn’t have to worry about it. It acts as a central interface that all SyncFramework scripts can talk to and get the information they need.
SessionController Options
There are several options available on the SessionController inspector, found on the Session Controller object.
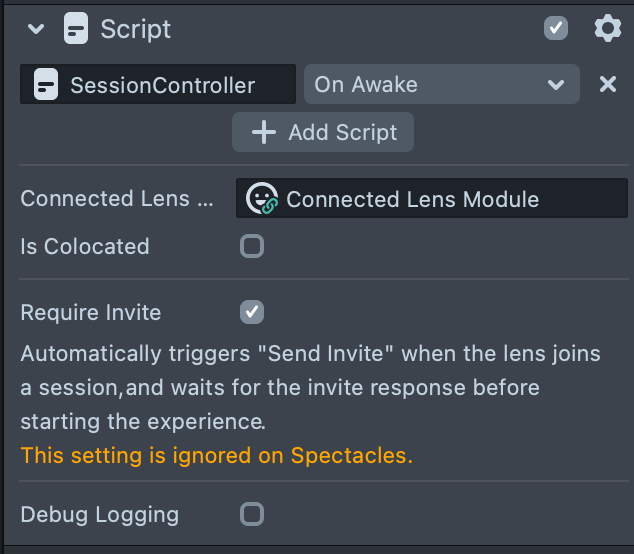
- Is Colocated: You can toggle this on to enable colocated tracking. Note that there are currently several limitations with this. See the Colocated section below.
- Require Invite: You can toggle this on to automatically send an invitation out at the appropriate time of joining a session.. This also requires the invite flow to be finished before the session is considered "ready". If you don’t want this behavior, you will need to manually call
sendInvite()on the SessionController. Also note that this option is ignored on Spectacles, since there is a completely different invite flow that is automatically triggered on Spectacles. - Debug Logging: You can toggle this on to enable debug logs for the SessionController. This can be kept off unless you are actively trying to debug an issue and would like to see more information in the logs.
SessionController API
Here are some useful APIs you can find on SessionController.
global.sessionController
Way to access the SessionController from any script.
global.sessionController.getIsReady(): boolean
Returns true if the SessionController has finished joining the session, sending invites, and setting up any other requirements (such as colocated tracking).
global.sessionController.notifyOnReady(onReady)
Calls the onReady callback as soon as the SessionController has finished all setup, as described in getIsReady(). If setup is already finished, the callback will be called immediately.
global.sessionController.getSession(): MultiplayerSession
Returns the current MultiplayerSession object. Always use this instead of storing a reference to the session, since it’s possible for the session to change. Note that this may return null if the session hasn’t been joined yet.
global.sessionController.getLocalUserId(): string
Returns the user id of the local user. Note that this may not be available until setup has completed (see getIsReady() and notifyOnReady()).
global.sessionController.getLocalConnectionId(): string
Returns the connection id of the local user. Note that this may not be available until setup has completed (see getIsReady() and notifyOnReady()).
global.sessionController.getLocalUserName(): string
Returns the display name of the local user. Note that this may not be available until setup has completed (see getIsReady() and notifyOnReady()).
global.sessionController.getLocalUserInfo(): ConnectedLensModule.UserInfo
Returns the UserInfo object of the local user. Note that this may not be available until setup has completed (see getIsReady() and notifyOnReady()).
global.sessionController.getUsers(): ConnectedLensModule.UserInfo[]
Returns a list of users currently connected to the session, represented as UserInfo objects. Note that this may not be available until setup has completed (see getIsReady() and notifyOnReady()).
global.sessionController.getUserByConnectionId(userId): ConnectedLensModule.UserInfo
Returns the UserInfo of a user currently connected to the session with the matching connection id, or null if none exists. Note that this may not be available until setup has completed (see getIsReady() and notifyOnReady()).
global.sessionController.getUsersByUserId(userId): ConnectedLensModule.UserInfo[]
Returns a list of users currently connected to the session who have a matching user id. Note that this may not be available until setup has completed (see getIsReady() and notifyOnReady()).
global.sessionController.getServerTimeInSeconds(): number?
Returns the current server timestamp in seconds, or null if not available. Note that this may not be available until setup has completed (see getIsReady() and notifyOnReady()).
Colocated Tracking
Colocated tracking is a feature of Connected Lenses that allows users to share the same tracking in their local space. When in the same location, you and your friends can reference the same World Tracked experience on your individual devices. You can learn more in the Connect Lenses Overview guide
To enable Colocated tracking, enable the Is Colocated checkbox on your Session Controller object.
The Colocated Tracking flow is still in development. It has been implemented as-is to unblock development of Colocated lenses, but it shouldn’t be expected to be production ready.
The first user to join must finish mapping before other users join the session. This will be fixed in a later version of SessionController.
Device Compatibility
| Mobile Device joins | Spectacles joins | Lens Studio joins | |
|---|---|---|---|
| Mobile Device invites | ✅ | ✅ | ❌ |
| Spectacles invites | ✅ | ✅ | ❌ |
| Lens Studio invites | ⚠️ | ⚠️ | N/A |
✅: Works as expected, but The first user to join must finish mapping before other users join the session.
⚠️: May be able to join, but tracking will not be compatible. Can be used for some limited testing, but it’s recommended to instead use two devices in the same space. May be improved in a future version.
❌: Currently is not compatible. May be fixed in the future.
UserId and ConnectionId
There are two ways to identify users in Connected Lenses. One of them is by userId, which is tied to a user’s Snapchat account. The other is by connectionId, which is tied to a device who has joined the session. The distinction is important, since the same Snapchat user account can join the same session from multiple devices at the same time. A common case of this is a user connecting to the same session from Spectacles and their mobile device at the same time.
UserId
Tied to a specific Snapchat account. This means that multiple devices using the same Snapchat account can share the same UserId. This can be useful for:
- Persistent object tied to a user account (See the Persistent Player Owned example).
- Object or value that "belongs" to a user connecting on multiple devices at once (like a score on a scoreboard).
- Identifying the same user each time they join a session.
ConnectionId
Tied to a specific device currently connected to the session. ConnectionId is unique to each connected device, and unique to each time the device joins a session. RealtimeStore ownership is tied to connectionId, not userId.
This can be useful for:
- Identifying the owner of a realtime store.
- Tying an object or value to a specific device (like an avatar representing device position).
Example Situation
This is a simple example showing a situation where one user joins on two devices at once, and another user joins on a single device. Note that these example userIds and connectionIds do not accurately reflect how they would appear, but are simplified for explanation.
| userId | connectionId | |
|---|---|---|
| User A (Phone) | abc | 123 |
| User A (Spectacles) | abc | 456 |
| User B (Phone) | def | 789 |
Common Patterns
In the next section, you will learn about some of the common implementations you could use Sync Frameworks for.
Player Avatars
Example: AvatarController
Any easy way to make an avatar for each player is by using an avatar controller script, a simple prefab, and an Instantiator.
For the prefab, just create a prefab with the graphics you want and put a SyncTransform on it.
Add the Instantiator script to a SceneObject and make sure your prefab is added to the Prefabs list.
For the avatar controller script, you will need to instantiate the prefab, set its persistence to "Player", then update its position and rotation every frame to match the Camera.
// Avatar Controller

//@input Component.ScriptComponent instantiator

/** @type {Instantiator} */

var instantiator = script.instantiator;

//@input Asset.ObjectPrefab myPrefab

/** @type {ObjectPrefab} */

var myPrefab = script.myPrefab;

//@input SceneObject myTarget

/** @type {SceneObject} */

var myTarget = script.myTarget;

var camTransform = myTarget.getTransform();

instantiator.notifyOnReady(onReady);

function onReady() {
  var worldPos = camTransform.getWorldPosition();

  var worldRot = camTransform.getWorldRotation();

  var options = new InstantiationOptions();

  options.onSuccess = onSpawned;

  options.persistence = 'Owner';

  options.claimOwnership = true;

  options.worldPosition = worldPos;

  options.worldRotation = worldRot;

  instantiator.instantiate(myPrefab, options);
}

/**

* @param {NetworkRootInfo} networkRoot

*/

function onSpawned(networkRoot) {
  var myTransform = networkRoot.instantiatedObject.getTransform();

  script.createEvent('UpdateEvent').bind(function () {
    myTransform.setWorldPosition(camTransform.getWorldPosition());

    myTransform.setWorldRotation(camTransform.getWorldRotation());
  });
}
Host Management
Example: AirHockeyController in Air Hockey Example
Sometimes, it’s useful to have a single player manage the overall state of the experience. An easy way to do this is to have a SyncEntity, in the example it’s called ExperienceController, that controls the state of the experience. Whoever is the owner of this entity is considered the host of the session.
Declare the SyncEntity with "claimOwnership" set to true:
var syncEntity = new SyncEntity(script, null, true);
With claimOwnership enabled, every player will try to become the owner of this entity whenever possible. So whichever player joins first will become the host by default. If the host player ever leaves, a new player will try to claim the host role automatically.
You can add some properties to track the state of the experience. Remember that since the host owns the entity, only the host is allowed to change the state properties.
var isGameStartedProp = syncEntity.addStorageProperty(
  StorageProperty.manualBool('isGameStarted', false)
);

var leftScoreProp = syncEntity.addStorageProperty(
  StorageProperty.manualInt('leftScore', 0)
);

var rightScoreProp = syncEntity.addStorageProperty(
  StorageProperty.manualInt('rightScore', 0)
);
To check if a user is the host, you can check who owns the entity. You can make a helper function like this:
function isHost() {
  return syncEntity.isSetupFinished && syncEntity.doIOwnStore();
}
Now you can handle things differently based on who is the host.
Player Roles
Example: AirHockeyController and AirHockeyPaddle in Air Hockey Example
An effective way to track player roles is to have a SyncEntity represent each role. A player can see if a role is filled by checking if the SyncEntity for that role is owned, and can claim that role by calling tryClaimOwnership() on that SyncEntity. If the player leaves the session, the role will automatically become available again.
Scoreboard Example
Example: SharedScoreboard
You can use the StoragePropLookup class to easily track dynamic values in a store.
/** @type {StoragePropLookup<int>} */

var scoreProperties = new StoragePropLookup(
  syncEntity,
  'user-score-',
  StorageTypes.int
);

scoreProperties.onAnyChange.add(redrawScores);
See the SharedScoreboard.js file to see a full example of a shared, persistent scoreboard.
Changing Values Using Events
Example: OwnedValueEntity in Modification Events example
It may be useful for a single user to control a property, but still allow other users to modify it. A simple example of this is a shared score. If multiple users are trying to increase the score by setting it to a new value, each user could be overwriting each other’s changes due latency - they are basing their new score value on an old score value that is no longer correct. A cleaner solution is for one user to act as the owner of the object, and have other users send events to the entity with a delta value of the amount they want the score to change by. This way, all value changes come in through a single place and can be applied in order.
Script that tracks a score value and responds to events:
// Declare our SyncEntity with claimeOwnership set to true

var syncEntity = new SyncEntity(script, null, true);

// Create "score" property

var scoreProp = syncEntity.addStorageProperty(
  StorageProperty.manualInt('score', 0)
);

// Subscribe to "addScore" event

syncEntity.onEventReceived.add('addScore', function (message) {
  // Only react if we own the entity

  if (syncEntity.doIOwnStore()) {
    var scoreChange = message.data;

    // Set the score value to the current value plus the event data

    scoreProp.setPendingValue(scoreProp.currentOrPendingValue + scoreChange);
  }
});
Script that sends score change events to the first entity:
// Get SyncEntity on other object

var otherSyncEntity = SyncEntity.getSyncEntityOnComponent(otherScript);

// Make sure setup is finished

if (otherSyncEntity.isSetupFinished) {
  // Send event telling to add 5 to score

  otherSyncEntity.sendEvent('addScore', 5);
}
Persistent Object Per Player
Example: Persistent Player Owned example
An interesting use case is one where each player controls a single, persistent object. This is tricky for two reasons:
- When rejoining a session, you need to reuse the existing object instead of instantiating a new one
- Objects become unowned when the owner leaves
To solve the first issue, use the overrideNetworkId property in InstantiationOptions. This allows you to specify the network ID you want to use for the prefab instead of randomly generating a unique one. The benefit is that if an entity with the passed in ID already exists, the Instantiator will return that one instead of instantiating a new one. As long as the ID is generated based on userId (which is consistent across sessions and devices), we will always have a consistent network ID and be able to reuse the same object. You can see an example of this in PersistentOwnedObject.js.
Example of instantiating an object using overrideNetworkId:
var options = new InstantiationOptions();
options.persistence = 'Persist';
options.claimOwnership = true;
options.localPosition = localPos;
options.overrideNetworkId =
  global.sessionController.getLocalUserId() + '_scoreHolder';

instantiator.instantiate(prefab, options, onSpawned);
For the second issue, we need to implement our own simple ownership system based on userId instead of connection Id. The easiest way to do this is by adding a StorageProperty tracking the owner’s userId, and checking if this matches the current user. See an example of this in PersistentOwnedObject.js.
Example of storing owner id to check ownership:
var ownerId = syncEntity.addStorageProperty(StorageProperty.manualString("ownerId", ""));

syncEntity.notifyOnReady(function() {
   var doIControl = false;

   // Did we just create this store?
   if (syncEntity.doIOwnStore()) {
       ownerId.setPendingValue(global.sessionController.getLocalUserId());
       doIControl = true;
   } else {
       // Did we previously create this store?
       if (ownerId.currentValue == global.sessionController.getLocalUserId()) {
           doIControl = true;
           syncEntity.tryClaimOwnership();
       }
   }

   // If we control the store, allow interaction
   if (doIControl) {
       // Setup interactions here
   }
Simple Predictive Movement (Dead Reckoning)
Example: AirHockeyBall in Air Hockey Example
You can use a simple Dead Reckoning solution to calculate the position of an object every frame without needing to send updates over the network.
First, you will need three properties to track the state of the object:
// Last known position

var posProp = syncEntity.addStorageProperty(
  StorageProperty.manualVec3('pos', transform.getLocalPosition())
);

// Last known velocity

var velocityProp = syncEntity.addStorageProperty(
  StorageProperty.manualVec3('velocity', vec3.zero())
);

// Timestamp of last change

var timeStampProp = syncEntity.addStorageProperty(
  StorageProperty.manualDouble('lastChanged', -1)
);
Using just position, velocity, initial time, and current time, you can calculate the current position of an object.
/**

*

* @param {vec3} pos

* @param {vec3} velocity

* @param {number} initialTime

* @param {number} currentTime

*/

function extrapolatePos(pos, velocity, initialTime, currentTime) {
  var elapsedTime = currentTime - initialTime;

  return pos.add(velocity.uniformScale(elapsedTime));
}
Now you can use this every frame to update ball position based on the last known state.
function updateBallPosition() {
  var startTime = timeStampProp.currentOrPendingValue;

  var newPos = extrapolatePos(
    posProp.currentOrPendingValue,
    velocityProp.currentOrPendingValue,
    startTime,
    getServerTime()
  );

  newPos.y = 0;

  transform.setLocalPosition(newPos);

  transform.setLocalRotation(quat.quatIdentity());
}
When you want to change the state, like if the ball should start moving, bounce, or get reset, you will just need to update the pending value of the property.
/**

*

* @param {vec3} position

* @param {vec3} velocity

*/

function updateMovementState(position, velocity) {
  posProp.setPendingValue(position);

  velocityProp.setPendingValue(velocity);

  timeStampProp.setPendingValue(getServerTime());
}
If you own the entity (in this case, you are the host), the pending value will automatically be sent out to other users and become the current value. If you do not own the entity, the pending values will stay pending locally, and get overwritten whenever new values are received from the host. The benefit of this solution is that each user is able to keep simulating the state of the ball on their own, while they wait to receive the accepted state from the owner.
If you detect that the ball collided with a wall locally, you can do the same calculations as the owner would to determine the new movement vector the ball should take. However, since the owner might have a slightly different version of the game world then you have because of latency, their result could be a little different than yours. With this pattern you can try to use as accurate a current state as possible while waiting for the owner to update the other players, at which point, you can immediately apply the revised state.
To make sure these code snippets are completely usable, you can use the following function to calculate the current server time in seconds:
function getServerTime() {
  return global.sessionController.getSession().getServerTimestamp() * 0.001;
}
Changing Player Origin Point
Example: Moving SceneRoot in Air Hockey Example
It can be useful during remote experiences to change the origin point of a player. By default, every player avatar begins at the origin point of (0,0,0), which doesn’t feel very natural since some users will have to move forward and turn around to interact with others. The Camera object is controlled by a DeviceTracking component which overrides its world position and rotation every frame. Since you cannot independently control the camera component, you can move all our world objects instead to achieve the same effect. As long as you are working in local space and have all the networked objects under a single root parent object, it’s pretty straightforward to relocate the root object to match the desired position.
This code is taken from AirHockeyController.js. The recenterToRootPos() function takes in a Transform (child of sceneRoot) that is placed in the desired Camera position and rotation. The sceneRoot object will be relocated so that the Camera position and rotation match the target viewTransform object.
Note that the y component of the forward vec is flattened automatically, since you only want to adjust the world’s y rotation and keep the up vector the same.
//@input SceneObject sceneRoot

/** @type {SceneObject} */

var sceneRoot = script.sceneRoot;

//@input Component.Camera camera

/** @type {Camera} */

var camera = script.camera;

/**

* Move the SceneRoot so that the camera transform matches the desired `viewTransform`

* @param {Transform} viewTransform

*/

function recenterRootToPos(viewTransform) {
  var rootTransform = sceneRoot.getTransform();

  var camTransform = camera.getTransform();

  var desiredWorldForward = flattenDirVecY(camTransform.back);

  var rotQuat = quat.rotationFromTo(
    flattenDirVecY(viewTransform.forward),
    desiredWorldForward
  );

  rootTransform.setWorldRotation(
    rootTransform.getWorldRotation().multiply(rotQuat)
  );

  var desiredPos = camTransform.getWorldPosition();

  var viewPosOffset = desiredPos.sub(viewTransform.getWorldPosition());

  var newPos = rootTransform.getWorldPosition().add(viewPosOffset);

  newPos.y = rootTransform.getWorldPosition().y;

  rootTransform.setWorldPosition(newPos);
}

/**

*

* @param {vec3} vec

* @returns {vec3}

*/

function flattenDirVecY(vec) {
  return new vec3(vec.x, 0, vec.z).normalize();
}
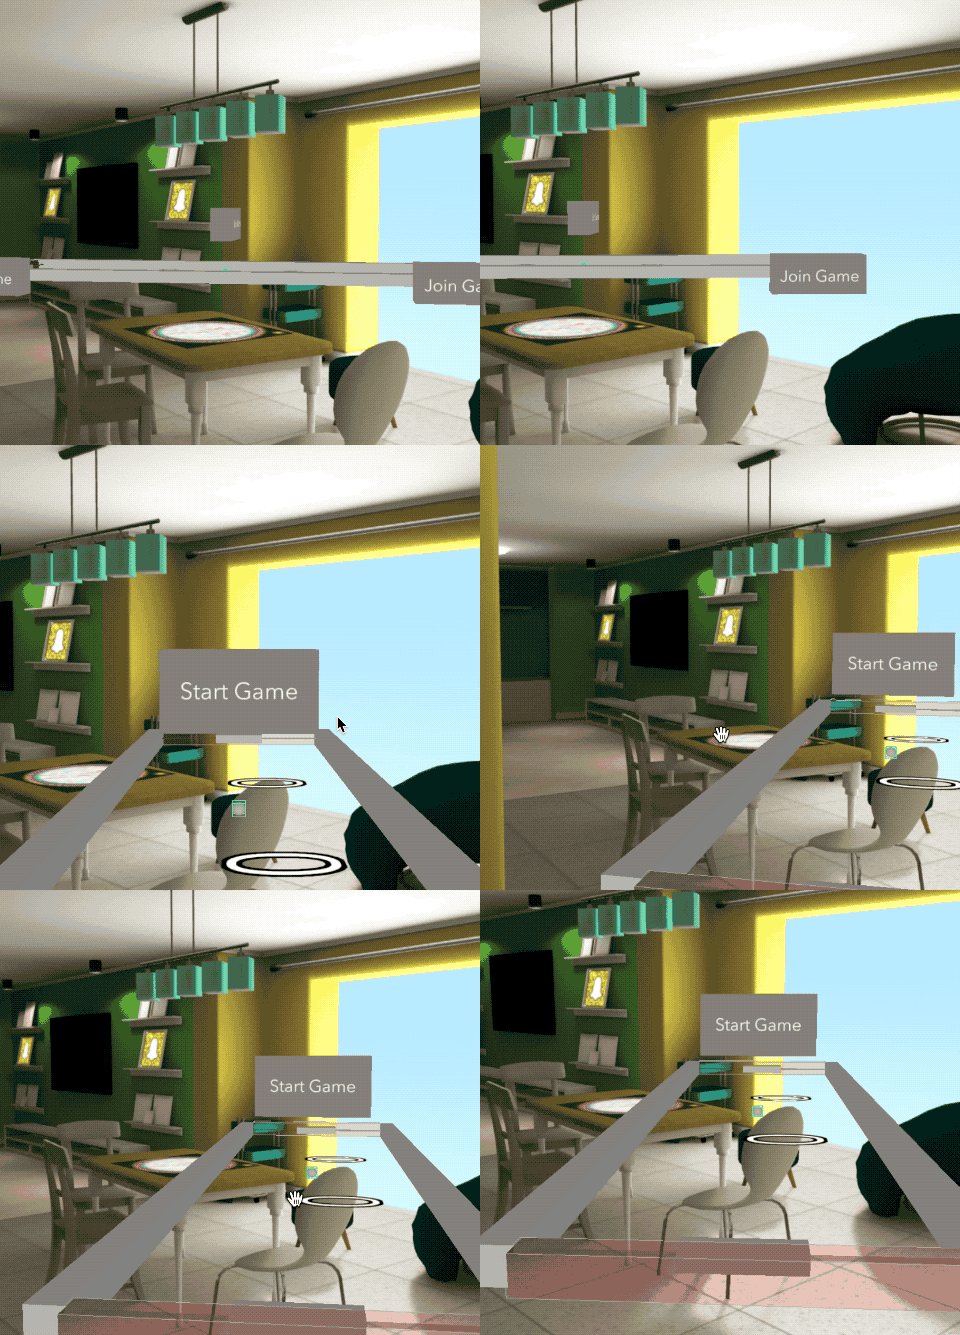
This is how it looks in the Air Hockey example. When you click on a Join Game button to choose a role, the game automatically brings you to the correct location. This is very helpful in AR games where you might not physically be able to reach the position the game wants you to be.
Debugging
In this section, you will learn some helpful ways to debug in Lens Studio when building experiences with Sync Framework
Text Logger
You can enable the Text Logger Camera under the Text_Logger object to show on-screen text that can be helpful for debugging, especially on devices. You can use the function global.logToScreen() to add messages to this. You can also enable and disable the Text Logger Camera in-lens using the Logger button on the toolbelt as described below.

Clear Test Session
Sometimes, it’s necessary to completely clear the session you are testing in. You can do this by using the Clear Test Session button. First, select the Connected Lens Module. By default, you can find it in the Sync Framework/Resources folder.
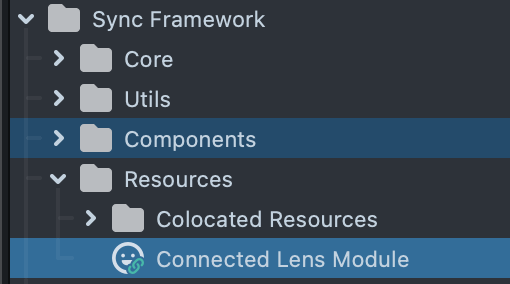
In the Inspector panel, click the Clear Test Session button.
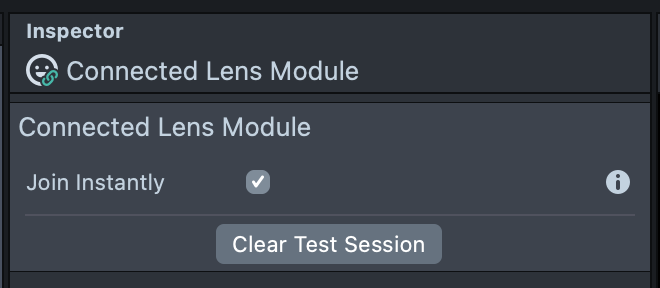
Now the session has been cleared, and going forward, you will connect to a brand new one. Make sure that you Push To Device if you are testing on device, so that it has the new session to connect to.
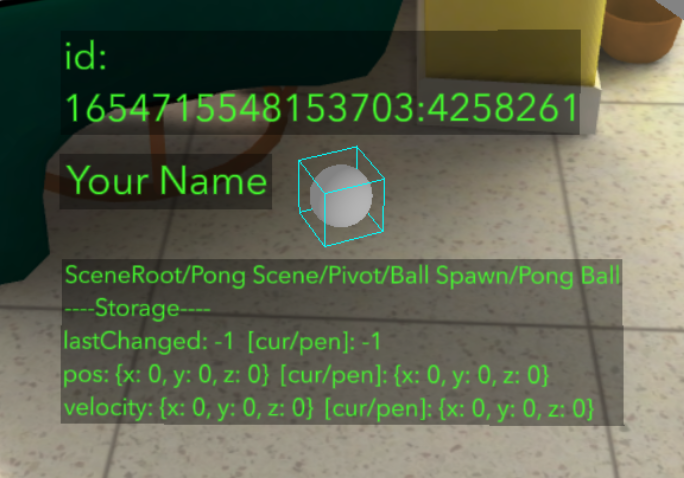
SyncEntityDebug
SyncEntityDebug is a helper script that shows information about a SyncEntity. You can connect Text components to the information you want to display, and you can easily display debug information in world space next to your objects.
Debugging Toolbelt
Look directly down to see some buttons used for debugging. Tapping them will trigger their behavior. You can disable or delete the Toolbox object at any time to remove it from your lens.
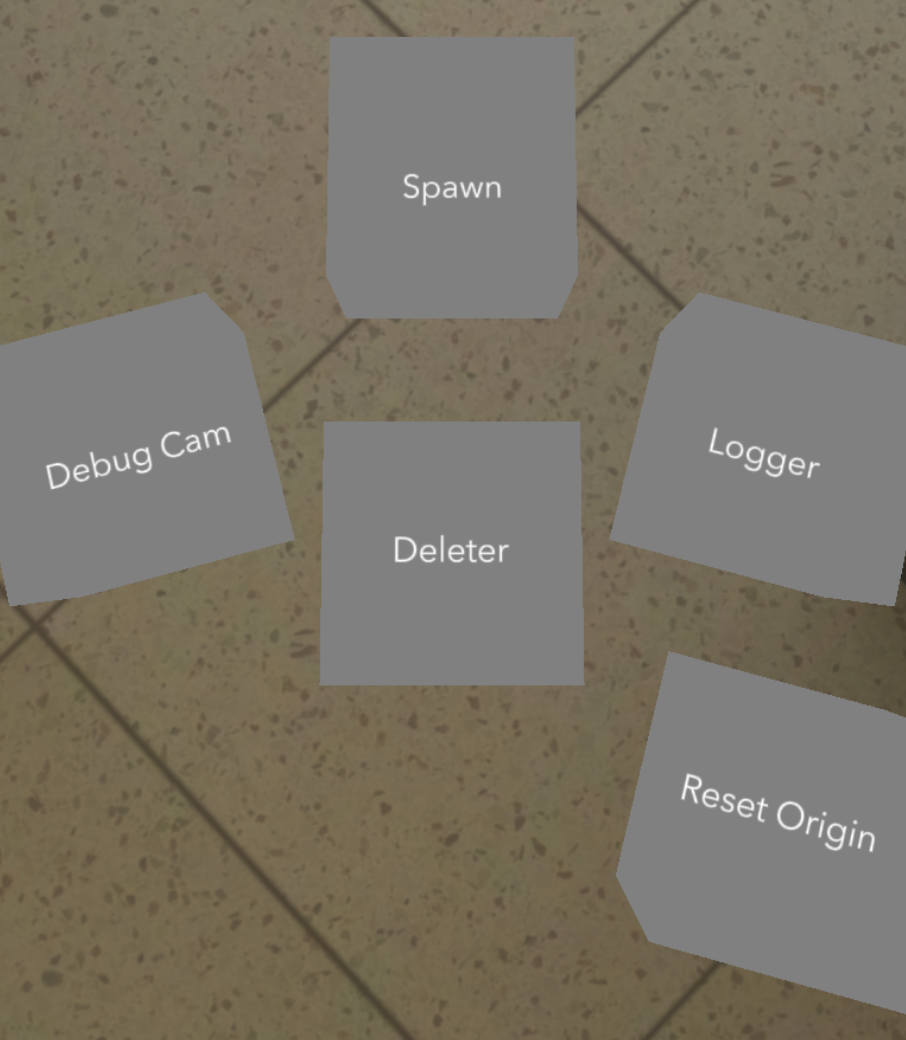
- Spawn: Spawns a sphere to test instantiation and ownership
- Deleter: Toggles on/off a box that destroys spawned spheres on collision
- Debug Cam: toggles on/off the camera rendering SyncEntityDebug objects by default
- Logger: toggles on/off logger text that covers the screen
- Reset Origin: Resets the scene root to be in front of the current camera position
Lifecycle
-
SessionController is initialized.
-
All SyncEntities in the scene are initialized, and subscribe to events on SessionController.
At this point, it’s ok to add StorageProperties, subscribe to events, and request ownership on SyncEntity.
-
SessionController reacts to ConnectedLensEnteredEvent and begins to set up the session.
-
When the session setup is finished, getIsReady() becomes true and all of SessionController’s notifyOnReady callbacks are executed.
At this point, SessionController is completely ready to use. Any methods like getSession() and getLocalUserInfo() are available.
-
All SyncEntities begin to initialize themselves. Depending on the situation, they may initialize immediately, or may take up to a second to initialize.
-
When each SyncEntity is ready and fully initialized, they will execute each of their notifyOnReady callbacks.
At this point, if a SyncEntity’s **notifyOnReady** callback has been called, the SyncEntity is completely ready to use.
TLDR
If you need to use SessionController functions, it’s safest to wait for the global.sessionController.notifyOnReady() callback, or for global.sessionController.getIsReady() to return true.
If you need to set up a SyncEntity by adding storage properties or callbacks, it’s fine to do so at any point.
If you need to actually make changes to a SyncEntity or start its behavior, it’s best to wait for the syncEntity.notifyOnReady() callback, or for syncEntity.isSetupFinished to return true.
