Cloth Simulation
Overview
This guide covers the main concepts of how cloth simulation works in Lens Studio and Snapchat. This guide is script heavy. However, you can also review the Cloth Simulation Template to see an example of what you can do with Cloth Simulation.
Cloth Simulation
Cloth simulation renders and simulates the real-world transformation of clothes in real time. Lens Studio now includes the realistic cloth simulation feature. Cloth simulation allows you to make cloth move with human actions (move, stretch and bend), collision, gravity, air friction, etc. Each single point on cloth may move in different directions due to the combination of different forces.
Getting Started with Cloth Mesh
You can import your own mesh for Cloth Simulation. You’ll need to paint at least one vertex color on your own custom mesh to follow specific objects or set different simulation properties in Lens Studio. Below we will walk you through how to create a cloth mesh to be used in Lens Studio in Blender, you can also use other 3D modeling software.
In Blender, click on your mesh and switch to Vertex Paint Mode. Choose colors to paint on the mesh. You can pick different parts of the mesh based on different vertex colors in Lens Studio.

With different vertex colors, you can bind vertices to Pivot Points in Lens Studio. The bind parts won’t be affected by cloth simulation, but are stationary relative to Pivot Points. For example, you can bind the red part of the mesh bandana to the Neck Pivot Point object. Thus, the red part of the bandana remains relatively static to the Neck and the black part will have the cloth simulation effect.
You can see more details on how to import 3D objects into Lens Studio here. We recommend a maximum of 3000 triangles and single-sided mesh with two-sided material for the cloth mesh.
In the case of a tutu we use a simple flat mesh with only 1388 triangles. The result is a relatively good cloth simulation with good performance.

3D Body Tracking and Cloth Mesh
To create a cloth mesh for 3D body tracking, there are several FBX 3D models in the Cloth Simulation Template. You can find them in the Resources -> 3D Body Tracking References.

With the bindPoints FBX, you have a reference for the cloth binding points. They are the spheres in the screenshot. Combining bind points and 3D body tracking, you can then bind different cloth vertices to the body tracking points. For example, with the jacket, you can bind the green part to the right arm bind point, the yellow part to the left arm bind point, and the red part to the neck.
With Body_Mesh_T_Pose FBX, you can have a reference for the body mesh occluder. You can use it for cloth occluder.
With the Collider Guides FBX, you use it as the reference for body part colliders in the Lens Studio.

When creating cloth mesh for 3D body tracking, use the FBX files as the reference for cloth transform. In order to have the right binding and occlusion, click here to see how to export and import 3D objects into Lens Studio.
You can also find the 3D Body Tracking Prefab in the Resources -> Prefabs in the Cloth Simulation Template. For details, see the examples in the Cloth Simulation Template.
Getting Started with Cloth Component
Clothes are added to a scene using a Cloth Visual attached to an object. To create it, first add a new Scene Object by clicking the + button in the Scene Hierarchy and selecting Scene Object, or by right-clicking in a blank area inside the Scene Hierarchy and selecting Scene Object. Then, with the Scene Object selected, go to the Inspector panel and select Add Component, followed by Cloth Visual.
Cloth Visual Component

- Mesh: attach imported mesh and cloth materials
- Mesh Shadow mode: choose shadow mode for cloth mesh
- Debug mode: enable/disable debug draw for cloth mesh
Simulation
- Frame Rate: Ensures simulations run at a consistent speed on different devices.
- Iterations: Controls the number of iterations performed per simulation step, influencing constraint stiffness as iterations increase.
- Update Normals: Enables or disables normal updates on the cloth surface.
- Bend Mode: Specifies the bending calculation method (e.g., isometric or linear).
- Gravity: Defines the external gravity force vector, typically set along negative Y for standard downward gravity.
- Mass: Sets the mass of each vertex in the cloth mesh.
- Stretch Stiffness: Controls the cloth’s rigidity when stretched, preserving edge lengths. Lower values result in a less rigid cloth.
- Bend Stiffness: Controls the cloth’s rigidity when bent, preserving its shape. Lower values result in a less rigid cloth.
- Friction: Represents air resistance, controlling how quickly the cloth’s motion diminishes. Lower values result in slower damping, allowing the cloth to move longer before settling.
- Max Acceleration: Limits the cloth’s maximum acceleration.
- Enable Colliders: Determines whether collision repulsion is enabled with collider models.
- Stiffness: Sets the hardness of repulsion constraints. Lower values result in softer interactions.
- Offset: Adjusts the offset to prevent cloth vertices from getting too close to colliders.
- Friction: Applies a damping force at points of contact, reducing relative sliding motion.
- + Choose Collider: Attaches selected colliders.
- Add Vertex Binding: Assigns vertex bindings to objects or pivot points.
Vertex Binding
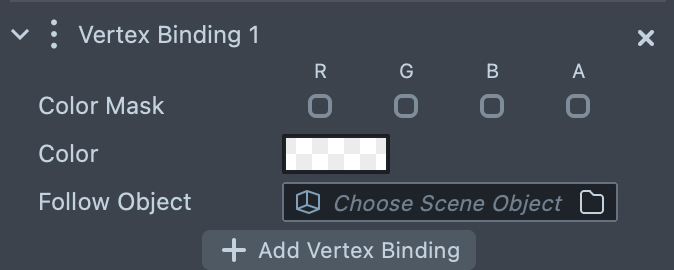
- Color Mask: Enables or disables individual RGBA channels for vertex color selection.
- Color: Specifies the vertex color used for binding.
- Follow Object: Attaches a follow object that the selected vertices will follow.
Physics Collider Component
To make the collision effect with the cloth mesh, use the Physics Collider Component in the Lens Studio.
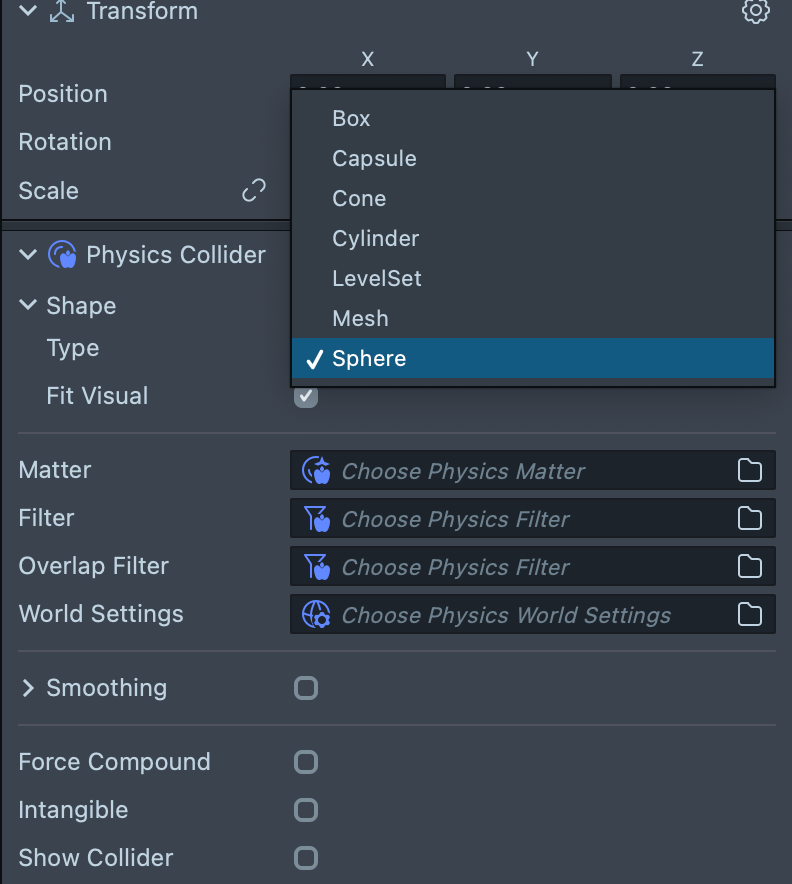
With the Show Collider field enabled, you can also draw the collider in the Scene.
Only Primitive Collider works with Cloth Simulation.
You can add the Physics Collider Component to different tracking, like the head, hand, or even 3D body tracking. Here is an example of 3D body tracking with full body part colliders. See the examples in the Cloth Simulation template.

Add the Cloth Visual Component with Script
To set up the Cloth Visual Component in scripting, create a new Cloth Simulation Script. In the Asset Browser panel, select + -> JavaScript File. Double click to open the editor and paste the following code into your script:
// @input Asset.RenderMesh mesh
// @input Asset.Material material
//Create ClothVisual Component
var clothVisual = script
  .getSceneObject()
  .createComponent('Component.ClothVisual');
//Simulation Settings
clothVisual.bendMode = ClothVisual.BendMode.Isometric;
clothVisual.mesh = script.mesh;
clothVisual.mainMaterial = script.material;
clothVisual.gravity = new vec3(0, -100, 0);
clothVisual.stretchStiffness = 0.1;
clothVisual.bendStiffness = 0.1;
clothVisual.friction = 0.1;
clothVisual.repulsionEnabled = true;
clothVisual.repulsionOffset = 0.1;
clothVisual.repulsionStiffness = 0.1;
clothVisual.repulsionFriction = 0.1;
clothVisual.iterationsPerStep = 60;
clothVisual.frameRate = 30;
clothVisual.debugModeEnabled = false;
clothVisual.drawCollider = true;
clothVisual.updateNormalsEnabled = true;
clothVisual.mergeCloseVerticesEnabled = true;
//Initialize ClothVisual Component
clothVisual.onInitialized = clothInitCallback;
clothVisual.updatePriority = 0;
function clothInitCallback(clothVisualArg) {
  clothVisualArg.resetSimulation();
}
Add a new Scene Object in the Scene Hierarchy panel and rename it to “Cloth Simulation”. In the Inspector panel, drag and drop the script onto the new Scene Object to create a new script component.

Fixed Points on Cloth Mesh
In cloth simulation, you need some points on cloth mesh to be bound to specific objects, like the head or body. Otherwise, with the gravity property, the cloth will only fall down. You can pick points based on the vertex color to transform with binding objects and attach/detach flexibly.
Cloth mesh may be very large and there may be multiple vertices on it. We support a flexible way to get vertex index via vertex color on cloth mesh.
Make Fixed Points Following Objects with Scripts
Here is the script to pick points based on the vertex colors. Note that we set red vertices to follow the FollowObject as an example:
// @input SceneObject followObject
// different vertex colors
var red = new vec4(1.0, 0.0, 0.0, 1.0);
// different color mask (picking which color channel to compare)
var colorMask = new vec4b(true, true, true, true);
var redIndices = [];
//Create Cloth Visual Component
var clothVisual = script
  .getSceneObject()
  .createComponent('Component.ClothVisual');
//Initialize ClothVisual Component
clothVisual.onInitialized = clothInitCallback;
clothVisual.updatePriority = 0;
function clothInitCallback(clothVisualArg) {
  // binding all red vertices to the Scene object: follow_obj
  redIndices = clothVisualArg.getPointIndicesByColor(red, colorMask);
  for (var i = 0; i < redIndices.length; i++) {
    clothVisual.setVertexBinding(redIndices[i], script.followObject);
  }
  clothVisualArg.resetSimulation();
}
Vertex Simulation Settings for Cloth Mesh Properties
The VertexSimulationSettings provides possibilities to set specified vertices with different simulation settings on mass/stretchStiffness/bendStiffness/friction. Like fixed points on cloth mesh, you can select the vertex color to modify based on the vertex colors available in your mesh. Notice that, for each vertex simulation property, the global weight property is available. Global weight determines how much global settings influence the Cloth Simulation Script. If you set Global Weight to 0.0, you are using the absolute value of the property in the Vertex Controller on this vertex. If you set it to 1.0, you ignore the property value in the Vertex Controller. When you disable the vertex controller, all the vertex properties are 0.0 by default, so the mesh will be simulated by all global simulation settings.
Let’s take Bend Stiffness as an example.
let G = globalSimulationSettings.bendStiffness
let G.VertexWeight = globalSimulationSettings.bendStiffnessVertexWeight
let V[i] = perVertexSimulationSettings[vertexIndex].bendStiffness
let V[i].GlobalWeight= perVertexSimulationSettings[vertexIndex].bendStiffnessGlobalWeight
In the simulation, the final result for Bend stiffness will be bendStiffness[i] = G * V[i].GlobalWeight + V[i] * G.VertexWeight;
Add Vertex Simulation Settings with script
Here is the script to pick points based on the vertex colors. Notice here we customize yellow vertices with Vertex Simulation Settings as an example:
//Create Cloth Visual Component
var clothVisual = script
  .getSceneObject()
  .createComponent('Component.ClothVisual');
// yellow vertex colors
var yellow = new vec4(1.0, 1.0, 0.0, 1.0);
// different color mask (picking which color channel to compare)
var colorMask = new vec4b(true, true, true, true);
var yellowIndices = [];
//Initialize ClothVisual Component
clothVisual.onInitialized = clothInitCallback;
clothVisual.updatePriority = 0;
function clothInitCallback(clothVisualArg) {
  yellowIndices = clothVisualArg.getPointIndicesByColor(yellow, colorMask);
  // create a vertex settings set specific simulation settings value on it
  var vertexSettings = ClothVisual.createVertexSettings();
  vertexSettings.stretchStiffness = 0.75;
  vertexSettings.bendStiffness = 0.75;
  vertexSettings.stretchStiffnessGlobalWeight = 0.0;
  vertexSettings.bendStiffnessGlobalWeight = 0.0;
  // set this vertex simulation settings to all the yellow vertices with
  for (var i = 0; i < yellowIndices.length; i++) {
    clothVisualArg.setVertexSettings(yellowIndices[i], vertexSettings);
  }
  // we can also use getVertexSettings(vertexIndex) and modify vertex settings.
  clothVisualArg.resetSimulation();
}
Next Steps
Now that you’ve learned the basics of Cloth Simulation, try making your own cloth. See different examples in the Cloth Simulation Template.