Sentiment Analyzer
The Sentiment Analyzer example demonstrates how you can utilize the Emotion and Yes/No classifiers to enrich any vocally driven lenses with Speech Recognition. The example includes several helper scripts that you can use to trigger visual effects without the use of scripting. Learn mode about Speech Recognition and it's limitations

Sentiment Analyzer asset is available in the Lens Studio Asset Library. Import the asset to your project, create a new Orthographic camera and place the prefab under it.
Guide
Sentiment Analyzer shows how to use voice command detection with Speech Recognition. It includes support for two intent models:
- Emotion Classifier: Anger, Disgust, Fear, Joy, Sadness, and Surprise.
- Yes/No Classifier: Positive Intent and Negative Intent.
Here is how to logout of My Lenses, log back in by clicking on the user icon in the top right corner.

VoiceML Module
This example is built using the VoiceML Module that can be found the Asset Browser panel. It is referenced in Speech Recognition [EDIT_ME] script and provides required API.

In order to access microphone data in Lens Studio enable it in the bottom left corner of the Preview panel.

If the voice event - On Listening Enabled is successfully called. We can see the Listening Icon pop up. Now try to speak to the microphone. The icon will animate when in listening mode. Animation will pause when getting the final transcription results. And turn red when getting an error.
Speech Recognition
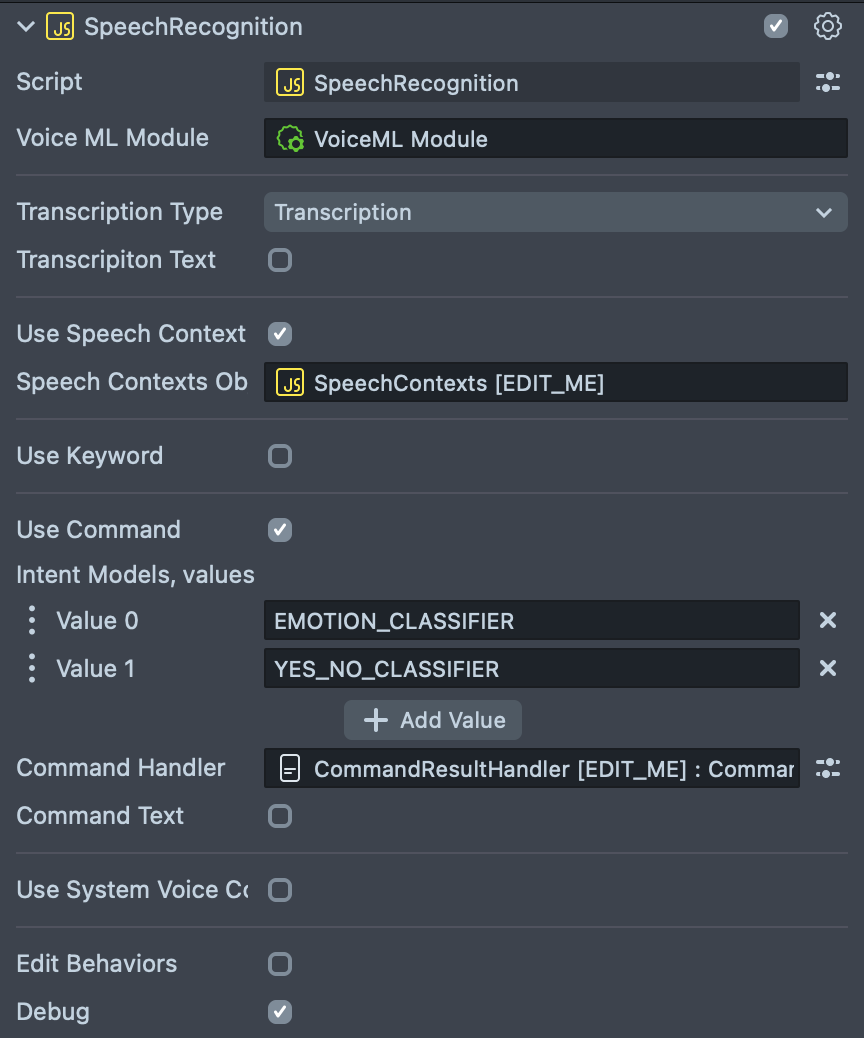
SpeechRecognition script attached to the Speech Recognition scene object is the main controller. It is the same script used in the Speech Recognition example, this which explains each script input in details.

- VoiceML Module - reference to the Voice ML Module asset.
- Transcription Type - a type of transcription, Can take one of the values:
- Transcription - final transcription.
- Live Transcription - live and slightly less accurate transcription before we get the final, more accurate transcription.
Try to change the setting to see the difference.
-
Transcription Text: if enabled transcription result can be displayed on a Text component.
- Text Component: Text component to set output text to.
-
Use Speech Context: if enabled, allows to set Speech Contexts object.
- Speech Contexts Object: reference to a Speech Context Script.
-
Use Keyword: allows the use of Keyword Detection, read more here.
-
Use Command: allows to handle commands and configure intent models.
- Intent Models: array containing intent model names. It is set to two values:
- EMOTION_CLASSIFIER: Allows to detect and emotion such as Anger, Disgust, Fear, Joy, Sadness or Surprise.
- YES_NO_CLASSIFIER: Allows to detect positive or negative intent.
- Command Handler: a reference to a CommandResultHandler script that allows to define responses for detected intents.
- Command Text: if enabled detected command can be displayed on a Text component.
- Text Component: Text component to set output text to.
- Intent Models: array containing intent model names. It is set to two values:
-
Use System Voice Command: allows to use some of built-in system commands. Read more here.
-
Edit Behaviors - allows to add behavior script responses for different voice events.
- Debug : if enabled prints out detected voice events in the Logger panel.
For each voice event, multiple instances of Behavior script can be set: - On Listening Enabled: Behavior scripts triggered when the microphone is enabled. - On Listening Disabled: Behavior scripts triggered when the microphone is disabled. - On Listening Triggered: Behavior scripts triggered when changed back to listening mode. - On Error Triggered: Behavior scripts triggered when there is error in the transcription. - On Final Transcription Triggered: Behavior scripts triggered when it's a full result, or partial transcription. - On Command Detected: Behavior scripts triggered when any command is detected.
Command Result Handler
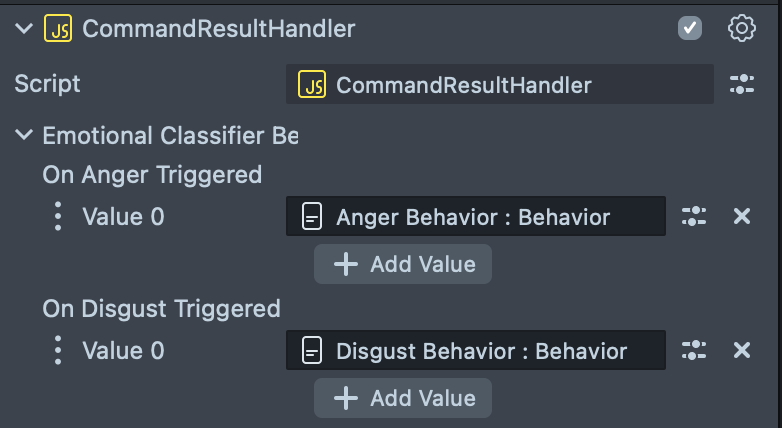
CommandResultHandler script allows to add responses to detected commands. Select the CommandResultHandler [EDIT_ME] scene object and tweak script inputs.
The example is simply configured to print put the text to Logger panel. Read more about Behavior script to add a response of your liking.

In Lens Studio Preview the microphone button is not simulated on the Screen. When we reset the preview, once the Speech Recognition is initialized, On Listening Enabled will be triggered automatically. To learn how to use the microphone button, try to preview the Lens in Snapchat! Please check the details in Previewing Your Lens.
Speech Context
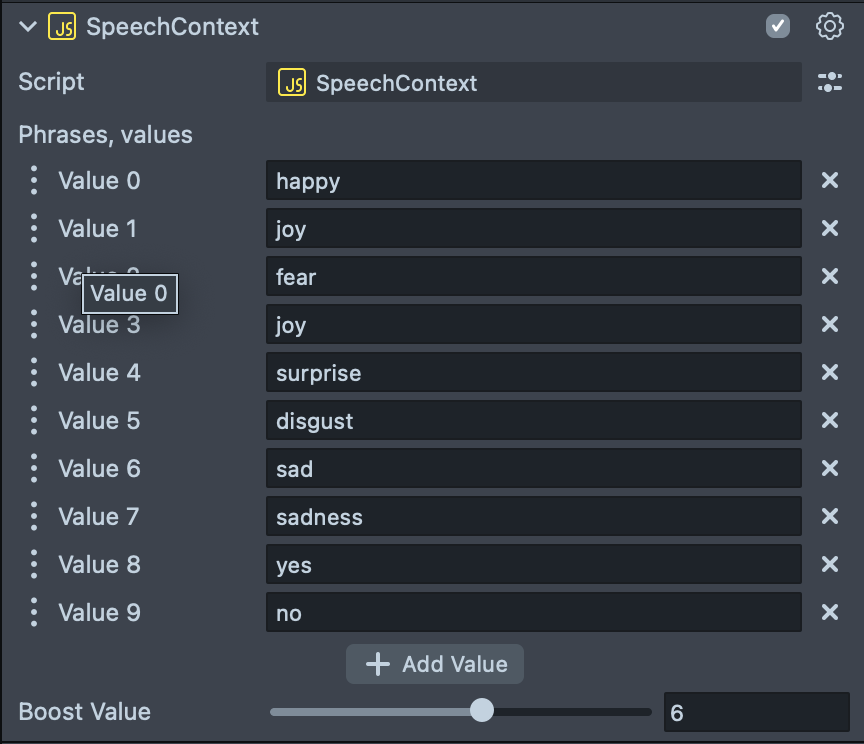
Adding speech contexts to the transcription allows to boost some of the words for specific transcription scenarios. Use this when transcribing words which are rarer and aren’t picked up well enough by Snap, the higher the boost value will be, the more likely the word to appear in transcription.
Select the SpeechContexts [EDIT_ME] scene object in Scene Hierarchy. Attached script allows to add words to the phrases and set a boost value for the phrases. To add a new word, click on the Add Value field and input the word you want to add.

Notice here the phrases should be made of lowercase a-z letters. The phrases should be within the vocabulary.
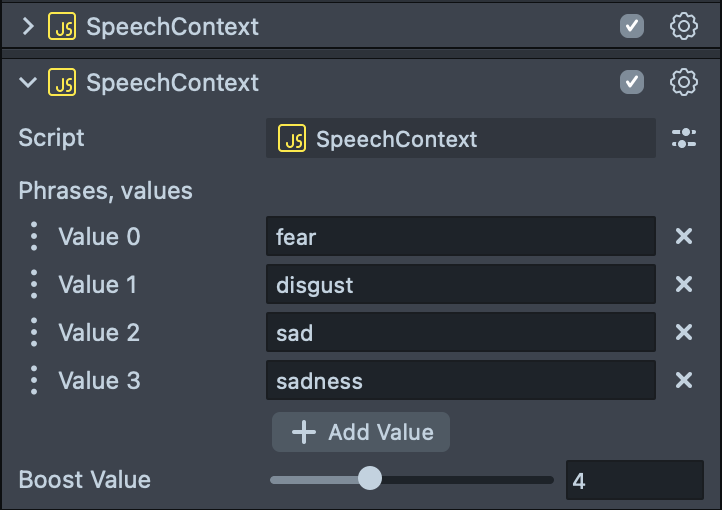
Or you can add another instance of Speech Context script to the same scene object with a different boost value.

The range for boost value is from 1-10, we recommend you’ll start with 5 and adjust if needed (the higher the value is, the more likely the word will appear in transcription)
Behavior and Tween
In the example, when the voice command is detected, you might notice here we are triggering four tween animations:
TWEEN_SETSCREENTRANS_DETECTED-Orthographic Camera->UI->NLP Command Text-> FirstScript Component.TWEEN_SETCOLOR_DETECTED-Orthographic Camera->UI->NLP Command Text-> SecondScript Component.TWEEN_SETOUTLINE_DETECTED-Orthographic Camera->UI->NLP Command Text-> ThirdScript Component.- And we also pause the Listening Icon animation.

Error Codes for Command Responses
There are a few error codes which NLP models might return:
#SNAP_ERROR_INCONCLUSIVE: if two or more keyword categories.#SNAP_ERROR_INDECISIVE: if no keyword detected.#SNAP_ERROR_NONVERBAL: if we don’t think the audio input was really a human talking.#SNAP_ERROR_SILENCE: if too long silence.- Anything starting with
#SNAP_ERROR_: Errors that are not currently defined in this document and should be ignored.
The Lens can only detect one voice command from each intent model. However both intent models can return valid results. For example, “Yes, I feel happy” will return Joy and Positive Intent as the results. “I feel happy” will return Joy for Emotion Classifier and #SNAP_ERROR_INDECISIVE for Yes No Classifier.
Previewing Your Lens
You’re now ready to preview your Lens! To preview your Lens in Snapchat, follow the Pairing to Snapchat guide.
Once the Lens is pushed to Snapchat, you will see a hint: TAP TO TURN ON VOICE CONTROL. Tap the screen to start VoiceML and the OnListeningEnabled will be triggered. Press the button again to stop VoiceML and the OnListeningDisabled will be triggered.

Related Guides
Please refer to the guides below for additional information: