Submitting Your Lens
Introducing Lens Folders
We are introducing Lens Folders to manage all Lenses for you and your teams. With this evolution, you will be able to create Lens Folders to manage and distribute Lenses for yourself, as well as for your teams and organizations.
What are Lens Folders?
Lens Folders are the home for your Lenses. With Lens Folders, you can organize your Lenses based on your needs, and share access to the Lens Folder with members of your teams and organizations. With Lens Folders, a Lens can be created independently of where it will be used. If you are working with a business or an advertiser, your Lens can be assigned to another profile other than yourself, as well to multiple ad accounts, provided that they are in the same organization.
For existing My Lenses users
Snap will automatically create an Organization and a Lens Folder for all your current Community Lenses. Those Lenses will automatically be distributed to your profile with no interruptions. Your historical Lens metrics and visibility setting will not be impacted.
You will also be able to create a new organization and a new Lens Folder during the submission flow.
For new Lens Creators
You will be able to create a new organization and a new Lens Folder during the submission flow.
Project Set Up
Before submitting your Lens, make sure you have configured your project info. For more information about configuring your project info, please refer to the Configuring Project Info guide. Next, make sure your Lens meets the performance requirements detailed in the Performance and Optimization guide. Finally, make sure the Lens you are submitting meets our Submission Guidelines.
To submit, select the Publish Lens button in the top left corner of Lens Studio. This opens the My Lenses window. If you have not configured your project info, the project info window will be opened instead.

Log Into Snapchat
You'll now be prompted to log into Snapchat. The username and password are the same ones you use for your Snapchat account.

Next, you'll be prompted to authorize Lens Studio. Click Authorize.

Once authorized, click Continue on the "Back to Lens Studio" prompt.

Set up an organization and a Lens Folder
You need to set up an organization to create a Lens Folder. If you do not yet have an organization, you will be asked to create a new organization in the submission flow.

You can select an existing organization if you already have one, and set up a Lens Folder under your selected organization.

Select a Lens Folder
Once you have set up your Lens Folder, you can select the Lens Folder to submit your Lens. You can set up multiple Lens Folders under one organization to manage the permission and access of your Lenses.

Submit as a new Lens or Update an existing Lens
You can either submit the Lens as a new Lens, or update an existing Lens under your selected Lens Folder.
Adjust Lens Details
After a Lens Folder has been selected, you’ll be prompted to add information on your Lens. Here you can add descriptive Tags to help Snapchatters find your Lens. In addition, you can set the Visibility of your Lens.
You can add up to 8 tags. Each tag should be between 3-15 characters and must contain only numbers and letters.
Upload to Lens Folder
If you are not ready to publish your Lens to Snapchat yet, choose the Upload to Lens Folder option. The Lenses will not be published anywhere and you will be able to update the Lens from your Lens Folders.
If you are a Camera Kit partner and do not wish to distribute your Camera Kit Lens to the Snapchat app, you should select Upload to Lens Folder. Then, the Lens will only be uploaded to your Lens Folder and will be available in your Camera Kit Lens Scheduler.
If you are a Lens Creator who works with a business organization, and want to publish your Lens to a Profile or an Ad Account that belongs to another organization, you should select Upload to Lens Folder. The Lens then will only be uploaded to your organization’s Lens Folder and will be available in Business Manager for distribution.
Upload and Publish
If you are ready to publish your Lens to Snapchat and let Snapchatters to view and use your Lens, choose “Upload and Publish”. You will be able to modify the Lens Visibility later.
Only choose “Upload and Publish” if you want to publish the Lens to the logged in user’s account.

If you wish to publish the Lens to your own profile, choose “Upload and Publish”. You can also set the Visibility of your Lens.
Finally, click Submit Lens to submit your Lens.
Before submitting your Lens, we recommend creating a preview video. If you have added your preview video in the Project Info window, you do not need to add another one here. For more information on creating a preview video, follow the Creating a Preview Video guide.
When you're done you will be presented a with a congratulation message where you can head to My Lenses where you can manage the new Lens, as well as all the Lenses you've already submitted.
My Lenses
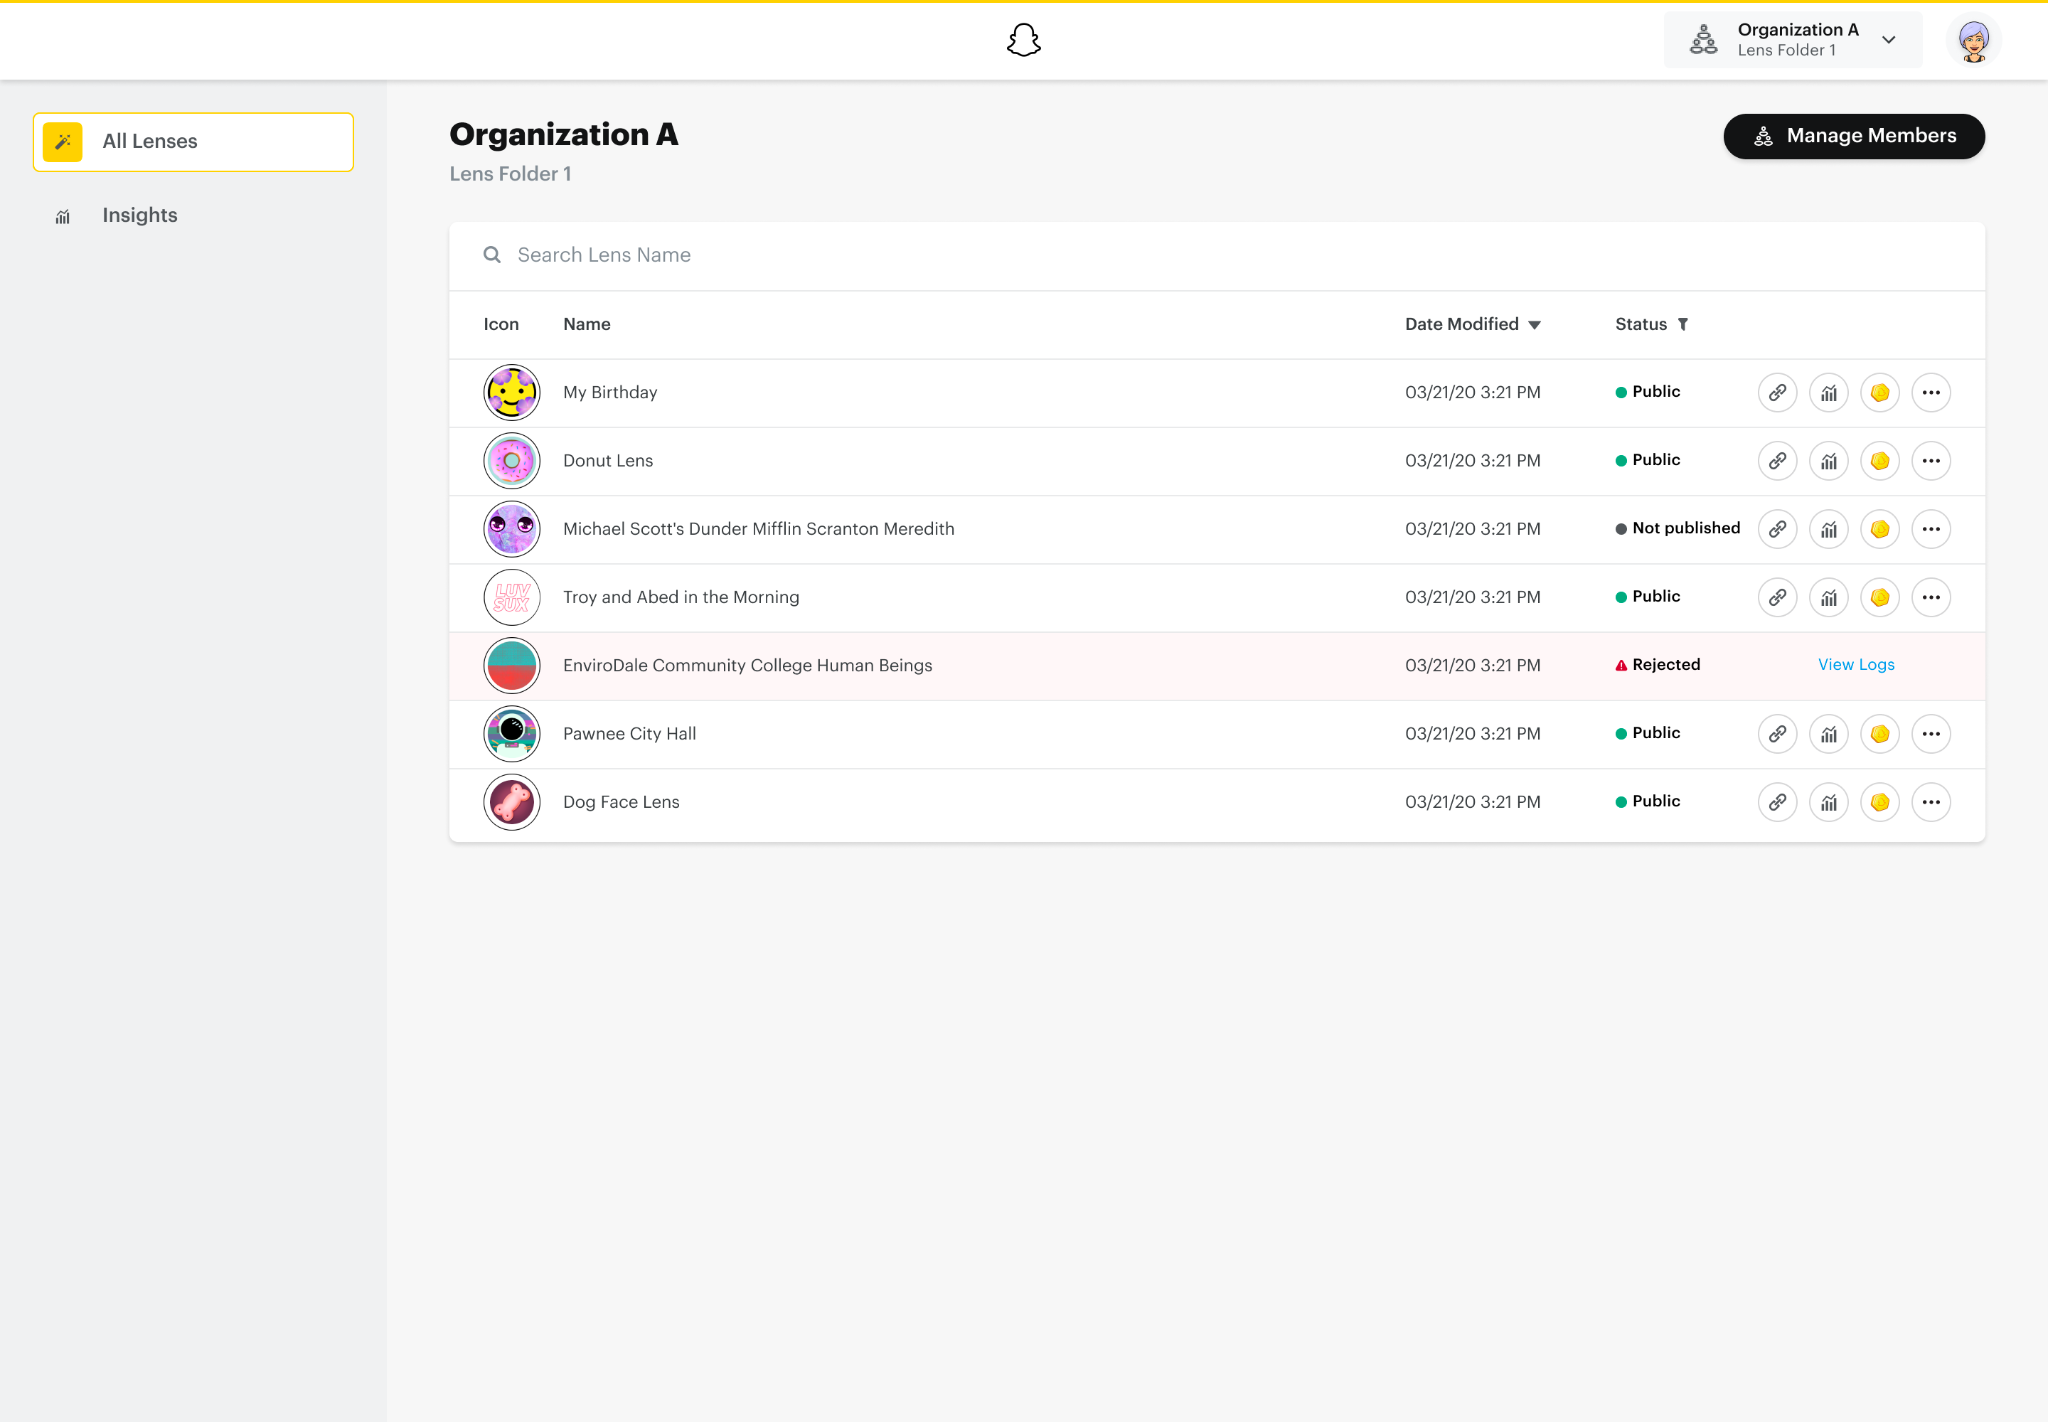
Once you've uploaded your Lens, you'll be taken to the My Lenses portal. Here, you can see all Lenses that you've uploaded and monitor the submission process. You can also get to the My Lenses portal directly by pressing the My Lenses button in the top right of your Lens Studio project window.

Here you can search for your Lenses, get its status, change its details, as well as get its Snapcodes or Link so you can share it.
You will see all Lenses on your personal profile on the “All Lenses” tab.
Organization Drop Down
If you want to look for Lenses in a specific organization / Lens Folder, you can open the organization drop. Here, you will find a list of organizations that you have access to.


When you land on an organization, you can switch between different Lens Folders using the filter.
Snap has introduced a search bar in the Organization dropdown that allows you to search My Lenses by Organization ID, Org Name, Lens Folder ID, Lens Folder Name, Ad Account ID, Ad Account Name, Business Profile ID, or Business Profile Name.
Manage Members (Only for users who work with business)
If you want to manage members for your organization / Lens Folder, click on Manage Members button. You will be taken to Snap’s Business Manager to manage members for your organization and Lens Folders.
Roles and Permissions of Lens Folders
Members in your organization can have one of three roles on a Lens Folder:
| Roles | Permission |
|---|---|
| Lens Folder Admin | Lens Folder Admins can view, create, manage, and delete Lenses within a Lens Folder, as well as manage and delete the Lens Folder itself. |
| Lens Manager | Lens Managers can view, create, and manage existing Lenses in a Lens Folder. They cannot take action on the Lens Folder itself. |
| Lens Creator | Lens Creators can only view existing Lenses and create new Lenses in a Lens Folder that are not made available to the Snapchat community. They cannot take any other action on the Lens Folder or Lenses within it. |
Organization Admins have full access to Lens Folders. Business Admins can view all Lens Folders and assign roles to others and themselves. Learn more about roles and permissions here.
Lens Folder Deletion
Lens Folders belong to Organizations, and therefore can’t be deleted. You can, however, delete your Lenses from the Lens Folder.
If you delete your Snapchat account, Lenses in your Lens Folders will not be deleted. If you DO NOT want your Lenses to be used in Snapchat, please make sure that you delete all your Lenses before deleting your account.
Lens Statuses
Below you will find a brief description for each state your Lens could be in. Your Lens' current status is displayed in the Status column of the My Lenses portal.
In Review
While the Lens is waiting to be approved, the Lens will show as In Review under Status. If this is the first time you've submitted this Lens you won't yet have a Snapcode or any Lens stats.
Live
Lenses that are live will show as Live under Status.
You can get a link to the Lens by clicking on the link icon on the right side next to the ... button. Additionally, you can download the Snapcodes for the lens by click on the ... icon, and selecting Download Snapcode,
For best practices when sharing, please refer to the Sharing Your Lens guide.
Offline
Sometimes you may want to take a Lens offline. To do this, click on the Lens, and under Visibility, choose Offline.
While a Lens is offline, the Snapcode will be deactivated and anybody who scans it will be shown an error message.

At any time, you can make it Live again by changing its visibility.
When deactivating (or reactivating) a Lens it can sometimes take approximately 10 minutes before the Snapcode stops working.
Invalid
Sometimes there might be a technical issue with your Lens.
If this is the case, the status of your Lens will show as Invalid. There will be one or more reasons shown to help you debug and fix your Lens. You can then submit an update. Please refer to the Submission Guidelines under "Technical Requirements" for some reasons why it may be invalid.

If the Lens has already been Live and it's just your most recent submission that is Invalid, the previous version will remain active and it can still be used by Snapchatters.
Rejected
If the Lens has been rejected, the Lens will show Rejected under Status.
For more information on why a Lens might have been rejected, please refer to the Submission Guidelines. When your Lens is rejected, it can no longer be unlocked.

However, if your Lens has been rejected you have the opportunity to modify your Lens Project, fix the content, and submit an update.
Lens Submission Error Reporting
In general, all Lens submissions go through a 3-step process before they are published to Snapchat. The Validation step is the first to happen within the process. Before Lenses are submitted for further testing, Lens metadata is read to ensure the Lens being submitted meets certain requirements, such as the version of the Lens package being submitted. Once the validation step is passed, Lenses are pushed to the Automated Testing stage which is where the bulk of Lens testing occurs. Lenses are checked for performance, device compatibility as well as memory usage across an array of devices (iOS and Android). The final step includes Content Review. In the Content Review step, all Lenses are reviewed to ensure they do not contain any assets or attachments that violate Snapchat’s Community Guidelines.
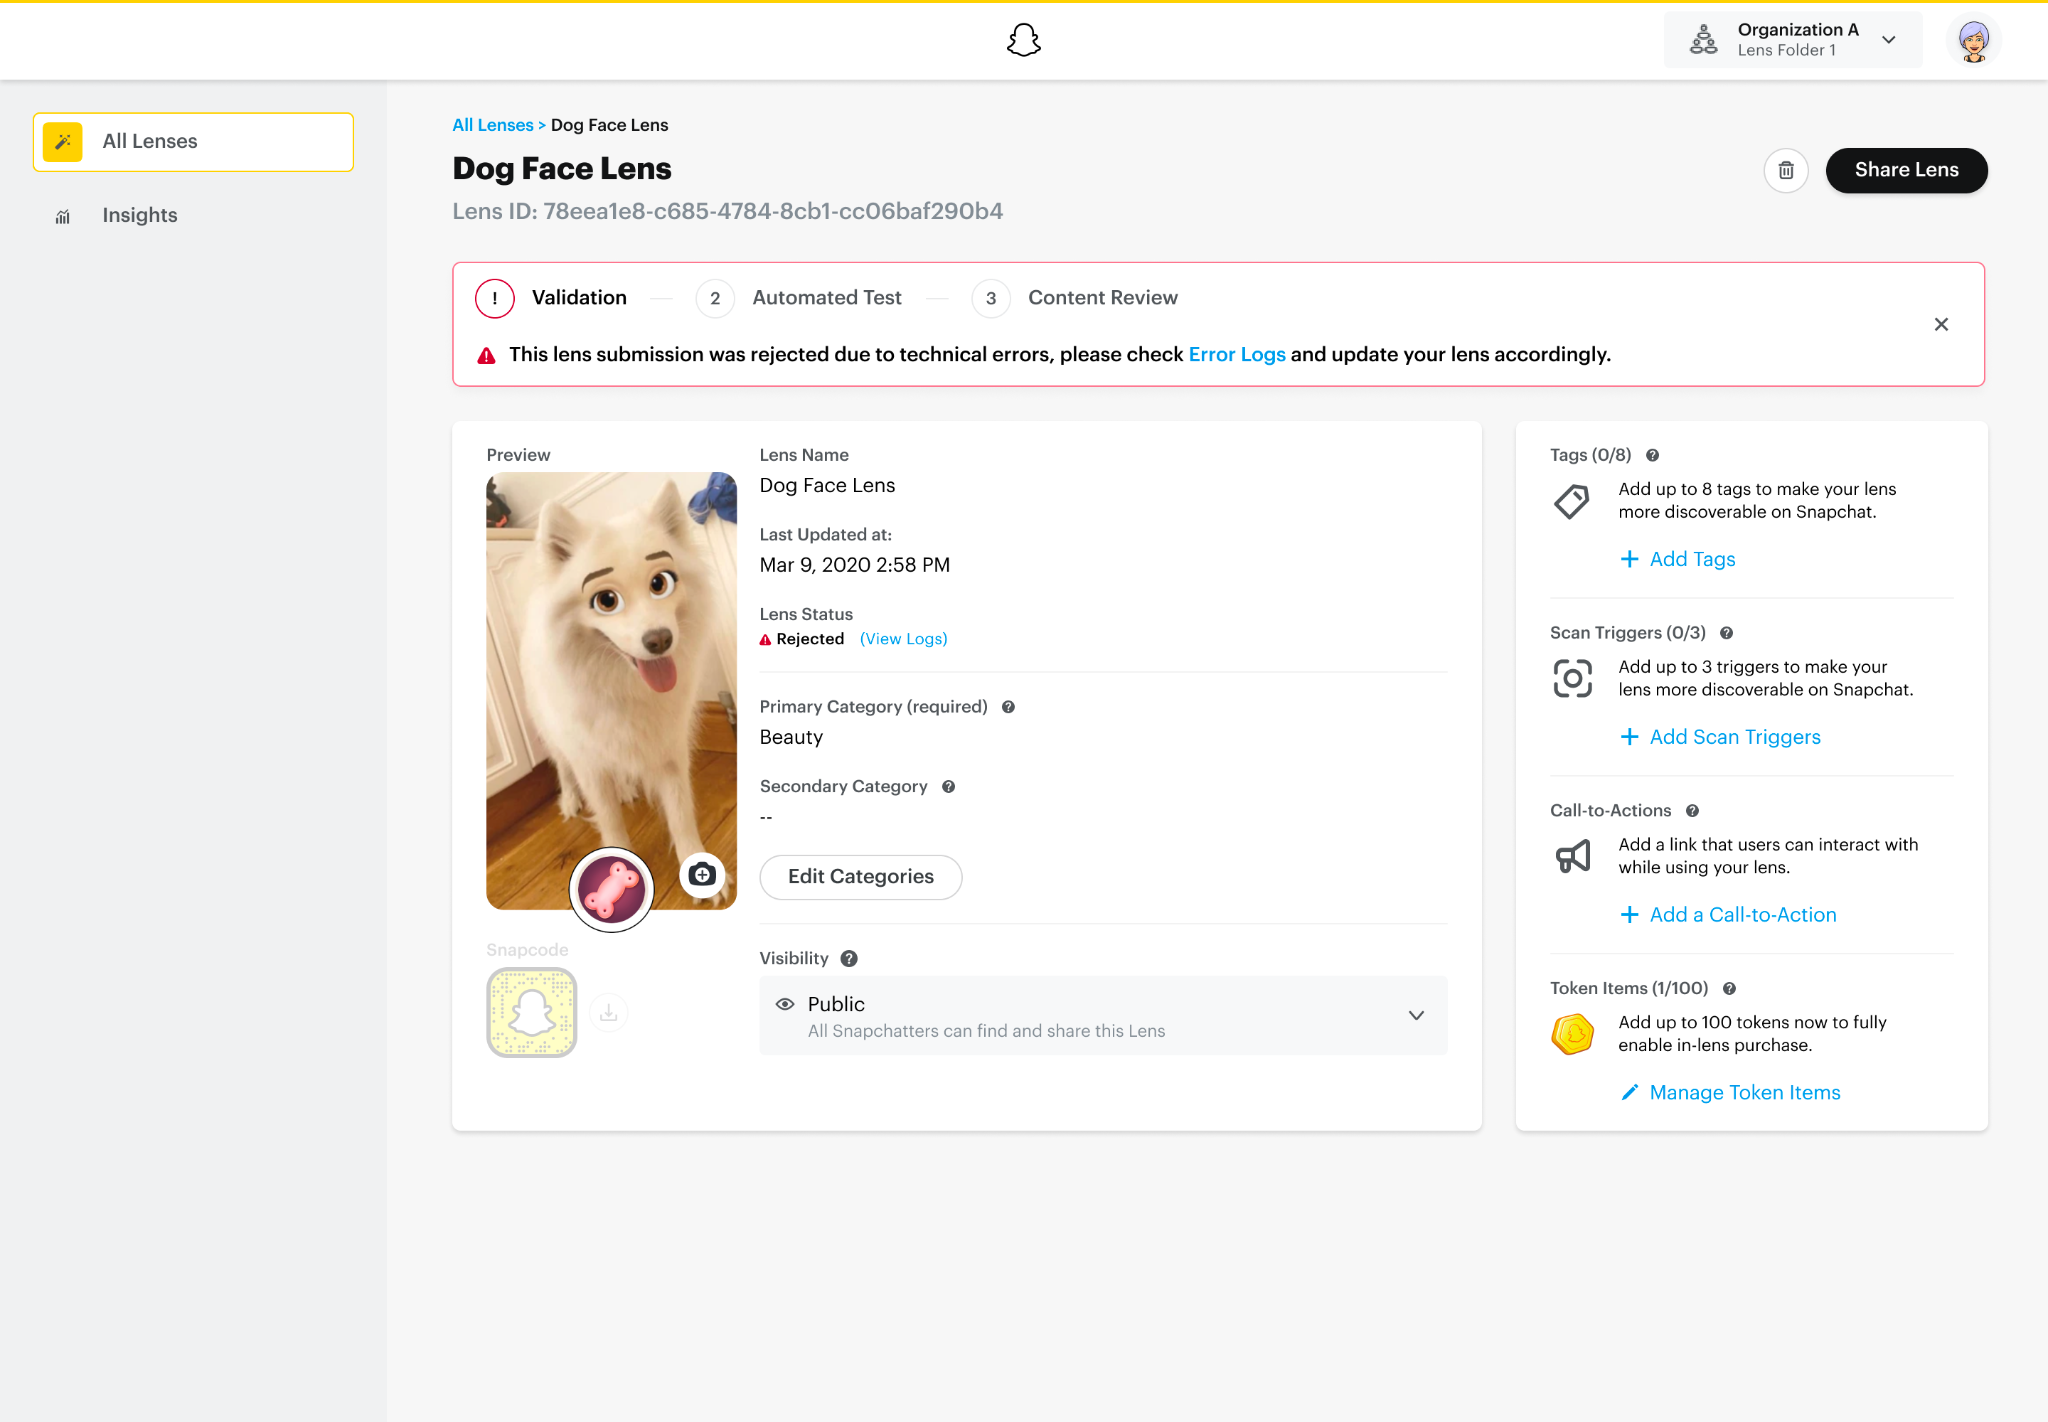
There may be cases in which you run into technical issues during the Validation, Automated Testing, or Content Review phases of the Lens submission process and your Lens may be rejected. To find more details about the rejection, you can find the Lens within the ‘All Lenses’ view of My Lenses and click on the Lens name to learn in which stage of the Lens submission process it failed.


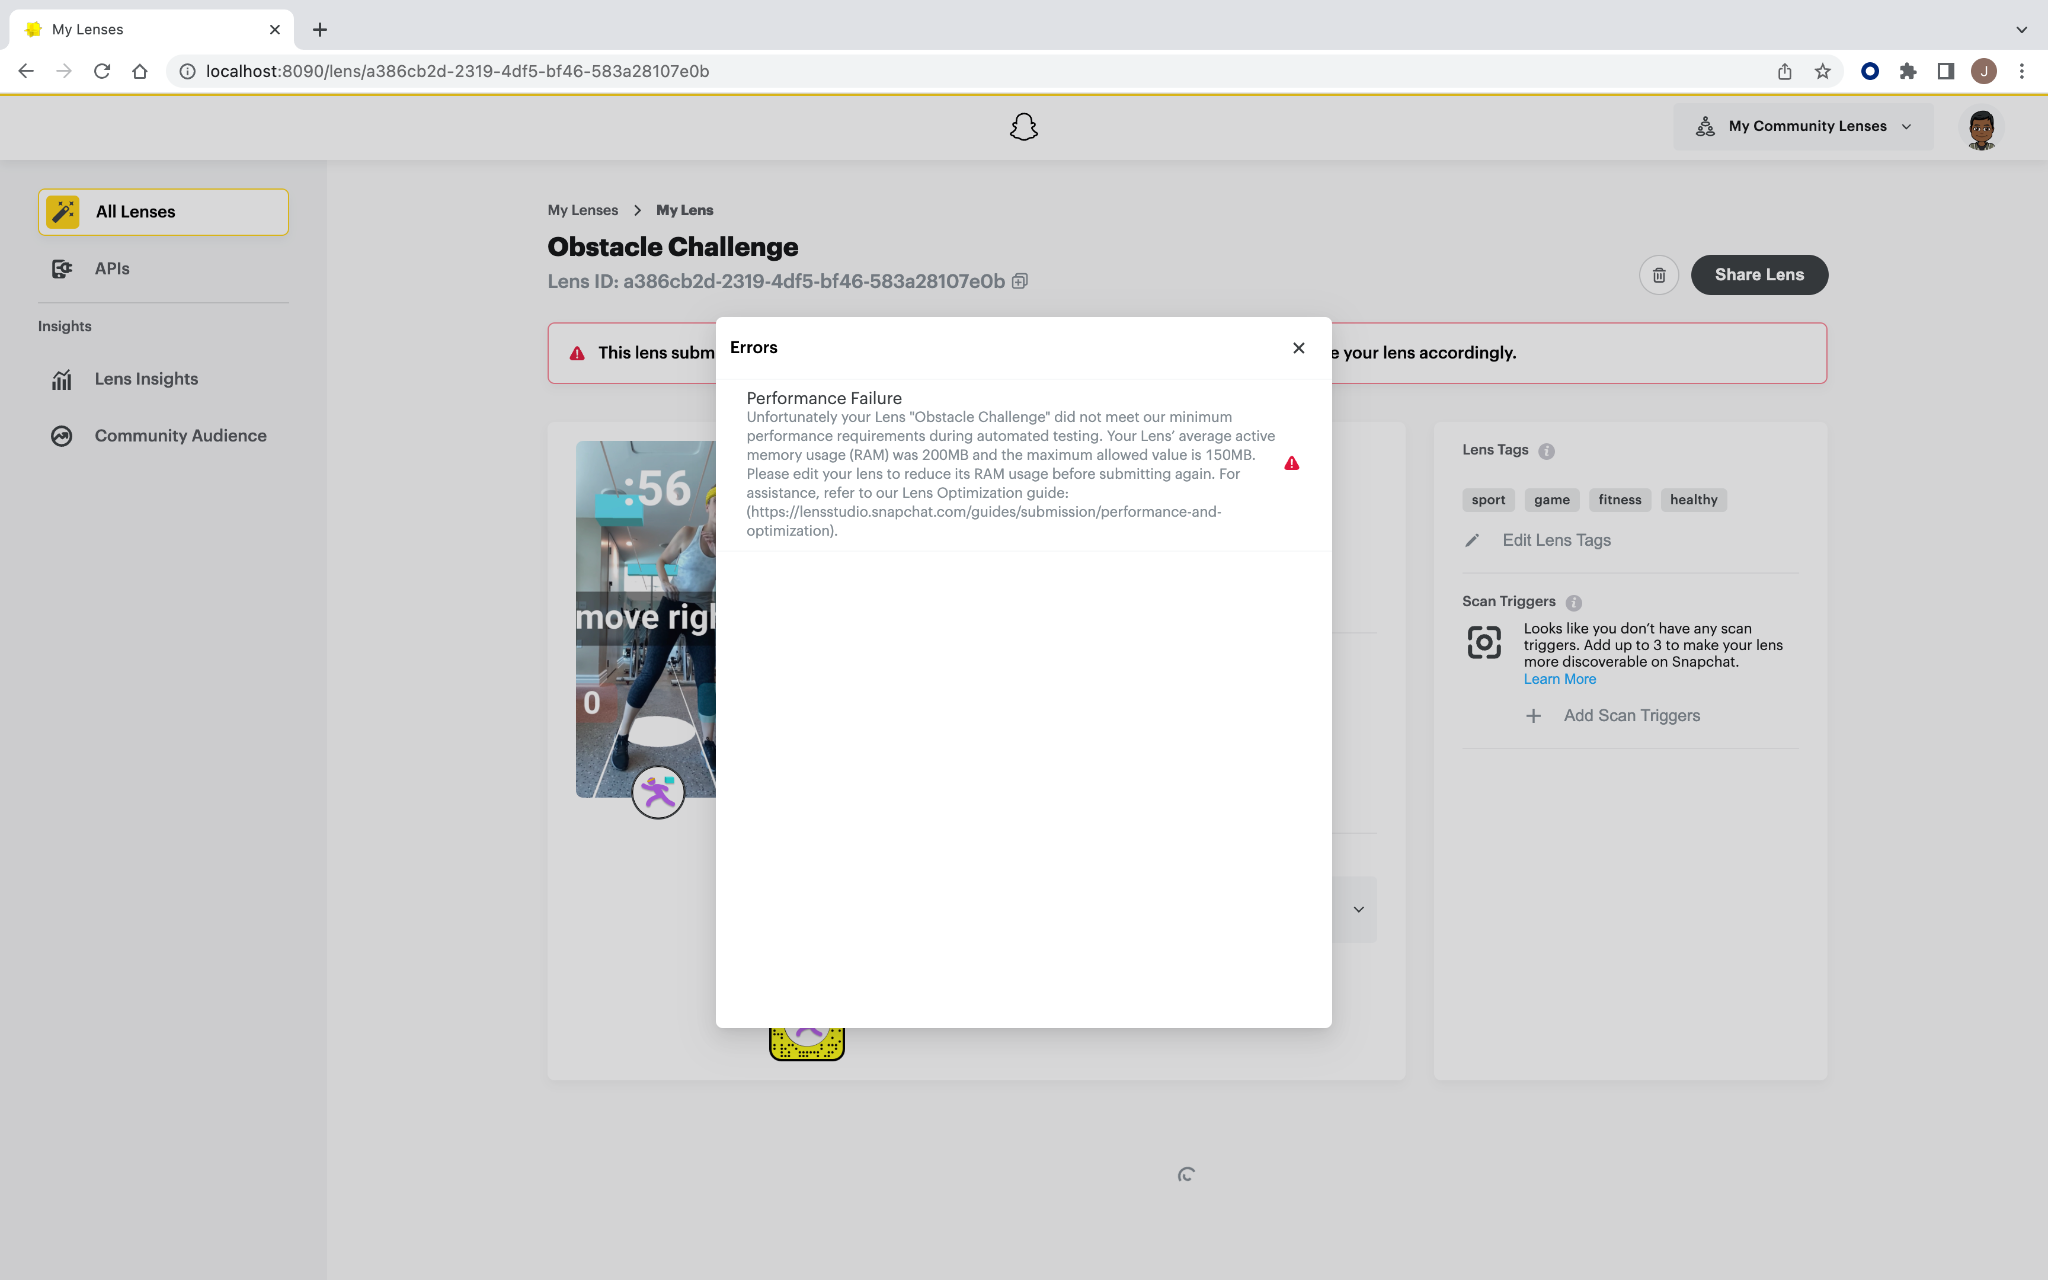
If a Lens fails in any part of the submission process, My Lenses shows you which step the issue occurred. By clicking on ‘Error Logs’, a modal will pop up and you will be able to see more details on the specific failure:

If these occur, please use the Lens Troubleshooting guide and follow the steps to locally test your Lens within Lens Studio.
Lens ID
Each Lens has a unique identifier. This is useful for being able to distinguish different Lenses you have submitted if they have a similar name or icon. It will also be needed for possible support requests.
To copy your Lens ID go to My Lenses and select the Lens you need the ID from. Click on the copy icon and your Lens ID will be copied to your clipboard.

Related Guides
Please refer to the guides below for additional information: