Earring Try-On
The Earring Try-On Template offers a quick way for you to get started with Earring based Try-On experiences and showcase additional features to enhance the user experience.
Ear Binding is a Custom Component that enables Lens Developers to build AR Try-On experiences that can bind a 3d Object to users ears. With earrings being a popular fashion accessory, AR Try-On experiences offers a way for users to visualize how earrings will fit to their ear.
Template Walkthrough
This Template introduces you to creating a Earring focused Try-On Lens, which allows you to attach objects to a user’s ear. The Earring Try-On Template contains three different examples of how to utilize the Ear Binding Custom Component. In the Objects panel, you can see the following examples:
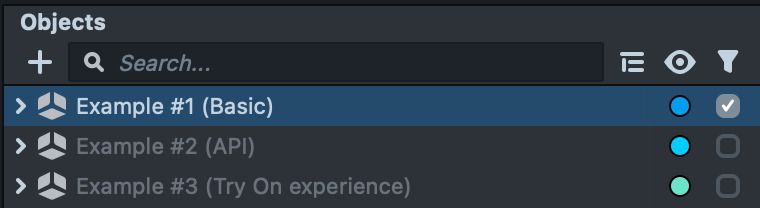
Basic
The Basic example is using the Ear Binding component to bind a single stud earring to a specific earring landmark.
You can utilize this example to test how Ear Landmarks work when placing content. If you edit the Earring Scene Object, you can change between different settings to see how they affect the final result in the scene panel.
API

Through the API of the Ear Binding Component it’s possible to manipulate the different settings of the component via script.
In this example, you can find two earrings, each holding a component in its hierarchy for changing the Ear Binding settings through the API. You can utilize the script EarringAPIExample to see how you can manipulate the Ear Binding settings using code.
See full API in Ear Binding Component API.
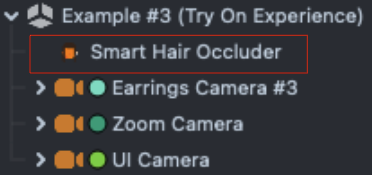
Earring Try-On Experience

This example shows a complete Earrings Try-On experience with additional advanced features within Lens Studio to increase a user’s immersion:
-
Advanced earrings: Some earrings may have moving parts, attach to different parts of a user’s ear or may hang from a user’s ear. These earrings show how to set up Physics to give a realistic feel.
-
Hair occlusion: Occlude the earrings using
Head VisibilityCustom Component to make the visual more realistic. For more information, go to the Head Visibility component section -
Hand physics and occlusion: Adding the ability to touch the earrings and occlude them using the hands.
-
This is achieved by importing the
Hand PhysicsCustom Component from the Assets Library.
-
-
Earring selection UI: Users may want to cycle between different styles and types of earrings. The Earring Selection UI is a UI element styled as a Carousel to allow users to select different earrings
- You can learn more about how to utilize the Carousel UI below.
-
Zoom: Using the ‘Zoom Image’ Custom Component to offer an easy way to inspect the look and feel of the earring. Zoom can be found under the Zoom Scene Object. For more information, go to the Zoom Setup section.
Ear Binding Component Overview
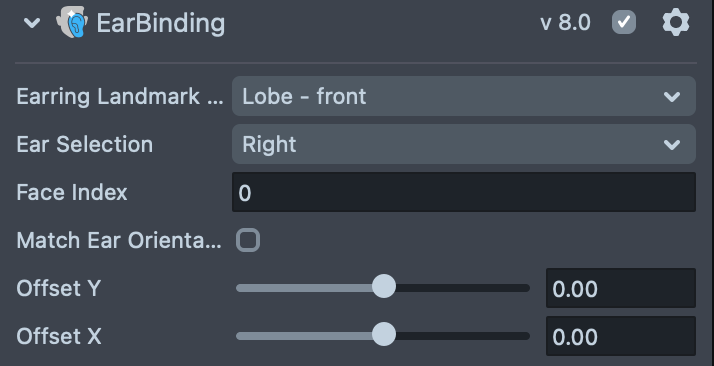
The Ear Binding component attaches its hierarchy to a landmark on either left or right ear.
-
Ear Landmark: Determines the position on the ear. You can select one of the following landmarks available on the user’s ear.
Index Position 1Lobe - front 2Lobe - back 3Top Orbital 4Scapha 5Helix 6Tragus 7Diath 8Rock 9Snug 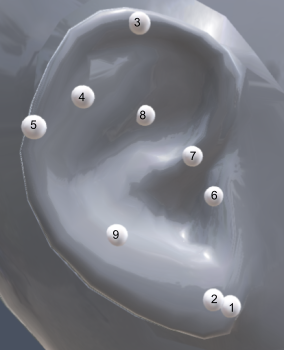
-
Ear Selection: Select target attachment ear -
leftorright. -
Face Index: The index of the face this event is tracking. You can change this value to control which face the event tracks. The first detected face is
0, the second face is1, and so forth.- Ear Binding can be used to add earrings to two persons at the same time.
-
Offset X / Y: fine tune the asset position with offset from the original landmark position. The offset is in the UV space of the ear mesh.
Adding Earring Binding to an Existing Project
Now that you have viewed the Earring Try-On Template and see how the Ear Binding Custom Component works, you can also add Ear Binding to your existing Lens Studio Projects. In this section, you will learn how to set up Ear Binding from scratch in a similar structure to the Earring Try-On template.
-
Open a new or existing project in Lens Studio 4.34 or greater.
-
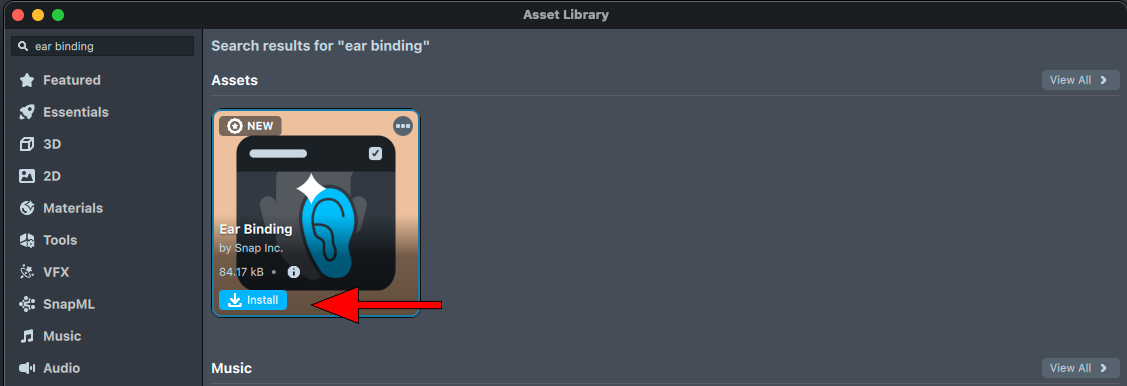
Left-click on the Asset Library button, located above the Objects panel.
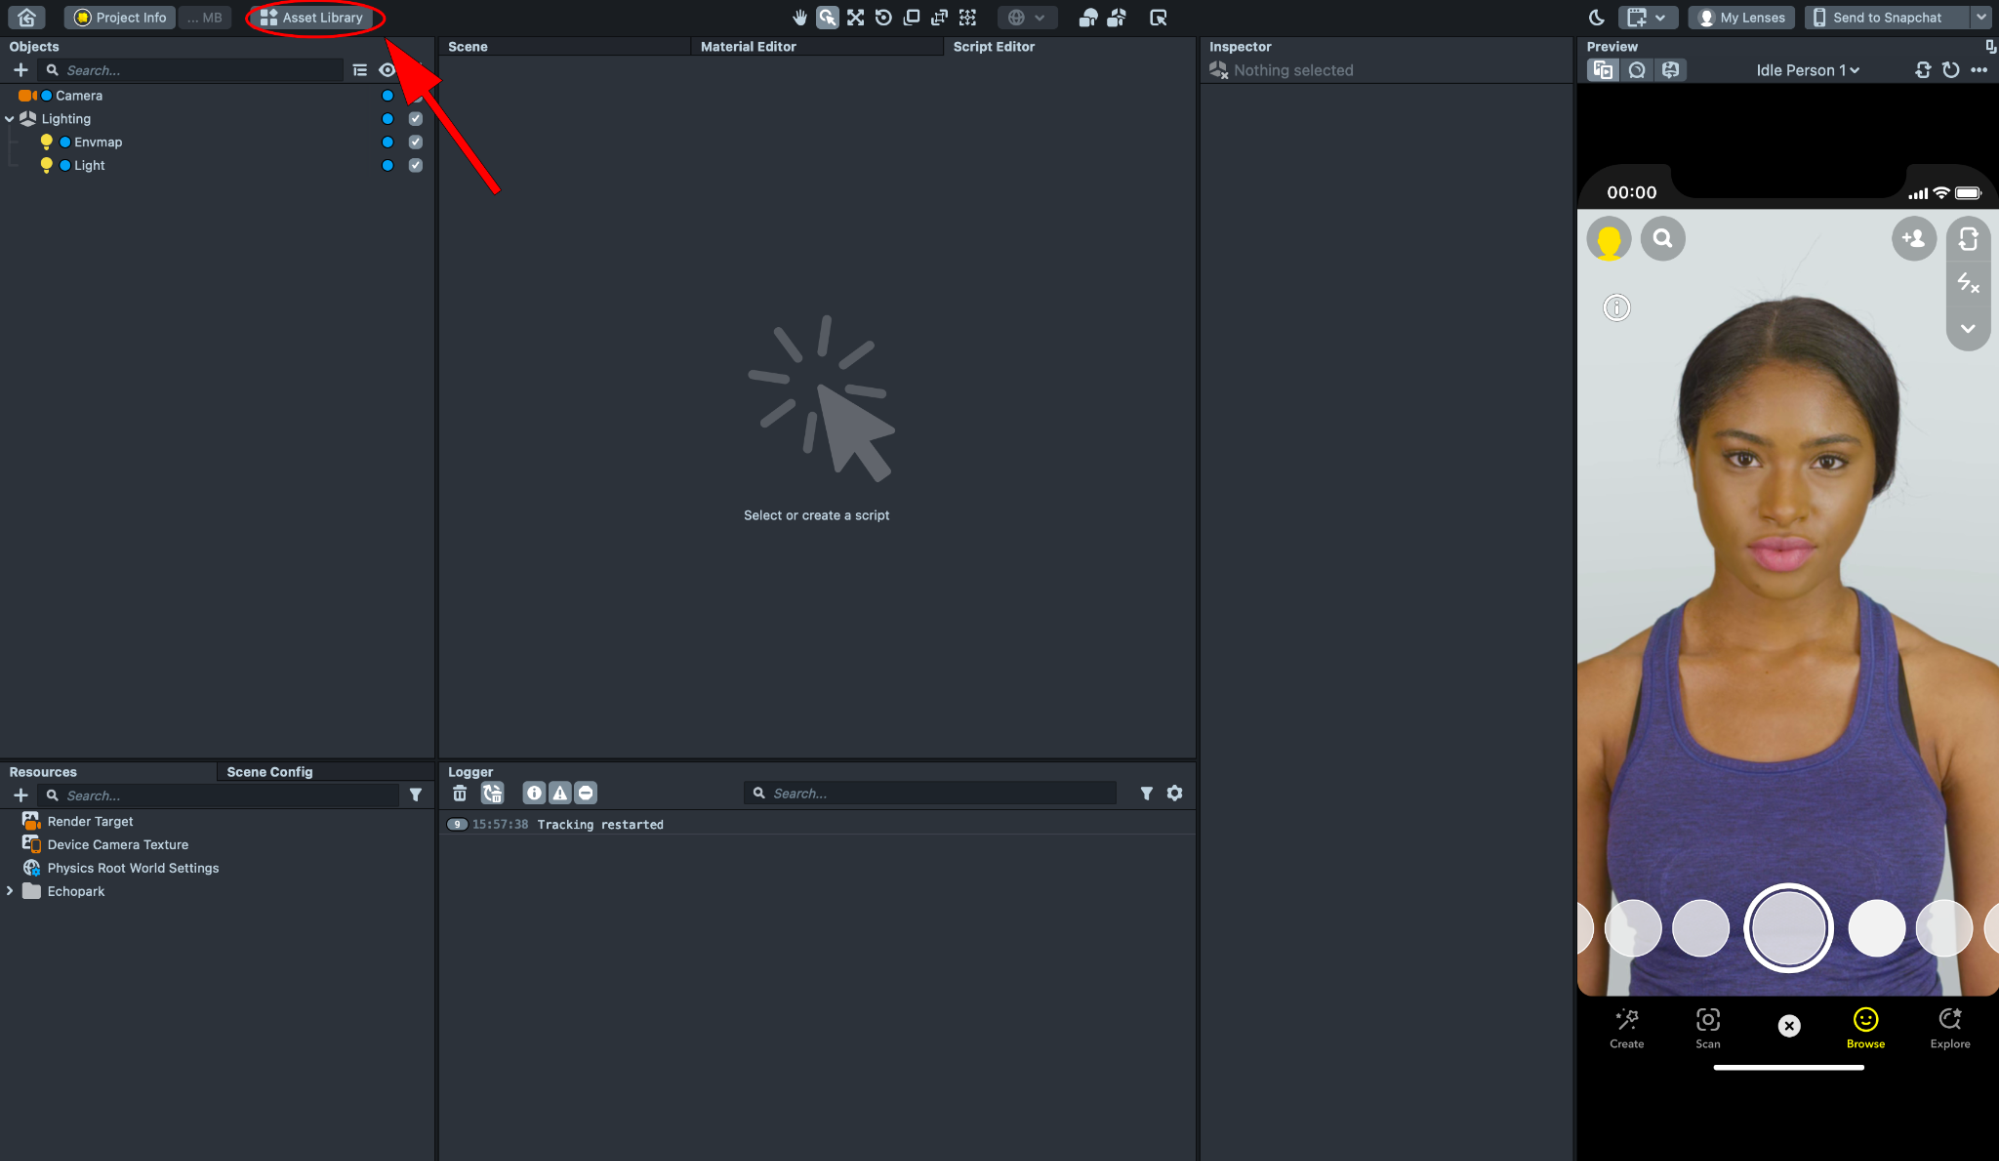
-
Search for
Ear Bindingin the search bar at the top left. -
Click Install on the Ear Binding Asset.
-
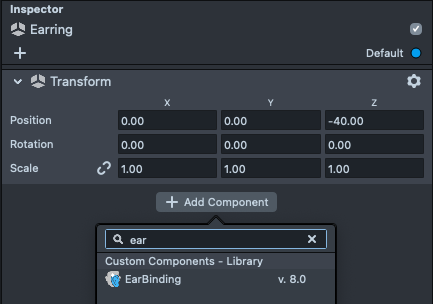
In your project, Add a new Scene Object under the main camera. Name the new Scene Object;
Earring.
-
With the new Scene Object selected, left-click on Add Component in the Inspector panel and search for
Ear Binding. -
Press Enter to add it to the selected Scene Object.
-
Add your earring asset under the hierarchy of the
EarringScene Object. For this example, we’ll add a sphere to represent an earring. Set the sphere’s scale to0.15on all axes for better visibility.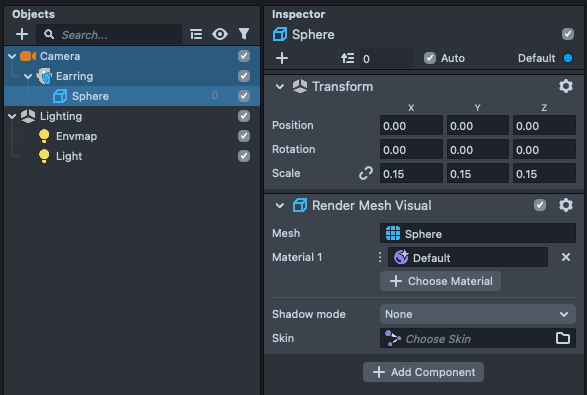
-
You can now select the
EarringScene Object and set the earring settings to your needs.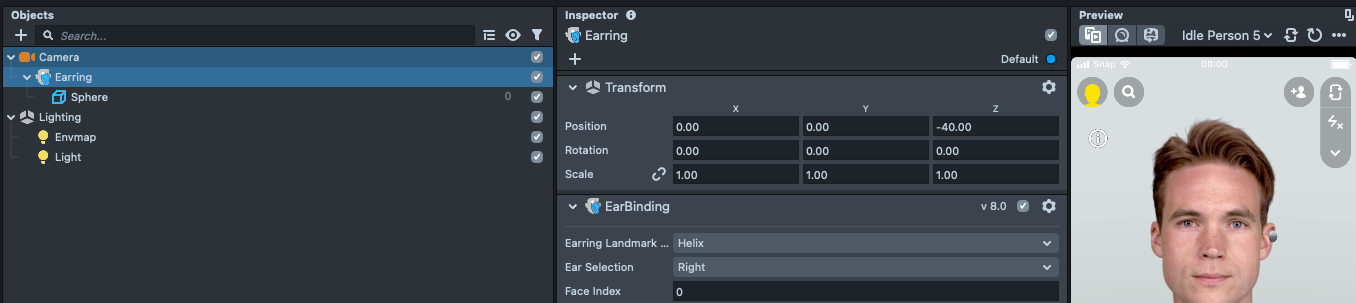
Adding Your Own Earring Asset
When designing an Earring Try-On Lens, you may want to include your own custom models to represent the type of earring you want to showcase. In the next few sections, you will learn about some things to keep in mind when building earring assets and how to set up your model to take advantage of what Lens Studio has to offer for your AR Try-On Lenses.
Creating Earring in 3D Modeling App
Download the face model to build the earrings assets with the right size to fit the face model in Lens Studio Please visit the face mesh page
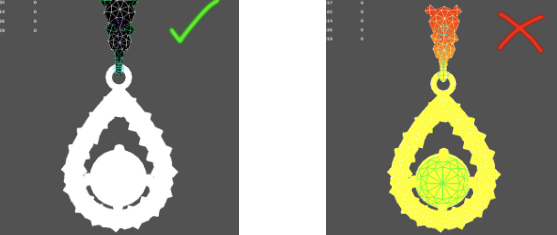
For every earring asset you create, it is important to remember to set its pivot to be at the point where you want the earring to be attached to the ear.
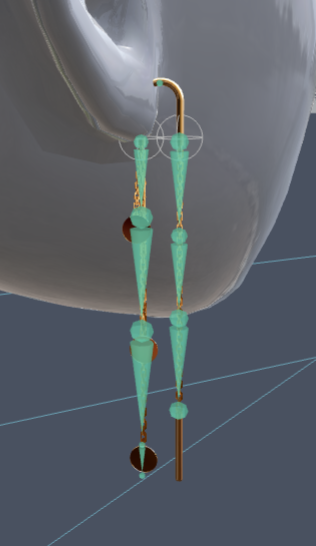
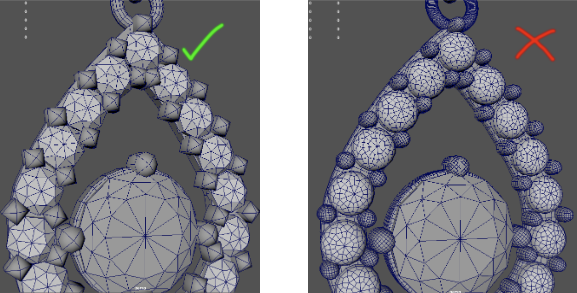
For the gold and chain earrings shown in the example above, the model was set up with an skeletal rig so that the mesh could have physics properties based on the different joints in order for them to act in a physically correct way. It is important to note that the rigged mesh is not required for every earring, a simpler type of earring that is fixed in position to the ear, such as an earring stud, doesn’t need to be rigged.
For rigged earrings, see the section in this document on how to set up the physics for the earring.
You can see an example of a rigged earring below, the green markings represent the rigged joints:
Please visit the export 3d object guide / 3D object import guide to see how you can bring in your own model.
Adding Interactivity with Advanced Features
Lens Studio offers Lens Developers a wide range of powerful and immersive features for AR content. In this next section, you will learn about some of the extra features you can include in your Try-On experience to enhance the user’s experience, such as making the hair occlude the earring or set up the earring to move with the user's head movement.
Physics Setup
Physics system updates separately from the AR tracking system, follow the Chain Custom Component setup for best results.
Lens Studio offers an incredibly robust Physics system to enable AR content to act and react like physical objects. We’ve used the Chain Custom Component that handles the physics setup.
The Chain Custom Component has two benefits that you can use in your future projects:
- Physics setup can be a bit time consuming, this script will take all the heavy lifting on itself.
- Taking care of hierarchy setup that works best for physics objects that are tracked, a use case which needs special handling - as the physics object needs to be separated from the tracked object (as the earring is attached to the tracked ear).
The Chain Custom Component offers a quick way to set up physics behavior on skeletal rig objects such as chains or earrings. The Chain Custom Component will take care of adding Physics Body and Constraints between the joints and can be used for dangling chains and double ended chains, such as necklaces.
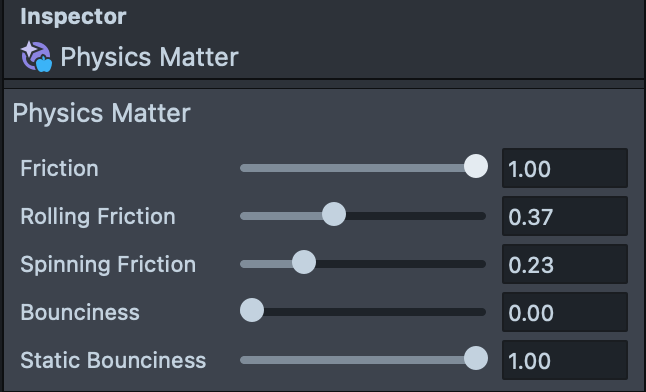
The Chain Custom Component determines physics behavior of the chain by controlling the shape, mass and damping as well as friction and bounciness through applying Physics Matter.
Setting Up
Joint Referencing
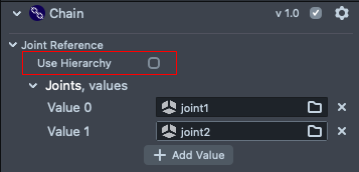
The first step for setting up the chain is providing the joints in the same order as in the model hierarchy, the custom component can do that automatically given the first joint in the hierarchy, the only requirement for automatic joint referencing is that the joints will keep a direct parent-child relationship as shown in the image below.

For automatic joint referencing, drag and drop the first joint to the Chain Base field of the Chain Custom Component, make sure that the ‘Use Hierarchy’ checkbox is set.

For cases where there isn’t a direct parent-child relationship between the joints such as in the image below, you should uncheck ‘Use Hierarchy’ and reference the joints manually.

Chain Shape
The Chain Custom Component adds physics bodies in the shape of a cylinder to each joint of the chain. In this section you can control the shape and constraint type of the chain.

Shape Radius - the radius of the cylinder in cm.
Cylinder length - the length of the cylinder in cm. This is the length of the cylinder that will be added to each joint.
Hinge offset - the position where the constraint will be positioned relative to the joint and will control the moment of inertia for the joint movement. A value of 0 will place the constraint in the middle of the joint, a value of 1 will place the constraint at the top of the joint giving it some freedom of movement, a value greater than 1 will give the joint even more momentum when moving.
Constraint Type - can be set as either Point or Hinge, determining the degrees of freedom the joint can move.
Chain Mass
This section of the Custom Component will determine the weight for each of the joints in the chain.

Mass Setting - can be either Weight or Density. The weight being the weight of each joint in kg, regardless of the shape of the joint and density will be the weight in kg/l thus taking the shape into account of calculating the weight of each joint.
Base Weight - the weight of the first joint.
Tip Weight - the weight of the last joint. The weight of the intermediate joints are linearly interpolated between the base and the tip.
Advanced Setup

Damping - the amount the chain slows down between frames.
Ang Damping - the amount the chain slows down on angular movement between frames.
Physics Matter - can reference a physics matter object that determines the friction and bounciness of the joints. In order to create a physics matter object, click the ‘+’ button in the Resources Panel and search for Physics Matter. This field can be left empty and will use default Lens Studio settings.

Anchor Both Ends - will set the last joint in the hierarchy as non-dynamic, this way the chain will have two anchoring points, in the beginning of the chain and in the end of the chain. This can be used to set up a necklace use-case.
Intangible - make the chain intangible.
Camera - set which camera should render the chain, use this if the chain is not a part of a camera’s hierarchy.
Debug

This section of the Custom Component is useful for showing the colliders and constraints of the joints and is recommended to be used while working on the chain to better understand the physics behavior.
Show Constraints - will show the constraints in a yellow mark.
Show Colliders - will show the collider as a blue cylinder for each joint.
More details about the different physics constraints and how they affect the physics body can be found in the Physics
Hair occluder using Smart Hair Occlusion Custom Component
‘Smart Hair Occlusion’ includes a hair occluder mask that toggles automatically when selected face features are hair occluded. This effect helps to show the hair on top of the rendered 3D earring and increase realism. This is important because in some scenarios the hair will be tucked behind the ear, and in that case we want the virtual earring to be visible.
Adding Smart Hair Occlusion
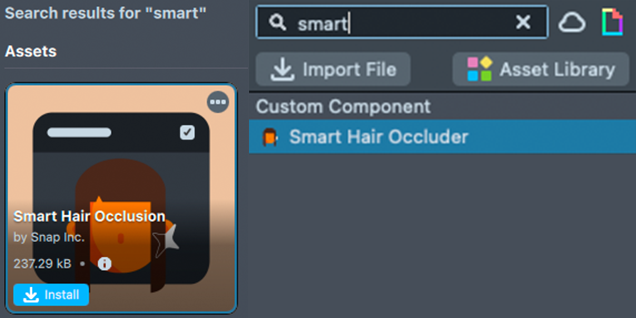
To add the ‘Smart Hair Occlusion’ Custom Component, search for ‘Smart Hair Occlusion’ in the Asset Library and add it to the project, than add it to your project via the Resources Panel.
Drag the ‘Smart Hair Occlusion’ Custom Component to the scene hierarchy, select the layer for the scene object to be the layer you want to occlude and you're done!
Smart Hair Occlusion Setup
Scene Hierarchy

Take a look at the Hair Color Template to see another example of using hair segmentation
UI Carousel

The Image Carousel Custom Component allows you to easily switch between different earrings. You can add / remove earrings by modifying the Icons list in the Inspector panel and place the corresponding earrings in the Earring Selector object.
Under the UI Camera Scene Object, you can find the Carousel Scene Object which holds the Carousel2D script. The icons value holds the textures that show as buttons to the user.
The actual function to disable or enable a specific earring takes place in the Earring Selector Scene Object.
In order to add/remove items from the Carousel:
- Add the earrings Scene Objects to the
Object Enablerscript under theEarring SelectorScene Object.
- Add the corresponding earring icons to the carousel, in the
CarouselScene Object.
Earrings’ icons should be placed in the same order as they appear in the Object Enabler script.
- If adding to a new project, another step is needed to connect between the
Carouseland theObject Enablerscript. This is done in the carousel settings.
Zoom Image
The Zoom Image Custom Component adds a Picture-In-Picture to the top corner of the screen. this enables the user to inspect the earring with more focus to details.
The Zoom Image has many cool features, such as the ability to focus on a specific target, or the ability to use touch to move the zoom.
Earring Try-On Template contains a helper script to determine which object is focused in the zoom using the head rotation, this way. When the user is rotating his head, the zoom will automatically focus on the ear that is facing the camera.
The helper script can be found under the scene object Zoom Point of Interest Selector.
Adding Zoom Image to an empty project
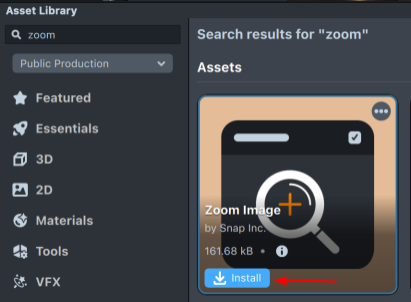
Add the Zoom Image custom component to Lens Studio via the Asset Library, search for Zoom Image and press install.
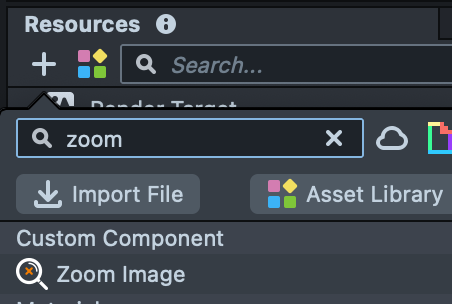
Then add it to your project by pressing the ‘+’ button in the Resources panel and search for Zoom Image. After doing so, you should see the Zoom Image component in the Resources panel.
The Zoom Image is used with an orthographic camera, and will require a Screen Transform. This will enable you to change the size and position of the zoom output.
You can add the Zoom Image custom component by first adding a Screen Image to the scene, which will add the orthographic camera if needed and the scene object with the Screen Transform, then replace the Image component with the Zoom Image component.
The last step before seeing the Zoom Image is referencing the camera you want to use as an input for the zoom.
Next you can change the screen transform to suit your desired look and feel.
The default output material for the Zoom Image is the ‘2D Shapes Shader’ (which can also be found in the Asset Library), which lets you customize the cutout shape anywhere from a circle to a rectangle, add outline and more. You can select the material and modify the shape as needed. Alternatively, you can use the default image texture if you’d like a rectangular shape without borders.
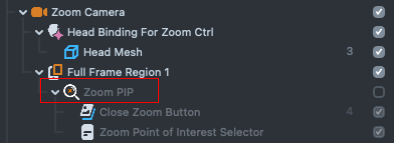
Zoom Image Setup in Earring Try-On
You can find the ‘Zoom Image’ Custom Component under the ‘Zoom PIP’ scene object. In the try-on experience, the zoom default state is ‘off’, and can be set on via the zoom button.
The zoom functionally is set via the script ZoomButtonController.js. The zoom button animation is done via the script ButtonControllerPIP.js
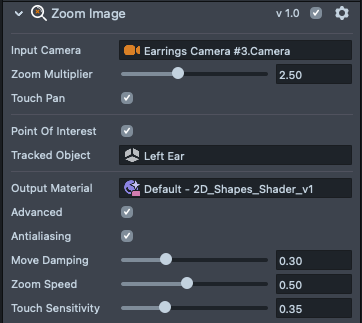
Input Camera - The camera that will be used for zoom input.
Zoom Multiplier - Zoom value.
Touch pan - Adds the ability to use touch gestures to move the zoom center.
Point of Interest - Zoom will center around the referenced scene object.
Output Material - The material for the zoom output.
Antialiasing - Sets Antialiasing for the input camera. Will result in a sharper zoom image.
Move Damping - Adds delay to the zoom movement towards the point of interest.
Zoom Speed - The speed for the zoom to change from its current value to the target value.
Touch Sensitivity - Sets the sensitivity for the touch which will affect the zoom movement.
Ear Binding Component API
The Ear Binding component exposes the following API which can be used to control it from a script.
| Name | Type | Description |
|---|---|---|
setEarringLandmark(earringLandmark) | Function(String) | Sets the ear landmark to use |
getLandmarkNames() | Function() | Gets a list of possible landmarks |
setEarSelection(ear) | Function(int) | Sets the ear, 0 = left, 1 = right |
setEarringOffset(offset) | Function(vec2) | |
faceIndex | Property | Set the person index to which the earring will bind to |
Example script:
/**
* Using the component from a script
*/
//@typename EarBinding
//@input EarBinding earringCtrl
script.earringCtrl.setEarSelection(0) // set earring to left ear
script.earringCtrl.setEarringLandmark("Scapha"); // will set the earring landmark to ‘Scapha’
script.earringCtrl.setEarringOffset(new vec2(0.005,0) // set the earring position with UV offset of 0.005 on X axis.
Previewing Your Lens
You're now ready to preview your Lens experience in Snapchat! To do so follow the Pairing to Snapchat guide.
Tips on earrings asset creation
- If it’s your first time modeling earrings, and you want to better understand the fine details of earrings geometry, there are good references online, you can try searching for
diamonds scheme to model gemstonesas a reference to start your model with.
- It is important to turn on hard edges for edgy parts (for example gemstones) and smooth for smooth metal parts
- Use Hard (only .0 or 1 ) skin for parts that are not flexible
- Set joint in the beginning of the dynamic element if it is not flexible
- Don't create very high poly meshes for not rigid parts
- It is important to add loops in flexible areas - It is better to use a high poly mesh in places where there will be skin with a soft gradient
What's Next?
Now that you have learned about how to create your own Wristwear Try-On Lenses, take a look at some of the other AR Try-On examples.
- Check out the Developing Fashion Lenses for Virtual Try-On using Lens Studio course on how to make your own Fashion Lens.
- Footwear Try-On
- Cloth Simulation Try-On
- Wristwear Try-On
- Garment Transfer
Related Guides
Please see the guides below for additional information: