Upload Lenses for Camera Kit
Whether you have chosen to get Lenses through a Lens Pack or create your own Lenses, they will need to be published from Lens Studio into your Camera Kit application. For publishing your Lenses for Camera Kit usage, the Lens will need to be submitted to a Lens Folder..
Third Party Lens Creation
If a Lens was created from a source outside of your organization, it is important to follow these steps to ensure it is uploaded correctly.
- Obtain a .zip file of the Lens Studio project files
- Unzip the compressed file
- Check which version of Lens Studio the Lens was created in by right-clicking on the
*projectName*.lsprojand selecting Open With -> Text Editor of your choice - Locate the
lastSavedWithfield within the file, it will be near the top and look like this:
"lastSavedWith": {
  "type": "Public",
  "major": "4",
  "minor": "55",
  "patch": "1",
  "build": "0"
}
- Open the Lens in the correct version of Lens Studio, in the above example this would be Lens Studio 4.10
- Proceed to Publishing to a Lens Folder
Publishing to a Lens Folder
The easiest way to use your completed Lens in your Camera Kit application is to publish it to a Lens Folder. Lens Folders allow you to:
- Skip traditional Lens QA
- Have any user manage your Lens within the Organization
- Easily add new Lenses to your Camera Kit project
Submitting a Lens
New Lenses can be submitted to a Lens Folder directly from Lens Studio. To submit a new Lens to your Lens Folder from Lens Studio:
- Open Lens Studio to your Lens project and Login
- Once your new Lens is created, select Publish Lens
- A web browser tab will open the Lens Publishing Portal.
- Choose which Organization you will be uploading your Lens to.
If your page does not have an Organization and Lens Folder dropdown, ensure that you have been added as a member of an Organization.
- Select a Lens Folder to store the Lens in.
- See Creating a New Lens Folder if you are submitting a Camera Kit Lens for the first time.
- Enter in Lens details and visibility settings.
- For more information, see Lens Visibility Settings
- Click Submit.
Once you publish your Lens, ensure that the Lens Folder being published to has been Added as a Lens Source for your organization, or the Lens will not appear in Lens Scheduler.
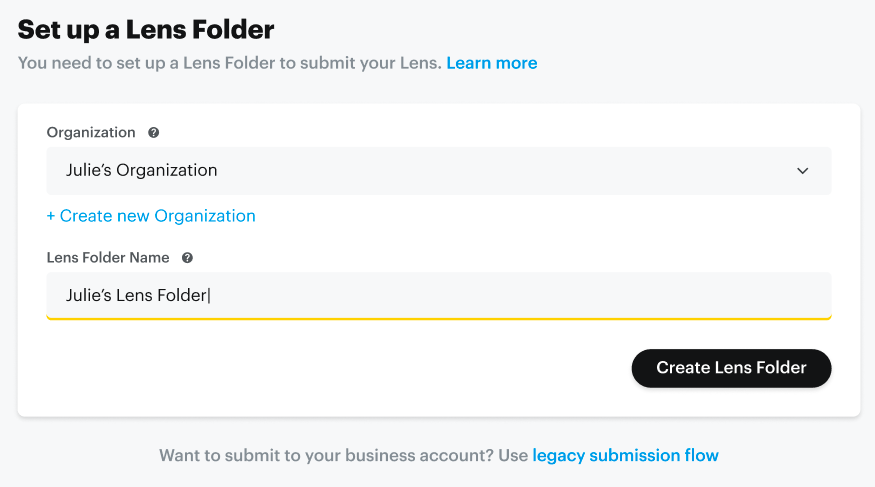
Creating a New Lens Folder
Lens Folders are stored in Organizations, which can be managed by multiple accounts with access. Lenses can be stored in a new or existing Lens Folder. To create a new Lens Folder:
- Begin the steps to Publish a Lens from Lens Studio and you will be brought to the My Lenses portal
- Choose your Organization to create the new Lens Folder.
- Click on + Create New Lens Folder.
- Enter in your new Lens Folder name.
Lens Visibility Settings
During Lens submission you will have the options to set the visibility status of the Lens to a few options. These will control which users are able to access your AR content within Snapchat and Camera Kit.
- Public: The Lens will be available for use in your Camera Kit application and Snapchat.
- Hidden: The Lens will be available for use in Camera Kit and in Snapchat using a Snapcode.
- Offline: The Lens will be available in Camera Kit but not at all in Snapchat.
- Save As Draft The Lens will only be available within Camera Kit. This setting will not require additional moderation beyond the automated QA checks and should be the quickest path for Lenses to be made available within Camera Kit.
The visibility settings can be changed at a later time and the Lens can be separately added or removed from your app via the Camera Kit Lens Scheduler.
If Public or Hidden is selected, the Lens will go through QA approval before changing visibility.
Managing Lenses in Lens Folders
After submission, Lenses can be viewed in their respective Lens Folders. To view and switch to different Lens Folders:
- In My-Lenses, select the organization that owns the Lens Folder in the upper right corner.
- Select Lens Folders from the options on the left.
- Click on your desired Lens Folder. The respective Lenses will be shown from the Folder.

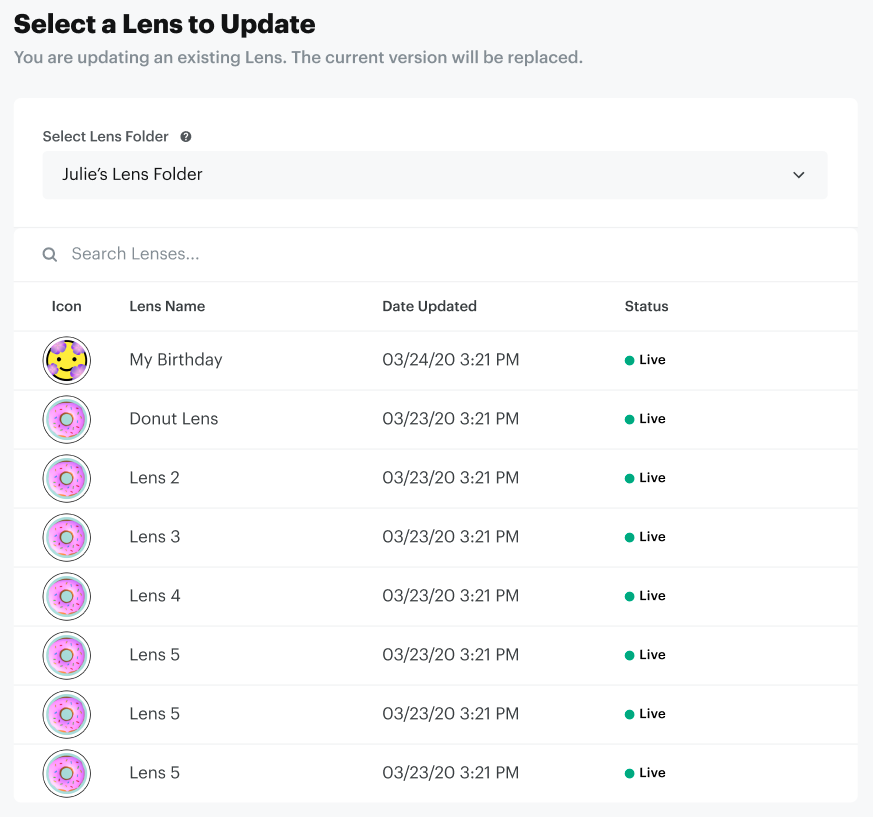
Updating Existing Lenses
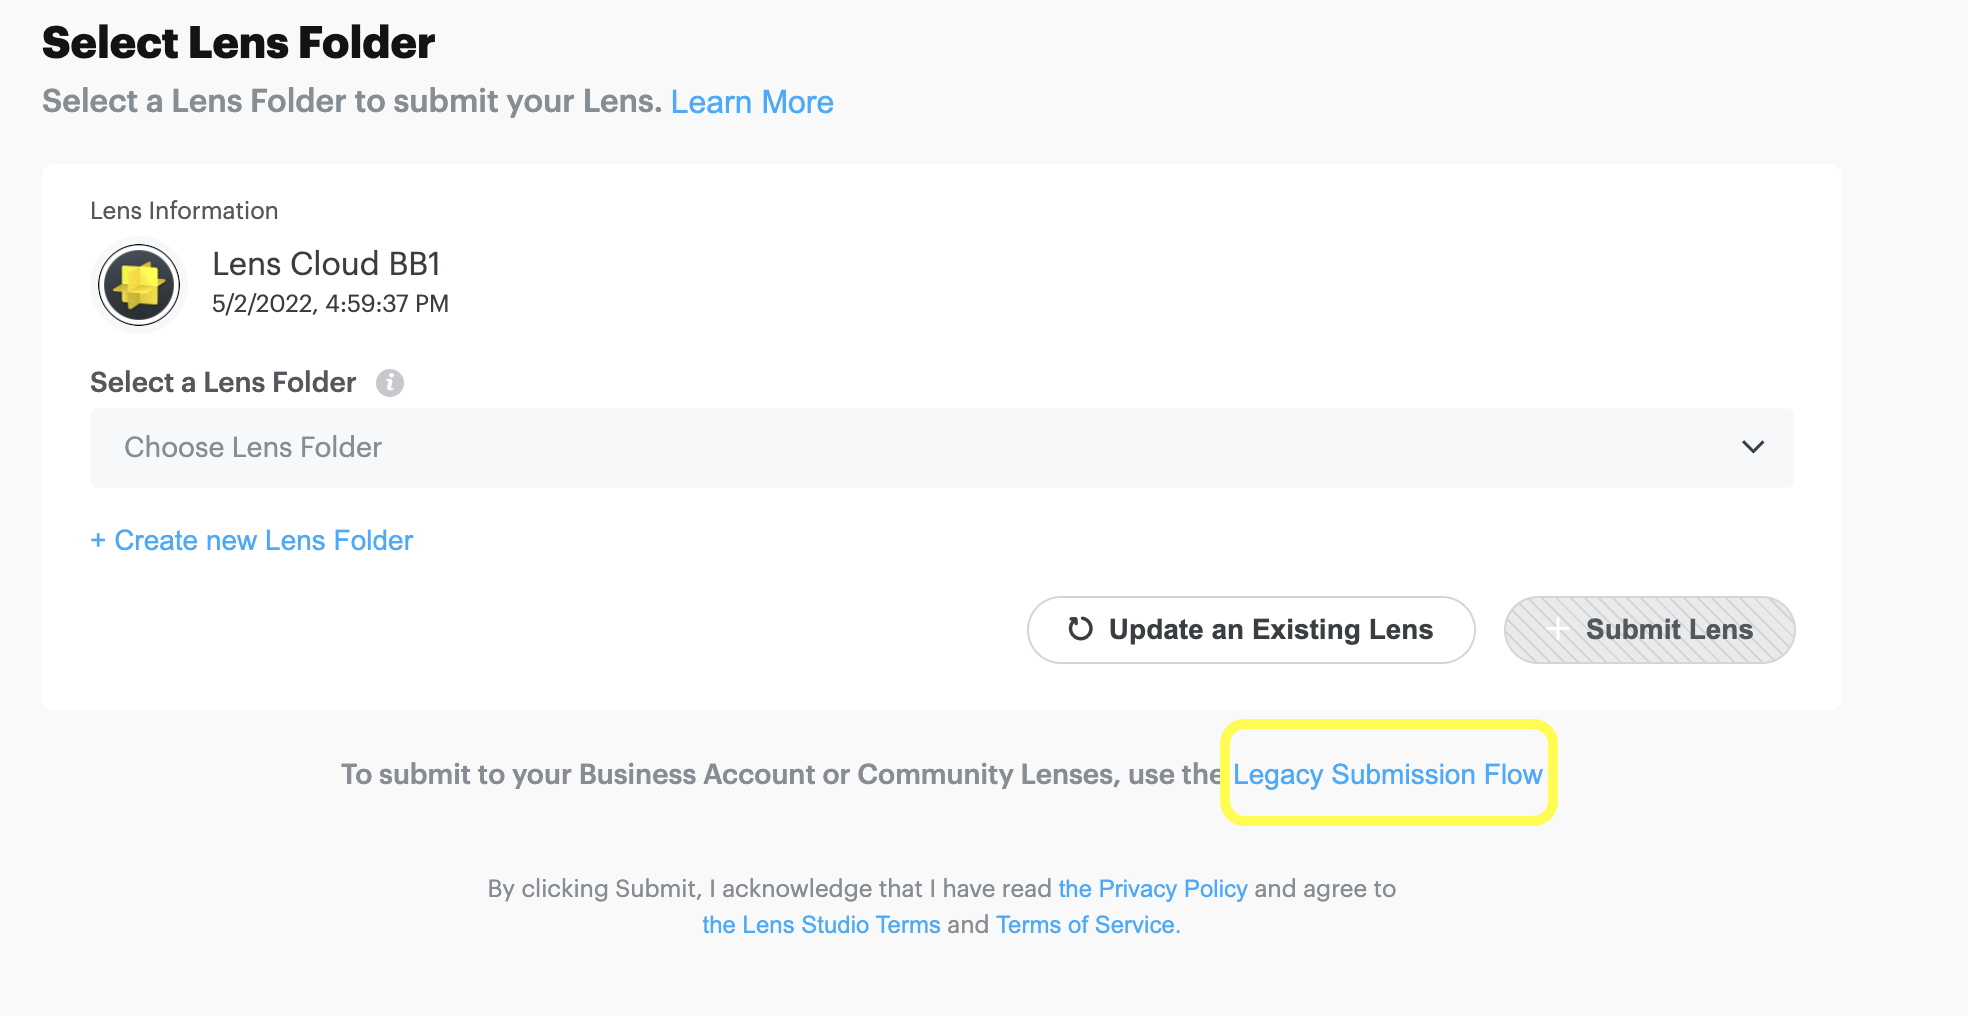
Lenses submitted prior to the rollout of Lens Folders can still be found within the My Community Lenses or Business account sections. To move these Lenses to a Lens Folder, they will need to be re-published directly to the Lens Folder from Lens Studio. Otherwise, they can be accessed via the Legacy Submission Flow when submitting a Lens
You will need to go through step 5 in Submitting a Lens, then select update Existing Lens and select the Lens you wish to update.
Other Ways to Submit Lenses
While the recommended path for submitting Lenses is to upload them to a Lens Folder, some users and businesses may prefer to follow the legacy submission flows which are outlined below. The legacy submission flow can be selected during the publishing process within the My Lenses Portal:
Public Profiles
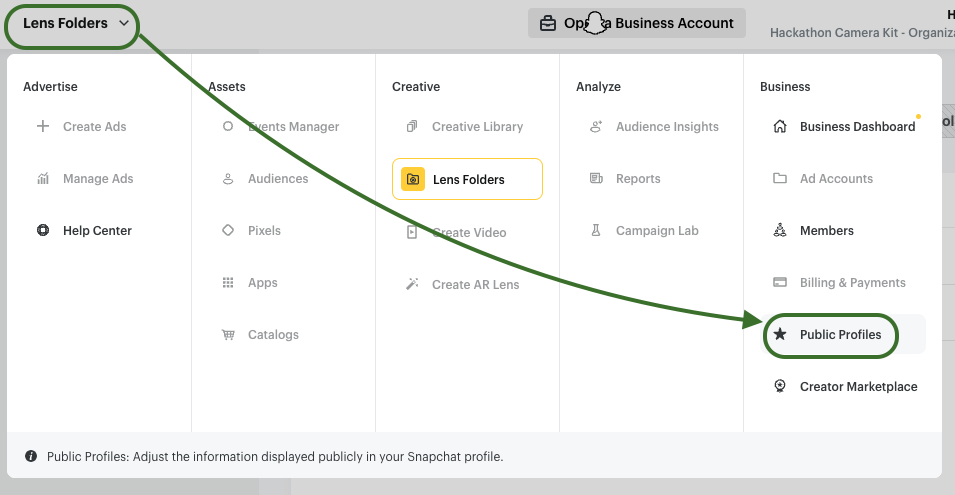
Lenses can be submitted to your company’s Public Profile for easy use and visibility in both Snapchat and Camera Kit. Steps for setting up a Public Profile for your business can be found here and the following steps show how to upload a Lens to a Public Profile and Camera Kit integration:
- Upload the Lens to a Lens Folder with the Do not publish to Snapchat visibility option
- This ensures the Lens will not be associated with the uploading user's account within Snapchat
- Once uploaded, click Continue to Business Manager and you will be brought to the Lens view within Business Manager
- Select the dropdown in the upper left and then select Public Profile
- Select the targeted Public Profile
- Select the Lenses option in the left bar to see Lenses currently associated with this Public Profile
- Select Add New Lens > Add from a Lens Folder > The Lens Folder you uploaded to > the Lens
- Once approved, the Lens should appear as Live within the Lenses view of the Public Profile and you can click into the Lens and adjust the Lens Status as needed.
- For Camera Kit, ensure the Lens Folder this Lens was uploaded to has been added as a Lens Source in Lens Scheduler
Additional information on this workflow can be found here.
Community Lenses
If you wish to upload to your own community profile instead, you can select to use the Legacy Submission Flow when brought to the original Lens submission landing page.
Once you publish your Lens as a Community Lens, ensure that the account being published to has been added as a Lens Source for your organization, or the Lens will not appear in Lens Scheduler
Next Steps
Once the Lens has been reviewed, it will be available in Lens Scheduler for use within your application. To add this newly submitted Lens to a Lens Group for use in Camera Kit, and for a more thorough overview of the Lens Scheduler, please visit the linked guide.