Manage Lenses for Camera Kit
Lens Scheduler for Camera Kit enables you to manage and schedule Lenses for delivery to your application.
Access to the Lens Scheduler is tied to membership of an Organization that has been approved for Camera Kit usage.
If you are a member of a Camera Kit enabled org and don't have access to the Camera Kit section of My-Lenses, confirm that the correct Business Manager roles are set for your account.
Overview
There are three primary Lens Management functions in the Lens Scheduler:
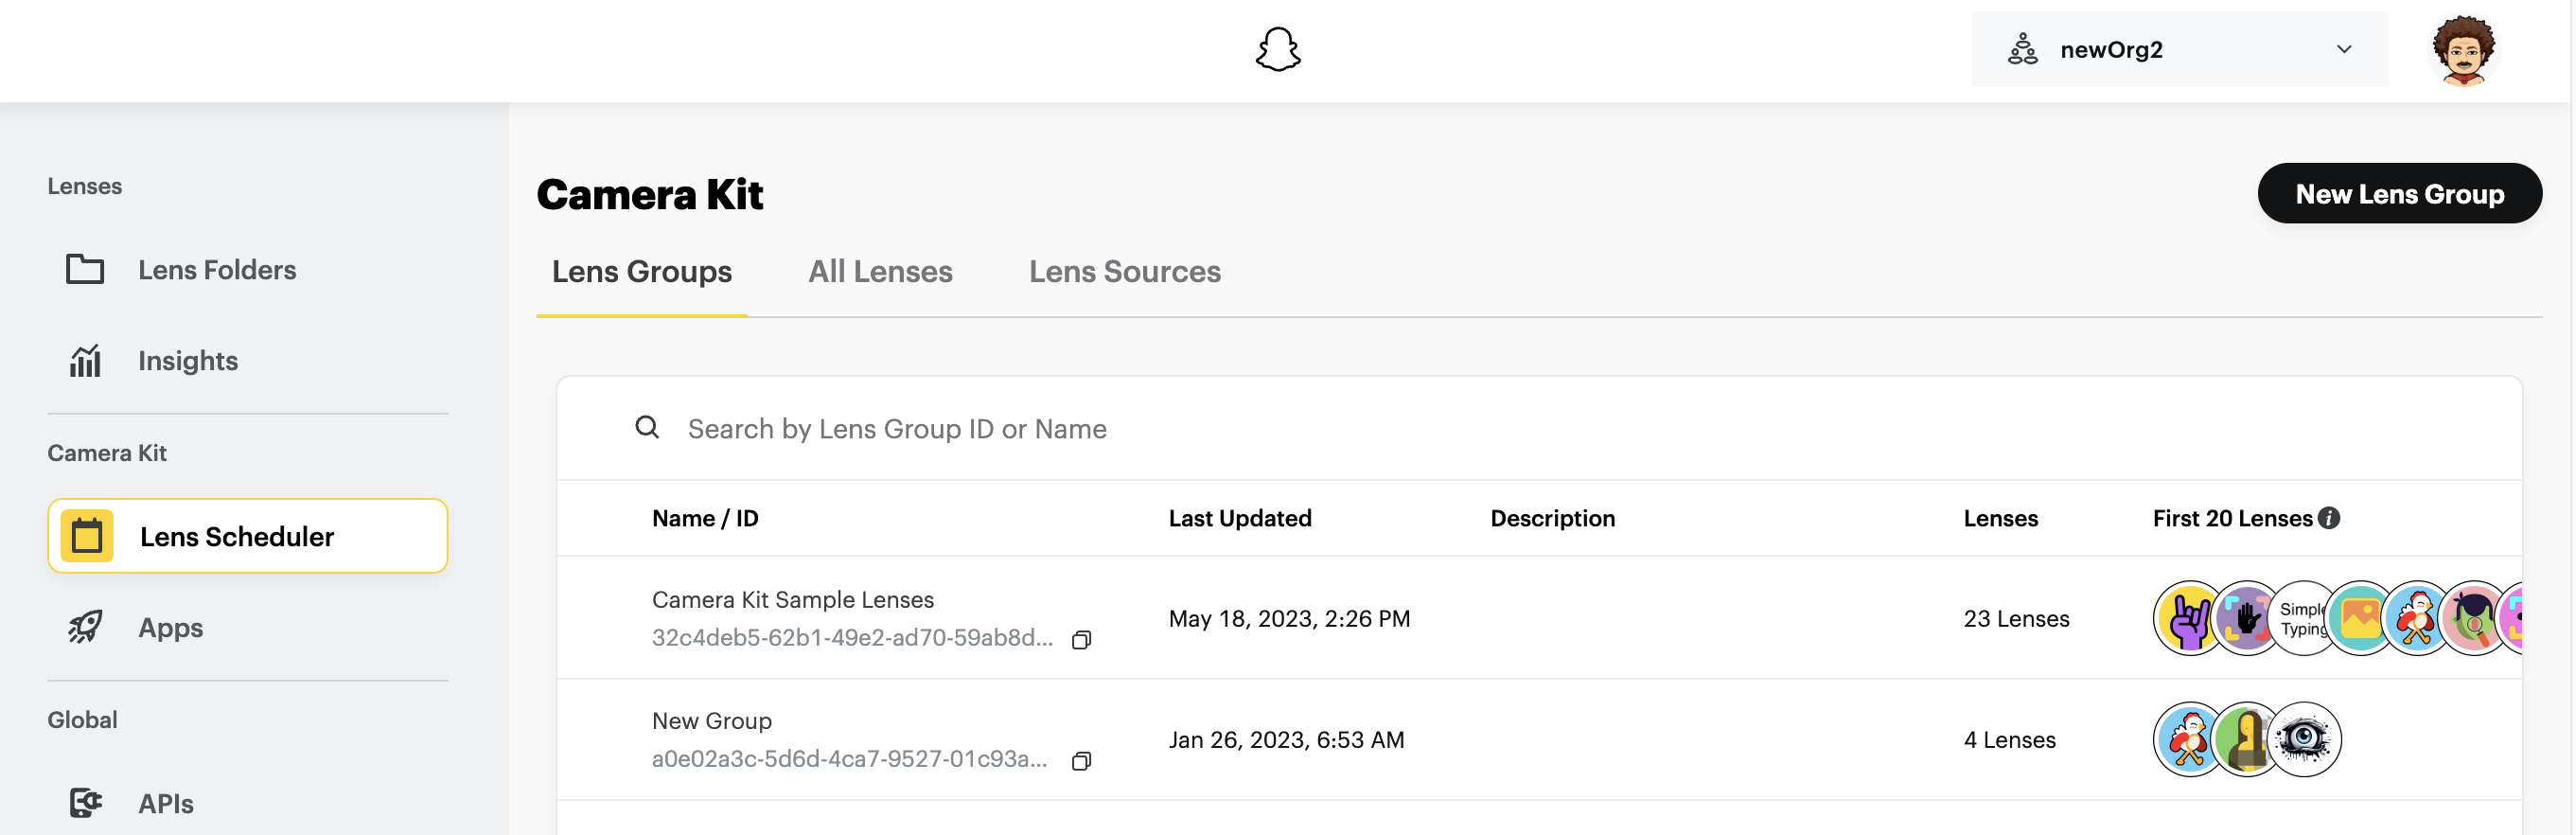
- All Lenses — all of the Lenses that are available for use within your application or website
- Lens Groups — collections of Lenses ready for delivery to your app or website
- Lens Sources — a Lens Folder, individual user profile (member of your organization), or Public Profile (Profile for your business within the Snapchat application) that are associated with Lenses.
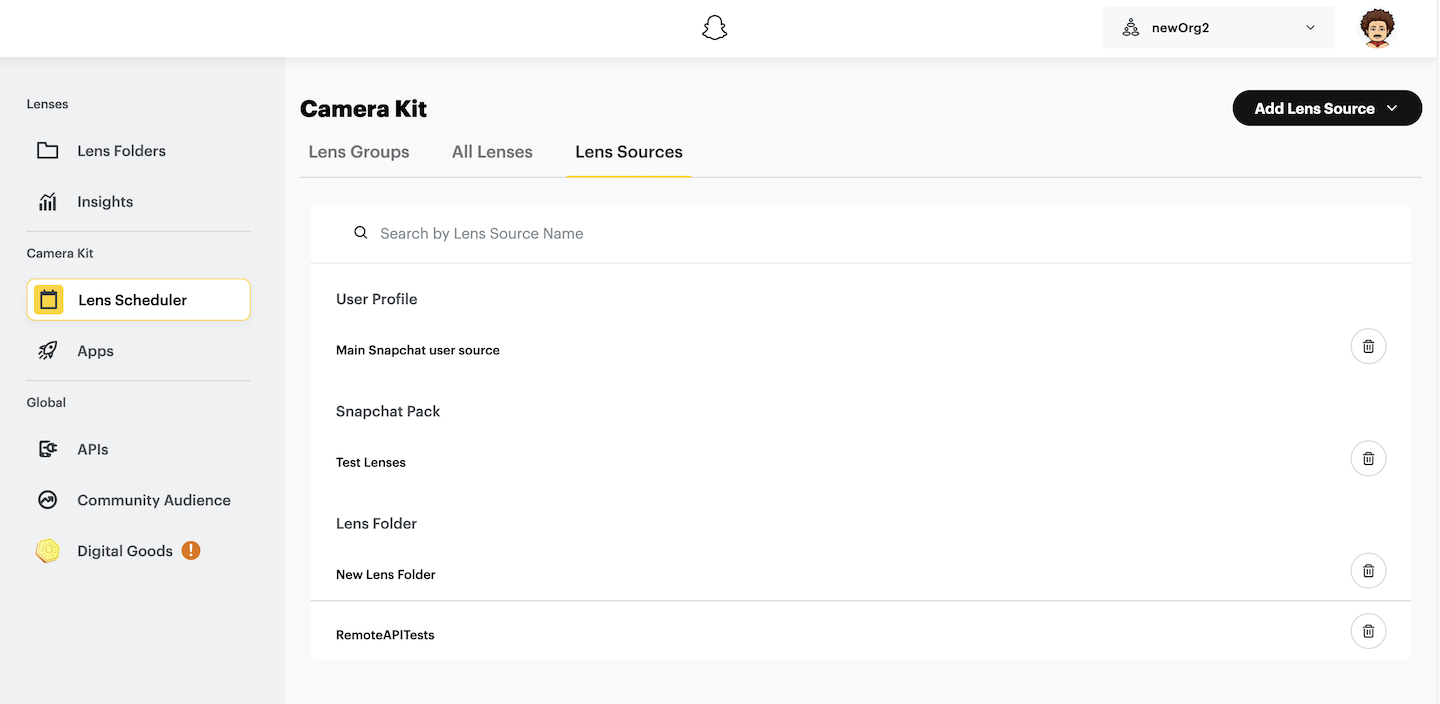
Lens Sources
Lenses shown in the All Lenses list are added via 'Lens Sources'. A Lens Source is one of the following:
- Lens Folder — Lens Folders are containers of Lenses which are owned by the Organization rather than an individual user and allow for greater flexibility when managing the content available to your application. Lenses can be submitted to a Lens Folder by members of that Organization and there are additional access options for team members to ensure intended usage. See Getting Lenses into Camera Kit for more information on setting up and submitting to Lens Folders.
- Public Profile — these are permanent homes for your business within the Snapchat application and are attached to your organization. Public Profiles can be created by following these steps.
- User Account — single access personal accounts for submitting ‘Community Lenses’ in the Lens Studio submission flow. To add a single user as a Lens Source the user account should first be added as a member of your Organization.
- Test Lenses — a collection of Lenses provided by Snapchat to test your initial integration.
Newly created Lens Folders will need to be added as a Lens Source for use in a Camera Kit project.
Adding Lens Sources
Admins of your Organization can add a Lens Source by clicking on the 'Add Lens Source' button and selecting ‘User Profile’, your Lens Folder name, or ‘Public Profile’.
Click 'Add Sources' to complete your selection.
Any Lenses that are associated with the new Lens Source will now be visible under the 'All Lenses' tab and are ready to be added to your Lens Groups.
You may not have access to all of the available types described. For example, you don't see Public Profile as an option you may first need to create a profile.
Removing Lens Sources
You may also remove any number of Lens Sources at any time by clicking on the trash icon for each respective source when you are in the Lens Sources tab.
The confirmation dialog will ask you to confirm your action and also present you with a list of impacted Lens Groups. If any Lenses from this Lens Source have been added to a Lens Group, it will be indicated here.
To confirm your action, click 'Delete Lens Source'.
Lenses originating from Lens Sources being deleted will be automatically removed from any Lens Group they were added to.
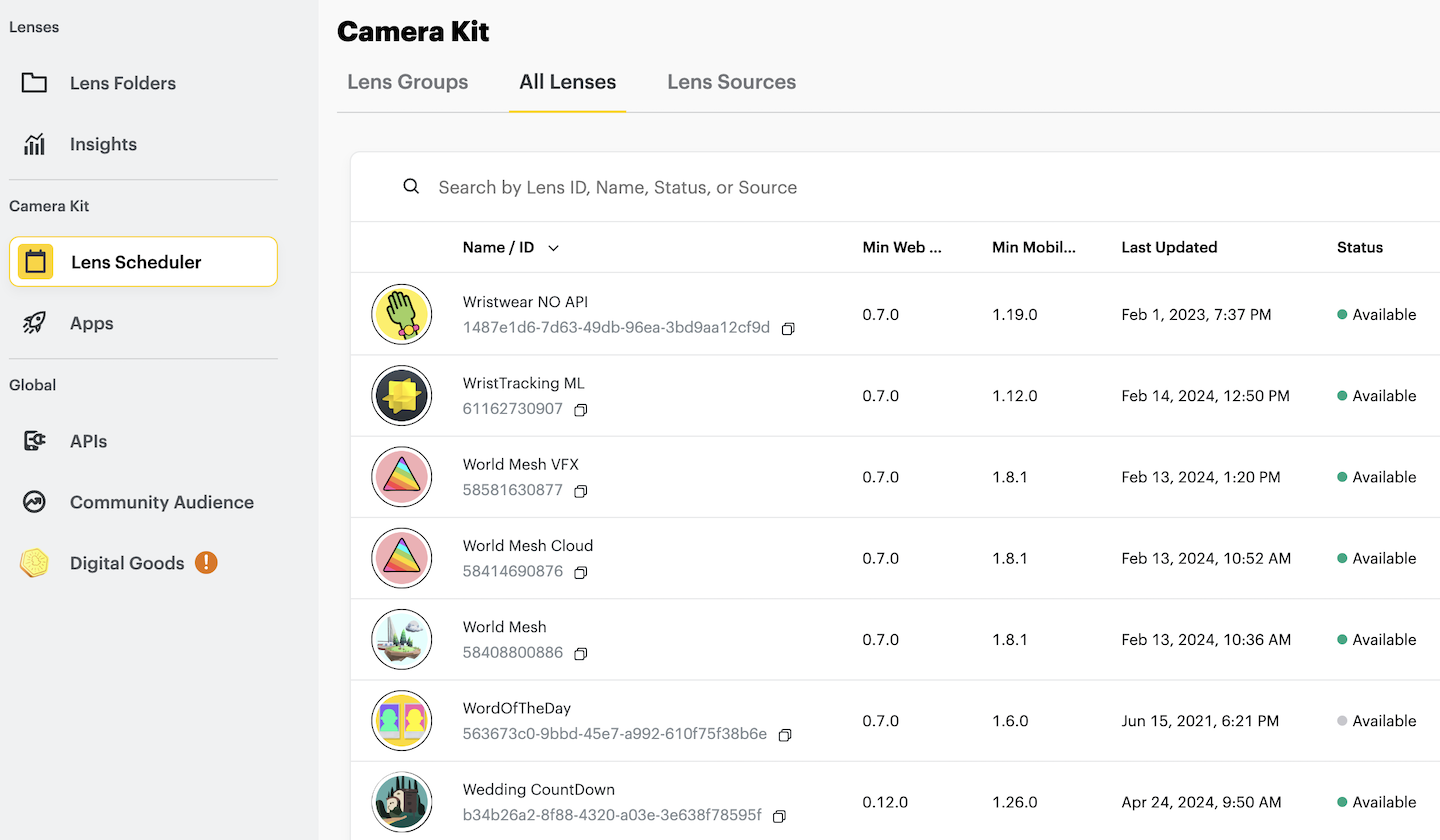
All Lenses
When you open the Lens Scheduler for the first time you will see Lenses from our Test Lenses Pack. Once you have Lens Sources attached, you will start to see your own Lenses appear in the 'All Lenses' tab.
The ‘All Lenses’ view includes all of the Lenses you can use to deliver to your Camera Kit application. For each Lens listed, there is an overview of the Lens name, its unique ID, last update, and associated Lens source.
It also shows you the minimum version of the Camera Kit SDK that the Lens can run on. If your app uses a version lower than this value, the Lens will not work and will not be delivered to your app.
Clicking on a Lens row will show its details page.
Lens Details
By clicking on one of the Lenses in the All Lenses tab you will be presented with a more detailed view of the Lens.
This view will display basic Lens information as well as the Lens Groups it is added to, its Snapcode, and vendor data.
The Snapcode can be used to unlock the Lens in Snapchat only. Camera Kit does not yet support Snapcodes.
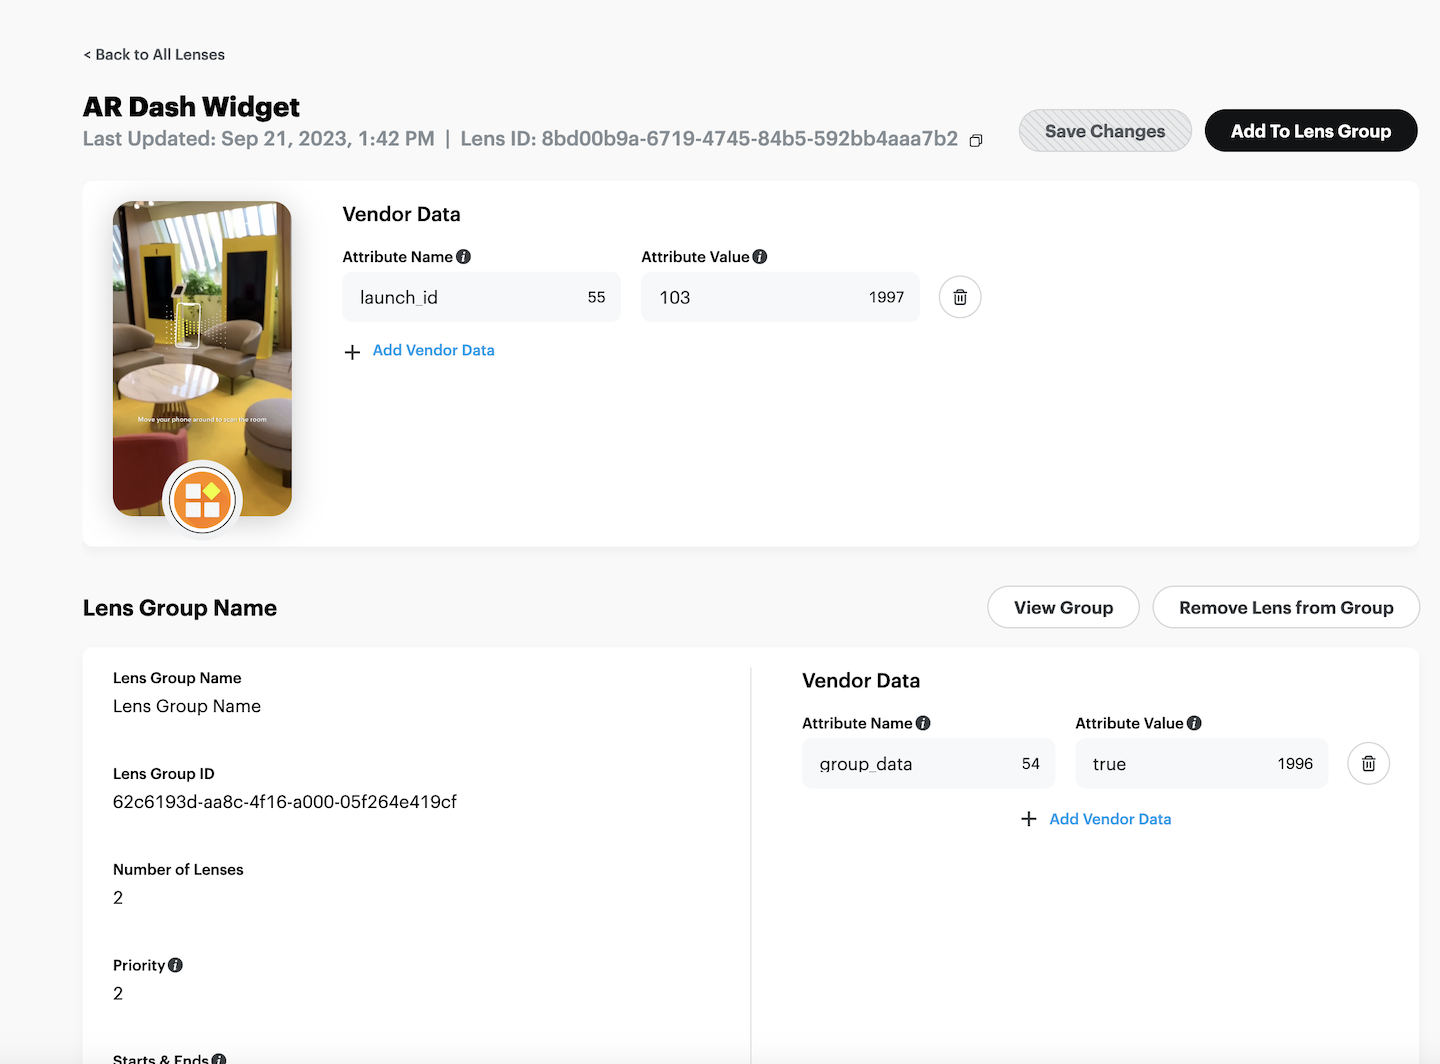
Vendor Data
Vendor data is arbitrary metadata that can be added to any Lens either at a global level or just for a specific Lens Group.
- Global level: the data will always be attached to the Lens object
- Lens Group level: the vendor data is only included when this Lens Group is requested
This metadata is delivered to your Camera Kit app along with the other basic data provided for your Lens. It can be accessed via the vendor data property on the Lens object within the SDK.
Vendor data can be added for any business logic within your application. You might use it for classifying or filtering Lenses based on your user preferences.
Lens Group Information
Any Lens Groups that the Lens belongs to will be listed here. You can add or remove the Lens from a group at any time using the appropriate actions.
Additionally when added to a Lens Group you can specify vendor data unique to that group. The vendor data will only be attached to the Lens object when requested from that group.
Lens Groups
Lens Groups are collections of Lenses that could be thought of as a logical representation of a Lens Carousel UI element within a Camera Kit application. A Lens can belong to as many groups as you choose and you can create as many groups as you'd like.
Lens Group Detail
When you click on a Lens Group from the list of all groups you will be presented with the full details of that group.
From here you can edit the group name, copy the Lens Group ID for use in your app, add or remove Lenses, and also the sort order of Lenses within the group.
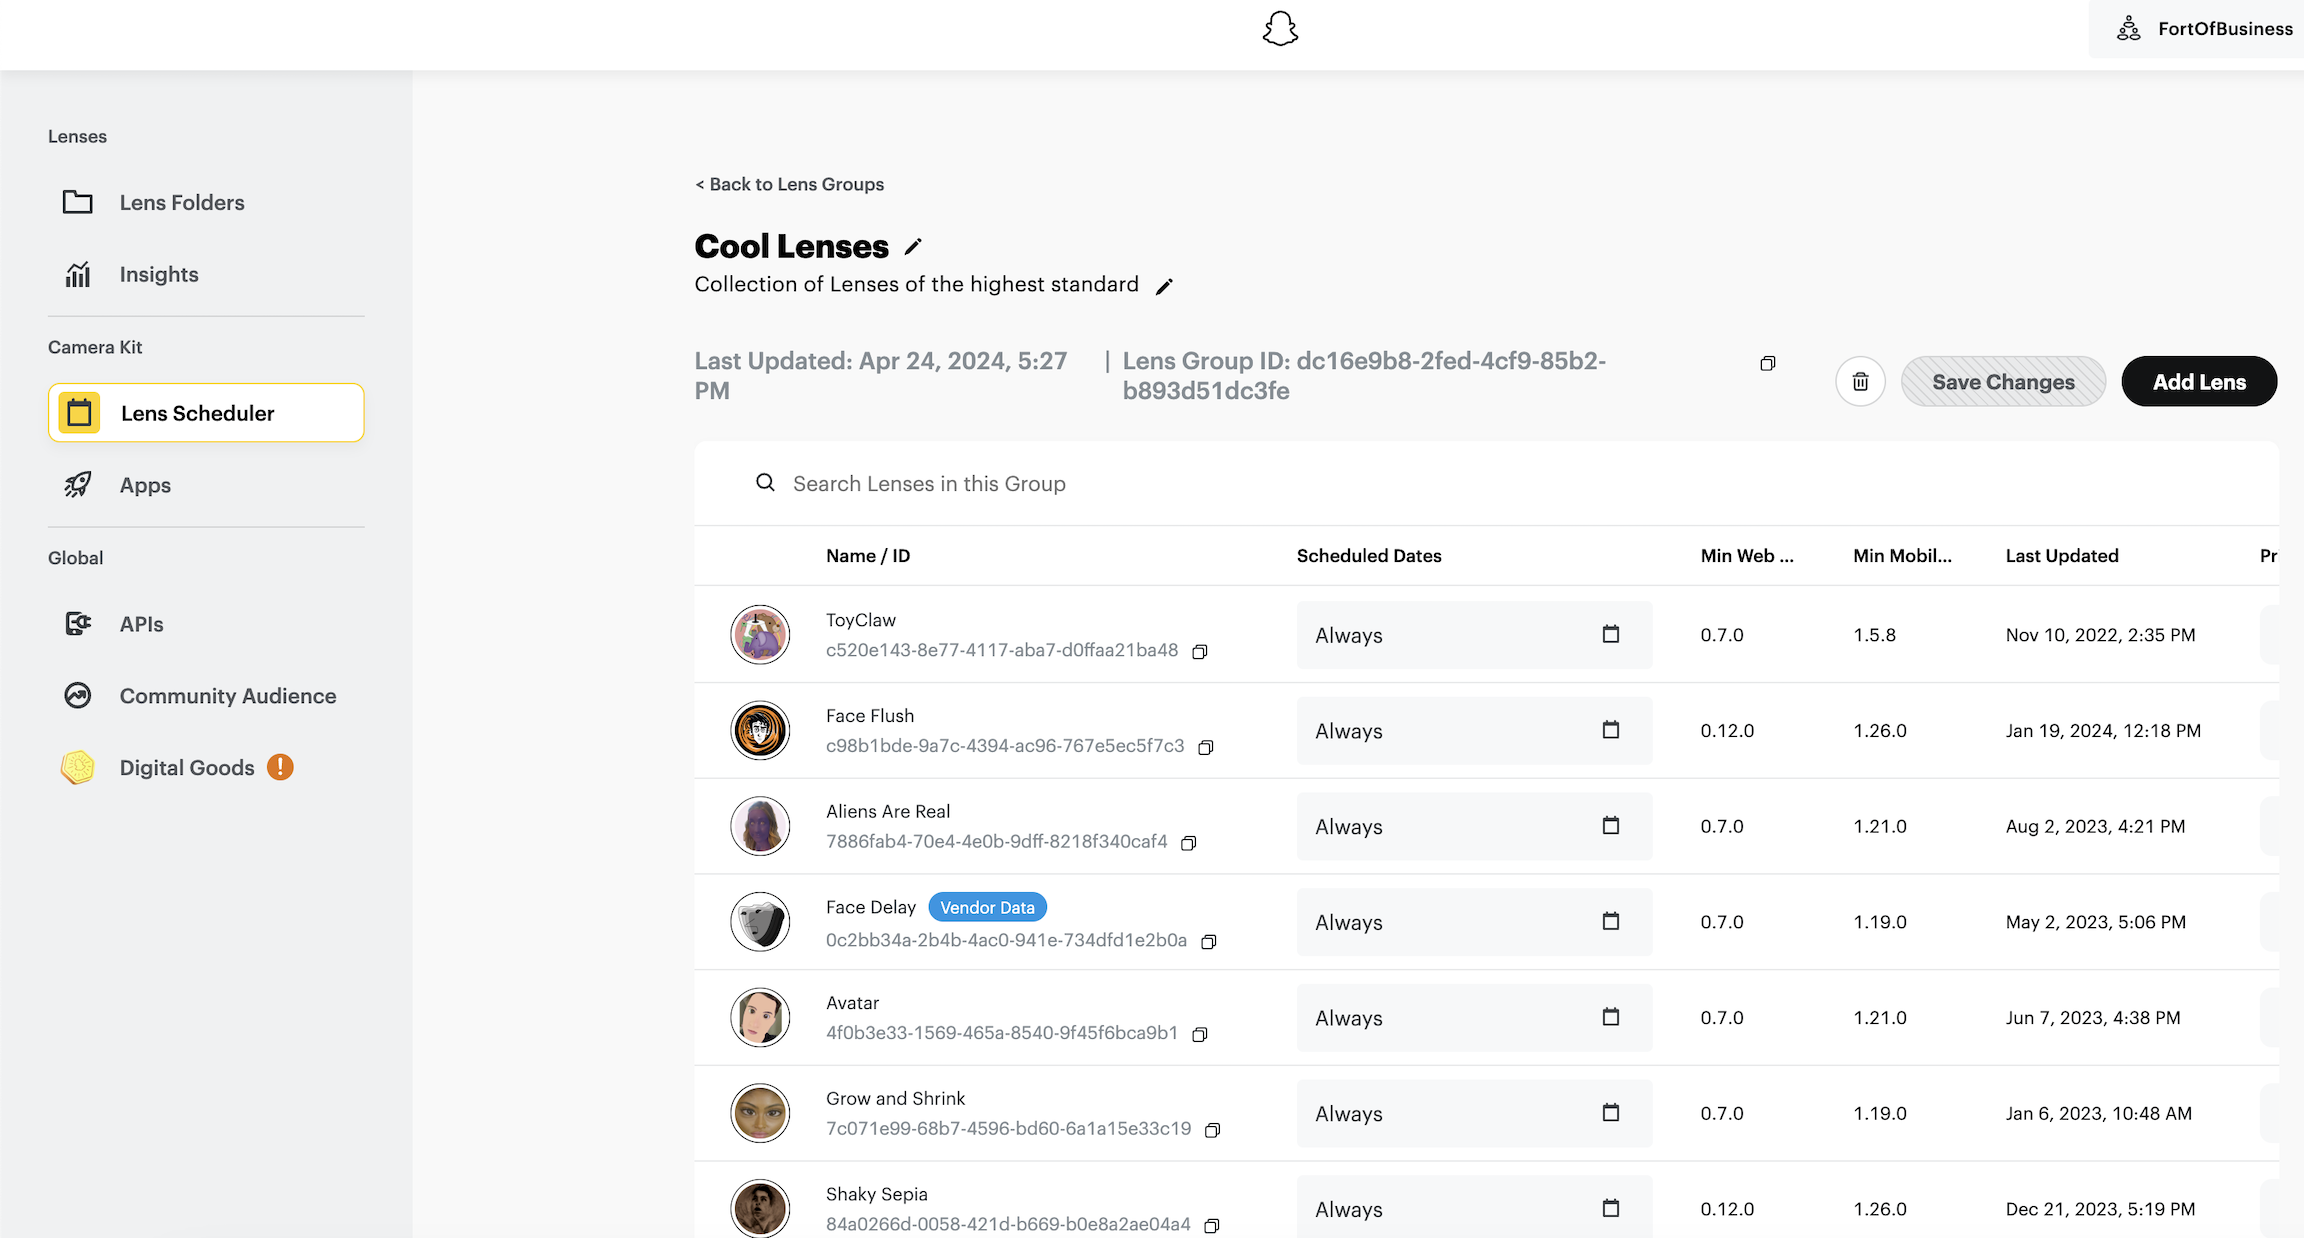
Lens Sort Order
Lenses within your Lens Group are shown in the carousel UI, ordered by the Priority value. The list is sorted from high to low.
Save Your Changes
Don't forget to save your changes!
If you change the Lens Group name, Lens priorities, schedule, or any other values you will need to click 'Save Changes' before the changes are committed.

Creating Lens Groups
After selecting the 'Lens Group' tab, click the 'Add New Lens Group' to create a new group. The new group dialog will request a Lens Group name and also the option to add Lenses. The group name does not need to be unique and Lenses can be added or removed at any time.
Click 'Save' to finish creating your new group.
A Lens can belong to as many Lens Groups as you like.
Adding Lens(es) to a Lens Group
To add more Lenses to an existing Lens Group, select the desired group and click the 'Add Lens' button. Select all the ones you wish to add to the group. After you have saved your changes, you can begin editing their priority and scheduling as needed.
Removing Lens(es) From a Lens Group
To remove Lenses from a Lens Group, select the desired group. From the list of Lenses, click on the Trash button for each respective Lens you’d like to remove.
Removing a Lens from a Lens Group does not delete the original Lens. It will still be available in 'All Lenses'.
Sorting Lenses Within a Group
A Lens Group is an ordered set of Lenses. The list of Lenses displayed in each Lens Group should represent the order in which they will be delivered and revealed on devices. You can order your Lens Group by editing each Lens' priority number. Priority is sorted from high to low.
Scheduling a Lens
Lenses can be scheduled to appear in your Camera Kit app within a specific timeframe. In the Lens detail page, under the Lens Group details section, you can set a start and end date for each Lens.
Public Profile
A Public Profile is an option for Camera Kit partners to expand the reach of your AR Lenses created for your application back to Snapchat for organic discovery on your business profile. Steps and best practices for setting up a Public Profile for your business can be found here.