Communicating Between App and Lenses
Overview
The Camera Kit SDK enables the host application to send data from the app to the Lens to create customized experiences. For example, this could include passing sports score data or news headlines for a Lens to display, award points in your app based on user interactions within a Lens, or events based on user input to better track Lens performance. This guide walks through the different options for communication between a Lens and the host application to help tailor the experience to match the desired use case.
Communication Functionality
Remote APIs
The most versatile option for communicating between a Lens and your Camera Kit powered application is via Remote APIs. This can be used to send data including images, 3D models, and other data to and from the Lens, allowing the Lens to adapt to changing information from the application in real-time. This feature requires a RemoteServicesModule API Spec within the Lens, the steps to create the API Spec are below. Note that while the setup for this option relies on Snap’s Remote API system, all communication is sent directly between the host app and Lens without a Snap server involved.
Remote APIs require that all communication between the Lens and the host application needs to be initiated by the Lens. That is, the Lens will send requests to the host application and the host application will respond. If your use case requires the app to be able to send information to the Lens at any time, the recommended path is to send a request from the Lens when the Lens is first applied and respond from the app when needed.
Creating an API Spec
- Open the my-lenses.snapchat.com/apis
Any account that is tied to a Camera Kit organization has access to the API spec portal within My Lenses. If you do not have access, confirm your account and organization settings.
-
Select Add API:

-
Fill out the fields with your corresponding information and be sure to set the target platform field to CAMERA_KIT then select Next
-
Select Add Endpoint to create a new endpoint and set any parameters needed for this endpoint:
- Make note of the generated Spec ID as it will need to be supplied into your iOS and Android applications to authorize the communication from the Lens.
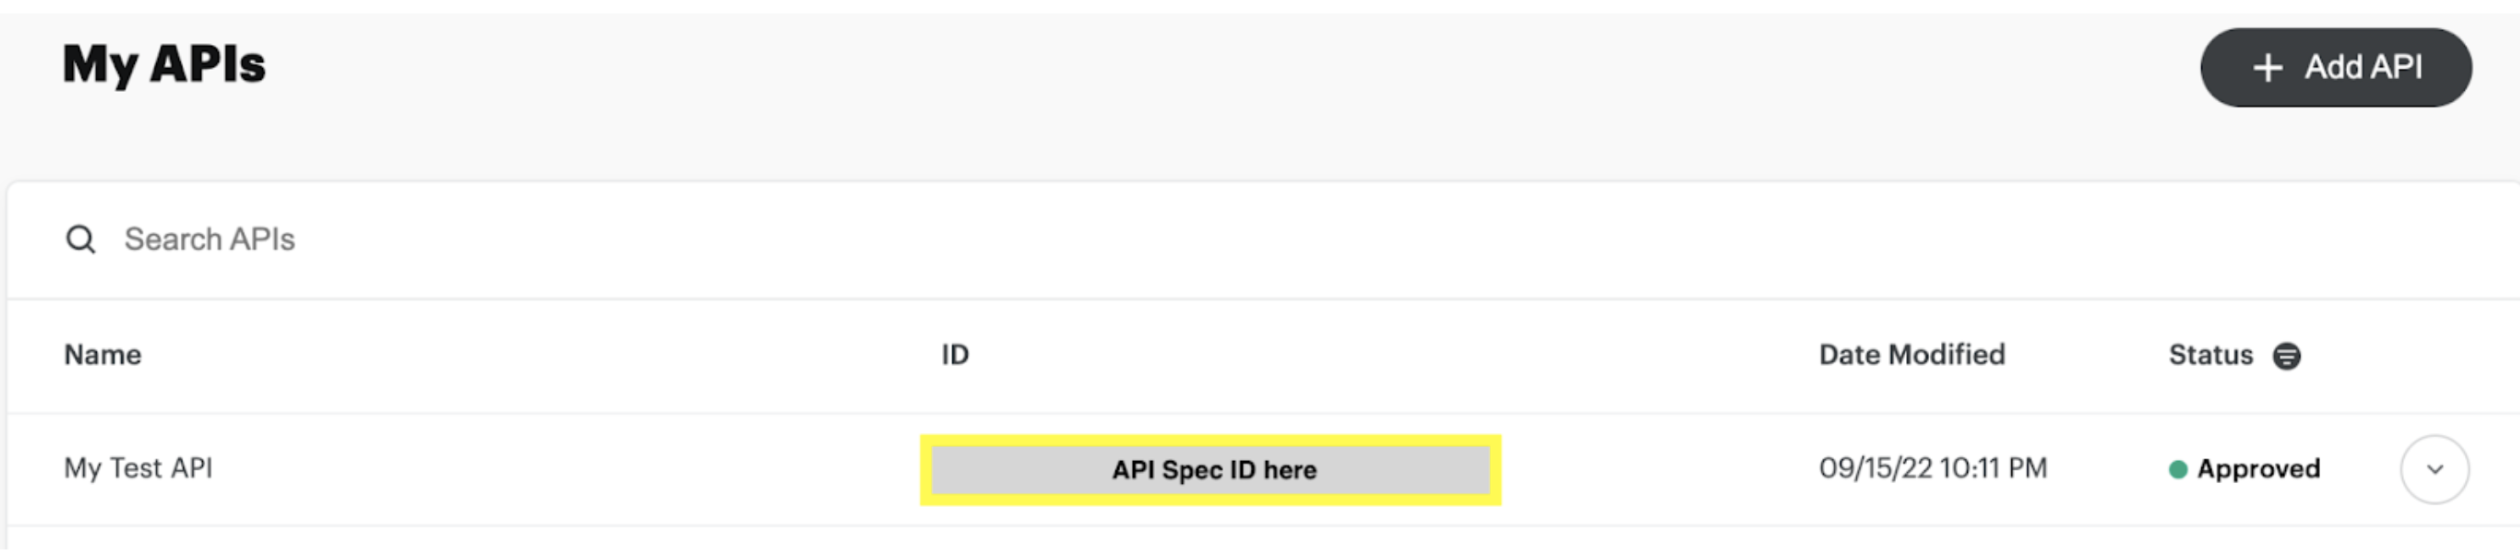
- Once the spec has been created and approved, open Lens Studio
Using API Spec in Lens Studio
If you wish to test out the functionality before creating a spec, the Placeholder API spec can be used. This can be found in the Asset Library starting in Lens Studio 4.19 and imported using the same process as you would for your own spec below. The specID for the Placeholder spec is: 363ee2a5-ad35-4a5f-9547-d42b2c60a927
-
Open Lens Studio and login to My Lenses using the same account you used to create the spec in the Creating an API Spec section above.
-
Open the current project or create a new project.
-
Open the Asset Library, select APIs, and select the API that you have setup.
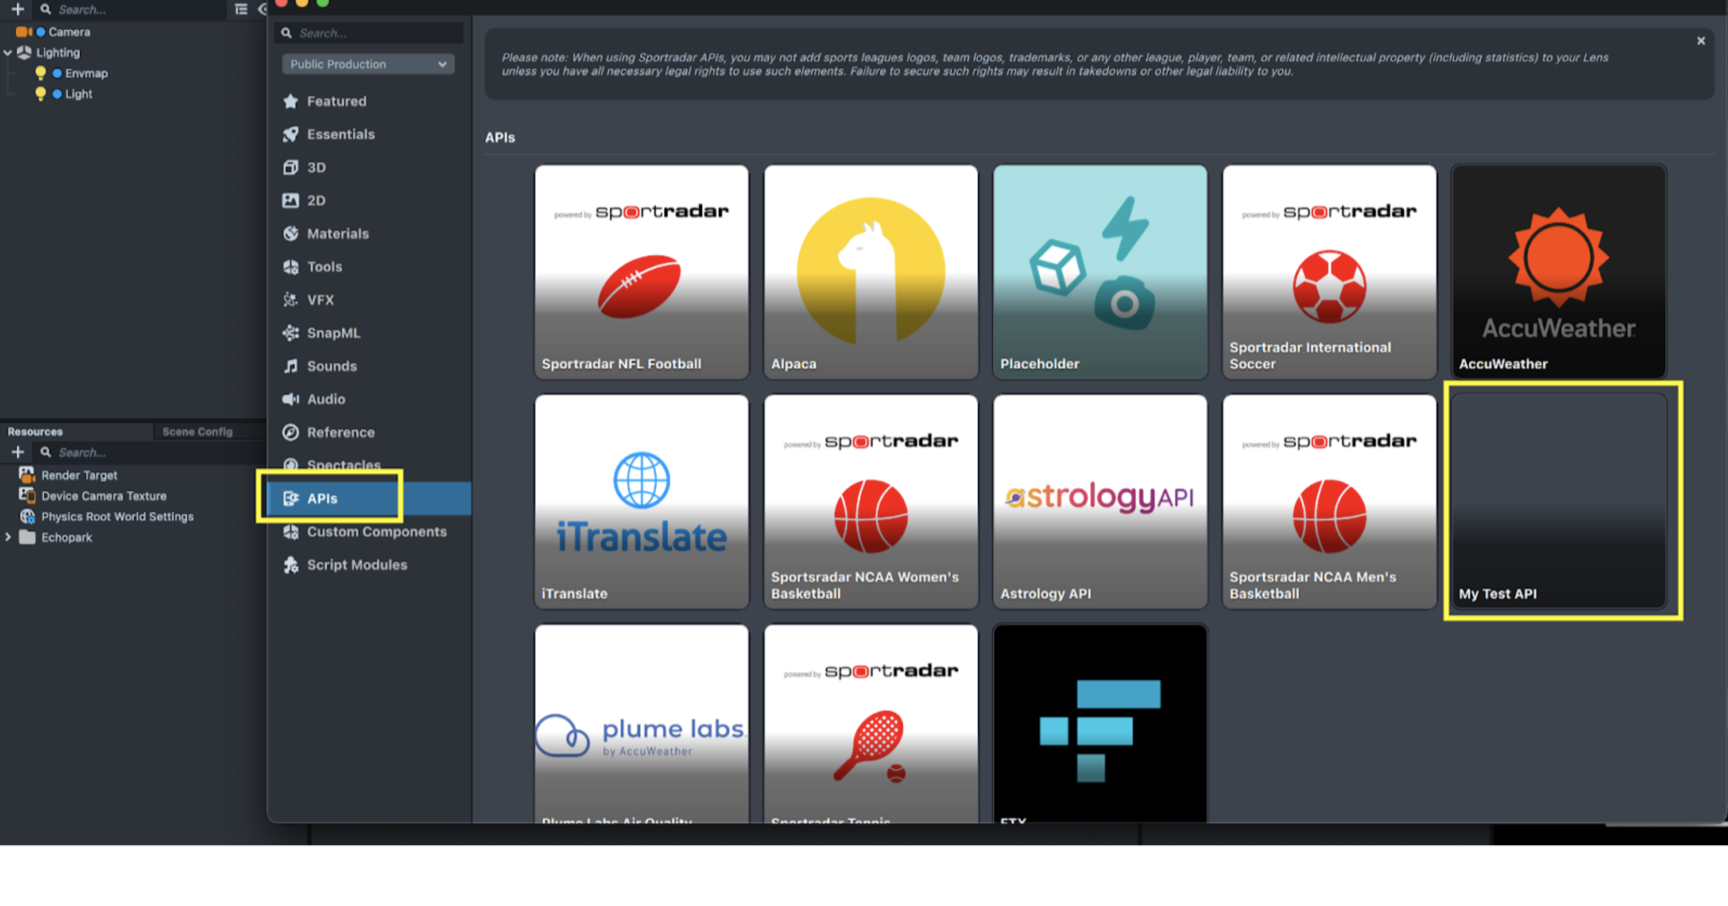
-
Select Import, note that some restrictions apply when using Remote API. This will import a Remote Services Module asset and an example js script for how to use the calls
-
Create the rest of your Lens
For a detailed walkthrough of the process please check out this video.
Lens Studio Best Practices for Remote APIs
Generated Script
It is recommended to not make changes to the generated script and instead reference these functions via script.api from other scripts. This will ensure that you do not lose progress or need to manually merge changes if you need to alter the spec and reimport at a later time.
Testing and Debugging
Since this API spec is set up for communication between the host application and the Lens, there is no actual remote service to respond to the Lens’ requests. This means that the performAPIRequest methods will fail when testing in Lens Studio. As a result, checking response.statusCode in Lens Studio will return an error value and when testing this within a Camera Kit app, anything other than 1 is an error.
To workaround this issue, here are a few testing scenarios to ensure the communication flow is working properly.
Push-To-Device
Push-To-Device from Lens Studio can be configured to send the Lens to your Camera Kit application and enable testing with the actual responses from the app. Push-To-Device will need to be configured within the app and steps to do this can be found on the In App Lens Testing page
Debug Responses
For testing within Lens Studio, the recommended path is to create a debug js script which will simulate the responses to your API requests. This allows the Lens creator to ensure the logic and flow in the Lens are correct before needing to test the Remote API data with the app.
For example:
// DebugResponse.js
//@input  bool useDebug;
global.useDebug = script.useDebug;

global.initResponse = {
    name: “debugName”
    // ..
}
Then for the request code:
function handleInitResponse(responseJSON) {
  // ..
}

script.api.initRequest = function () {
  if (global.useDebug) {
    handleInitResponse(global.initResponse);
  } else {
    // perform the actual request
    var req = global.RemoteApiRequest.create();
    // ..
  }
};
Lens Launch Parameters
Lenses can be launched with additional data to alter the state of the Lens. This data includes numbers, strings, or arrays of each. This functionality in Camera Kit is largely the same as launching a Lens via Snap Kit and a reference Lens and launch information can be found here
Data can be sent through the launchData object through these APIs on Android and iOS
Launch Parameters dynamic data input is limited to 3 KB
Vendor Data
Vendor data is often used by the app to properly handle conditions for the Lens so it can run as intended. However, the vendor data set in Lens Scheduler can also be sent as a launch parameter for the Lens and can be used in the same way as [ Lens Launch Parameters]. This allows you to modify Lens behavior through Lens Scheduler even after the Lens is live without any new code modifications in your application. For more information on using Vendor data, see the Vendor data section on the Lens Scheduler page.
Remote API Examples
Cat Facts
This example is provided within the Camera Kit Sample App and can interact via the Cat Fact Lens, where every time the Lens is launched, it receives a new cat fact.
Android Implementation
Reference code for sending cat facts to this Lens on Android can be found here
iOS Implementation
Reference code for sending cat facts to this Lens on iOS can be found here
Lens Implementation
// @input Asset.RemoteServiceModule remoteServiceModule

function handleAPIResponse(response, callback) {
  if (response.statusCode !== 1) {
    print('ERROR: The API call did not succeed!. Please check your request');
    cb(true);
  } else {
    try {
      var parsedBody = JSON.parse(response.body);
      if (cb) {
        cb(false, parsedBody);
      }
    } catch (e) {
      print('ERROR: Failed to parse response');
      if (cb) {
        cb(true);
      }
    }
  }
}

script.api.fact = function (max_length, cb) {
  var req = global.RemoteApiRequest.create();
  req.endpoint = 'fact';
  req.parameters = {
    max_length: max_length,
  };
  script.remoteServiceModule.performApiRequest(req, function (response) {
    if (cb) {
      handleAPIResponse(response, cb);
    }
  });
};
Button Press
This example showcases sending an event to the host app whenever a button is pressed within the Lens. This can be used to gain further insights into in-Lens interactions and be easily extended to other functionality to understand which areas of a Lens are seeing the most engagement.
Android Implementation
To use Remote APIs in your class you need to inherit from LensesComponent.RemoteAPIService. You can copy-paste the support API spec ID from Lens Studio as described above.
internal object ButtonPressedRemoteApiService : LensesComponent.RemoteApiService {

   object Factory : LensesComponent.RemoteApiService.Factory {
       override val supportedApiSpecIds: Set<String> = setOf("api spec id")
       override fun createFor(lens: LensesComponent.Lens): LensesComponent.RemoteApiService = ButtonPressedRemoteApiService
   }
…
}
Now override the process function that handles the data and creates a response to pass back to the Lens. The host app can respond to specific events from the lens (like button_pressed in this case) and retrieve the extra parameters that Lens has passed to the app.
override fun process(
   request: LensesComponent.RemoteApiService.Request,
   onResponse: Consumer<LensesComponent.RemoteApiService.Response>
): LensesComponent.RemoteApiService.Call {
   return when(val endpointId = request.endpointId) {
       "button_pressed" -> {
           Log.e(TAG, "Params from Lens ${request.parameters.toString()}")
           val byteArray = "{\"text\": \"Hello Lens\",\"length\": 0}".toByteArray()
           onResponse.accept(request.toSuccessResponse(body = byteArray))
           LensesComponent.RemoteApiService.Call.Answered
       }
       else -> LensesComponent.RemoteApiService.Call.Ignored
   }
}
Override the close function when closing the connection with Lens
override fun close() {
   // no-op
}
iOS Implementation
Create an API service class in the app to fetch the data requested by the Lens. In the service provider class, you can copy-paste the support API spec ID from Lens Studio as described above.
class ButtonPressedRemoteApiServiceProvider: NSObject, LensRemoteApiServiceProvider {
    var supportedApiSpecIds: Set<String> = ["api spec id"]

    func remoteApiService(for lens: Lens) -> LensRemoteApiService {
        return ButtonPressedRemoteApiService()
    }
}
The class ButtonPressedRemoteApiService has the job of getting data from a host
class ButtonPressedRemoteApiService: NSObject, LensRemoteApiService {
    private enum Constants {
        static let scheme = "https"
        static let host = "snap/button_pressed"
    }

    private let urlSession: URLSession = .shared
    …
Next we implement a method to actually fetch the data e.g. from your own remote API. Here is a simple example with some mock JSON data generated locally instead of data fetched remotely.
func processRequest(
        _ request: LensRemoteApiRequest,
        responseHandler: @escaping (LensRemoteApiServiceCallStatus,
            LensRemoteApiResponseProtocol) -> Void) -> LensRemoteApiServiceCall {

        guard let url = url(request: request) else {
            return IgnoredButtonApiServiceCall()
        }

        let task = urlSession.dataTask(with: url) { _ , urlResponse, error in

            // The two lines below generate mock JSON data.
            // Normally the app would fetch this data via an api call
           // For the sake of simplicity, we are hardcoding the JSON here

            let messageDictionary : [String: Any] = ["text": "buttons are great"]
            let jsonData = try? JSONSerialization.data(withJSONObject: messageDictionary,
                 options: [])

            // A response object with fetched (or in this case mocked) data
            let apiResponse = LensRemoteApiResponse(
                request: request,
                status: error != nil ? .badRequest : .success,
                metadata: [:],
                body: jsonData)

            responseHandler(.answered, apiResponse)
        }

        task.resume()

        return URLButtonRemoteApiServiceCall(task: task)
    }

   private func url(request: LensRemoteApiRequest) -> URL? {
        var components = URLComponents()
        components.host = Constants.host
        components.path = "/" + request.endpointId
        components.scheme = Constants.scheme
        return components.url
    }
The processRequest method handles the data and creates a response to pass back to the Lens. This also has a helper method to construct the URL with the data.
Lastly we can add some classes to describe ongoing and ignored calls sent in response to the remote api request:
class URLRequestButtonApiServiceCall: NSObject, LensRemoteApiServiceCall {

    let task: URLSessionDataTask
    let status: LensRemoteApiServiceCallStatus = .ongoing

    init(task: URLSessionDataTask) {
        self.task = task
        super.init()
    }

    func cancelRequest() {
        task.cancel()
    }
}

class IgnoredButtonApiServiceCall: NSObject, LensRemoteApiServiceCall {
    let status: LensRemoteApiServiceCallStatus = .ignored

    func cancelRequest() {
        // no-op
    }
}
Lens Implementation
This Lens example uses button_pressed as the endpoint and sends the ID of which button is pressed in the request parameters. Then, when the app responds to the Lens, the Lens reads the text object that is passed back in and writes to a screen text object. This function could be easily triggered via a Behavior script response on a button press. For an example of how to do this, check out the User Interface Helper UI System available in the Asset Library.
// @input Asset.RemoteServiceModule remoteServiceModule

// @input  Component.Text responseText;
// @input  Component.Text sendText;

var id = 0;

script.api.button_pressed = function (buttonID, cb) {
  buttonID = id;
  var req = global.RemoteApiRequest.create();
  req.endpoint = 'button_pressed';
  req.parameters = {
    buttonID: buttonID,
  };

  if (script.sendText) {
    script.sendText.text = 'Sending with ID: ' + id.toString();
  }

  script.remoteServiceModule.performApiRequest(req, function (response) {
    var parsedResponse = JSON.parse(response.body);
    if (script.responseText) {
      script.responseText.text += parsedResponse.text.toString();
    }
  });
};
Sending Images, 3D models, etc. to Lens
Sending objects to a Lens such as images, videos, and 3D models is also possible and can be interpreted by the Lens via the loadResourceAs APIs in Lens Studio.
Note that when sending these sorts of data you need to send that as the only data in the response as the conversion in Lens Studio runs on the entire response body.
Here is an example of this API for loading an image:
script.api.fetchImageRequest = function (imageId, teamId) {
    var endpoint = "image";
    var req = global.RemoteApiRequest.create();
    req.endpoint = endpoint;
    req.parameters = {
        "imageId": imageId
    };

    script.remoteServiceModule.performApiRequest(req, function (response) {
        script.remoteMediaModule.loadResourceAsImageTexture(
           response.asResource(),
           function (texture) {
               global.onImageResponse(imageId, texture);
           },
           function (error) {
               // handle error
           });
       });
   }
}