World Mesh Example
The World Mesh example allows you to instantiate and occlude virtual objects based on real world surfaces through real-time 3D mesh reconstruction of what your device sees. The example allows you to instantiate objects based on surface types, or based on its orientation.
This example uses the World Mesh, which capabilities can vary across devices. Take a look at the World Mesh guide to learn more.
The World Mesh used in this example was previously limited to device with LiDAR. However, starting with Lens Studio 4.10, this capability can be used on devices with LiDAR and recent devices with ARKit or ARCore. This example also comes with a fallback mechanism for devices without World Mesh capability.
Guide
You can push the Lens to your device as you would with any other Lens, but your device must support World Mesh. You can preview how it would look on a supported device in Lens Studio using the Interactive Preview mode in the Preview panel.
Setting up the Example
Bringing the Example in
Find the World Mesh - Spawn On Surfaces asset in the Asset Library and import it into your project. Click here to learn more about how to use assets in the Asset Library.
Once you import the asset from Asset Library, you can find the package in the Asset Browser.
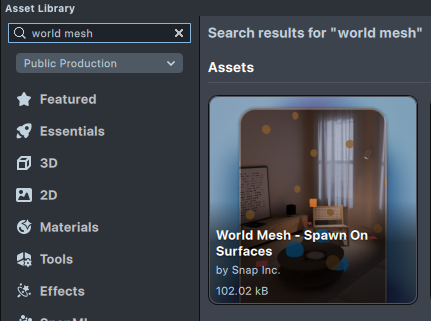
Follow the instructions and drag the prefab World Mesh - Spawn On Surfaces__PLACE_IN_SCENE into Scene Hierarchy to create a new Scene Object.
Setting up the scene
Following the note in the prefab (1. Add Device Tracking - World to [Camera Object]), we need to add Device Tracking to our camera so the Lens knows to track the world.
In the Objects panel, select Camera. Then, in the Inspector panel press Add Component -> Device Tracking.
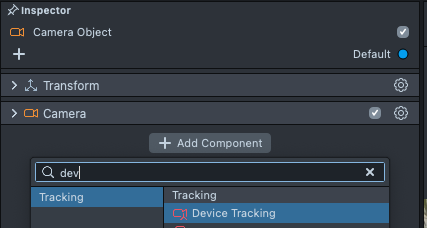
Then, select World in the Device Tracking drop down.
Learn more in the World Tracking guide.
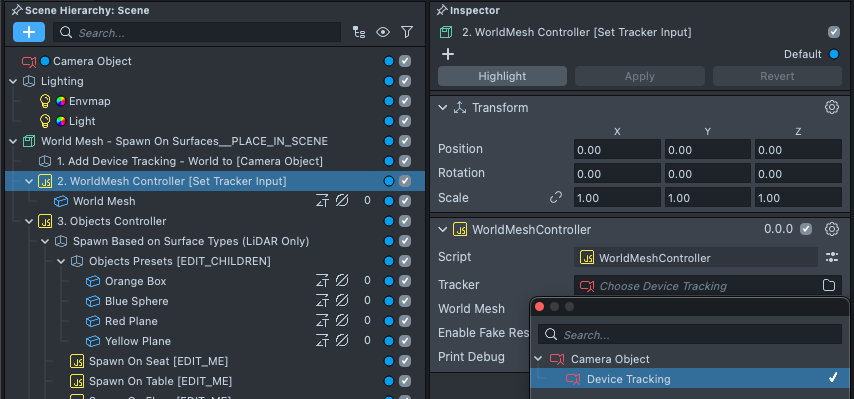
Finally, we will tell our spawner about this component. In the Scene Hierarchy panel, select 2. WorldMesh Controller [Set Tracker Input]. Then, in the Inspector panel, click on the Tracker field, and choose the newly added Device Tracking component.
How it Works
The World Mesh Example demonstrates two of the key features enabled by World Mesh:
- World Mesh: A mesh that is automatically generated that represents the real world. You can use this to occlude AR effects based on the real world
- Hit Test Results: Using the ray casting or hit test function, you can learn about the mesh that was hit at a certain point, as well as its position, normal. On device with LiDAR, you can also get information on the type of surface that is hit. Learn more about this in the API documentation
Like other Lenses where the user should be able to walk around, this example uses the World mode in the Device Tracking Component found in the Camera object.
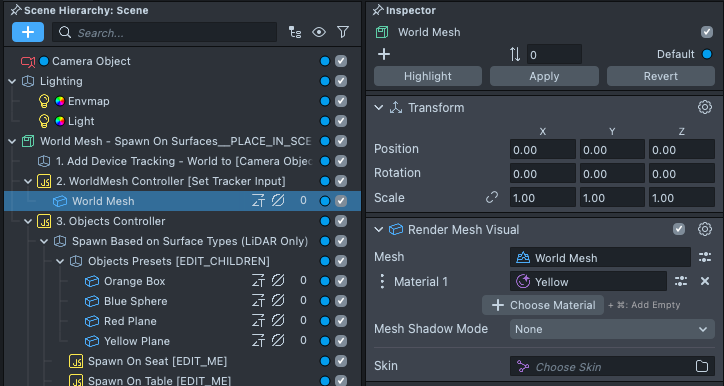
You can see the World Mesh being built in this example, by selecting the World mesh object, and then changing it's material from occluder to one that is visible.
Instantiating Objects Based on a Surface's Information
The example provides two ways of describing where your virtual objects should be instantiated: by surface type, or by normal orientation.
By surface type uses semantic information about the surface it is potentially instantiating on. This is only available on devices with LiDAR. You can specify that a virtual object should only spawned on:
- Wall
- Floor
- Ceiling
- Table
- Seat
- Window
- Door
- None (of the above types)
When a device is unable to semantically describe a surface, it will default to None.
The example provides an All type which will add a spawner for each type described above, such that you can ensure that an object is spawned everywhere. This is useful when you want an object to spawn regardless of whether the surface type is known or not.
By normal orientation uses the orientation of the detected surface to determine what should be instantiated. In other words, you can tell an object to instantiate only on:
- Up facing surfaces (like tables and floors)
- Down facing surfaces (like ceilings)
- Vertical surfaces (like walls)
You can mix and match these two descriptors as needed. Take a look at the Spawner Setup section below to learn more.
For example, we can select one of the spawner setup, and increase the number of instances.
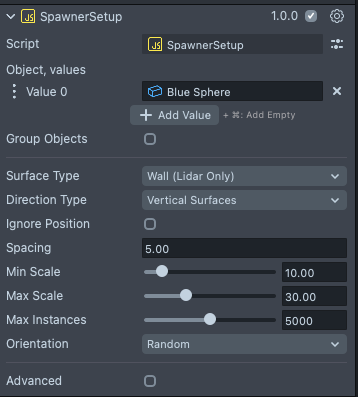
Then, in the preview panel, we can see how we're instantiating on surfaces with that setting.
Scene Setup
Each object we want to spawn require three things:
- The Render Mesh Visuals to spawn
- A special Graph material for each Render Mesh Visual that enables instantiation
- A SpawnerSetup script which configures how the object should be spawn
By default, the example comes with several objects and their corresponding spawner for each surface type.
- Desert: Seat type
- Clouds: Wall type
- Boat: Floor type
- Forest: Table type
- Stars: Ceiling type
- Planets: None type (surface types we don't know)
- Clouds: All vertical surfaces
- Plane: All down facing surfaces
- Trees: All up facing surfaces
You can play around with the Interactive Preview, to see these objects instantiate in your scene as if you were on a device with LiDAR. The classic video and photo preview will demonstrate what the Lens will look like on non LiDAR devices.
You can find the visuals underneath the Objects Presets object, and their SpawnerSetup underneath the Objects Controller object.
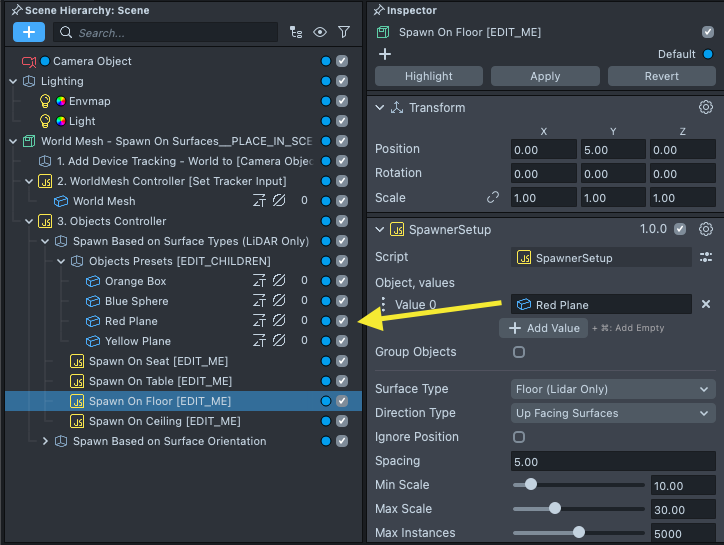
Each referenced Render Mesh Visual has a special graph material. Since we are populating the world with a lot of these objects, it is more efficient to instantiate them through their material (shader), rather than with additional scene objects.
These Graph materials are unique in that they have their Frustum Culling with Extend option with a large padding so that they don’t disappear when you look away from their origin (since the instantiation can be anywhere), and have parameters that are passed in through the script which describes where they should be instantiated.
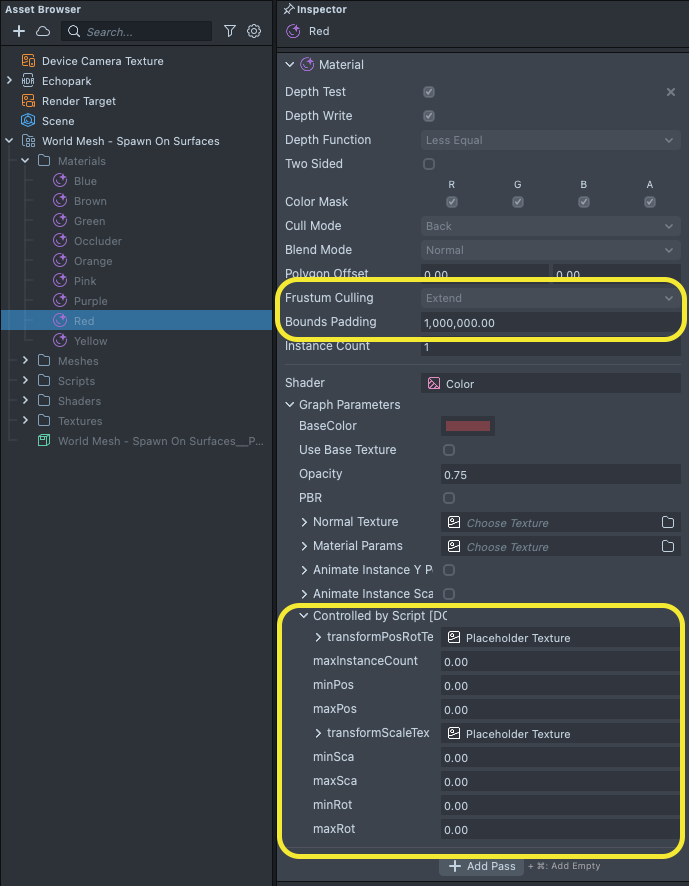
At a high level, the SpawnerSetup will tell the special graph material to instantiate new copies of the Render Mesh Visual, based on the Hit Test Result.
Spawning Your Own Object
Bringing in your Assets
You can import your own 3D object by dragging them into the Scene panel of Lens Studio. Then, drag them under the Objects Presets objects in the Scene Hierarchy panel.
With the object imported, add the mesh into your scene. Put it under the Objects Presets [EDIT_CHILDREN] object.
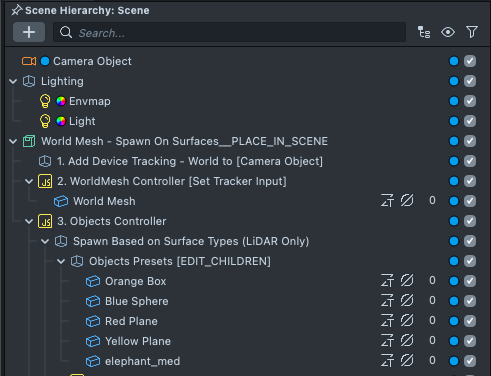
Learn more in the Export and Importing 3D content guide.
Applying the Special Material
With your objects imported, let's create the special material to apply to it.
You can right-click on the World Mesh - Spawn On Surfaces asset in the Asset Browser panel, and select Unpack for Editing from the drop-down menu to unpack all assets stored in the bundle. Click here to learn more about Asset Packages. Once you unpack the package, you can then edit its content.
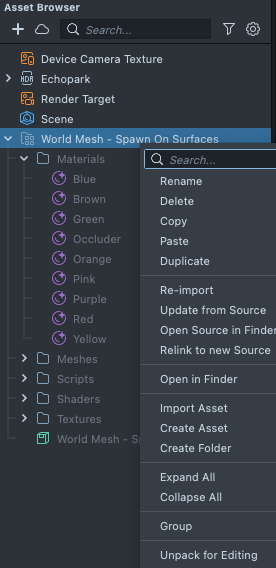
Duplicate one of the example special graph materials by right clicking on one in the Asset Browser panel, and then pressing the duplicate button.
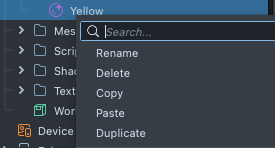
Then assign the new material to the Render Mesh Visualof the object you’ve imported.

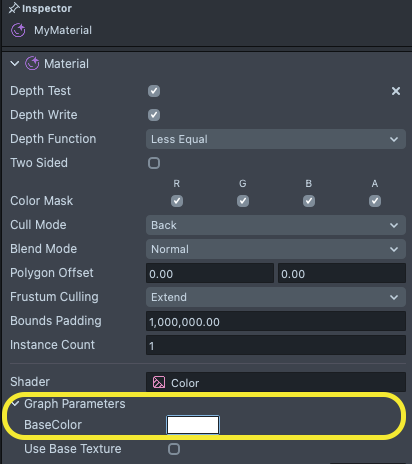
Since the default materials are colored to help differentiate the various instances, you can set the Base Color to white so that your texture comes through without color modifications.
This example comes with several example materials to help you get started. However, since they are graph materials, feel free to customize them to your needs by double-clicking on your copy in the Asset Browser panel to open it in the Material Editor!
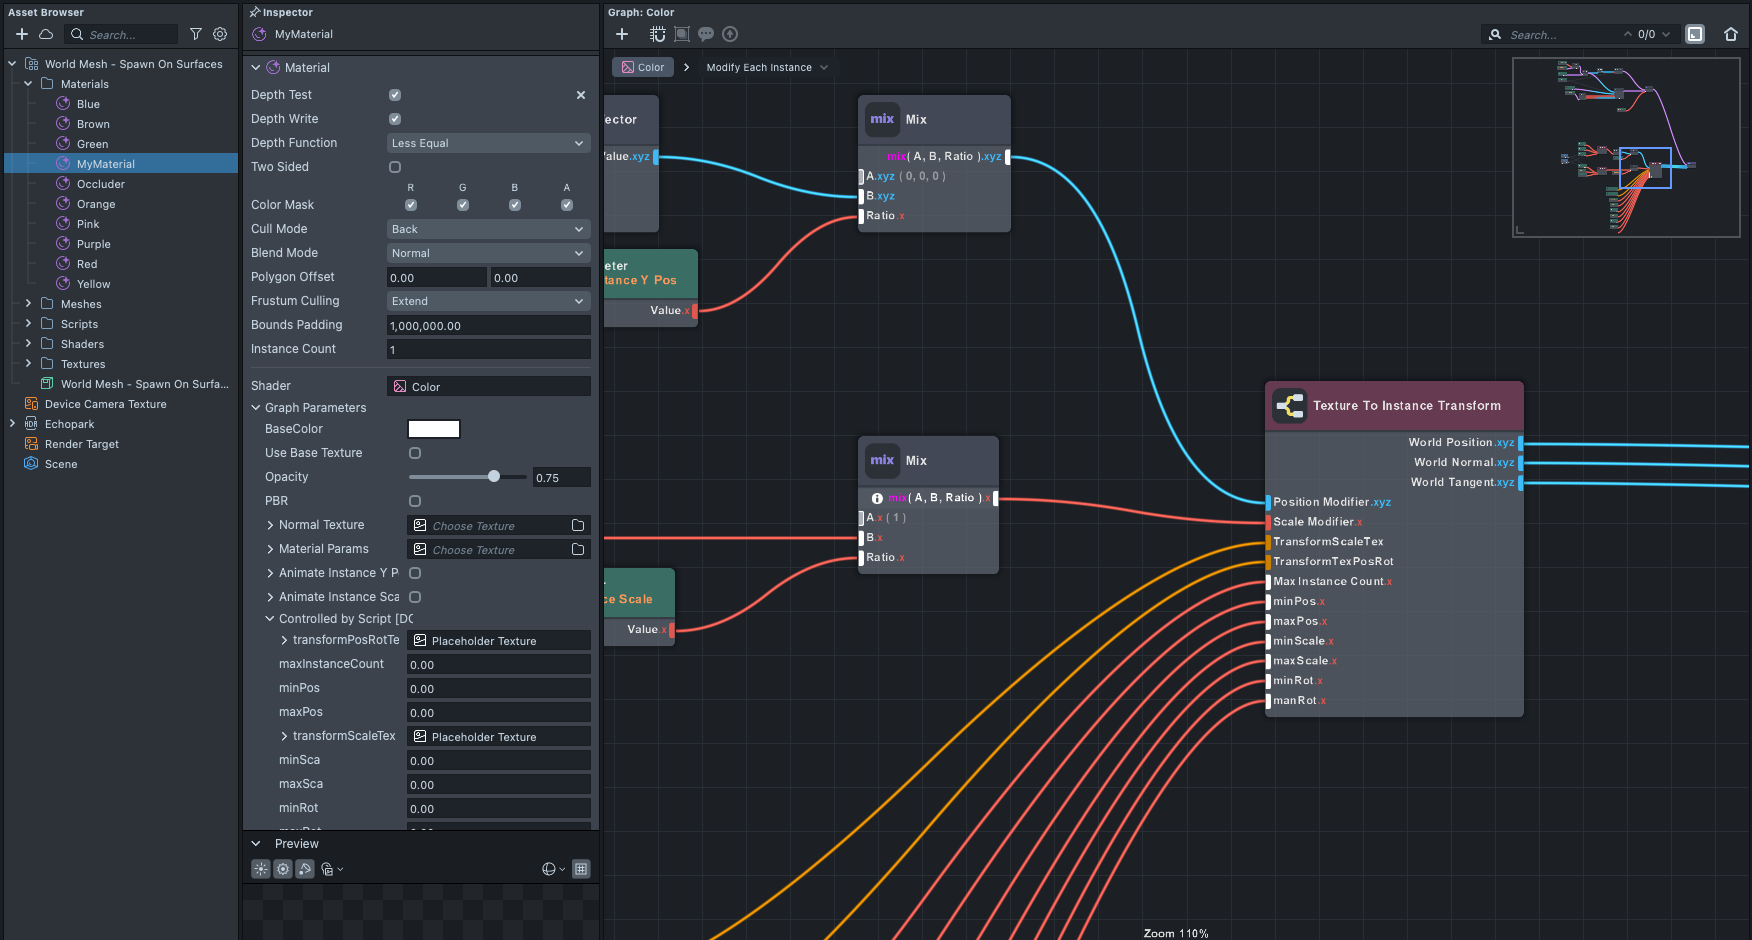
If you want to instead add the special capability to an existing graph material, you can copy all nodes related to the Vertex Shaders, and increase the Frustum Culling padding of your material.
Additionally, make all the texture parameters under Controller by Script use the Filtering Mode Nearest (click the V button next to the texture to show the texture’s option). This is important to make sure that the shader can read the precise data passed in by script, rather than a filtered data.

You can see an example of a material which has a custom setup in the material used by the water. In the water material, the water texture is made procedurally rather than through a texture.
Adding Spawner Setup
Finally, with your objects set up, we can spawn them with the SpawnerSetup.
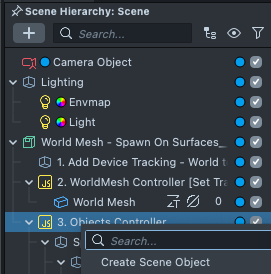
In the Scene Hierarchy panel, create a new object under Objects Controller.
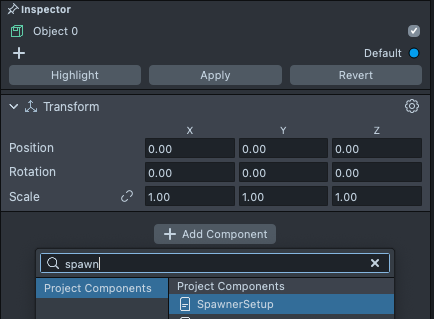
Then select the new object, and in the Inspector panel, press Add Component > SpawnerSetup script
Spawner Setup
The Spawner Setup script contains several options to configure how you want your objects to be spawned.
- Objects: a list of objects with a render mesh visual on them, with the special graph material described above.
- Group objects: When this option ticked, all of the listed objects will be positioned in the same place. With it unticked, one of the listed objects will be spawned at random.
- Surface Type: The type of surface that you want this object to be spawned on.
- Ignore World Pos: Use vec3(0,0,0) as the position of the object instance instead of the position of the object in the Inspector panel.
- Orientation: How you want to generate the rotation for each instance.
- Direction Type: Whether you want to spawn the object only when the hit test provides a certain orientation.
- Spacing: How crowded you want the objects to be. The higher the number, the less crowded. Usually a higher number is better so that you can cover more areas with less objects.
- Min Scale: Min value of multiplier for the object’s scale.
- Max Scale: Max value of multiplier for the object’s scale.
- Max Instances: The max number of objects to be spawned in the world.
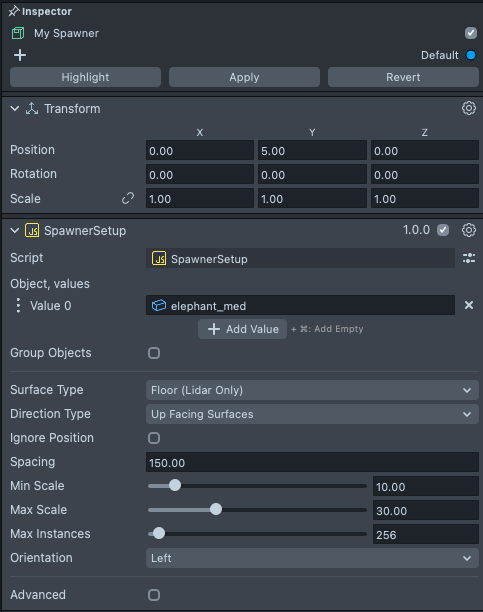
With your Spawner setup, you should now see your objects instantiated around the scene in the Preview panel.
Under the WorldMesh Controller object in the Helper Scripts object inside the Scene Hierarchy panel, you can change the Surface Dir Variation such that the Direction Type doesn't have to be exact. That is: allow surfaces that are generally facing the expected orientation to pass (e.g. a generally up facing surface will count as an up facing surface).
Fallback Mode
By default, the example provides a virtual surface for floor, table, and wall objects. You can skip this section if you don't need a specific configuration.
On devices without LiDAR capabilities you can define how you want your objects to populate the world by describing a “virtual surface.”
You can add your own or modify these definitions in the WorldMeshController script by defining a generator for a fake Hit Test Result.
For example, in the case below, we provide points on a surface between -125 and 125 in the x-axis, -50 in the y-axis, and somewhere between 50 to 250 in the z-axis, all of which have a normal is facing up, to spawn an object for the surface type floor.
var fakeFloorResult = {
  isValid: function () {
    return true;
  },
  getWorldPos: function () {
    return new vec3(Math.random() * 250 - 125, -50, Math.random() * 250 - 50);
  },
  getNormalVec: function () {
    return vec3.up();
  },
  getClassification: function () {
    return global.WorldMeshController.surfaceType.Floor;
  },
};
Then, all we need to do is add this to the list of possible results:
var fakeResultsPool = [fakeFloorResult, fakeTableResult, fakeWallResult];
In this way, you can define both several types of surfaces, and even a number of surfaces for each type.
Previewing Your Lens
You’re now ready to preview your Lens experience. To preview your Lens in Snapchat, follow the Pairing to Snapchat guide.