Ray Tracing in Lens Studio
Ray Tracing improves the quality and realism of virtual objects placed in the real world through accurate lighting simulation, which reflects your real world environment, and enhanced lighting controls for developers.
This technology improves the quality of any Lens which features scenes and objects where lighting bounces and is reflected on their surface. For example, the inclusion of fabrics that are metallic or polished along with materials such as metals, stones, glass, polished surfaces. Because of the importance of light reflections across a vast number of AR experiences, the use of Ray Tracing is leveraged in many use cases, including Lenses that feature:
- Virtual Products (jewelry, handbags, eyewear, electronics, metallic apparel fabrics)
- Gaming & Sports (automotive, courts, helmets)
- Architecture & Entertainment (buildings, windows, rooms)
- Self-Expression (digital fashion, highlight, reflective and metallic textures applied to face meshes).
Ray Tracing comprises several features: Reflections, Global Illumination, Shadows, and more. The current version of Lens Studio supports Ray Tracing Reflections and Global Illumination - future versions will add support for additional features.
Ray Tracing Features
Ray Tracing Reflections
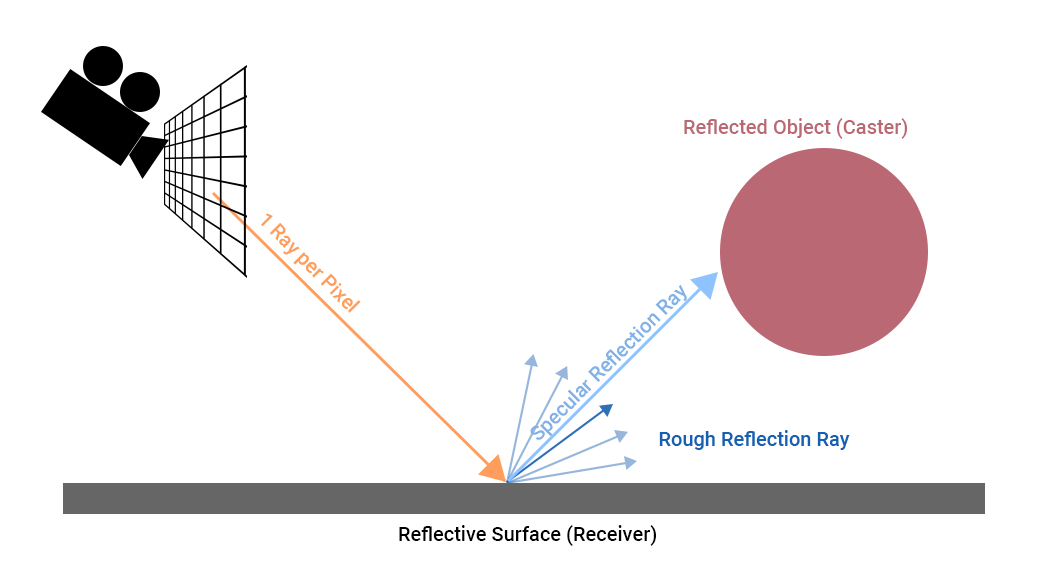
Ray Tracing Reflections simulates how light interacts with reflective surfaces. By tracing the path of rays from the reflective surface and accurately depicting the objects that should be reflected on those surfaces. This effect adds depth and authenticity to the visual representation of a scene and enhances its realism.
List of Supported Devices
Below is a list of all available devices that currently support Ray Tracing.
| Operating System | Device Name |
|---|---|
| iOS | iPhone 16: All Variants |
| iOS | iPhone 15: All Variants |
| iOS | IPhone 14: All Variants |
| iOS | IPhone 13: All Variants |
| iOS | IPhone 12: All Variants |
| iOS | iPhone 11: All Variants |
| Android | Samsung S25: All Variants |
| Android | Samsung S24: All Variants |
| Android | Samsung S23: All Variants |
| Android | Samsung S22: Adreno 730 All Variants |
| Android | Samsung S21: All Variants |
| Android | Samsung S20: All Variants |
| Android | Google Pixel 9: All Variants |
| Android | Google Pixel 8: All Variants |
| Android | Google Pixel 7: All Variants |
| Android | Google Pixel 6: All Variants |
| Android | One Plus 13: All Variants |
| Android | One Plus 12: All Variants |
| Android | One Plus 11: All Variants |
| Android | One Plus 10: All Variants |
| Android | One Plus 9: All Variants |
| Android | One Plus 8: All Variants |
Getting Started with Ray Tracing
Adding Ray Tracing
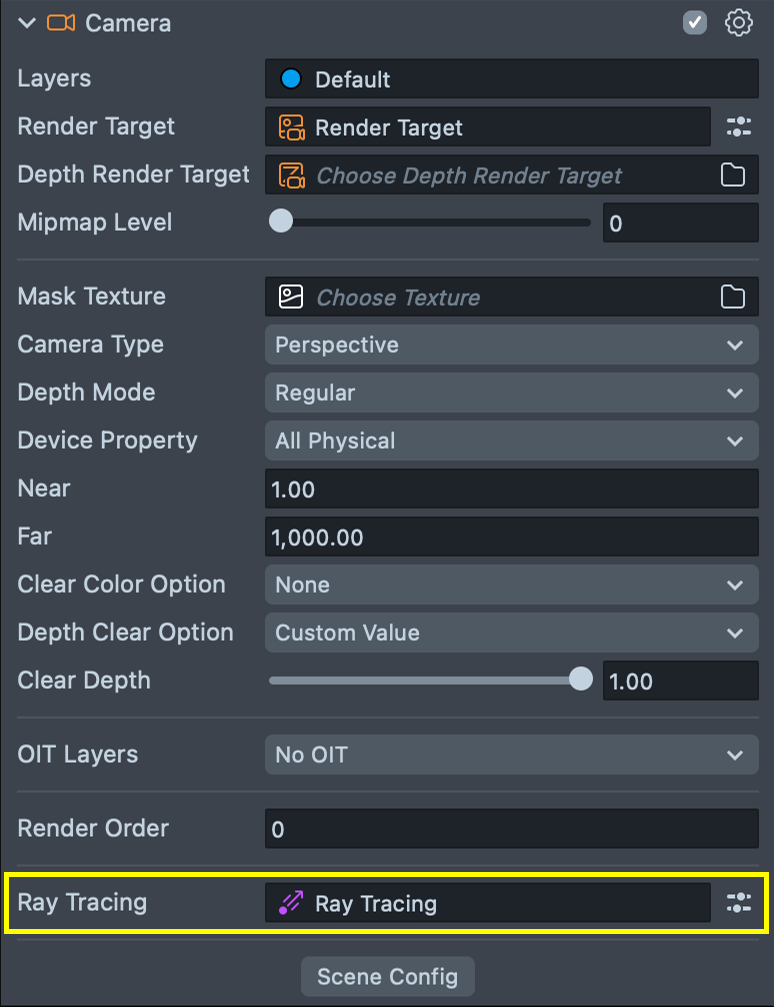
Lens Studio 5.0 has made it easier than ever to add Ray Tracing to your project. To start working with Ray Tracing, simply go to your Camera object, click on Choose Ray Tracing field and create new Ray Tracing asset. Adding the asset will enable Ray Tracing in the scene and set this camera to display Ray Tracing results.
Please note that each camera that requires Ray Tracing will need this asset added, but it will also result in increased performance so only add as needed.
Global Settings: Ray Tracing Settings Asset
Defines what features will be enabled and allows finer control over their quality and performance. While this version only includes Reflections and Global Illumination, future versions will have a few more features to control.
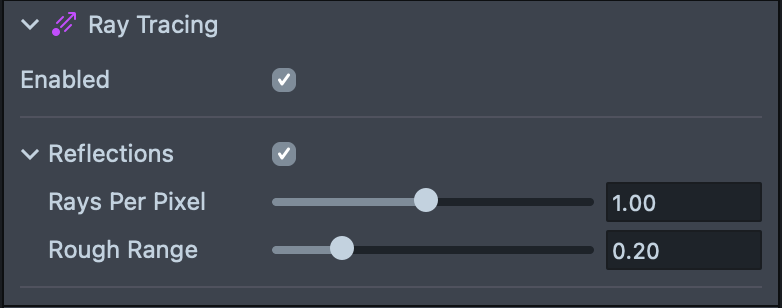
- Enabled: Toggles RT visuals for the related cameras. This allows an easy switch for the visuals, but if you wish to completely disable RT in the project, it’s suggested to remove the asset from the camera.
- Reflections: Enables Ray Tracing Reflections for the related cameras.
- Global Illumination: Enables Ray Tracing Global Illumination for the related cameras.
- Rays Per Pixel: Controls Ray Tracing fidelity for the camera, and is set to
1by default. Changing this value can increase/decrease quality in favor of performance.- Setting a higher Rays Per Pixel value will lead to sharper higher quality appearance, but will translate to a higher performance cost.
- Range: Controls the distance (in percentage of scene dimensions) after which the effect will receive the maximum blur. Ray Tracing effect of objects in the range will blur gradually.
Object Settings: Render Mesh Visual component
Ray Tracing is applied as the relationship between objects in the scene. Currently, Ray Tracing is only supported with meshes (Static and skinned meshes). The relationship is split to: Caster and Receivers.
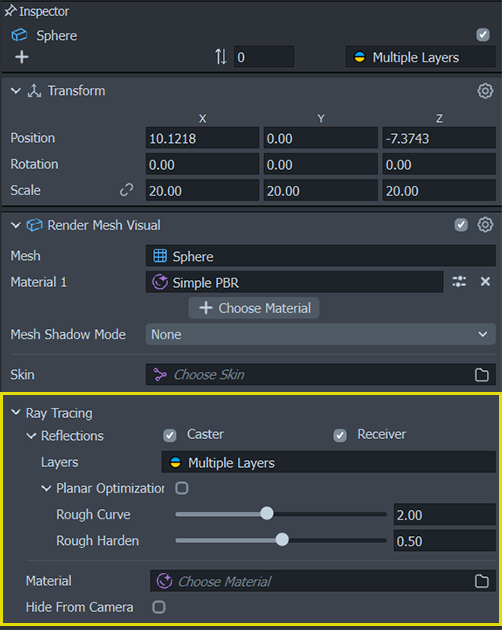
The behavior is set directly from the Render Mesh Visual component.
Each RT feature has its own Caster and Receiver checkboxes to allow for more granular control of visuals and performance.
- Casters: Visuals seen in Ray Tracing results and contribute to the calculations for reflections or global illumination. Can be toggled via the
Castercheckbox.- Material: This feature allows a user to override the material used for Ray Tracing without affecting the primary visuals seen in the lens. This can be used when needing to use a simpler material logic, or when you want to enhance the RT results with a custom material.
- Hide From Camera: This feature causes the caster object to not be rendered in the final lens, while still being seen in the Ray Tracing result. This is a good feature to use when wanting to use a simpler LOD geometry for the mesh to lower performance costs, or when wanting to enhance the RT result with additional meshes while not affecting the primary visuals.
- Receivers: Visuals from which rays will be tracing. Receiver meshes will add the Ray Tracing texture result in the material.
- Layers: An optimization feature for more granular performance control. This feature allows you to specify which casters a receiver interacts with based on layer mask, thus decreasing the performance load for each receiver.
- Planar Optimization: Only works on planar surfaces. Optimizes rendering for flat, planar surfaces by using a different and faster ray tracing method. Please note that using this method only works well for surfaces with low roughness values, and is aimed for mirror-like reflections on flat surfaces.
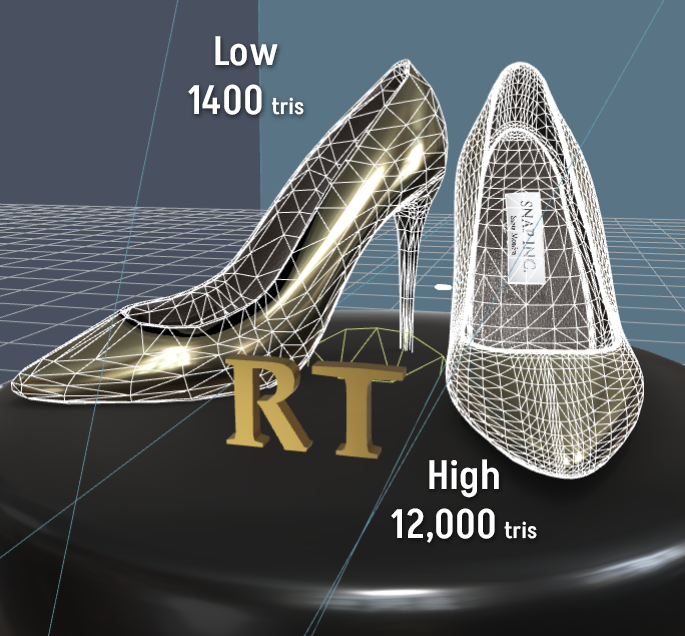
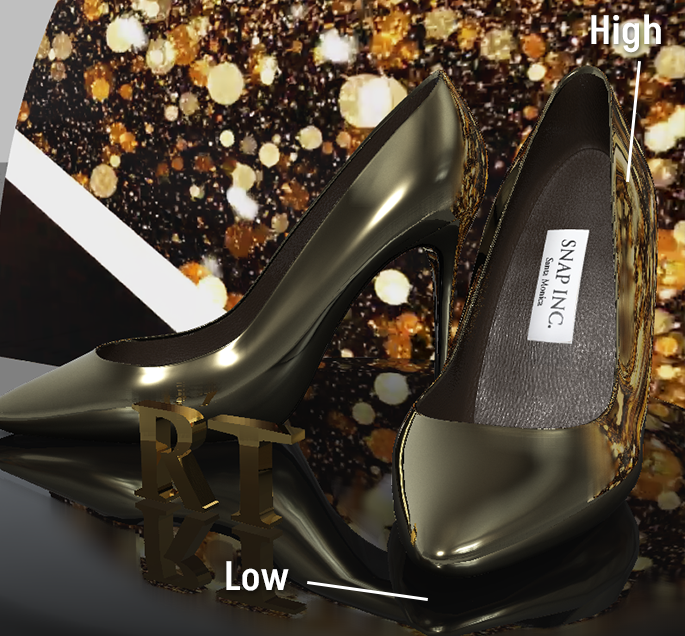
Please note that caster objects may lead to high performance costs based on their complexity. It is advised to use a lower LOD mesh as a caster using the 'Hide From Camera' setting. In the case of more complex scenes, it is also recommended to use Caster Filtering to further fine tune performance based on need.
The Hide From Camera setting is a great way to create unique and interesting visuals for Ray Tracing. Its main use is to use low poly versions for Caster and hiding them from the camera. However, another great use case is to add hidden visuals that can greatly customize the lighting effects. For example, using a bright and emissive mesh as a light source.
Because tracing objects (Receivers) only impact performance based on their pixel size on screen, you can use high poly meshes as Receivers and enjoy high quality reflections.
Materials
In this section, you will learn about the new Ray Tracing Materials that are built with the existing Physically Based Render materials within Lens Studio.

Caster Materials
While Ray Tracing should work with any material used in the project, Ray Tracing is built mainly to work with PBR-based materials, using the available PBR materials in the resource panel.
We are actively working on expanding support for all available material nodes in the material editor, but some nodes might not behave as expected in the Ray Tracing result. Please alert us if you find a bug with any of the nodes.
In case of custom materials not working as expected in reflections, it is suggested to create a simplified replica material and place it in the “Reflected Material” override setting on the caster object.
Receiver Materials
While Ray Tracing will still calculate the results on Receiver objects, it mainly requires a PBR-based material to display that result.
If you want to use a custom material, you will need to manually attach the result textures to your material.
For reflections, please use the reflections texture directly using the Ray Tracing Reflections node in the Material Editor. Note that this will only transfer Ray Tracing hits, and will draw a black (0,0,0,0) color for where the ray misses. You can mix that with the Environment Sample node to get the environment as well.
Reflections in AR might not anchor as well because Ray Tracing Reflections only interact with the 3D meshes in the scene, meaning, it doesn’t intrinsically see the camera feed. A good solution for this would be to use reprojection techniques for a hidden caster (either on the ground, background, or even a 360 dome) that way the Receiver object will receive the camera feed texture as reflection information.
- For faces, you can use the Face Reprojection asset in the Asset Library. Setting the face as a caster object will allow the object to “see” the face in reflections.
- Additionally, you can use the
Reflections Texturenode to get just the reflection data and construct a transparent material. This can be very useful to create the illusion of a 3D object reflecting on top of a real world surface.
Performance Consideration
Performance in Ray Tracing is controlled by 3 main factors:
-
Number of Rays: By default, Ray Tracing is using one ray per ray tracing (receiver) pixel in the screen. For performance heavy scenes, consider lowering the RPP (rays per pixel) value in the camera settings. Alternatively, consider resizing your receiver objects or distancing the camera.
-
Complexity of caster meshes: High poly meshes used as casters could result in significant performance costs, please consider adding a lower level of detail (LOD) version of the mesh and using that as a caster instead. Once placed in the scene, you can hide it from the camera by enabling the “Hide From Camera” setting on the mesh.
-
Number of casters in the scene: While Ray Tracing uses a number of techniques to optimize the scene automatically, performance could still be impacted by the number of casters each ray interacts with. To improve performance and further optimize the scene, you can use
Caster Filteringwhich allows controlling specific caster/receiver interactions, use this to remove unnecessary interactions.
Please consider that adding new casters during runtime will force the Ray Tracing Acceleration Structure to rebuild itself which may take up to a couple of seconds depending on scene complexity. To avoid “hiccups” in user experience, it is advised to have all your caster objects already existing in the scene and toggling them as needed.
Limitations
- Ray Tracing currently does not support transparency depth of more than one caster.
With Reflections - casters with transparency will appear as the envmap reflection, ignoring casters placed behind the first transparent object. - Meshes are limited to 65k triangles, meshes exceeding this will not function properly in Ray Tracing.
- Planar Optimization is not supported on iPhone 11 devices.
Known Issues
- Using two sided materials with Ray Tracing Reflections materials might cause self intersection reflections artifacts at small object scales.