Particles
To make it easier for you to mix-and-match our different examples, this template has been converted to an importable asset in the Asset Library with the name GPU Particles Technical Demo and GPU Particles Effects Pack.
The Particles Template includes a number of particles that can be easily exported and imported into other templates. The template guide covers the parameters used in our shader driven particle system. We've created several variations using the same shader each time to demonstrate the various types of effects you can create.
Tutorial
Guide
Exporting & Importing Particles
The Particles Template includes a number of particles that you can use in your Lens experiance. To use one of the included particles in another template, you need to first export the particle. To do this, select the particle in the Scene Hierarchy panel, right click and select Export Object. Then, in the Lens project you want to import the particle to, right click in the Scene Hierarchy panel and select Import Object.
Simple Particles
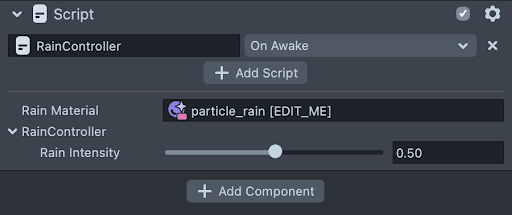
To demonstrate the functionality that you can achieve with scripting in conjunction with the particle material we've constructed a number of simple particles including Rain, Snow, Blizzard, Bokeh and Sparkles. Each simple particle has an Intensity slider that allows you to easily increase or decrease the intensity of the effect.
Spawn Over Time
Some effects you may want to spawn over time in which there are 0 particles at the start and over time they begin to emit. This is done by using a couple of scripts we've provided.
You can attach the scripts ExternalTimeController.js and GlobalTime.js and bind them both to the On Awake event in the inspector panel. Place these scripts on the SceneObject that contains the MeshVisual referencing the particle material you'd like to control.

Next, enable the External Time box for the material you'd like to control the time for. In this example we've done this for our smoke effect material.
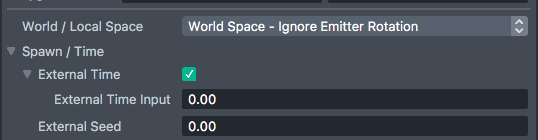
The particles should start to spawn from 0 once you refresh the view in Lens Studio.
3D Mesh Particles
You can also create particle systems that use 3D Meshes, like geometric shapes, clouds and asteroids, and even animated objects! This can add a great amount of versatility to your scene while still being highly optimized.
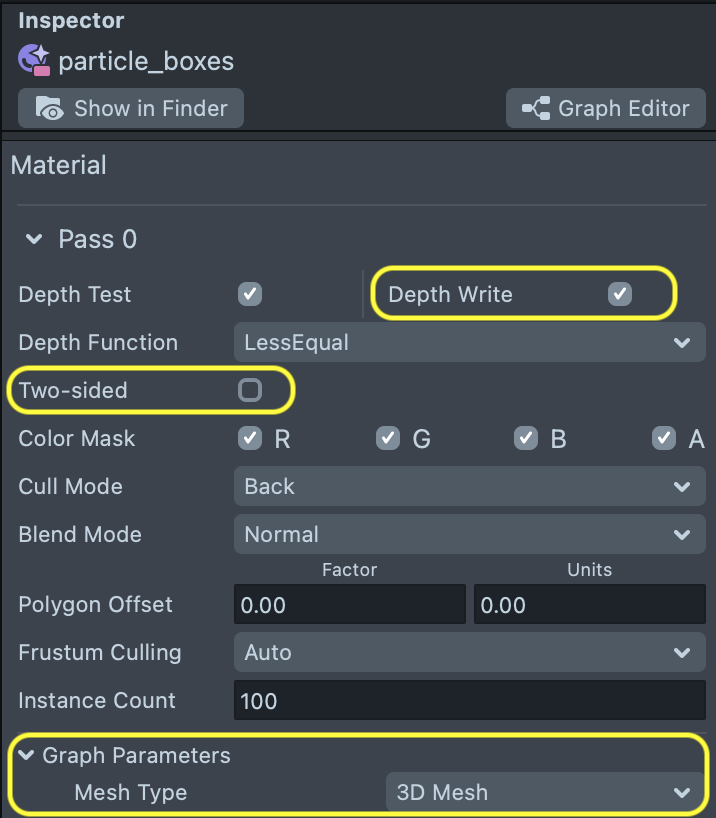
When using 3D Mesh particles, make sure to use the following settings on your material:
- Depth Write enabled
- Two-sided disabled
- Mesh Type set to 3D Mesh
The Particles template has 3 examples of 3D Mesh particles.
Simple Example
The Simple example shows the basic set-up for 3D particles using boxes.
To use a different mesh, simply replace the Box mesh on the Render Mesh Visual component with the new mesh you want to use (such as Sphere).
Animated Example
The Animated example shows how to set up 3D Mesh particles that use Skinned Animation. In order to use skinned meshes, the original object must be in the scene. Then, make sure that the object’s skin is assigned to Particle’s Render mesh Visual component.
The Red Panda Particles also have a setting for Material Parameters Map, which contains information about Roughness and Metallic values. You can add as many parameters as you want to the PBR section of any Particles material by using the Material Editor.
Complex Example��
The Complex example uses 2 separate particle systems to create flying rocket ships: one for the rocket body, and one for the rocket’s fiery tail.
This is possible because GPU Particles is a deterministic particle system. This means that particle systems with the same input values will always result in the same output values. This allows us to give the ships and tails the same position settings (instance count, spawn, lifetime, velocity, noise, gravity, local force, and scale), and results in both systems moving together.
Particle Trails
Trail rendering is a feature added in Lens Studio 5.4.0. This feature enables you to create particles with streaming trails that follow behind the leading particle. To learn more about trails, see the Trails section of the Particles Guide.
The GPU Particles Technical Demo includes two trail examples demonstrating various trail configurations. Both examples use the GPU Particles Trail Mesh Builder script to create a specialized GPU Particles mesh, which is required for trail rendering. You can find this resource in the GPU Particles Trail Mesh Builder package on the Asset Library. Additionally, both examples use the “Add” Blend Mode and a Night post effect enhance the glowing effect of the trails.
Rainbow Flare
The Rainbow Flare example uses noise, a rainbow color ramp, an alpha color ramp, and Particle Behavior set to Independent. Unlike our other examples, these particles only use trail geometry and do not have a head particle.
Shooting Stars
The shooting stars example uses local force, a trail texture with a blue gradient, and Particle Behavior set to Match Head.
Creating and Modifying Particles
Refer to the Particles guide for additional information on using and creating particles.