Mesh Data Texture
Mesh Data Texture is a powerful custom component can help you to create effects like particle spawning on meshes, scattering instances across surfaces, and more. It works seamlessly with both the VFX and Material editors, and provides access to the original mesh's normals, velocity and UV data. This unlocks many possibilities like setting geometry based on normal directions, inheriting velocity from animation, or create revealing effects using the UV data!
This custom component can be found on the Asset Library for Lens Studio version 5.13.0+. Looking for a similar tool for older Lens Studio? Search Spawn Particles On Mesh on the Asset Library and check the documentation here!
How it works
First, the mesh vertices are transformed into 2D space using their UV coordinates as positions to capture as much of the surface as possible. This technique allows us to capture both the front and back sides of the mesh. So proper UVs are a must for this to work correctly.
Mesh Data Texture custom component captures mesh information and encodes it into texture atlases for use in materials or VFX. It processes attributes like position, normal, velocity, and UVs using multiple render targets. The system runs in two camera passes: the first pass writes mesh data into the atlases, while the second stores position data from the current frame to calculate velocity. These textures are then sent to the materials or VFX, enabling dynamic effects that can react to the mesh’s shape and movement in real time.
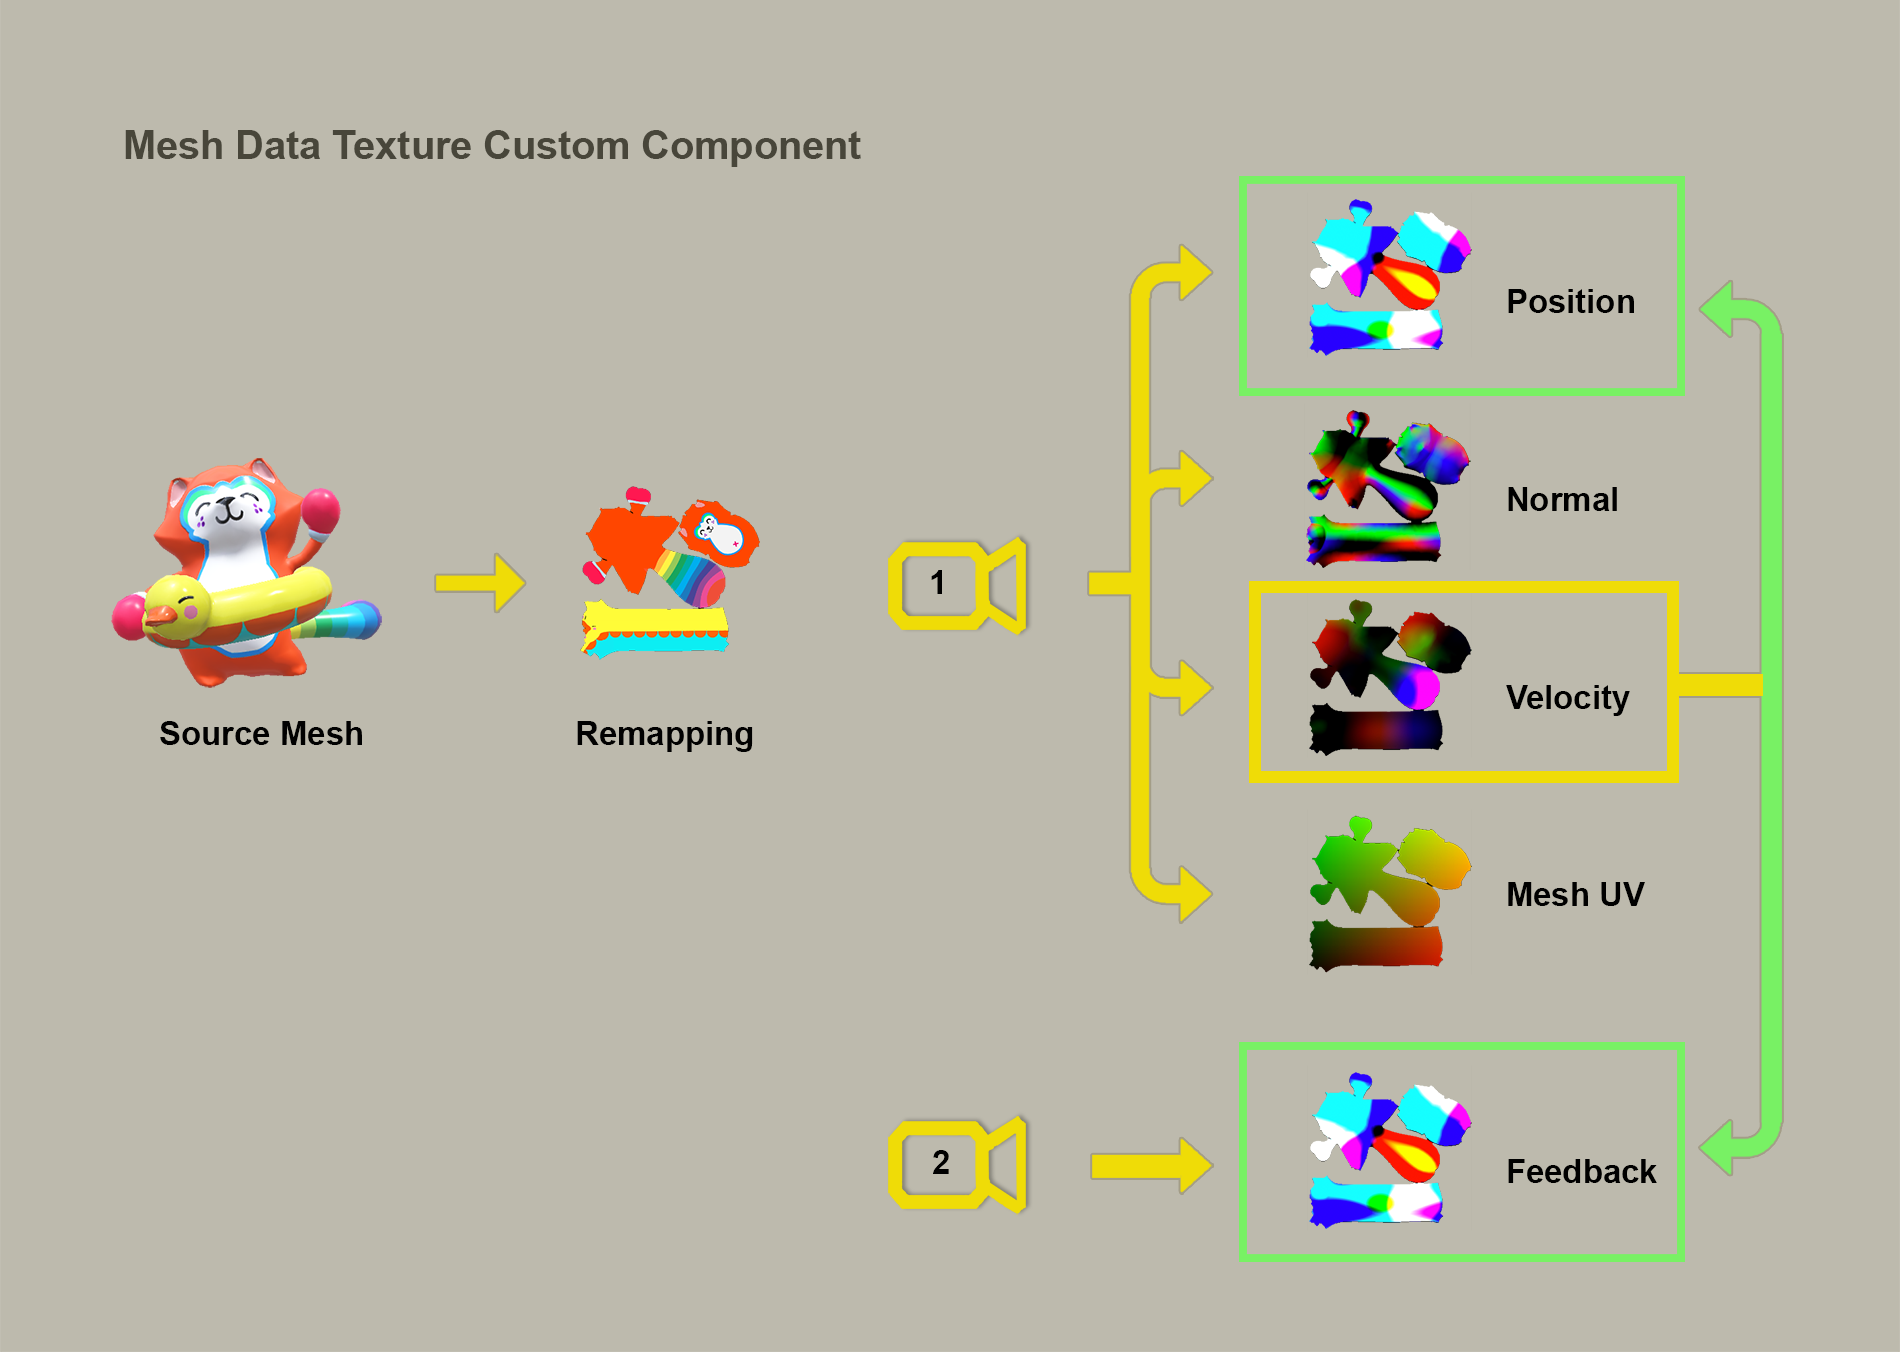
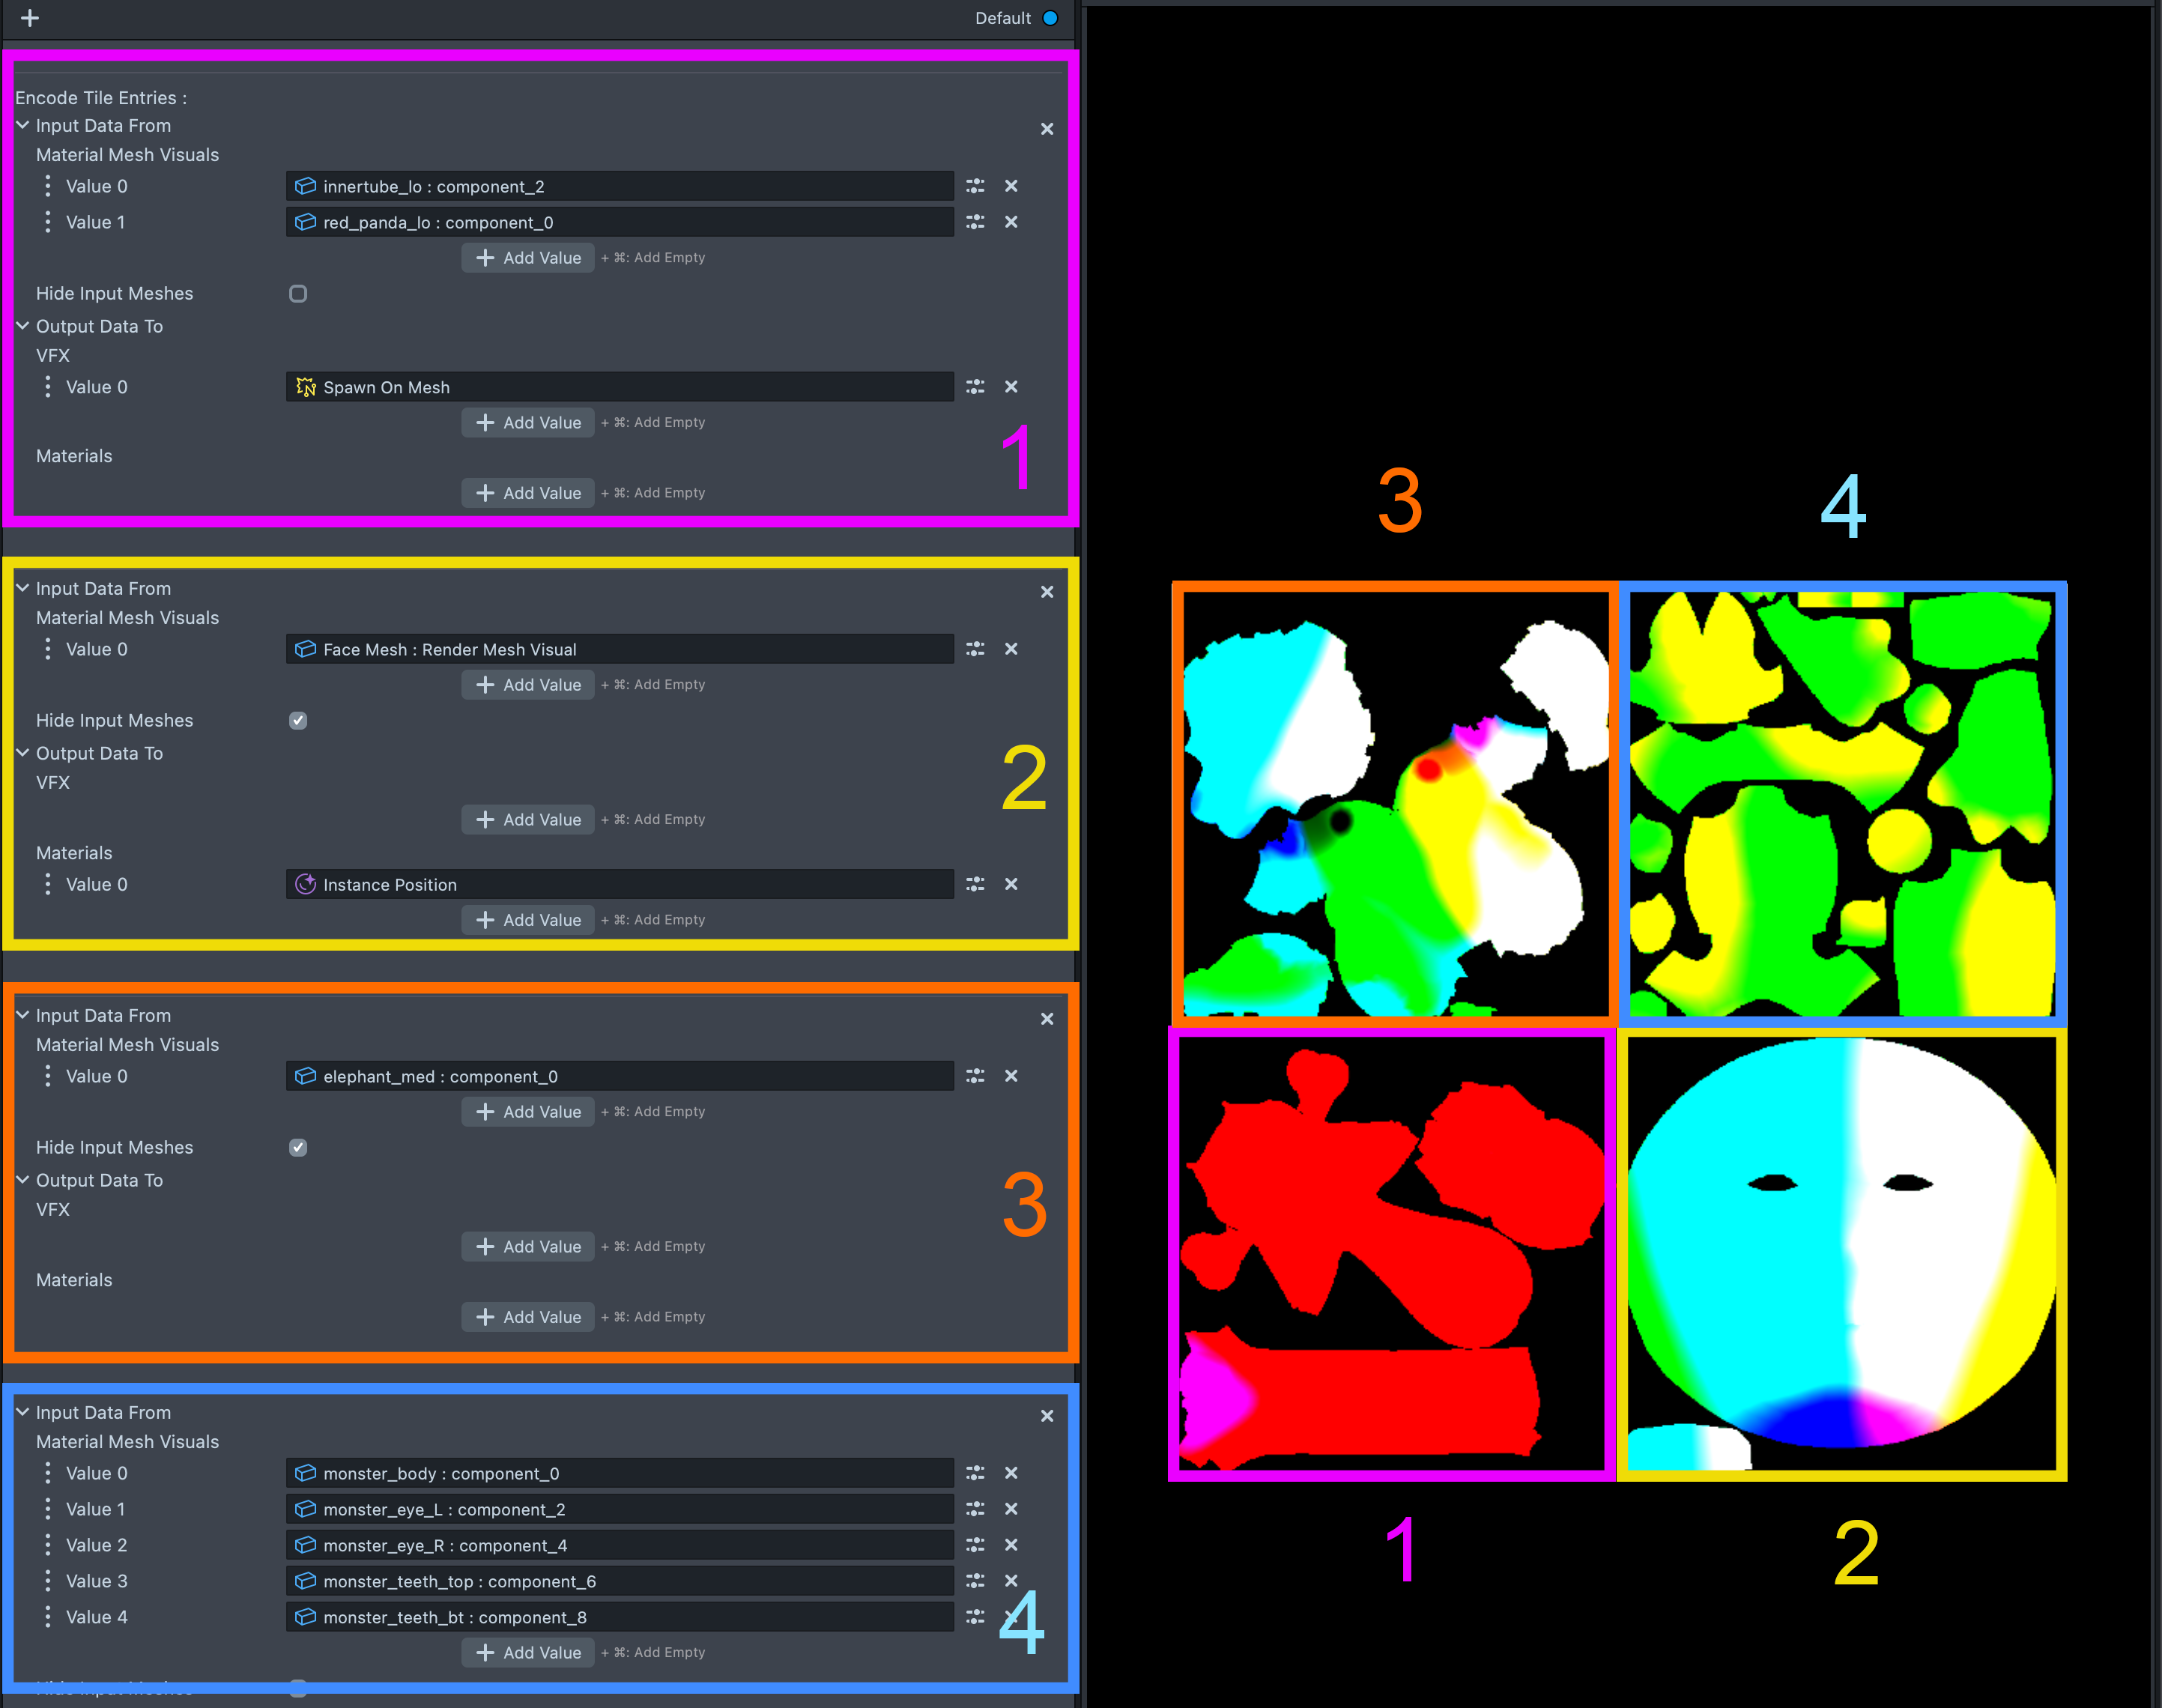
Mesh inputs are divided into tiles, with each tile representing a group of meshes rendered into a dedicated region of the atlas. This structure allows the script to handle multiple unrelated mesh sets independently while keeping everything managed through a single component. Whether you're using one set or many, the script automatically packs them into unified atlases. For example, below we're visualizing the position atlas data. With four entries, you’ll see four tiles—each written to its own section of the shared atlas. This makes it easy to sample the right data in different VFX or material graphs without needing multiple scripts.
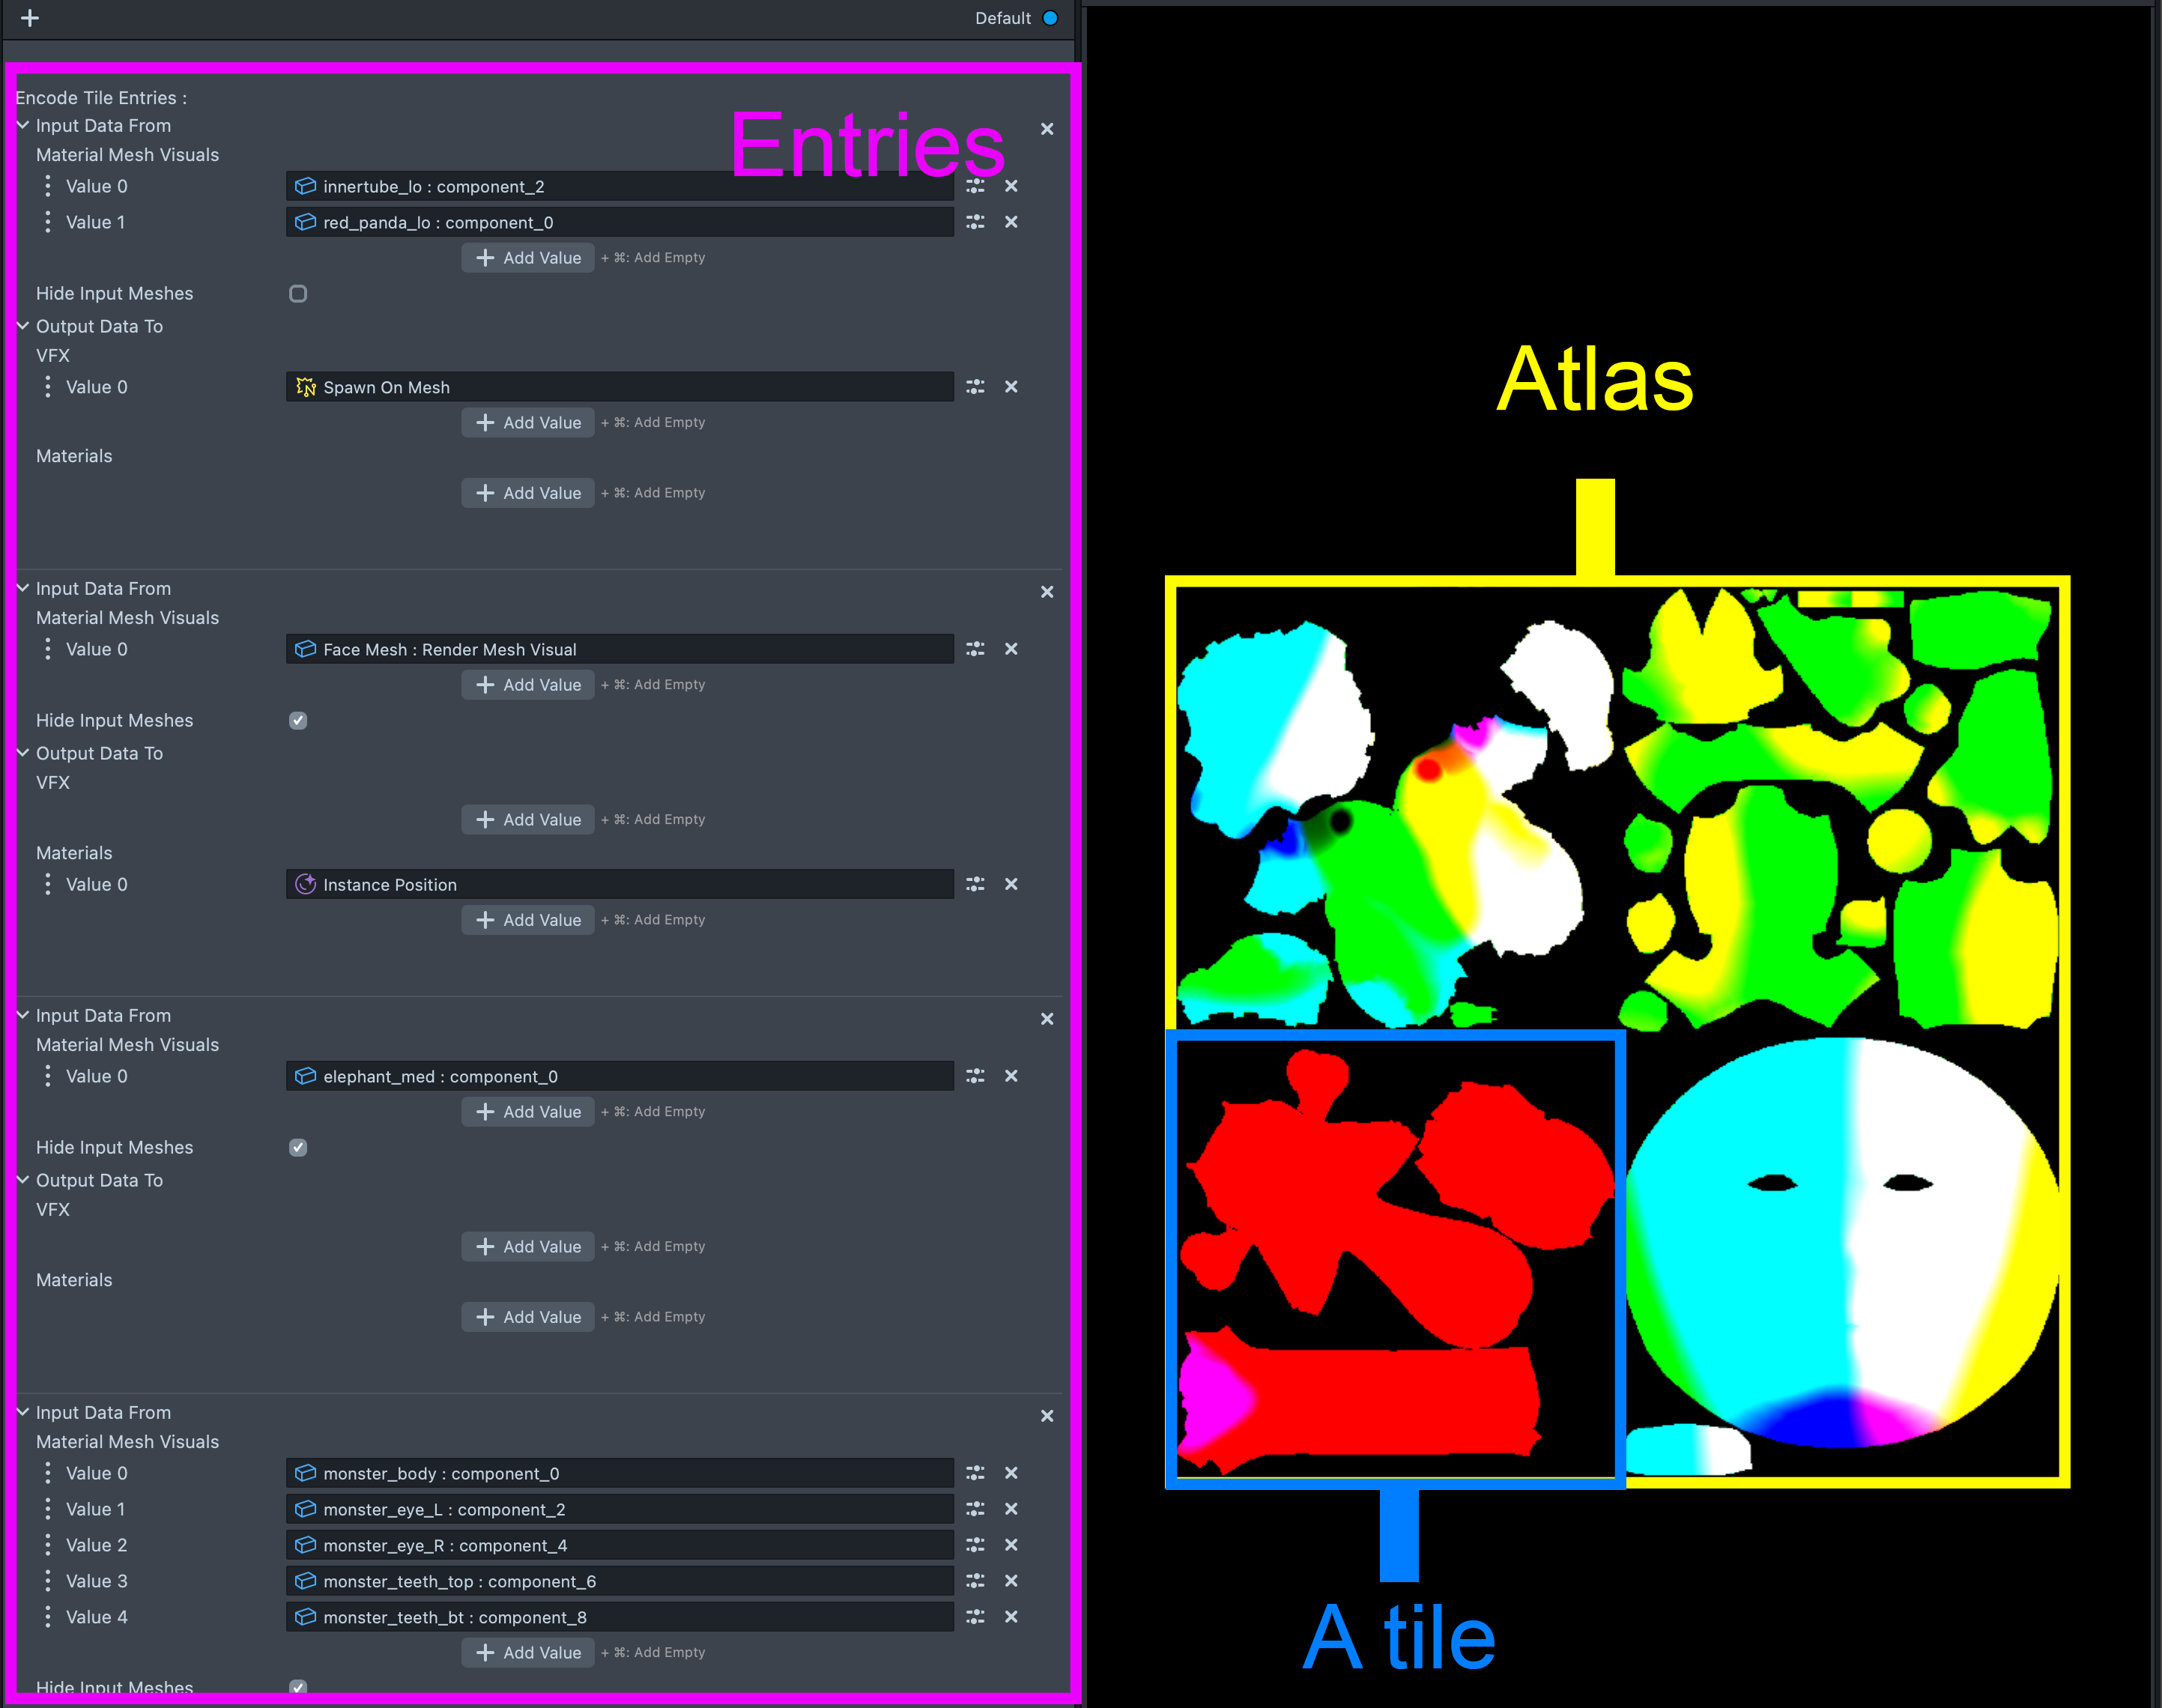
The atlas is always square, and its size automatically adjusts based on the number of mesh entry sets and the Per Tile Resolution setting. All of this happens seamlessly in the background, so you don’t need to worry about managing the layout. Debug mode can be enabled in the custom component to preview the encoded data if needed. This tile-based atlas structure ensures mesh data is organized efficiently and easy to access.
All materials and VFX assigned to a given entry automatically sample data from that entry’s tile, so no additional configuration is needed. Those data can be sampled in VFX, materials, or both, using a Sample Mesh Data Texture node. Check out the Mesh Data Texture Example pack in Asset Library for examples.
The Mesh Data Texture Example can be found on the Asset Library for Lens Studio version 5.13.0+.
Workflow
Mesh Data Texture Component
This is your starting point, everything begins with the custom component:
1. Select Mesh Attributes
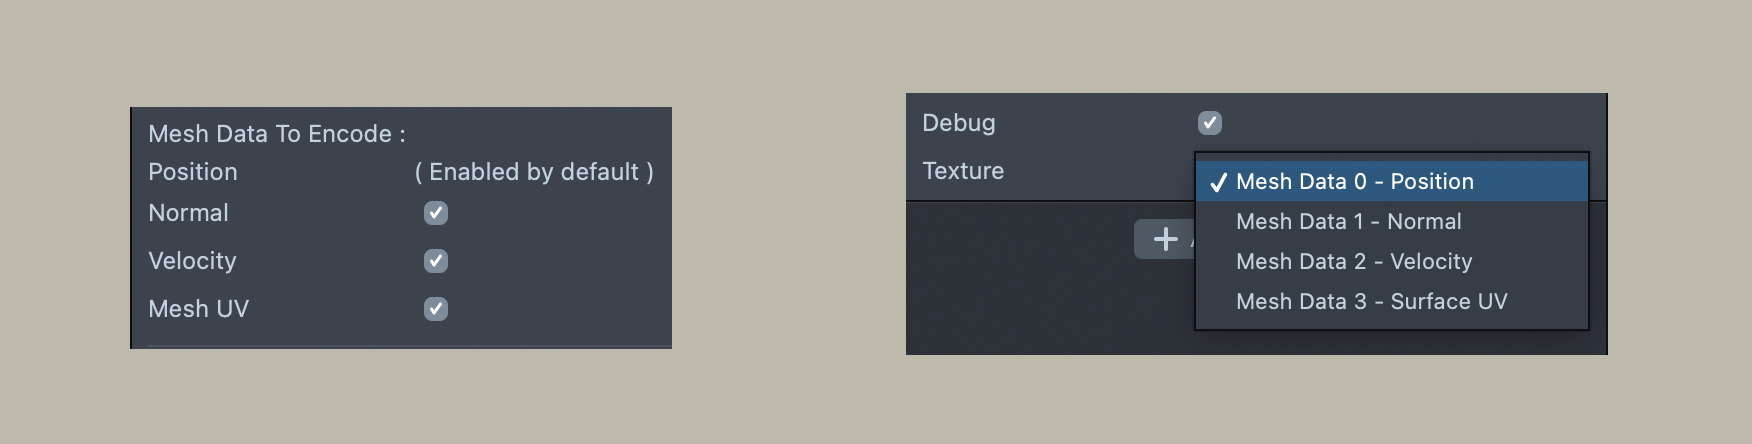
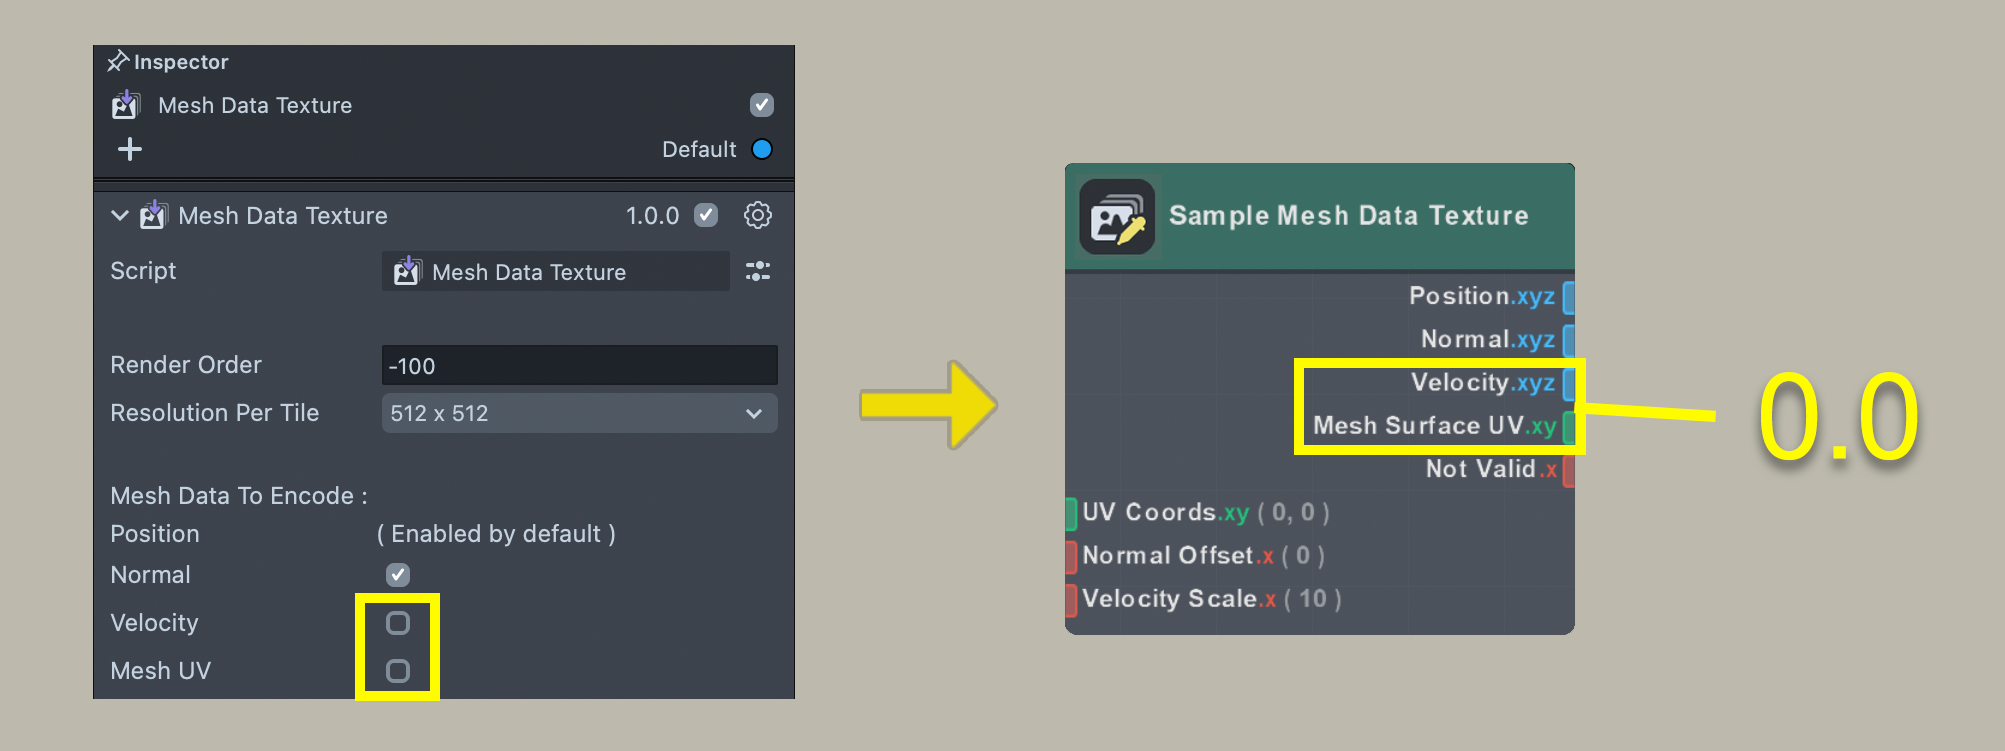
The Position attribute is always stored as default, you can optionally enable Normal, Velocity, and Mesh UV. When enabled, these attributes will be encoded for all tiles in the atlas. If an attribute is not enabled, sampling it in your graph will return zero. To verify which data is available, simply enable the Debug checkbox.
2. Mesh Input Setup
Each tile in the atlas represents one to a group of meshes. Meshes assigned to the same tile entry are rendered together, and their attribute data, such as position, normal, and velocity, are encoded into that tile. If your animated object consists of multiple geometry parts, make sure to include them in the same tile entry so their data is combined and available from a single lookup in materials or VFX graph.
It’s important that your geometry has good UVs. Try to minimize or eliminate overlaps, and ensure good coverage across the UV space.
3. Output Assignment
After assigning your meshes, decide where the attributes will be used. You can add multiple material or VFX outputs, each will receive the same mesh data defined in the corresponding tile entry. All outputs connected to a tile will share the same position, normal, velocity, and UV information encoded for that tile.
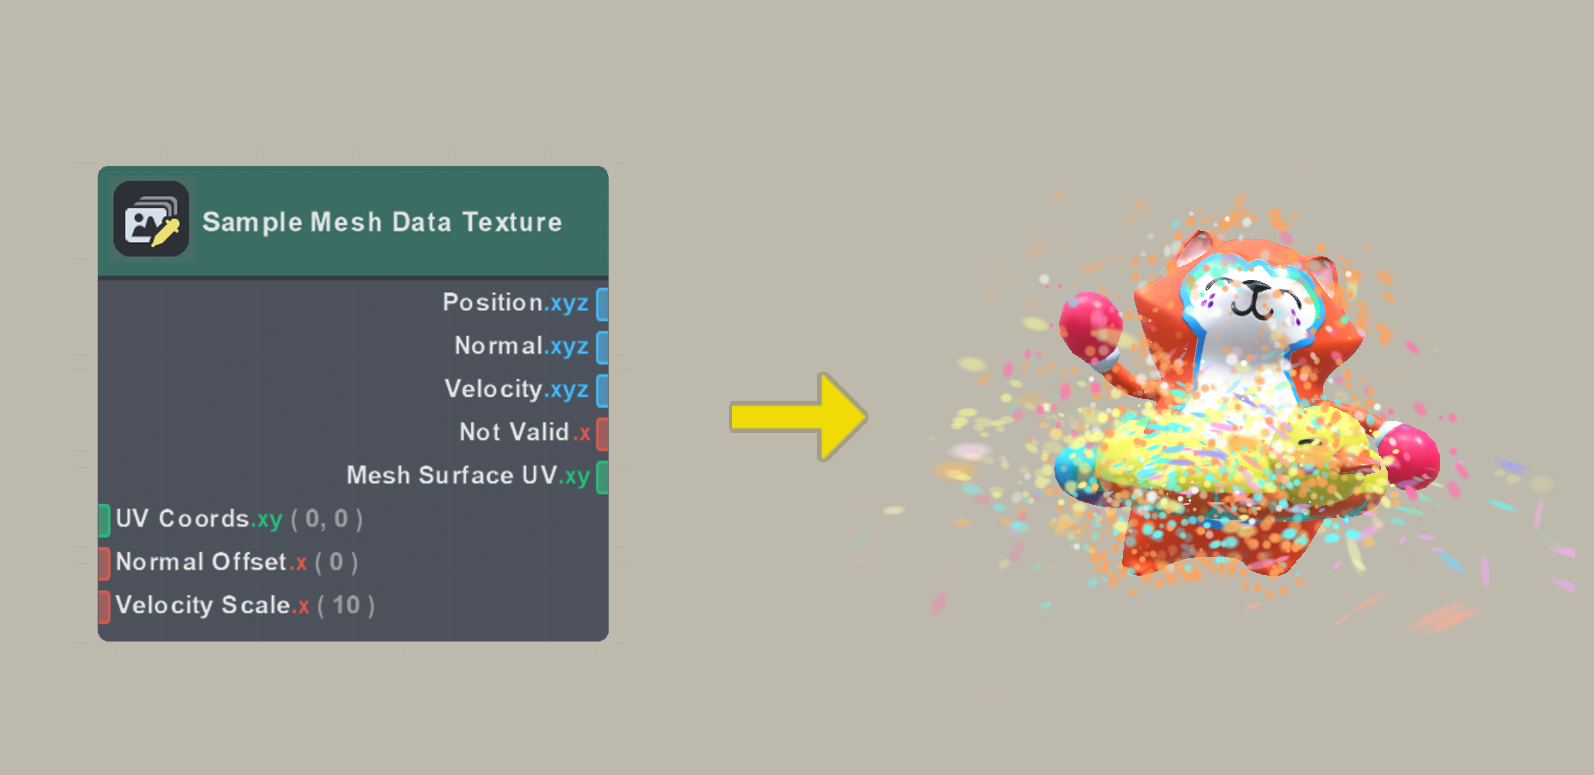
Sample Mesh Data Texture Node
After setting everything up in the script, you’re ready to jump into the material or VFX graph.
4. Materials / VFX Node Setup
Use the Sample Mesh Data Texture node to read data from the atlas. This works by sampling mesh attributes stored in tiled texture atlases.
Make sure the corresponding outputs are enabled in the script—if an attribute is disabled there, the node will return zero for that data.
Examples
This Mesh Data Texture Example pack can be found on the Asset Library for Lens Studio version 5.13.0+.
Spawn Particles On Mesh
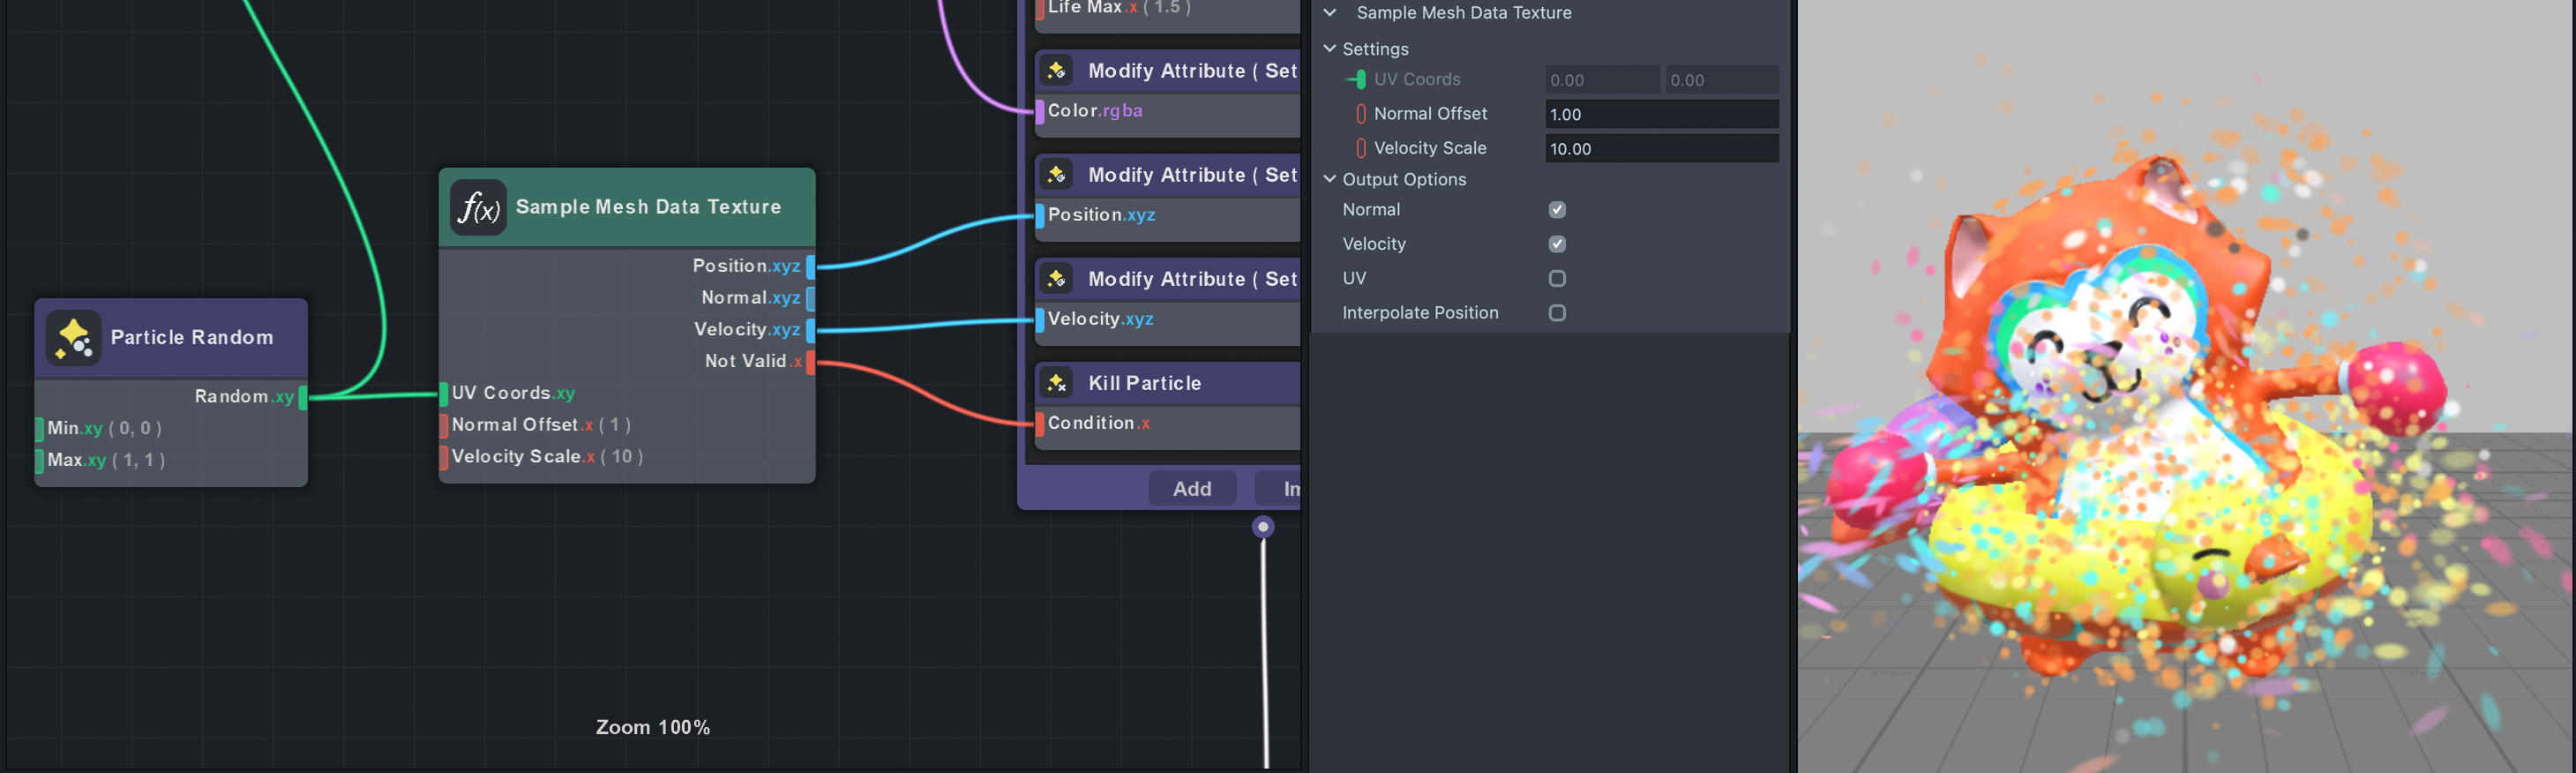
This example demonstrates a technique for spawning particles on deforming mesh positions while reading the mesh’s normal and velocity data.
Because particles don’t have UVs by default, you can use a Particle Random node (vec2) to generate texture coordinates. Set its seed to Unique for better distribution over time.
In this example, the Normal Offset moves the output position along the normal vector by 1. Useful for spawning particles slightly above the surface. The Not Valid output identifies pixels without meaningful mesh data, helping avoid spawning particles in empty regions.
This setup works with any mesh that has UVs and enables dynamic, mesh-driven VFX. Try it out with other animated objects by swapping the inputs on the Material Mesh Visuals under the custom component!
Interpolate Position
This example uses Interpolate Position to applies software filtering, which helps reduce jitter and makes position transitions look smoother, especially during slow animations where stepping may become noticeable.
If memory isn’t a concern, try increasing the Resolution Per Tile in the custom component first, this often improves smoothness with little performance cost.
Interpolated Position can make even low resolution data look smoother, but it does add a small performance cost to the shader.
If you don’t see a visible difference, it’s best to leave this option off to save performance.
While we could technically pass Not Valid into a Particle Kill node to remove invalid particles, this adds extra texture sampling just to determine whether particles should be discarded.
A more performant approach is to avoid duplicating the use of Sample Mesh Data Texture in both Initialize and Output stages.
Instead, we perform a "vertex discard" by collapsing invalid vertices to a single point in the vertex shader, effectively skipping them without incurring extra sampling cost!
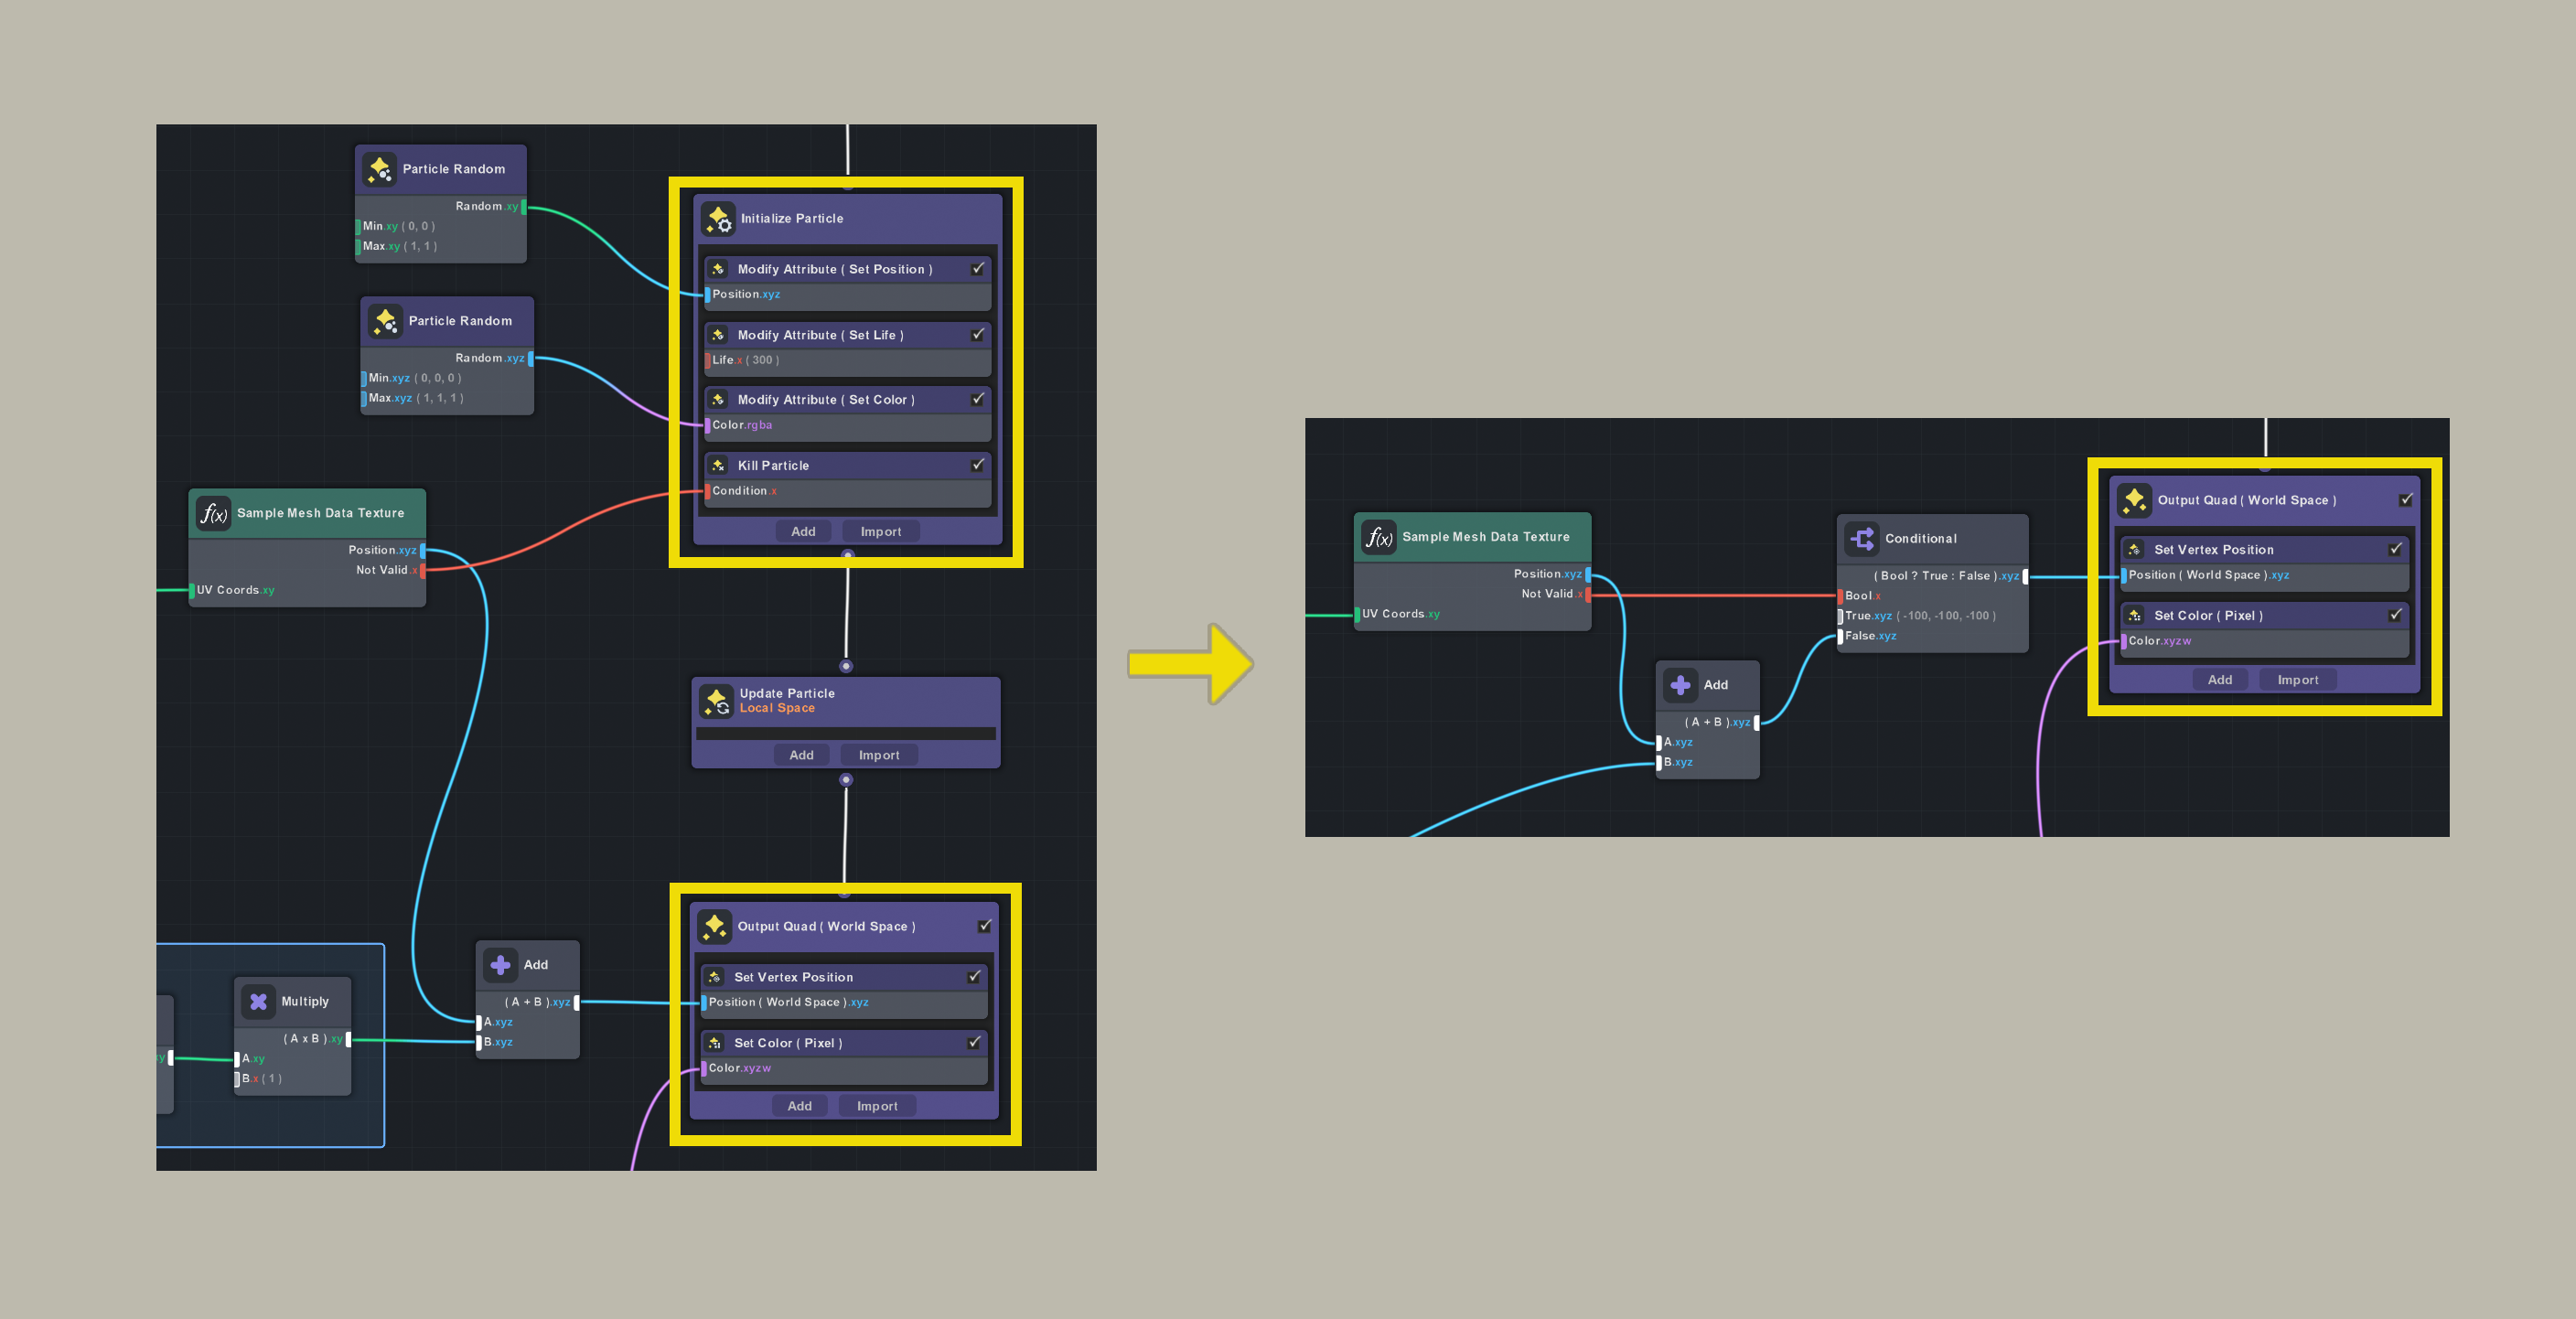
Set Vertex Position
This example demonstrates how to apply geometry onto a face mesh using materials.
Script Controls
| Group | Parameter | Description | ||
|---|---|---|---|---|
| Render Settings | Render Order | Controls the rendering priority of the data encoding camera. Lower values render earlier. Default is -100, but can be adjusted if your project uses multiple cameras. | ||
| Render Settings | Resolution Per Tile | The resolution of each tile in the atlas. Higher values provide better precision but come with increased cost. 64 x 64 is recommended for most cases. | ||
| Mesh Data To Encode | Position | Mesh position attribute is written to the atlas by default. | ||
| Normal | Enables writing of normals into the atlas. Use slightly more memory, performance impact low. | |||
| Velocity | Enables writing of velocity into the atlas. When velocity encoding is enabled, a feedback render pass processes velocity data for use in subsequent frames. Uses slightly more memory, performance impact low. | |||
| Mesh UV | Enables encoding of the mesh UV data into the atlas. Use slightly more memory, performance impact low. | |||
| Input Data From | Material Mesh Visuals | Mesh to read attributes from; each entry defines a tile in the atlas. Meshes in the same entry are rendered into that tile. | ||
| Hide Input Meshes | When enabled, the assigned meshes will not render. If disabled, the script will clone the original mesh inputs. This may impact performance depending on mesh complexity. | |||
| VFX | VFX that will receive the encoded data. | |||
| Materials | Materials that will receive the encoded data. | |||
| Debug | Texture | Encoded texture data type to visualize. |
Node
See Sample Mesh Data Texture node documentation for more info.