Introduction and Concepts
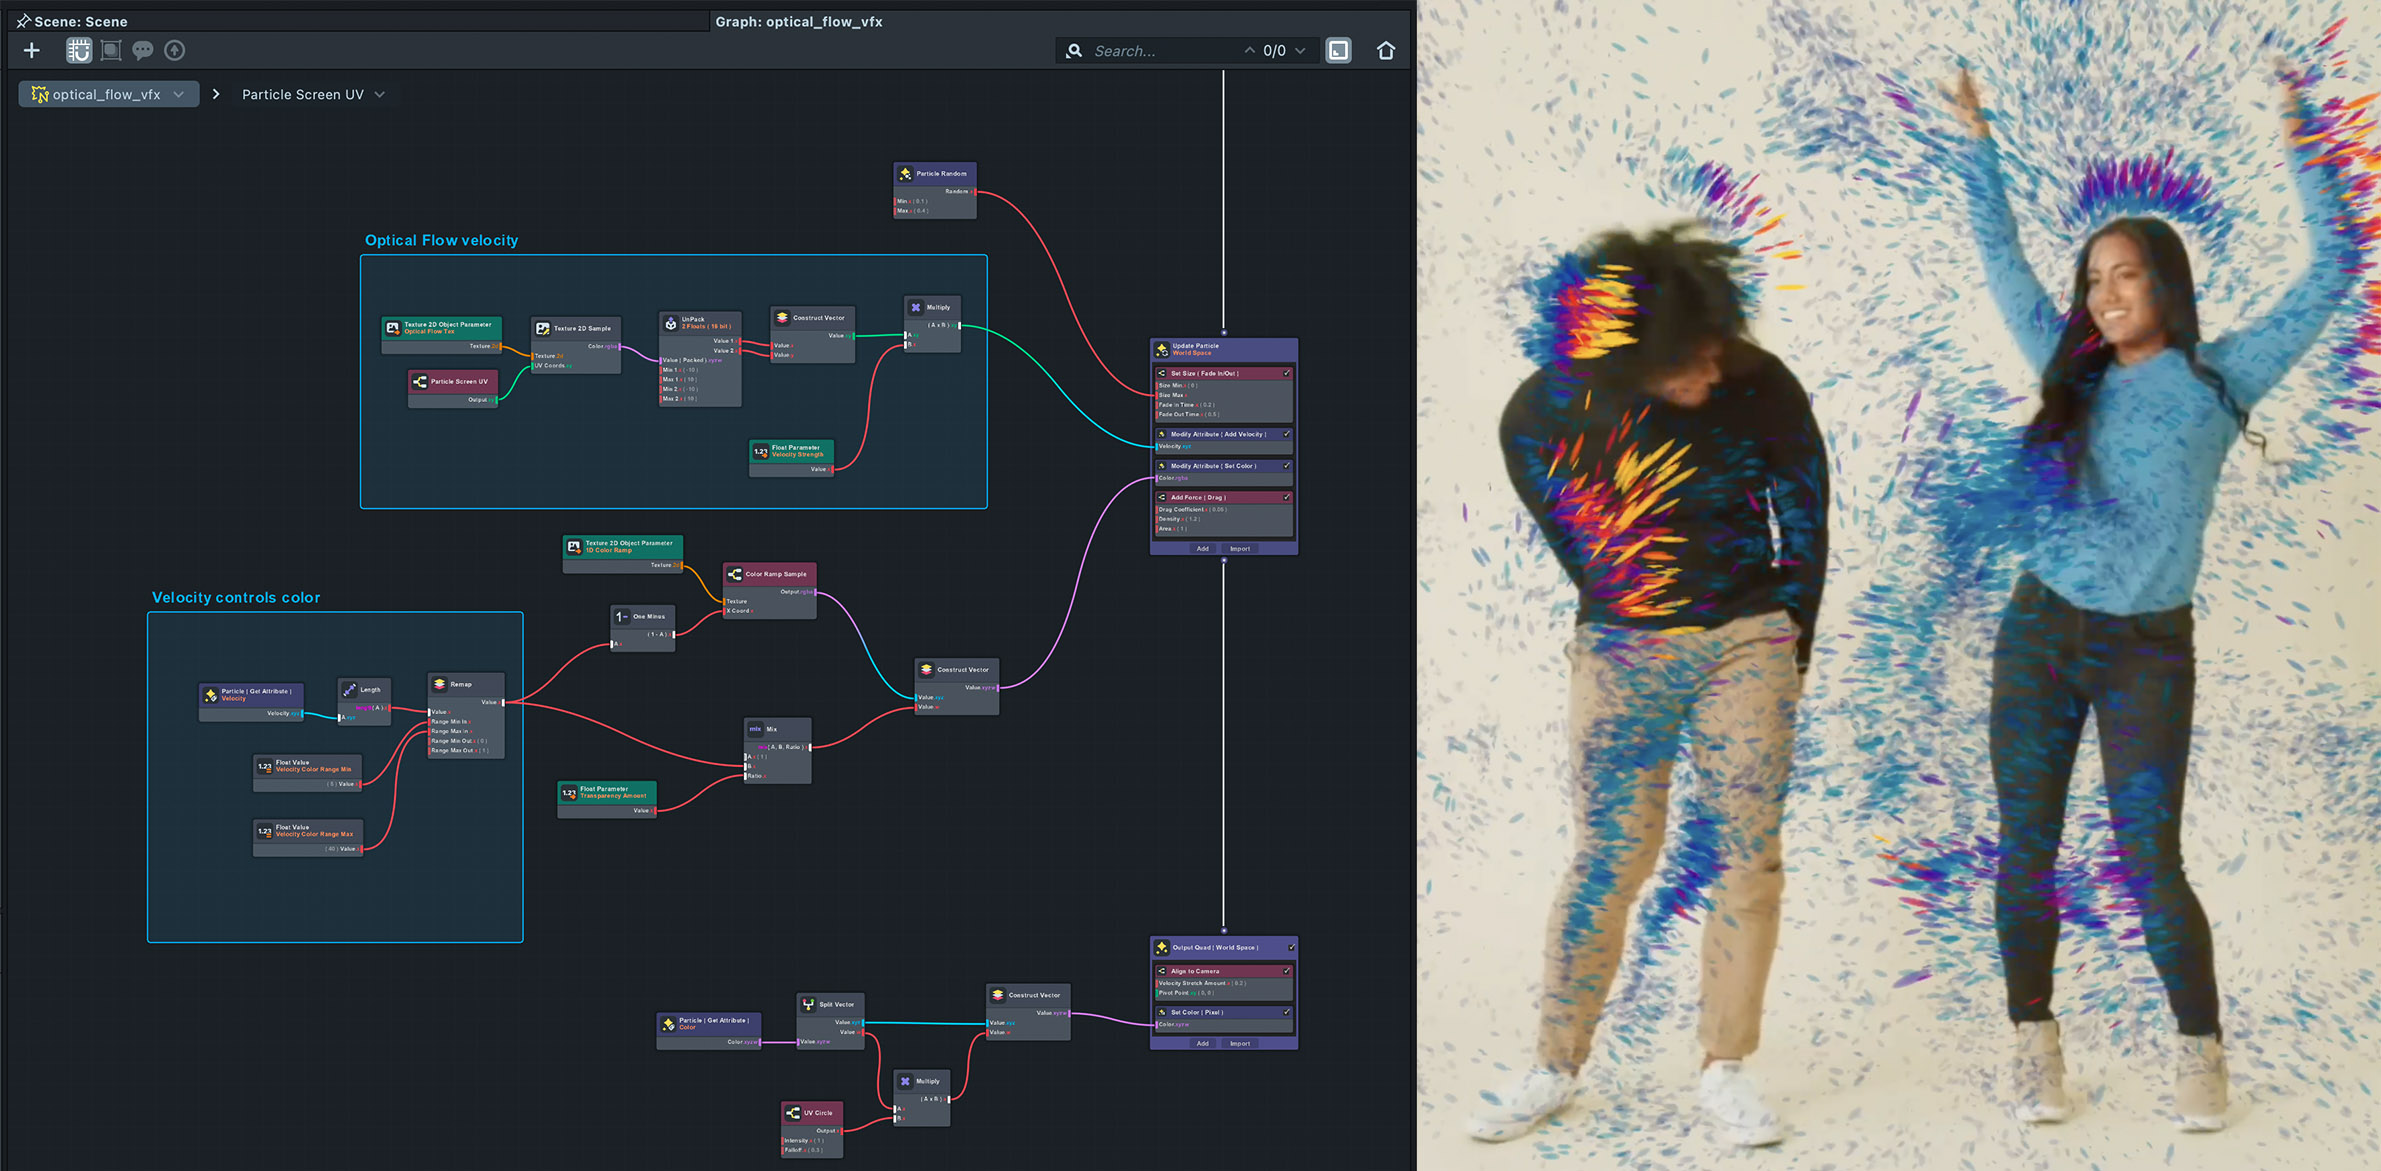
Welcome to VFX Editor, our new node-based visual effects engine in Lens Studio! With VFX Editor, you are in total control: from rain to magical powers to swarms of emojis, your imagination drives what’s possible.
VFX Editor builds upon similar ideas found in Material Editor, allowing you to create and share unique, customizable effects that have never been seen before. If you’re comfortable with Material Editor, you’ll find a lot of similarities here. If not, don’t worry: VFX Editor is its own powerful tool with a completely new set of capabilities to empower your creativity.
So let’s dive in!
Getting Started
The fastest way to get started with VFX is to add a Simple Emitter from the Scene Hierarchy panel.
This will import a Simple Emitter VFX Asset, create a new Scene Object and a VFX Component, and assign the Simple Emitter to the VFX Component.
VFX Assets are the effects systems that you create, whereas VFX Components are components which render the VFX Asset in your scene. This follows a similar pattern as Materials and Render Mesh Visuals.
Creating a VFX Asset
To create a VFX Asset, you have a couple options:
-
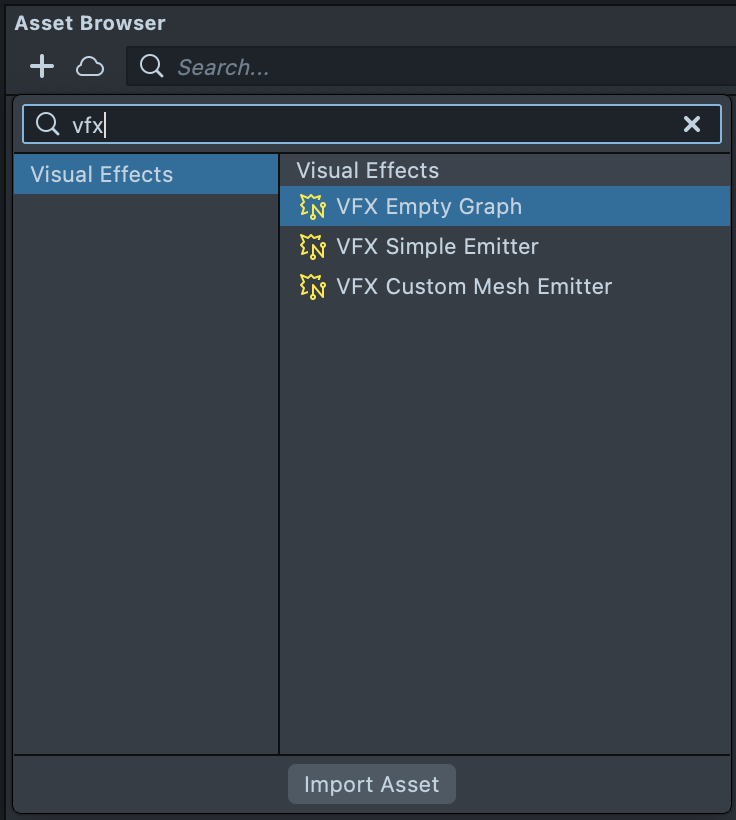
In the
Asset Browserpanel, click the+button and typeVFX. A list will populate with some built-in VFX assets. Click on one of them to import it into your project. -
In the
Scene Hierarchypanel, click the+button and typeVFX, and select aVFXobject from the list. This will add a VFX Asset and assign it to a newVFX Componentin your scene. -
Open the Asset Library and search for VFX, or navigate to the Effects section to import a VFX asset.
Once you have a VFX Asset available in the Asset Browser, you can drag it into Scene Hierarchy to automatically create a new Scene Object and VFX Component with the asset assigned.
Editing a VFX Asset
To edit a VFX Asset, double click on the asset in the Asset Browser. This will open the asset in VFX Graph where you can change how particles move and what they look like.
See The VFX Graph section below for more information.
Built-In Assets, VFX Template Project, and Asset Library
Lens Studio comes with three built-in VFX Assets:
- VFX Empty Graph is a blank canvas to create your own custom asset from scratch and is a great place to learn how the system works, one sub-graph at a time.
- VFX Simple Emitter demonstrates a basic emitter with a few of the most commonly used sub-graphs.
- VFX Custom Mesh Emitter is similar to Simple Emitter, but it is set up to use a custom mesh for rendering instead of quads.
The VFX Template Project is an educational tool for learning VFX Editor in a semi-structured way. Here, you’ll find many different approaches to creating all sorts of effects starting with very simple emitters and progressing up to advanced techniques. Open the VFX Template Project from the Home screen, or by selecting File > New Project From Template > World > VFX
You can find many more examples on the Asset Library. These assets are more complete effects that you can add to your project. All of them are completely open for you to edit, customize, and see how they work.
The VFX Graph
The VFX Graph panel is a node graph system for authoring your own custom VFX assets. The graph system shares a lot in common with Material Editor: many of the nodes are the same, but there are some important differences that we’ll look at here.
In VFX Editor, logic flows both horizontally: left-to-right, as well as vertically: top-to-bottom. Individual nodes are connected horizontally like in Material Editor, but terminate in a vertical stack of Modify Attribute nodes.
Containers also have their own sub-graphs that can be stacked vertically inside Containers. Inside these Container Sub-Graphs, you’ll find that they are simply setting Modify Attribute nodes.
Container Nodes
There are four distinct stages, represented by large container nodes, where particles are modified.
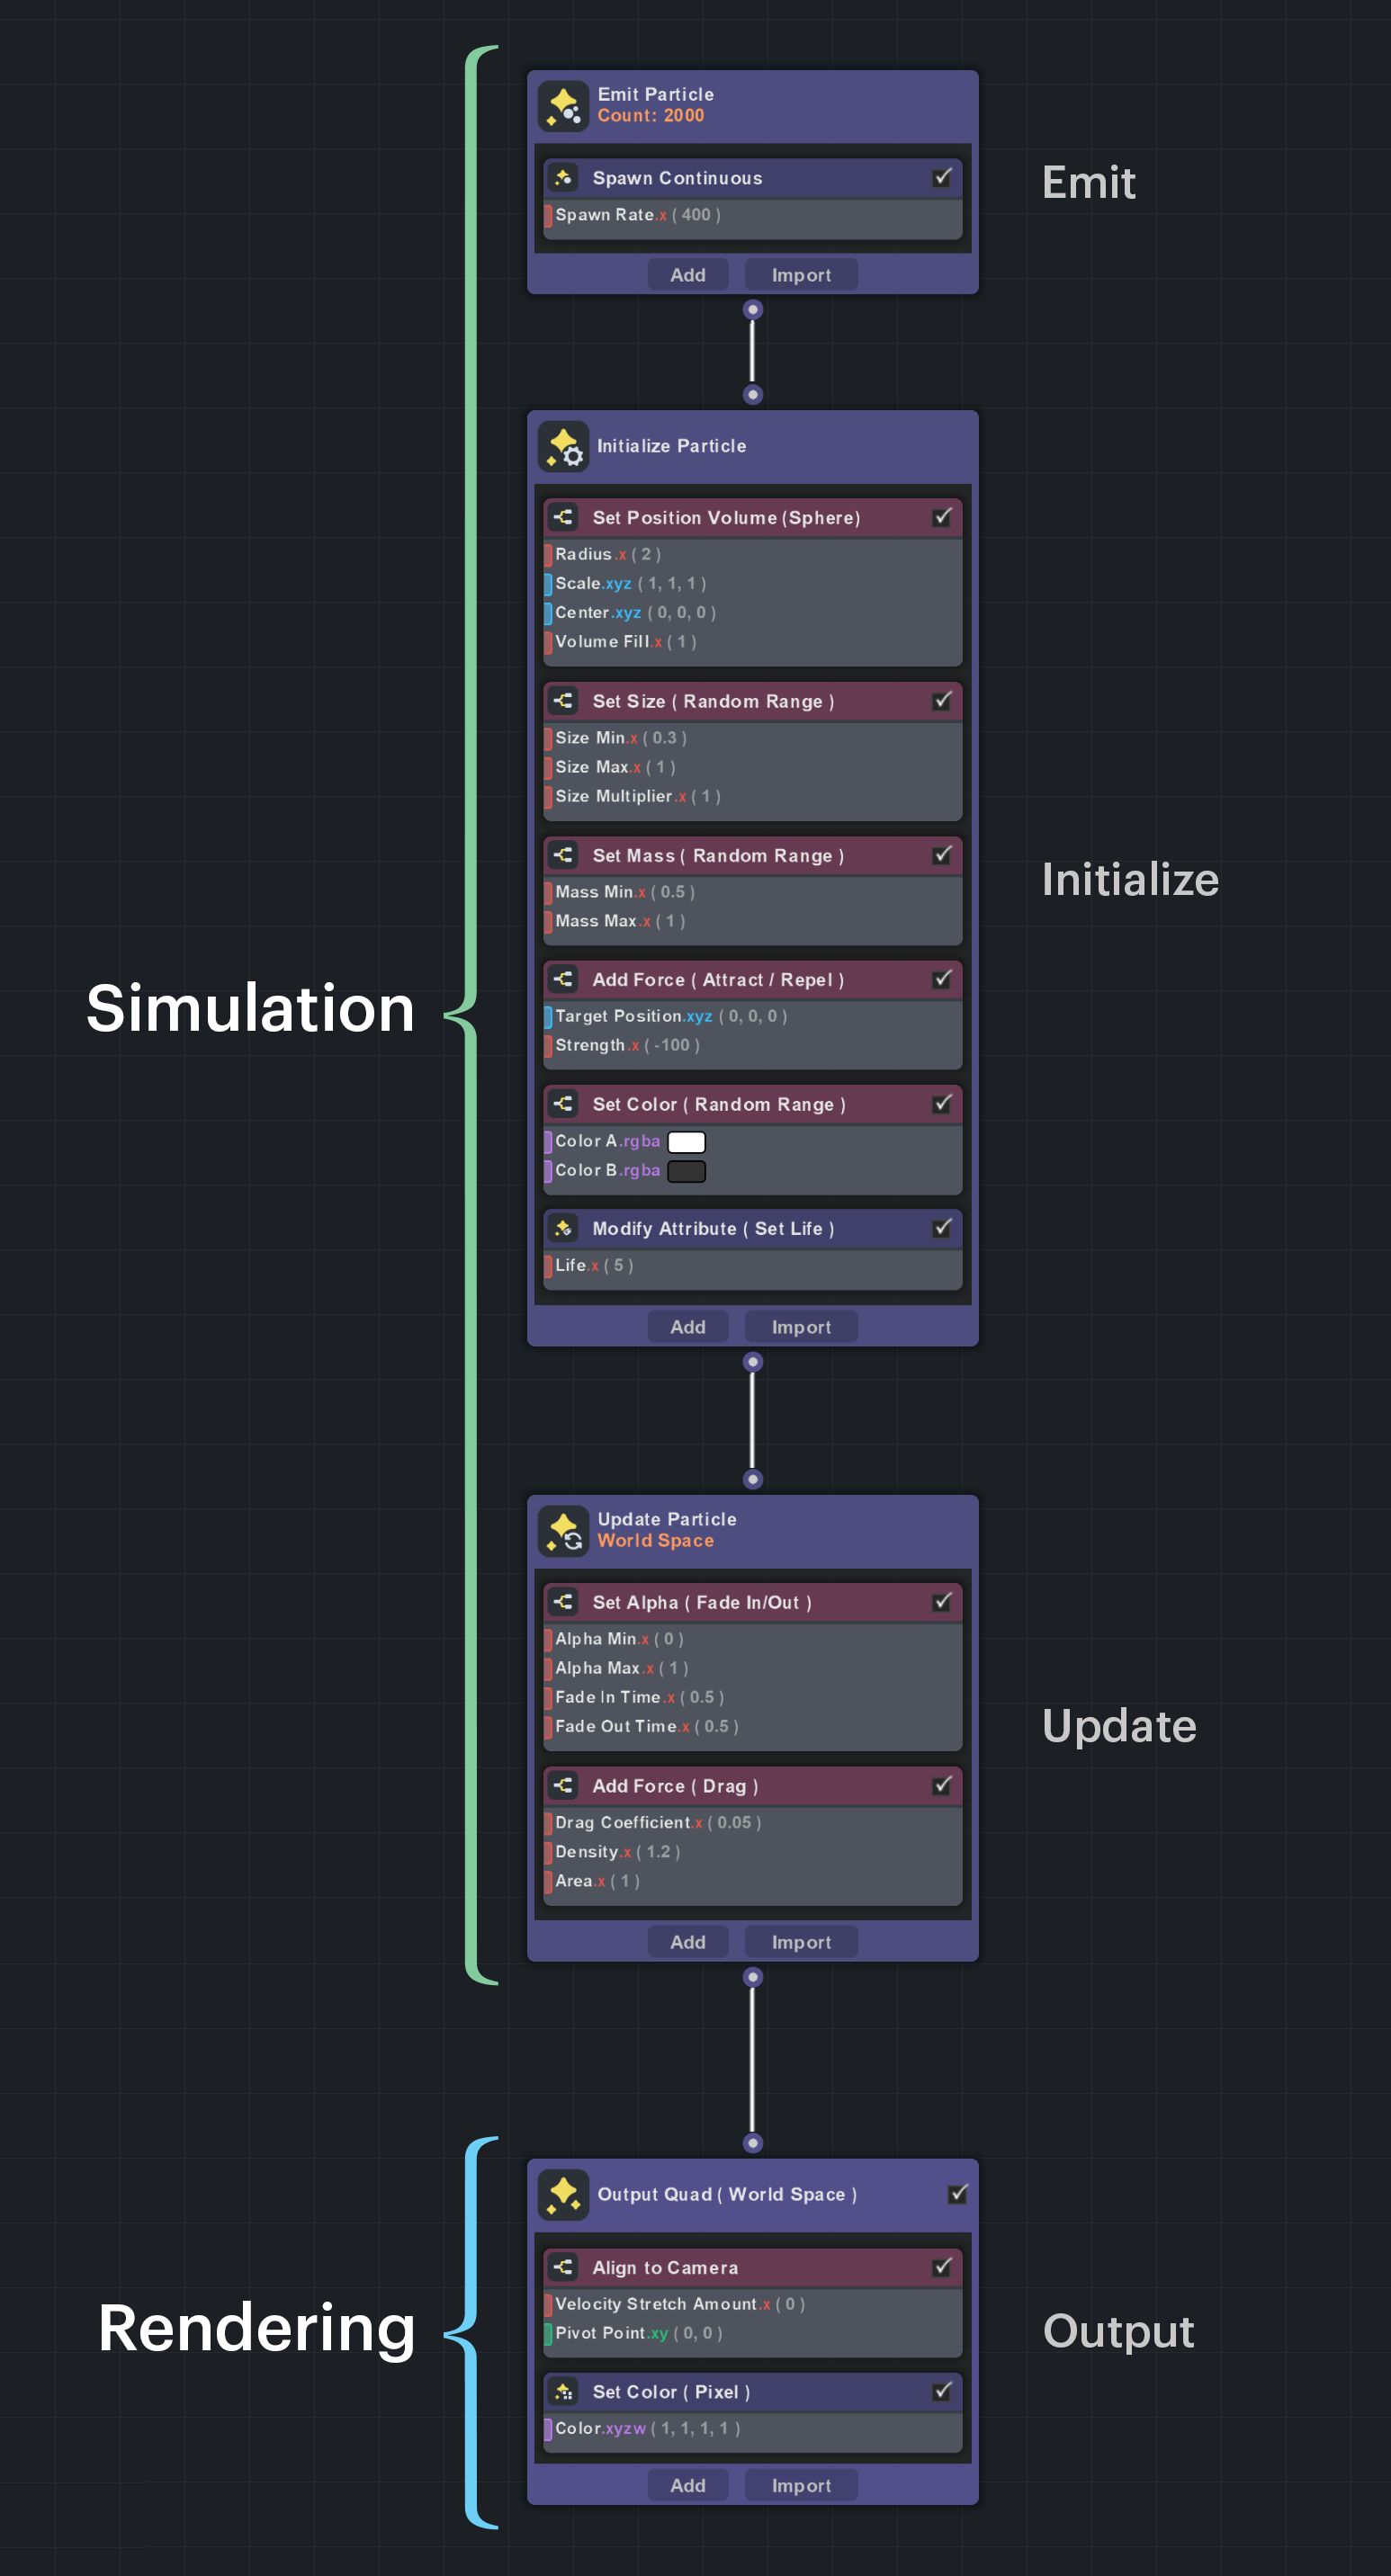
The first three stages, Emit, Initialize, and Update can be thought of as, collectively, the simulation part of VFX Editor. This is where particle movement and dynamics are defined.
The Emit stage controls how many particles are in the system and how many particles should spawn on a given frame.
In the Initialize stage, initial values are set on the particle the moment it is created. (See Initialize Particles section to learn more about how to set up warmup and time controls.)
The Update stage is processed every frame the particle is alive. Note that the stages described so far do not render anything to the screen.
The last stage, Output, is essentially a material applied to a two dimensional square mesh, also referred to as a “quad”. This is where you define how the particle is drawn to the screen. Instead of Modify Attribute nodes, you use a collection of Set nodes specific to the Output container to define the material. You’ll recognize these from the Shader node in Material Editor: Vertex Position/Normal/Tangent, and Pixel Color. A VFX Asset can also contain multiple Output nodes, each with its own material settings and draw order. See Multiple Output Nodes.
Notes On Particle Sorting
If you are using the Emit container, the Output node will display a Sort By Depth option. With this option selected, each VFX particle in a given system will be sorted by camera depth, from back to front. This doesn't sort different VFX assets between one another, which can be accomplished with Render Order, but will sort each individual particle of the same asset. If you have two or more instances of one emitter, they will sort with each other.
Sorting is helpful for common alpha blending modes, like Normal, the default, and Pre-Multiplied Alpha, but is not needed for Additive, Screen or Multiply modes.
Note that depth sorting has a performance cost, and it takes more GPU memory, so be sure to disable or delete sorted VFX nodes when no longer required.
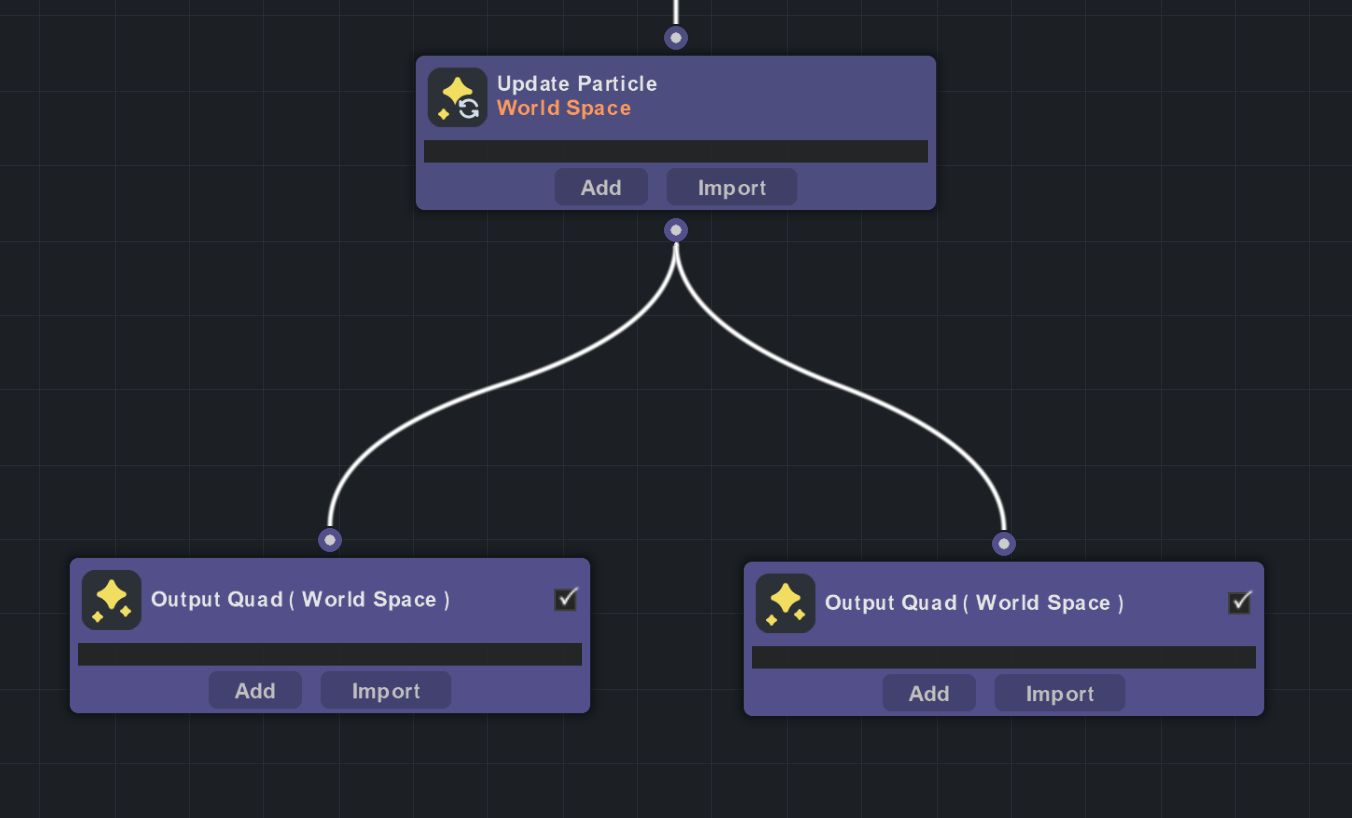
Multiple Output Nodes
A VFX Asset is not limited to a single Output node. You can add multiple Output nodes to the same graph, and each one renders the particles as a separate draw call with its own material settings, blend mode, geometry type, and depth settings.
This makes it possible to layer multiple visual passes from the same particle simulation. Some examples:
- An
AdditiveOutput for a glow or light bloom layer - A stretch trail Output using a long, thin custom mesh aligned to velocity, to render a motion trail behind each particle
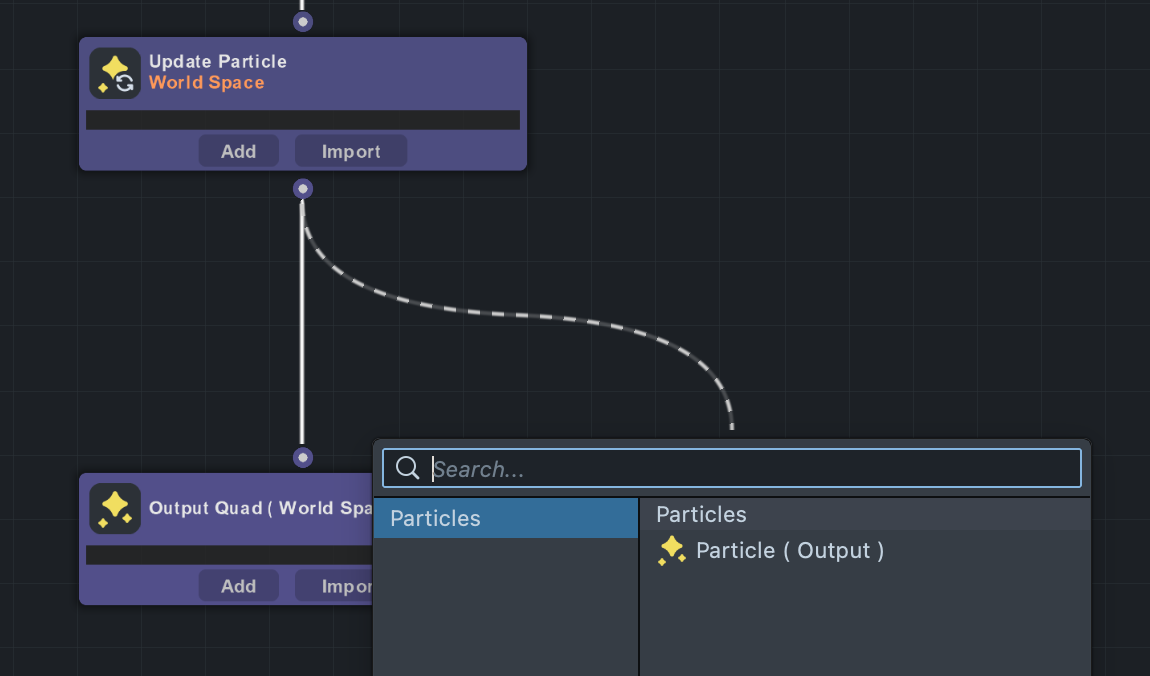
To add another Output node, drag a wire from the Update Particle node and select Particle (Output) from the context menu that appears.
Render Order Offset
The Render Order Offset property on each Output node controls its draw order relative to the other Output nodes in the same VFX Asset. Outputs with a higher offset are drawn on top of those with a lower offset.
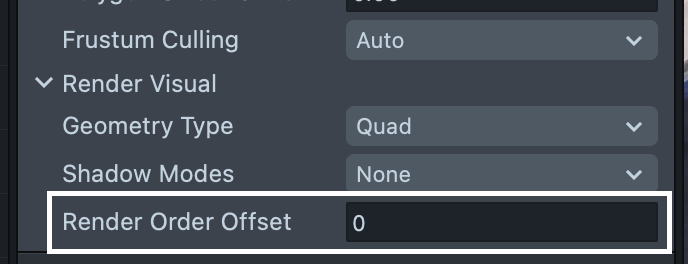
Render Order Offset only affects the draw order between Output nodes within the same VFX Asset. To control where the VFX Asset itself is drawn relative to other scene objects, use the Render Order property on the scene object.
Layer Overrides
The Layer Overrides property in the VFX Component inspector lets you assign each Output node to its own render layer, separate from the VFX Asset's default layer.
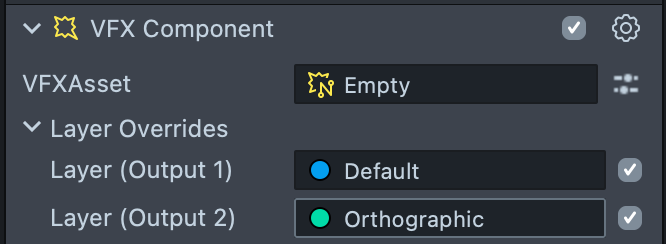
This is useful when you want different Output nodes to render on different layers. For example, you could assign a glow Output to a bloom render layer while keeping the core Output on the default layer.
Particles
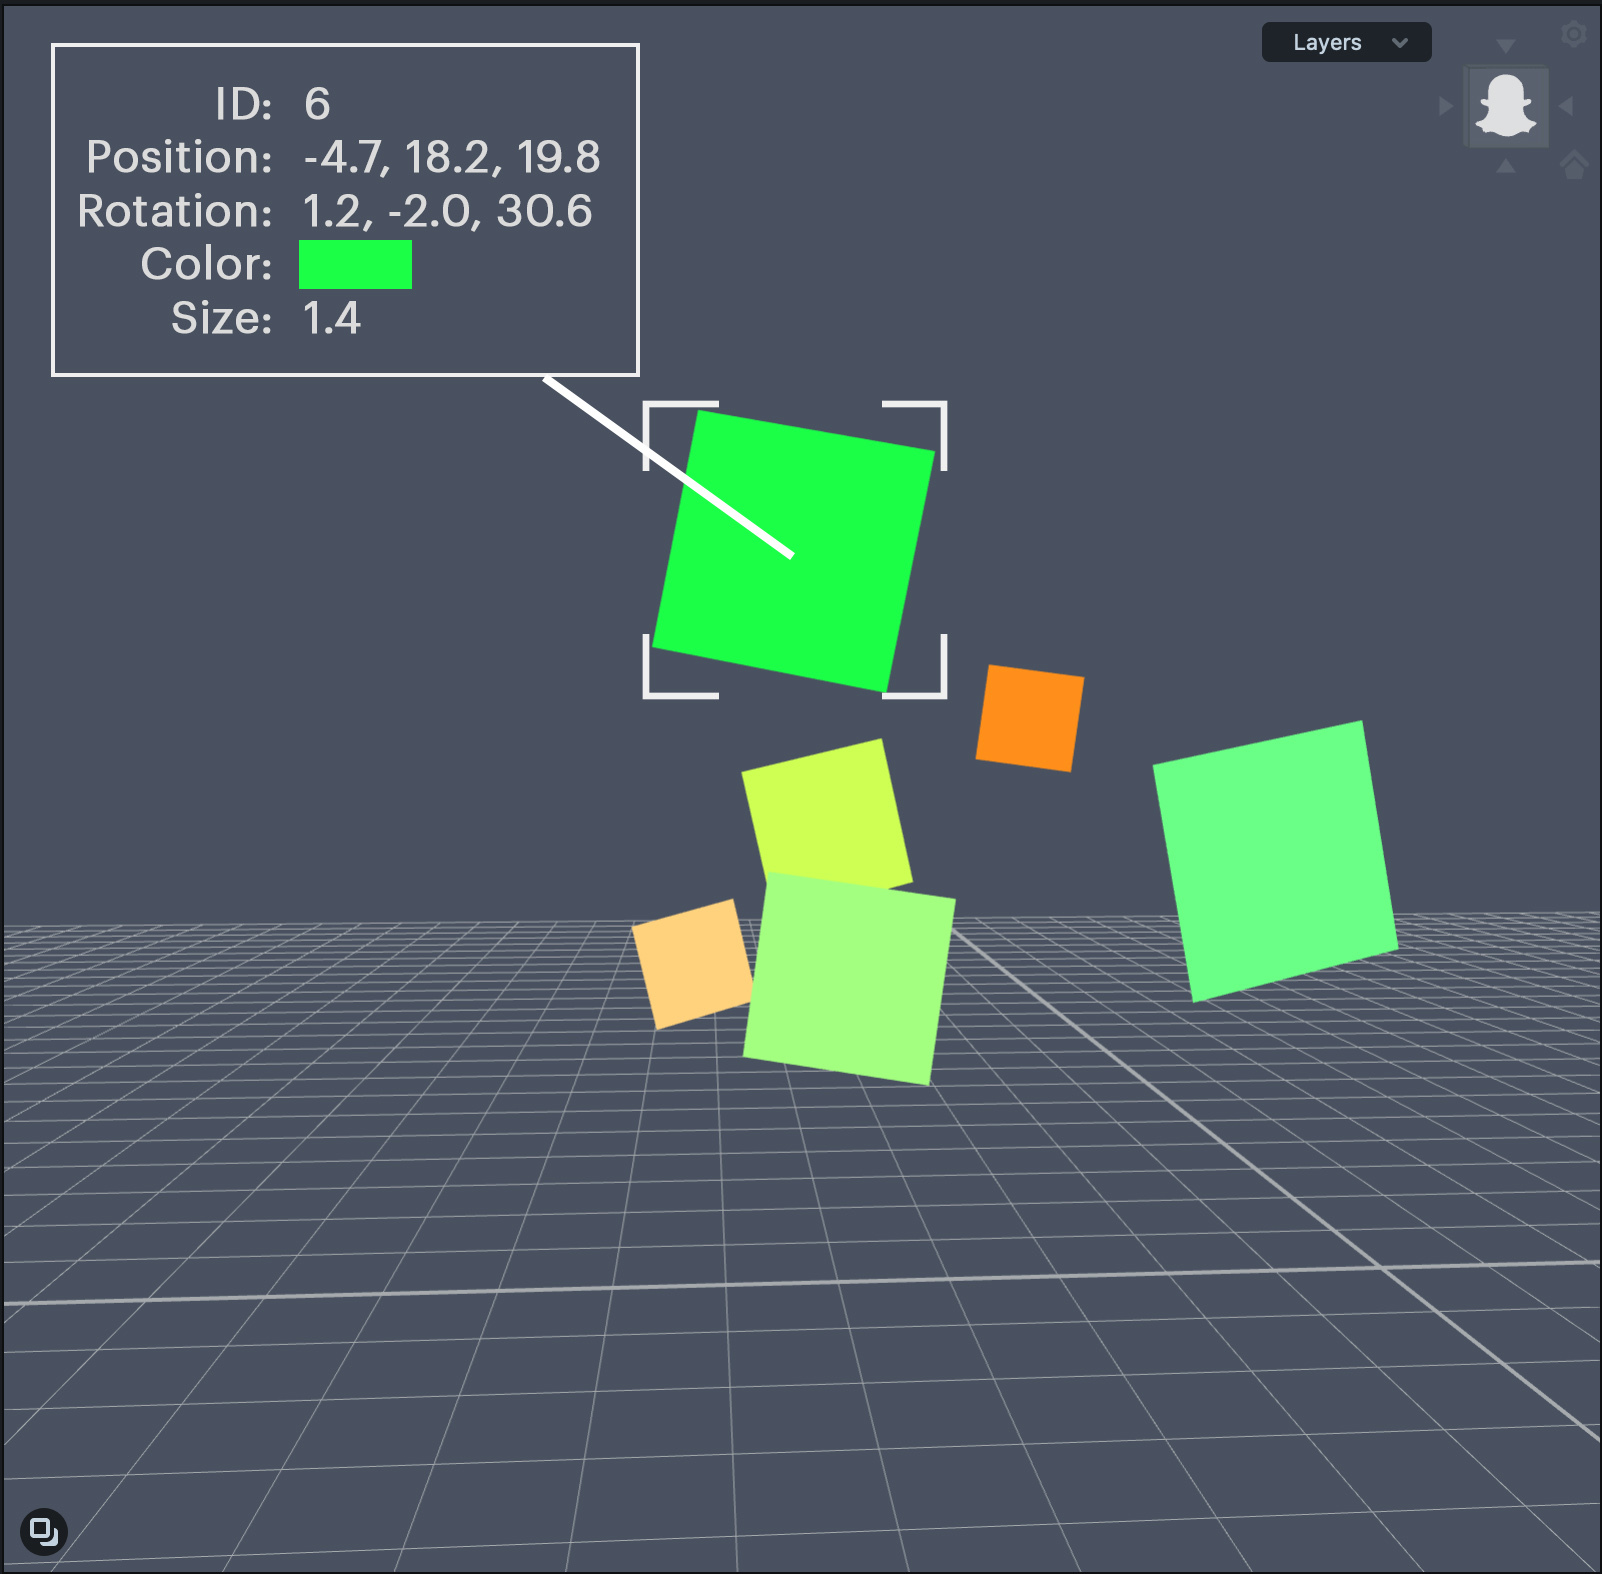
The primary difference between VFX Editor and Material Editor is that VFX Editor allows you to create and manipulate particle systems.
A particle is a piece of data that holds several attributes. Attributes are used to describe the particle: position, velocity, size, color, etc. In VFX Editor, we are interested in both manipulating these attributes over time, and using them to create a rendering material to draw it to the screen.
Many particle attributes can be modified, and some are set by the system automatically at spawn.
Modifiable Attributes
- Position (vec3)
- Velocity (vec3)
- Life (float)
- Force (vec3)
- Mass (float)
- Color (rgba)
- Size (float)
- Matrix (mat4)
- Custom (set by the user)
Set Automatically
- Age (float)
- Delay (float)
- Seed (float)
- Index (int)
- Copy ID (int)
Getting and Setting Attributes
Starting from Lens Studio 5.18, particles use high precision storage and no longer require attribute ranges. If you're migrating old projects, see the Migration and Troubleshooting section below.
Particle attributes can be accessed from anywhere in the graph system by using the Particle (Get Attribute) node. This node has a drop-down menu to select what particle attribute to get.
Modifiable particle attributes are set in the Spawn or Update containers using a Particle (Modify Attribute) node. To add a Particle (Modify Attribute) node, open the container node list by either hovering over a container and pressing Tab on your keyboard, or click the Add button on that container. Then search for the word “modify”, and you’ll see the list filter down to show the node.
These nodes have drop-down menus to select what attribute to modify, as well as what operation to perform on that attribute: Set (default), Add, or Multiply. Set replaces the selected attribute’s value with the one provided on the node’s input, while Add and Multiply will take the current value of the selected attribute and either add or multiply it with the input value.
Default Values
These defaults are applied in the Initialize container:
- Position is set to evenly fill a grid based on the particle count
- Velocity is set to (0,0,0)
- Force is set to (0,0,0)
- Size is set to 1.0
- Mass is set to 1.0
- Life is set to 16.0 (seconds)
- Matrix is set to identity
- Emission rate is set to 16 particles per second
Whenever a Modify Attribute node is used, it overrides the respective attribute default.
These defaults are applied in the Output container:
- The particle position, size, and matrix attributes are incorporated into the quad vertices to move, scale and rotate them according to particle simulation data. This behavior is overridden when a
Set Vertex Positionis added to theOutputcontainer. - The particle color attribute is used to set the pixel color. This behavior is overridden when a
Set Pixel Color nodeis added to theOutputcontainer.
Migration and Troubleshooting
Migration Rule of Thumb: If there's no visual error, you don't need to do anything. Keep using your VFX without updating nodes.
This section helps troubleshoot and fix VFX that broke when opening old projects or importing old VFX into Lens Studio 5.18 and above.
What Changed in Lens Studio 5.18+
Starting from Lens Studio 5.18, particles are packed with high precision storage:
- No range configuration needed - Attributes now use true float or half-float values to accurately represent value ranges without manual adjustment
- Legacy ranges removed - Implicit min/max clamping from the old range options is no longer present
- Up to 32-bit precision storage - Select full 32-bit float, half 16-bit float, or unsigned normalized 8-bit precision for custom attributes
Common Breaking Scenarios
Visual differences can occur when updating older projects because particle attributes no longer use range-based encoding. Here are some common situations you might encounter:
-
Range-based clamping: If you previously relied on an attribute's min/max range (set on the Initialize container) to clamp incoming values, those values will no longer be clamped. Previously clamped values can now exceed the old range.
-
Custom built-in ranges: If you used min/max other than the legacy defaults below, values were previously stored by mapping them into that range; they are now stored as raw values, which can change the visual result:
- Position: ±1000
- Velocity: ±1000
- Size: [0, 100]
- Mass: [0, 100]
- Color: [0, 1]
-
Particle Get Setting queries: If your graph queries Velocity, Size, or Color min/max using
Particle Get Setting, the node now returns hardcoded defaults instead of your custom configured values.
Diagnostic: Did you choose to upgrade nodes in your graph to a new version?
If YES, check which nodes you upgraded:
-
Custom Attribute Nodes:
- Issue: If your range was set smaller than the input value, it was being clamped. After node update, min/max ranges are removed because we now store raw float values.
- Fix: Check previous bounds in the legacy project, then use a
Clampnode on your value right before wiring it into theParticle ( Modify Attribute )node with the min/max range from the legacy project applied to the clamp.
-
Particle Get Setting Nodes:
- Issue: Querying
Velocity,Size, orColormin/max will break after node update because these options are no longer available in the dropdown. - Fix: Remove the
Particle Get Settingnode. Check previous bounds in the legacy project (before Studio 5.18) under the Initialize Particle stage, then hardcode those values in your graph.
- Issue: Querying
If NO, check your VFX configuration:
-
Using non-default attribute values:
- Issue: Check the Initialize Particle stage. If you were using a range smaller than incoming values, the range acted as a clamp. The new VFX system doesn't rely on min/max range, so your incoming value is no longer clamped.
- Fix: Manually retune VFX, using
Clampnodes as needed.
-
Using Particle Get Setting with custom ranges:
- Issue: If the
Particle Get Settingnode queries an attribute with a min/max range different from defaults, behavior will change. - Fix: Manually retune VFX, using
Clampnodes as needed.
- Issue: If the
Geometry Types & Custom Meshes
VFX Editor supports two geometry types: quads and custom meshes. By default, VFX Assets render with the Quad geometry type, selectable under the Render Visual>Geometry Type section of the Output container.
When both Mesh is selected as a Geometry Type and a mesh is assigned to the Custom Mesh field on the VFX Asset, the system will render particles using the assigned mesh. Refer to the Custom Mesh Emitter built-in asset as a starting point when working with custom meshes.

Sub-Graphs
VFX Editor adds a new kind of sub-graph: the Container Sub-Graph. Like regular sub-graphs found in Material Editor, Container Sub-Graphs are used to encapsulate node logic into higher level modular blocks, making the asset faster and more fun to create while making the graph easier to read. The difference with Container Sub-Graphs is that they have no Export nodes -- their purpose is to modify particle attributes.
Lens Studio comes with over 50 premade Container Sub-Graphs that you can mix and match to create amazing particle effects. The Container Sub-Graph list can be opened in two ways:
-
Click the
Addbutton on a container -
Hover your mouse over a container and hit
Tab
To create an empty Container Sub-Graph, open the Container Sub-Graph list and start typing Sub-Graph. The top result will be an entry called Sub-Graph.
Regular sub-graphs are also available in VFX Editor, and include all the sub-graphs available in Material Editor plus a few specific to VFX Editor. To add a regular sub-graph, hover your mouse over an empty part of the graph and hit Tab, or right click on an empty part of the graph and select Add Node (from Library).
For more information and to see a description of all sub-graphs in VFX-Editor, check out our VFX Sub-Graphs page.
Emitting Particles
In Lens Studio 5.6, we introduced the Emit container node. This allows for much more control over particle emission than before.
Check out the Emission Control VFX asset on the Asset Library for examples on how to use the Emit container.
The old method of emitting particles is still supported, so for VFX created before version 5.6 you will not see the Emit container at all. This uses a set of fixed functions to control emission.
Migrating to the Emit Container
If you are upgrading your system to use the Emit container, you can create the Emit container like you would any other node and connect it to the (old) Spawn container. Note that several changes occur when this happens:
- The old method of emitting particles stops working and particles are only spawned based on nodes in the Emit Particle container
- The Spawn Particle container is renamed to Initialize Particle
- The Initialize Particle container removes many settings: Spawn Space, Spawn Mode, Spawn Rate, Burst Rate, and Max Particle Life
- Particle count is now set explicitly on the Emit container
- Particle coordinate spaces are now only set on the Update container
- World mode will pass the object’s transform to initialized attributes. After spawning, particles will simulate in world space. In the old system, this is the same as setting Local in the Spawn container and World in the update container.
- Local makes the particle simulation relative to its scene object's transform. In the old system, this is the same as setting Local in both the Spawn and Update containers.
To recreate the old "Continuous" spawn mode with the Emit container:
- Set the desired Particle Count on the Emit container
- Set the desired lifespan using a Modify Attribute node
- Set the emission rate to be equal to the Particle Count divided by the Life using a Particle (Spawn Continuous) node in the Emit container. Make sure the frequency is set to Per Second.
To recreate the old "Once" spawn mode with the Emit container:
- Set the particle life attribute to something very high, like 3600 (representing 60 minutes)
- Set the Particle (Spawn Continuous) node's Spawn Rate to be the total particle count per frame.
This will immediately emit all available particles which will (practically) live forever.
Initialize Particles
Time Control
The Time Control section of the Initialize Particle container allows you to control the overall speed of the simulation or define a fixed time interval to achieve certain effects. Time Control in VFX introduces the concept of Component Time.
Component Time is time in seconds since the VFX component was enabled. Each component tracks its own independent time. This value is not shared between different VFX components, allowing multiple VFX instances to run independently with distinct timing.
By default, Component Time is accumulated using the real delta time of the lens, but can be changed to a fixed value. Play Rate serves as an additional multiplier on delta time and is applied whether or not fixed delta time is used.
// Default
Component Time += deltaTime * playRate

// When Use Fixed Delta Time is enabled
Component Time += fixedDeltaTime * playRate
Component Time differs from Elapsed Time in that Elapsed Time is the total time since the lens started, whereas Component Time only starts counting when the VFX Component is enabled, and is slowed down or sped up based on the VFX Asset's delta time configuration.
Component Time can be retrieved in graph using the Component Time node or in JS with script.vfxComponent.time().
- Play Rate: The overall speed of the simulation and a multiplier on the current delta time. Play Rate affects the speed at which Component Time accumulates.
- Use Fixed Delta Time: Toggles whether to use a fixed delta time or not.
- Fixed Delta Time: When Use Fixed Delta Time is true, this value is used for Delta Time. The Fixed Delta Time can be set from the VFX asset, and all VFX copies will receive the same Fixed Delta Time.
- Delay(secs): Introduces a delay before the system begins simulating, given in seconds. The Delay timer starts when the VFX Component is enabled.
Warmup
Warmup, also known as pre-warm or pre-roll, will run the simulation for a set amount of frames on the first frame of its instantiation in the scene. This is useful for making VFX systems appear to be in a more advanced state when a lens first starts.
- Warmup Time (secs): How long the system should simulate for during warmup.
- Warmup Steps: The number of steps used to calculate warmup. The fewer the steps, the better the VFX will perform on the first frame at the cost of simulation accuracy.
- Warmup Delta Time: The delta time used during warmup, computed as
WarmupTime / WarmupSteps. Delta times which are too large can lead to inconsistencies in the warmup behavior. For example with Spawn Burst, the delta time should be less than the burst period, otherwise particle emission will be skipped for that burst. A delta time of 0.0333 is considered very accurate.
Scripting
VFX Assets and VFX Components can be accessed in Script to set input parameters, allowing for powerful interactions with the rest of Lens Studio. This is done in a similar way as Material Editor.
For example, to set a float input parameter on a VFX asset:
//@input Asset.VFXAsset myVFX
script.myVFX.properties.myCustomFloat = 0.9;
For more information on scripting and VFX, check out the API reference for VFX Component and VFX Asset.