Light and Shadow

Lighting
Adding a Light Source
All templates come with a default light source in the scene. To create a new light source, first click the + button in the Scene Hierarchy panel and then select Light from the drop down menu.

Types of Light Sources
The following types of light sources exist in Lens Studio.
Point
The Point Light emits omnidirectional light from any position in the scene.
| Color | The color of the light source |
| Intensity | The intensity of the light source |
| Layers | Only acts on objects in the selected render layers |
You can specify a scene object's render layer or choose the set of render layers that a camera renders. Read more about render layers here.
Directional
The Directional Light simulates an infinitely far away light source emitting in a configurable direction. You can use directional light to simulate sunlight in the scene. To change the direction of the directional light emission, rotate the light object. To cast real-time shadows in your scene, use a Directional Light.
| Color | The color of the light source |
| Intensity | The intensity of the light source |
| Shadow Type | Can be None, Projective or Shadow Map |
| Auto Position | Available when you enable Projective. The light uses its rotation to automatically position itself to optimally cast the shadows of all Shadow Casters in the scene |
| Auto Frustum Size | Available when you enable Auto Position. The light adjusts its frustum size to optimally cast the shadows of all Shadow Casters in the scene |
| Frustum Size | Available when you enable Projective. The size of the light's frustum |
| Frustum Far | Available when you enable Projective. The far plane of the light's frustum |
| Frustum Near | Available when you enable Projective. The near plane of the light's frustum |
| Shadow Density | Controls the shadow density on all shadows cast by this Light Source |
| Layers | Only acts on objects in the selected render layers |
Only Directional and Spot Lights can cast real-time shadows.
Ambient
Ambient light illuminates all objects in the scene equally and globally.
| Color | The color of the light source |
| Intensity | The intensity of the light source |
| Layers | Only acts on objects in the selected render layers |
Environment Map
Environment Map light uses an environment map to illuminate all objects in the scene.
| Diffuse Environment Map | You can generate an environment map by using + -> Environment Map in the Asset Browser panel |
| Specular Environment Map | You can generate an environment map by using + -> Environment Map in the Asset Browser panel |
| Exposure | The exposure of the Environment Map |
| Rotation | Controls the rotation of the Environment Map |
| Layers | Only acts on objects in the selected render layers |
You can also add your own custom Environment Map by dragging and dropping a .hdr into the Asset Browser panel. Or select + -> + From Files in the Asset Browser panel and choose a .hdr from your computer. Once added, the diffuse and specular environment textures appear for you to plug into your Environment Map light.
Shadow
Lens Studio supports two shadowing techniques: Projective Shadows and Shadow Mapping.
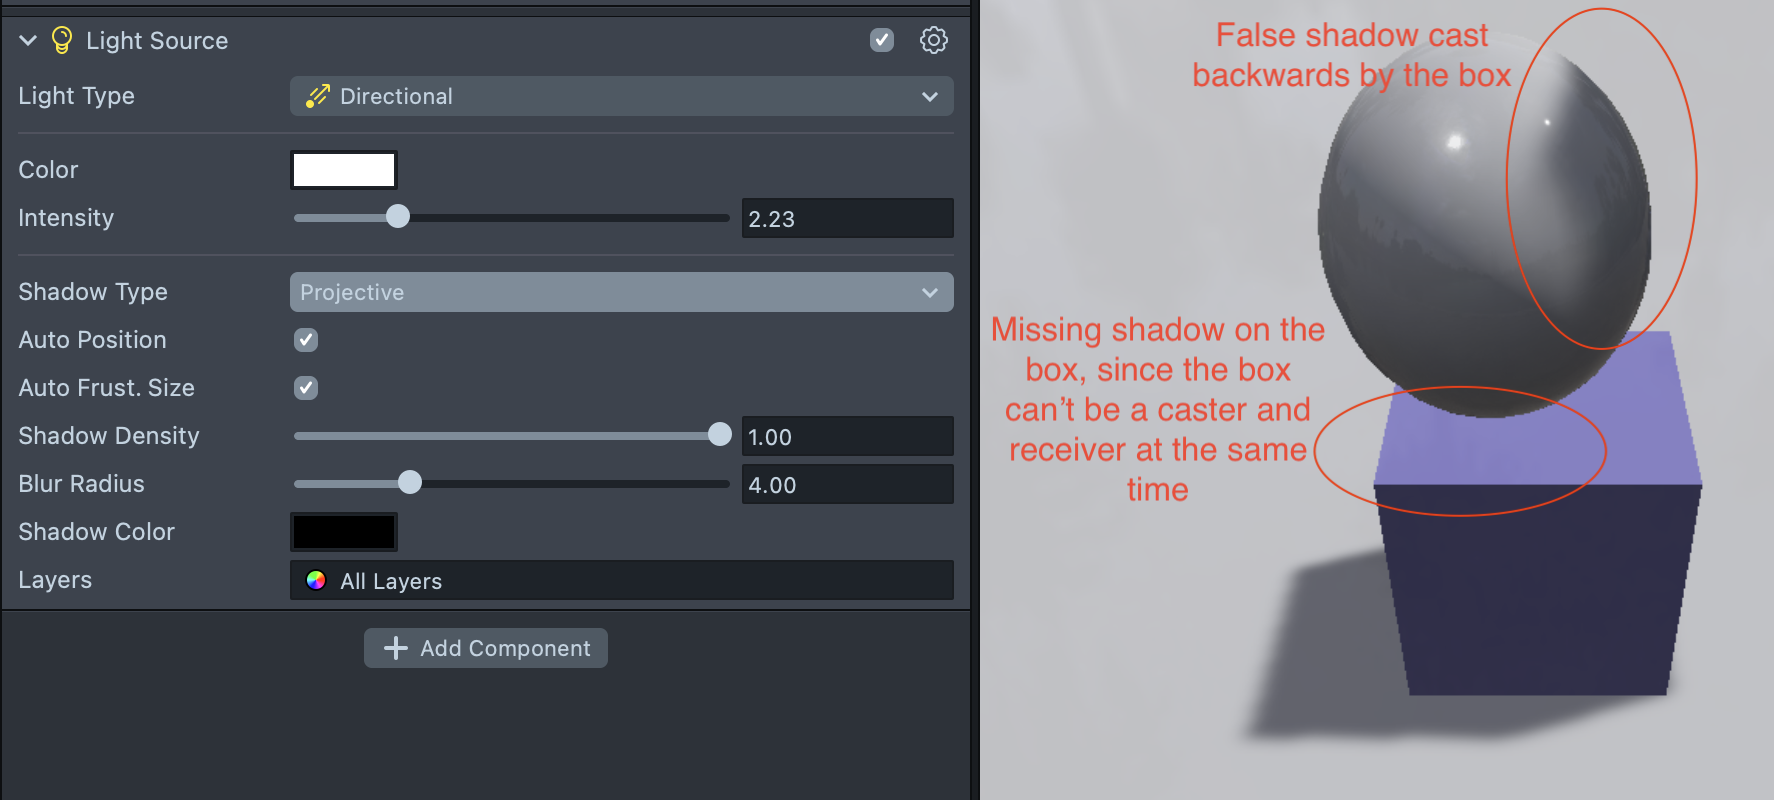
Projective Shadows work efficiently for casting virtual shadows on the real world, but don't work well for real, 3D shadowing. Shadows project both forward and backward from an object because they lack depth information. This also means that self-shadowing doesn't work (because an object set as caster and receiver at the same time would completely shadow itself, since shadows project equally in both directions).
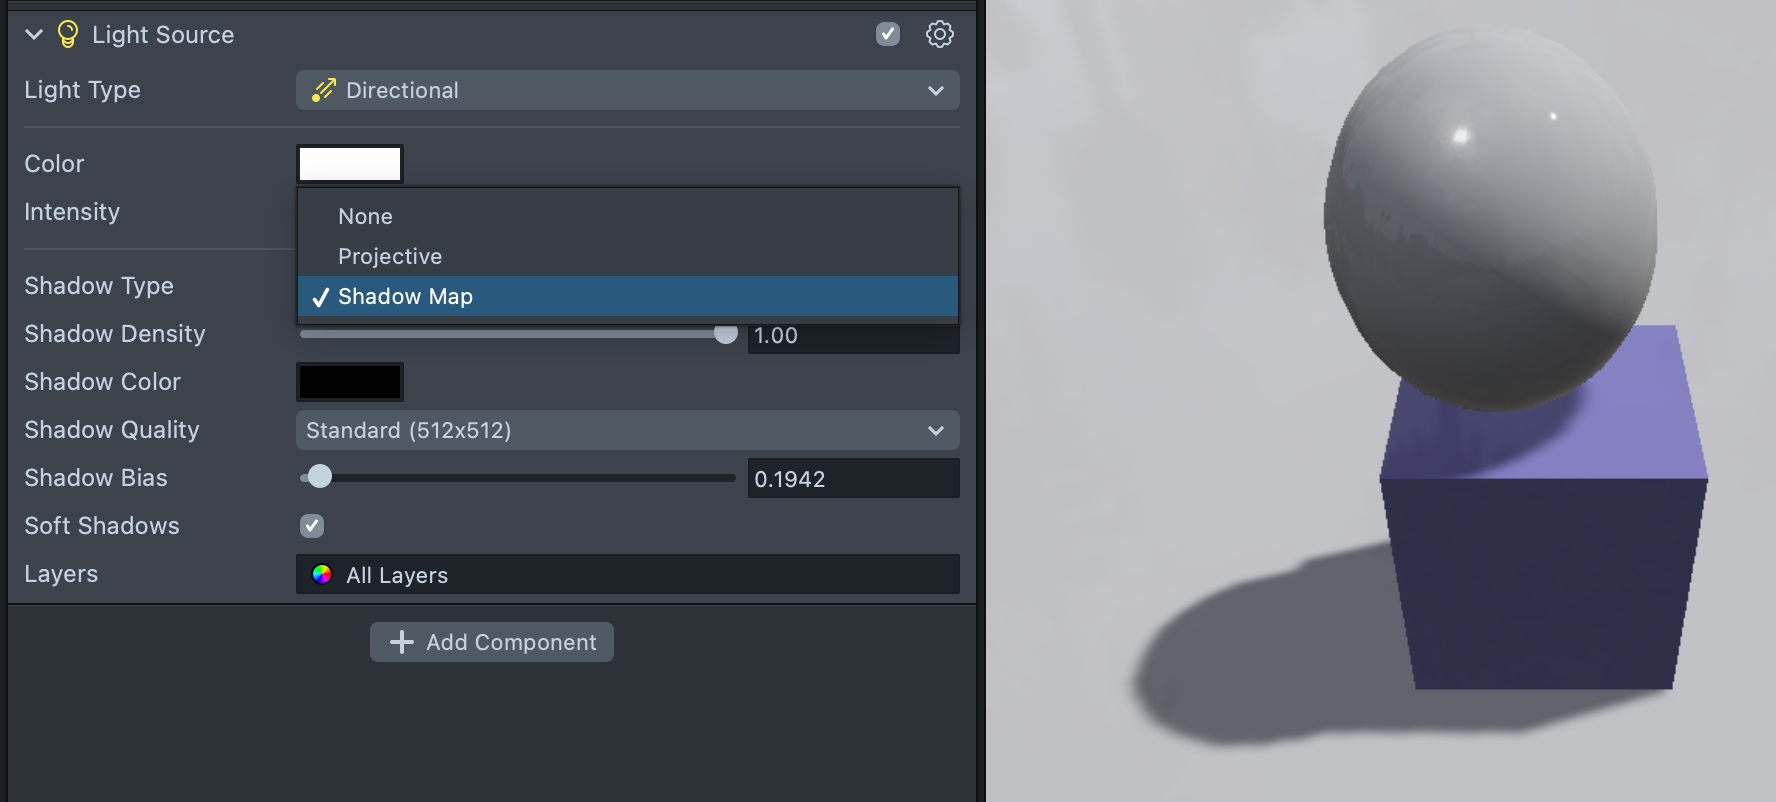
Shadow Mapping uses depth information to shadow objects correctly in 3D, including self-shadowing.
The Projective Shadows section below covers most of the scene setup that also applies to Shadow Mapping. You can skip ahead to the Shadow Mapping section if you already know the workflow.
Examples of issues caused by projective shadows:
Shadow mapping handles the same scene naturally - the box should serve as both caster and receiver:
Adding the Directional Light
To add a real time shadow to your Lens Studio project, first add a directional light and check the Shadows checkbox. You can only have one directional light casting shadows in a scene (or one spot light with shadow mapping).
For the best result, change your directional light rotation to point in the direction you want it to cast shadows. Then, check both the Auto Position and Auto Frust. Size checkboxes to let Lens Studio automatically set the best values for the shadow.
For more information about the Light Source component in Lens Studio, visit the LightSource API.
Configuring your Mesh
Next, select the SceneObject that you want to cast a shadow. In the Inspector panel find the Mesh Visual component and set the Shadow Mode drop down to Caster. You can further adjust the shadow intensity of this object using the Shadow Density slider.
You can tune the intensity of the shadow globally by changing the Shadow Density of the Directional Light Source, which sets the global shadow density cap. Adjust the individual shadow density of one object only when you want to specifically set this object's shadow density.
Adding the Shadow Plane
Finally, you must create a ground plane to receive the real time shadow. To create the shadow plane, follow the steps below:
- In the
Scene Hierarchypanel, click the+button and from the drop down menu selectMesh Visuals -> Shadow Plane - Make sure your object has Caster selected in its Shadow Mode.
- Make sure the Shadow Plane has Matte Shadow material attached, and that you select Receiver in Shadow Mode. These should already have the correct defaults.
- Make sure the Directional Light has Shadows enabled, and that its Layers match your object's and Shadow Plane's layer.

You only need one shadow plane in a project if it's big enough to cover all objects casting shadow in the scene.
Make sure your shadow plane sits at ground level, below the object.
Add Shadow For 2D Assets
You can add shadow for 2D assets that have a hard cut-out outline. Add a plane mesh and clear its rotation so that it faces the camera. Create an Unlit Material and change its Blend Mode to Normal to enable transparency of your 2D asset.

Apply the material to your plane mesh. Enable the shadow mode and set it to Caster as described in the preceding section. You can cast shadow this way for animated 2D textures as well.

Keep the following in mind when working with lights and shadow in Lens Studio:
- You can only have up to 3 directional lights and 5 point lights active in a scene at one time
- You can only have one light casting shadows
- If you want to learn more about optimizing your scene, follow the Performance and Optimization guide
Shadow Mapping
You may enable shadow mapping using the Shadow Type dropdown:
Shadow mapping works with Directional and Spot lights.
You get the option to enable Soft Shadows or not. For the best performance, turn Soft Shadows off, though soft shadows don't add much extra cost.
You have the option of changing shadow resolution using the Shadow Quality setting.
The shadow map always encompasses all casters automatically, like Auto Frustum Size with projective shadows. If you have a lot of objects really far apart, you need to increase your shadow map resolution.
With shadow mapping, it's important to set the Shadow Bias accurately to avoid the opposing artifacts of "shadow acne" and "Peter Panning." Using the least bias that avoids acne results in the least amount of Peter Panning.
Shadow Mapping makes it possible for an object to serve as both caster and receiver at the same time, even cast shadows on itself. For this to work, you should choose the Both setting under Mesh Shadow Mode on a Mesh Visual (in this case the box):
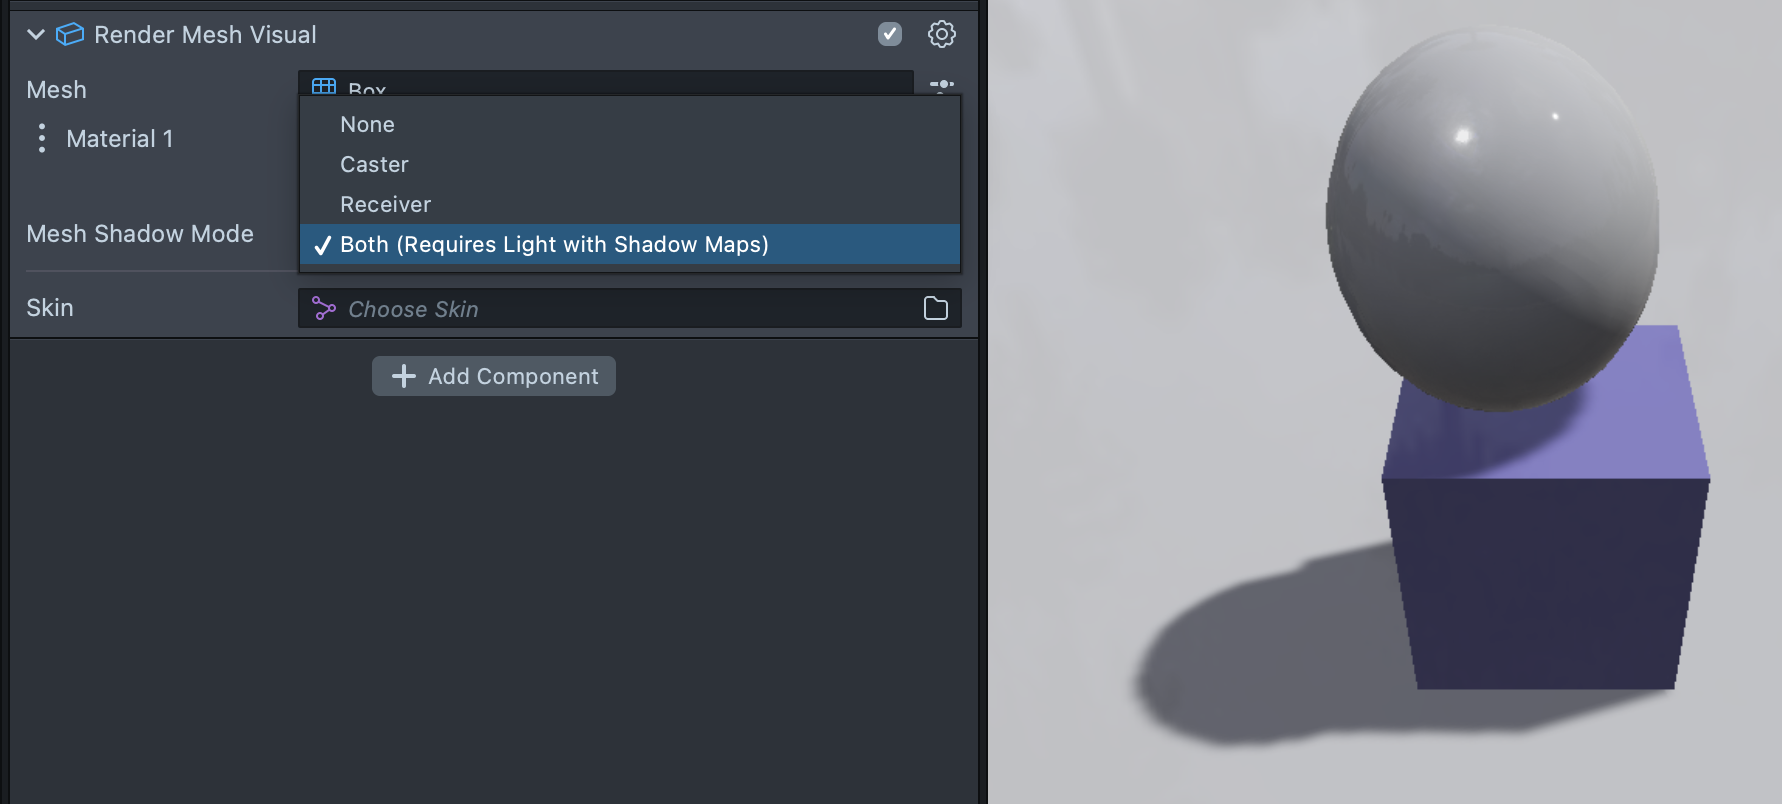
Note that you can optimize rendering performance by using Caster, Receiver and Both judiciously. Ex: if you have a flat ground plane that can't cast a shadow on anything, including itself, you can save performance by setting it to Receiver only, instead of Both.
Optimal use of Shadow Mapping:
- Use low shadow resolution and keep your casters close together if possible; turn off casting on far away objects
- Use
Caster,ReceiverandBothjudiciously - Turn off soft shadows for a small performance boost
- Tweak your shadow bias to the least value that avoids shadow acne