Performance and Optimization for Lenses
Lens Studio empowers our community to create expressive, immersive AR experiences, and then share their creations to Snapchatters all over the world. When building AR experiences in Lens Studio, it’s important to make sure your Lens works on a wide variety of devices, as performance has a direct impact on Lens reach and engagement.
In the next few sections, you will learn some of the recommendations to keep in mind when building your project for both Community Lenses and Sponsored Lenses and best practices to improve performance.
To run a Lens as an ad on Snapchat, your Lens must have a Lens Activation Time under 650 ms, as measured on our benchmark device. To ensure your Lens project meets this requirement, upload drafts of your Lens to the client's Lens Folder. This will run automated testing and surface any potential errors related to Lens performance. More optimization tips for LAT can be found here.
Top 5 QA and Optimization Tips
This Lens Studio video tutorial shares some of the top five tips to help you quality control and optimize your Snapchat Lenses in Lens Studio.
How to Check Lens Performance
When building Lenses in Lens Studio, you can check your Lens performance by Pairing your Device with Snapchat. Once the device is paired, you can select the Gear icon in the top-left corner on your device’s screen to display the performance statistics of the currently running Lens. Here, you can view the following parameters:
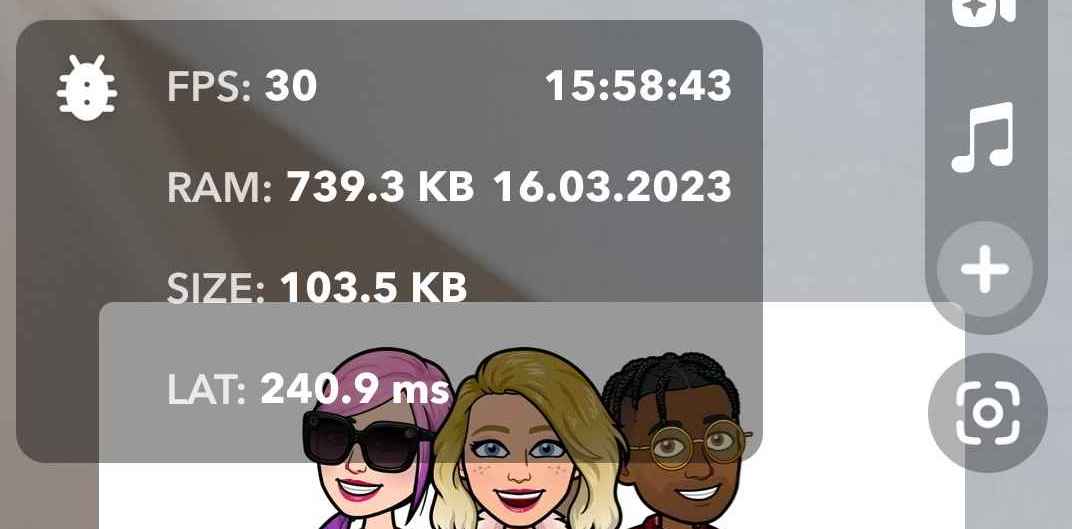
- LAT: Lens Activation Time, LAT tracks the time that it takes for a Lens to render/activate on your screen after it has been loaded on your mobile device.
- FPS: Frames per Second, also commonly referred to as Frame Rate.
- FPT: Frame Processing Time is the amount of time taken to process a single frame on the CPU.
- You should target
30 FPSfor your Lens for the best viewing experience, but ensure that it is greater than15 FPSon most devices.
- You should target
- RAM: The memory that is being used while the Lens is running.
- Lenses should not exceed
150 MBRAM.
- Lenses should not exceed
- SIZE: The current size of the Lens on device.
- Lens size should be less than
8 MB. - You can also view the Lens size within Lens Studio under Project Info.
- Lens size should be less than
Custom ML and Remote Storage Assets do not count towards the total size limit.
Recommendations for Sponsored Lens Project Settings
The Lens Studio Project Info window allows you to customize and configure settings required for Lens submission. You can learn more about the Project Info window of your Lens in the Configure Project Info guide. You should ensure the following settings are applied to your project:
- The Lens has a
name, aLens iconand aLens preview. - The size of the Lens should be less than 8 MB.
In order to ensure that your sponsored Lens receives wide distribution and engagement in Snapchat’s Lens Carousel, you should aim for the following performance statistics:
- Although
8 MBis the maximum file size limit, further optimizations can lead to greater reach across a wide array of devices. - The Lens utilizes both Front and Rear Cameras for enabling Face and World Lens Features. By not having both Front and Rear Cameras enabled for your Lens, it may receive less distribution in the Carousel and potentially may negatively impact any advertising campaigns using this Lens.
- All sponsored Lenses must display a brand name or brand logo and conform to Snap’s Ad Policies. Otherwise, the Lens will be rejected in Ads Manager when it is used in an advertising campaign.
Project Name and Structure Recommendation
Listed below are some examples of how good optimized Project should look like.
- In the Objects window, it’s good to have the camera name correspond to the contents of the camera. Some sample abbreviations:
FE, 3D, VFX, MASK, BLUR, SMOOTH etc.
-
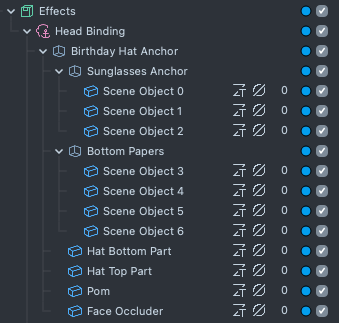
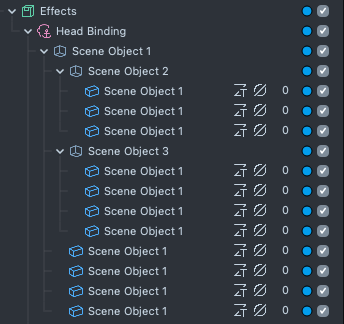
Be specific with naming in the Objects and Resources windows to best identify content within the project.
Perfect Good Difficult to navigate 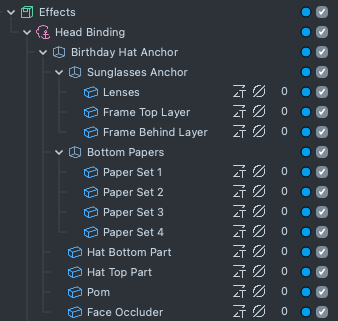
-
Objects in the Resources window should be structured and grouped in Directories, as it improves the organization, reusability, readability, maintainability, and scalability.
Directory structure sample:
Organized by types Organized within each directory 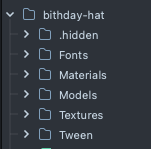
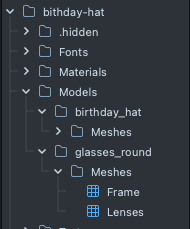
-
It's best practice to keep only Objects used in the project in the Resources window.
Best Practices for Lens Optimization
When creating Lenses, it is recommended that you test your lens across multiple devices, especially a lower-end Android device, to ensure that anyone viewing your Lens will have the best experience. If you find that your Lens is not meeting the recommended performance numbers mentioned in the previous section, please take a look at some of the recommended best practices listed below.
Lens Activation Time Optimization
After a Lens has been downloaded onto a device, it will take a moment to load into the device's memory before it can start running. This is called Lens Activation Time and can be optimized for faster activation, similar to the examples shown above. If you are noticing that your Lens is taking a longer than expected time to load on device, you can take a look at some of the following best practices to help optimize.
While most of the optimizations in the previous sections will help load time, some will not. There are potential trade-offs in the following set of practices.
- Materials: It is recommended to use simpler material and VFX graphs. This means having fewer nodes and using static bool parameters over dynamic. Unless graphs are exactly equivalent, shaders for each graph need to be compiled separately and they have a big impact on load time.
- You should avoid using complex nodes like noise, PBR or complex subgraphs, unless you really need them.
- Textures: Use
Performancecompression.- You may disable mipmaps as well. This may hurt FPS and cause aliasing, and may not be worth it if you are using Performance compression, but generating mipmaps can have a big impact on load time for large textures that are not using Performance compression.
- Objects: You should use the smallest number of objects and resources possible.
- Meshes: You should aim to have the lowest possible vertex counts without sacrificing the overall quality of the mesh, and use the smallest vertex attribute formats. If our Lens takes a significant amount of time to load, you could disable Draco compression and see if that helps.
Even after you follow all of the above Best Practices, if your Lens still does not comply with the performance requirements, you might have to simplify the concept of the Lens and remove resources.
Loading Lenses in Parts
Breaking Lenses into scenes or parts will allow you to improve your Lens performance, in both start-up time, as well as how it runs. That is: load and show parts of your Lenses only when you need it to reduce overhead cost.
You can even use Lens Cloud and prefabs to store additional parts of your Lenses to be downloaded later. This will allow the initial Lens to be as small as possible so the viewer can experience the Lens as fast as possible, while at the same time providing the opportunity to add more Lens content beyond the standard 8mb.
Take a look at the Scene Manager to learn more!
FPS/FPT Optimization
To help improve your FPS and FPT on different devices, and ensure a smoother, more responsive Lens experience, take a look at some of the areas and adjustments you can make:
- Render Targets: Try to limit the number of Render Targets your Lens uses. Two cameras that share the same Render Target is more performant than two cameras with two different Render Targets.
- Anti Aliasing: While anti-aliasing works well in most cases, MSAA has some impact on performance. If it's not giving you a noticeable visual benefit, you could disable it. To learn more about MSAA, please visit the Camera Component guide.
To disable Anti Aliasing:
- Select the Camera Output texture in the
Asset Browserpanel. - In the Inspector panel, verify that MSAA is disabled.
- SnapML: You should limit the number of ML Components used in a Lens.
- For the most optimal performance, it is recommended limiting your Lens to one ML Component.
- Materials: It is recommended to use simpler material presets and graphs. This means having fewer nodes, and using static bool parameters over dynamic.
- You should avoid using complex nodes like noise, PBR or complex subgraphs, unless you really need them. Single nodes can hide a lot of complexity and cost.
- You should turn on Order independent transparency, known as OIT, only for Lenses where it has a meaningful visual impact, as OIT has a significant cost.
- The four layer mode is recommended for OIT over the other OIT modes when applicable.
- Textures: Using
Performancecompression and enabling mipmaps is optimal for FPS. Mipmaps are crucial to reduce memory bandwidth and improve frame rate. They can als improve image quality, ie: less aliasing when textures are minified. If your texture always maps to screen pixels 1:1 or is magnified, mipmaps are not needed. - VFX: If your Lens has VFX effects, such as particles, you should reduce the number of particles and adjust emitters to avoid particles overlapping. Similar to Materials, you should also use simpler VFX graphs. To learn more, please visit the VFX graph optimizations for more information on how to optimize VFX graphs.
- Scripting: When writing scripts, it is recommended to tie logic to events rather than per frame updating. You should only use the script update event if you're unable to get the desired functionality that you want from the other events.
- You should avoid using scripts that repeatedly store large data, such as textures. Caching values in the script, instead of retrieving them via API each event, can lead to valuable performance optimizations.
RAM Optimization
Optimizing your Lens’ RAM usage has several benefits. Reducing memory pressure ensures your Lens can run stably on lower-end devices. Using less RAM implicitly means using less memory bandwidth, which reduces heating and battery usage, and can also improve frame rate. Using less RAM can also implicitly mean faster loading. To help improve your RAM usage on different devices, take a look at some of the areas and adjustments you can make:
- Object Count: Each item in the
Scene Hierarchypanel counts as an individual object. The more objects you add to your project, the more of an impact you will have on performance. You should try to keep the number of objects as low as possible. - Textures: You should use Performance Texture Compression, also known as hardware texture compression, when building a Lens. Performance Texture Compression uses six times less RAM for RGB textures, and four times less for RGBA textures.
- 3D Animation:
- Use the Tween Manager to add simple animations in Lens Studio. Utilizing Tweens in animation will have a lower impact on both memory usage and file size.
- It is recommended to stay under 100 joints for your animation rig.
- Additionally, while Lens Studio does support Blend Shape animation, you should avoid using it due to higher memory usage. If Blend Shapes are required, you should use sparingly and pay close attention to your frame rate performance.
- Vertex Animation: Vertex animation can be costly for all performance metrics: Frame Rate, Memory and Size on Disk. Pay close attention to the performance requirements for Lenses when using vertex animation.
- 3D Animation Length: You should keep your animations to be less than
10 secondsto match the length of a Snap. If you need to push beyond this, you will need to ay close attention to the size of your Lenses.
Size Optimization
Lens size has a big impact on the potential reach of your Lens. It has a direct impact on download time and storage space, and sometimes has indirect impacts on other performance metrics. To optimize the size of your Lens, consider the following tips:
- 3D Models: For the best performance on multiple devices, it is recommended to keep your 3D models under a total
100,000 triangles, or60,000 trianglesfor meshes that have joints or skinning. If you need to push beyond this, you'll need to pay close attention to your Frame Rate performance.- Use the smallest possible vertex attribute formats, and Draco compression.
- Textures: Similar to what was covered in the RAM Optimization section, Textures can have an impact on the size of a Lens.
- No texture should exceed
2048 x 2048 resolution. You should consider using the smallest possible size.- An example of this is if your image is just a solid color, you can just set the texture to be
4 x 4 px, or you can delete the texture node and use a constant color in the graph. - If your image can be utilized as a pattern, you can consider cropping the texture to a pattern that you can repeat in material instead.
- If only a small area of the texture space is needed, please use a special UV set that maps that area to the entire texture, and reduce the texture’s size accordingly. Large swaths of the same color are very wasteful.
- An example of this is if your image is just a solid color, you can just set the texture to be
- Texture Transparency: While PNGs with transparency are supported in Lens Studio, only use PNG if you need transparency. If you do not require any transparency or alpha channels, use JPG to save space.
- Texture Compression: You should use some form of compression to reduce the size of the Lenses. While
Sizecompression can create smaller texture sizes thanPerformance, this can severely impact loading time, FPS, and RAM in a negative way. You should always preferPerformancecompression when the Lens size impact is manageable in your Lens. Performance compression is also set as the default solution.- Please visit the Built-in compression guide to learn more about Lens Studio’s built-in compression feature.
- Texture Compression: You should use some form of compression to reduce the size of the Lenses. While
- Texture Reuse: You should attempt to reuse textures where possible. Each unique texture must be loaded at Lens start, and will affect performance. Too many unique textures can cause your Lens to be invalid.
- PBR Textures: For Normal and Material Params textures, you can sometimes set the resolution to be smaller than the Base Color texture.
- Videos and Animated Textures (GIFs): While both these formats allow you to play a sequence of images, they have different trade-offs you might want to consider. You should try both to see which one may fit better for your needs. Keep in mind, any sequence that is more than two seconds of animation would likely work better as a video than as a texture.
- While both can be used wherever a texture can be displayed such as materials, and images, they have slightly different APIs. For example: With an animated texture, you can jump to a specific frame, whereas with video you can only seek to a specific time. Another example is with video you can import synced audios, whereas with Gifs you bring them separately.
- In both cases, you can also consider using a separate texture that represents the alpha channel (opacity) for the texture. For example, if you want a video to be partially transparent, you can provide two videos: one with the RGB channel as your main video, and another black and white video that you can use as your alpha channel set as the Opacity Texture field in an Unlit material.
- No texture should exceed
- Materials: You should use as few and as simple material and VFX graphs as possible. Unless graphs are exactly equivalent, the shader code for each graph takes up extra space in the Lens.
- Audio: Use MP3 for all audio assets. In most cases, you can convert the MP3 to mono and use a lower bitrate to help save space in the exported Lens package. You should avoid long music tracks and instead utilize looping or fade out effects.
Render Targets Textures (RTT) Optimizations
You can learn more about Scene Set Up here.
-
Cameras should always have RTT. In rare cases, they can be without RTT and without a layer.
-
The project must be assembled with a minimum number of RTT and cameras. The more RTT means the more RAM consumption and longer Lens Activation Time.
-
The camera order in Scene config must correspond to the logical order of the cameras in the Objects window.
- The wrong order for Render Targets can cause some objects to lag. The Render Target in Scene config must correspond to the logical order of the cameras so that the render targets used in subsequent render targets must be rendered before them. Below, the image on the left shows the wrong render order. The right image shows the correct order. This is because "Render Target Motion Blur" is used as an input in “Render Target Motion Blur Ortho”, which is used in “BaseRenderTarget”.
If Base Render Target takes in MotionBlur Ortho Incorrect: Input Render Target happens after receiver Correct: Input of Render Target is rendered before receiver 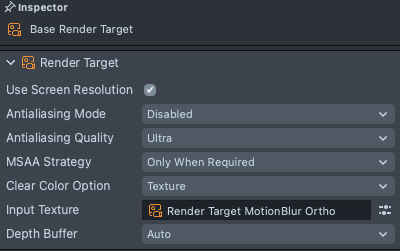
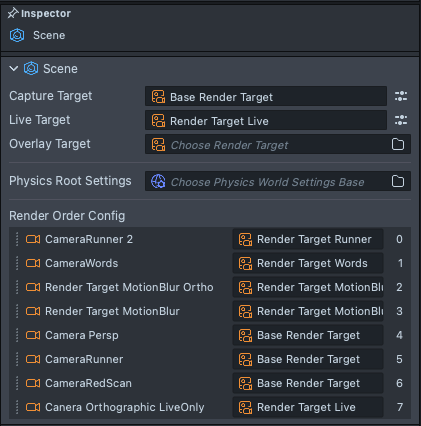
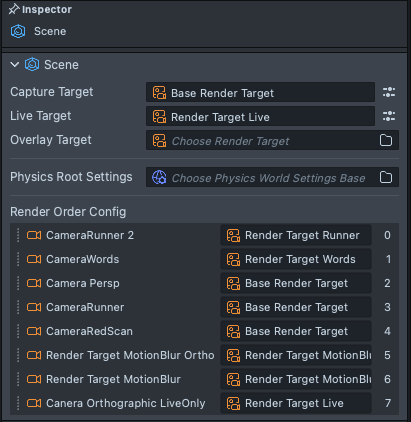
Below, on the right, is an example of what an incorrect Render Order in scene config looks like. The effect attached to the eyes is unstable when the model moves. However in the image on the left with the correct scene config, the effect attached to the eyes stays much more stable when the model moves.
Incorrect Render Order Correct Render Order 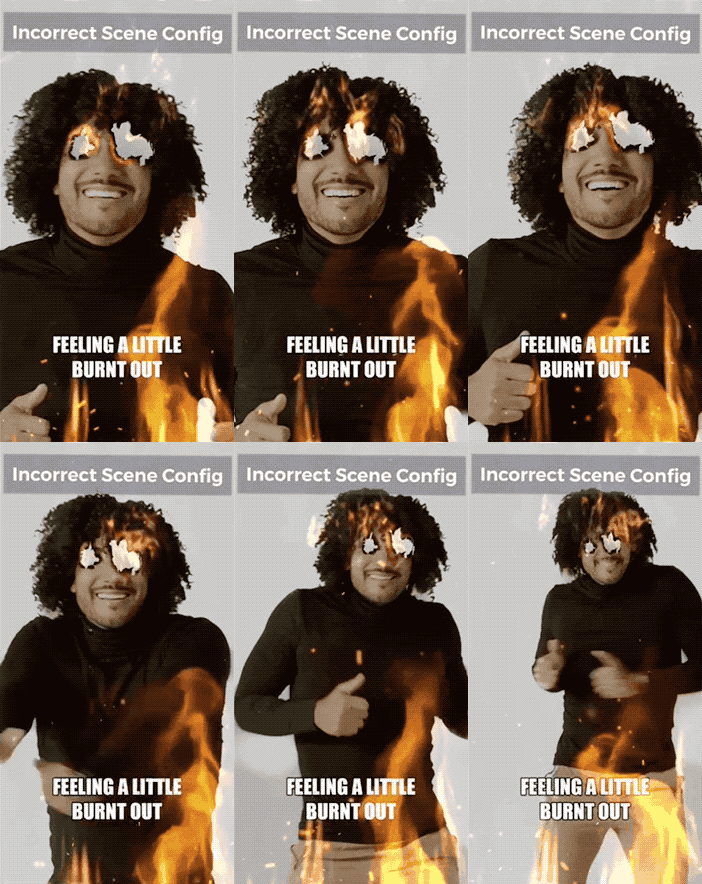

-
Clear depth should be enabled for the first camera and RTT, especially if there are 3D objects.
-
If there is a Live Target (with Screen Region in Live mode), it must have Capture Target.
-
Make sure that MSAA is enabled only for 3D cameras with 3D objects that require it.
-
MSAA can be an important part when working with 3D objects, but for 2D objects it is not needed, as it does not bring any visual changes and will only load the user's device unnecessarily.
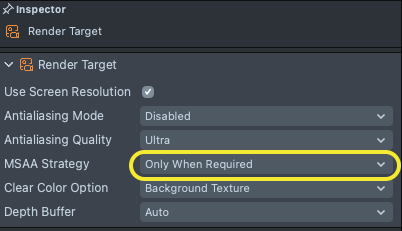
- If MSAA is disabled, use one RTT for FE and 3D cameras.
Texture Optimizations
Here are some additional optimizations you can do when working with textures in order to improve performance.
-
Try to use rational space in the texture.
-
Don't allow > 50% empty space on the texture.
- Too much empty space on textures should be avoided. Below, the image on the left is showing the empty space around the original texture, and the image on the right is showing the required empty space for this texture.

- Any empty spaces in the images are also calculated by the GPU and occupy certain bytes as RAM and device memory.
-
Optimal texture size for face effects (Face Mask):
- Eye color: 64x64 pixels.
- Lips: 250 pixels on the longest side.
- Lashes, eyeshadows: 300 pixels on the longest side.
- Blush, face paint, etc: 450 pixels on the longest side.
-
For elements that repeat, use the same texture.
- For example, you can try the Segmentation template in Lens Studio.

-
-
Resolution of the textures located on the screen must correspond to the occupied space (maximum 720x1280 pixels).
-
Using the proper resolution for the textures reduces the size of the Lens and the RAM usage, which will reduce the Lens load time and the load on the user's device. You can set the resolution for most textures based on the size of the screen. The maximum resolution that the Lens in Snapchat can output is 720x1280, so 2D textures in most cases should not exceed this size.
-
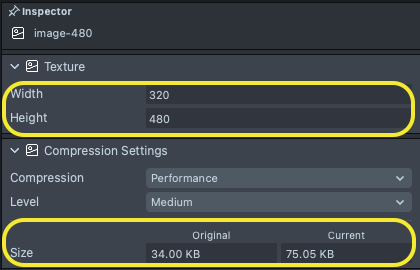
You can determine the right size by conditionally dividing the preview image into equal parts of 100 pixels, as in the example below. Based on this method, the size of the selected texture should be about 282 pixels x 89 pixels.

-
Example of the difference in size and RAM usage with different texture sizes.
| Unoptimized Image | Optimized Image |
|---|---|
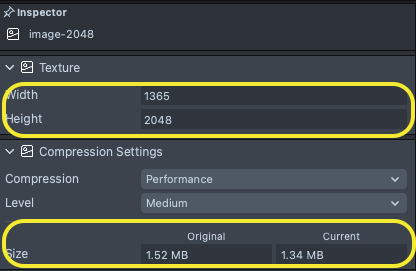 |  |
-
Texture resolution of the color texture (vignette, gradient, one color texture, etc.) in PNG format.
-
Textures like monochrome/bicolor vignettes can be small, 32x32 or 64x64
-
Depending on complexity, the size of the gradients can be 1x32/64 pixels in PNG format.
-
One color textures can be 1x1.
-
You can also make a gradient texture in the shader graph with nodes. Lens Studio will load the shader instead of texture faster.


-
-
Animated textures must have the ‘Always Play’ checkbox enabled (if not controlled from a script) and ‘Duration’ must be calculated based on a frame rate of 24 frames per second.
Face Effect Optimization
Here are some additional optimizations you can do when creating Face Effect Lenses:
You can learn more about face effects in our Face Effect documentation.
- The Second person render orders must be identical to first person. On the first face, the render orders of the second ear, for example, must also match the first ear.
- The exception is Face Stretch. For 3rd and 4th person render orders should be higher by 1.
EyeColormust have Rotation enabled.- Remove unnecessary effects. For example, remove eye color or liquify for the eyes if the user's eyes are covered with content.
- There should be no more than 10 liquefies on one render order and face index inside one Render Target Texture, otherwise it will crash due to device technical limitations.
Ray Tracing Optimization
Here are some addition optimizations you can make when creating Lenses using Realtime Ray Tracing:
- The most significant impact to development efficiency is to make sure you are building with the latest Lens Studio, and have Metal Developer Tool installed (available for mac and windows). Having the Metal Developer Tool will allow your computer to compile Metal shaders into Metal libs so that Lens start up time will be faster within Lens Studio.
- Try not to use many materials in a way that will create many shaders. Unless graphs are exactly equivalent, shaders for each graph need to be compiled separately and they have a big impact on load time.
For runtime optimization
- Create an allowlist for the Ray Tracing lens (using a script) and run a fallback (non-Ray Tracing) version on older devices where the performance is not good enough.
- Follow "Performance Consideration" in the Ray Tracing tutorial.
Additional Lens Optimizations
Listed below are some best practices you should do in order to improve your Lens performance.
-
Icon size should be 320x320 pixels.
- You can learn more about the Icons best practices here.
-
Segmentation must be under morphing in order for morphing to work on the segmentation mask. So that the segmented image is not distorted, you can duplicate the stretch into the camera with the mask.
- Find more about segmentation set up here

-
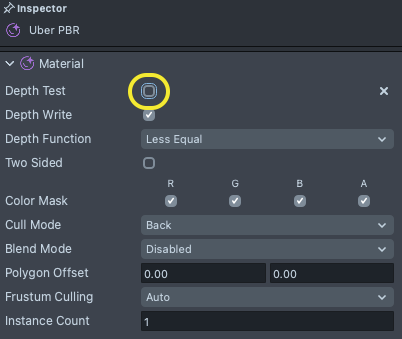
If they are not needed, turn off Depth Test, Depth Write, Two sided, and Alpha in materials. Usually, these are materials in the ortho camera; materials with particles that don't need depth or for materials for face effects.
- You can find out more here.
- Since 2D materials do not interact with each other by depth, it is recommended to turn off Depth Test and Depth Write to reduce the load on the device.
With Depth Test Without Depth Test 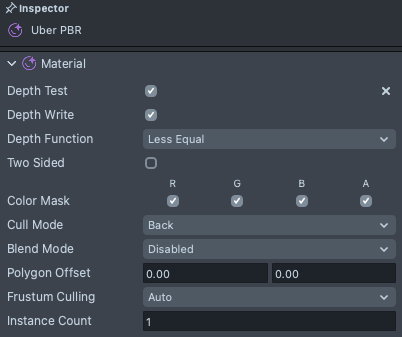
-
It’s best practice to use simple materials instead of complex ones, where possible.
- Find more about material types here.
- PBR and Uber materials are complex and using them increases Lens Activation Time. For simple elements, it’s better to use Unlit. Notice how the Unlit has significantly less parameters, which allows the materials to process faster.
Uber PBR Unlit 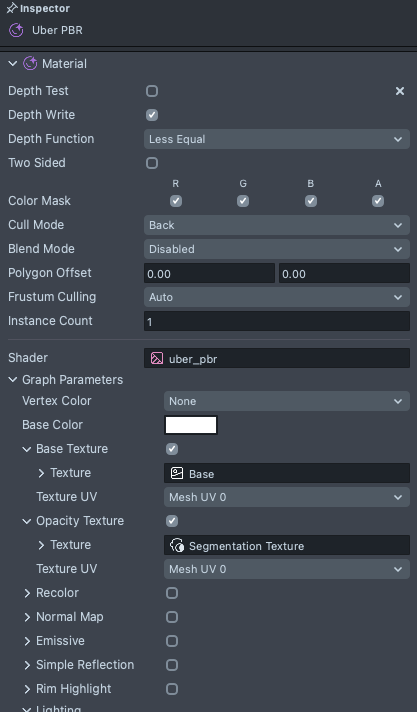
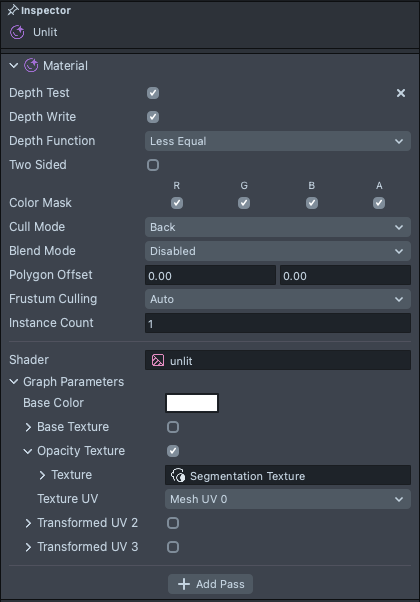
-
Below are examples of differences between materials used.

