Overview
You can emit particles in Lens Studio by using the Particles object. The Particles object is a shader based system that has many options, including, but not limited to: animated textures, velocity, gravity, and noise.
The Particles Template includes a number of preset particle systems such as rain, snow, smoke, and more.
Take a look at the VFX Editor to make more complex particle systems using a node-based editor, VFX vs Particle System to learn more about the difference and limitations.
Create the Particles
To create particles, in the Scene Hierarchy panel, select + -> Particles.
Configuring the Particles
To configure the particles, in your Asset Browser panel, open the Particles folder and select the Particles Emitter Material. Then, in your Inspector panel, you can modify the properties of your particles.
For example, you can modify the texture of each particle by dragging and dropping your new texture into the Asset Browser panel, and assigning it to the Textures -> Base Texture -> Texture field.
Refer to the Particle Material Options section below for detailed explanation of each setting.
Starting Particles on Event
By default, the particles object emits on start. You can modify this behavior by using the External Time option, and using a script to start the particles.
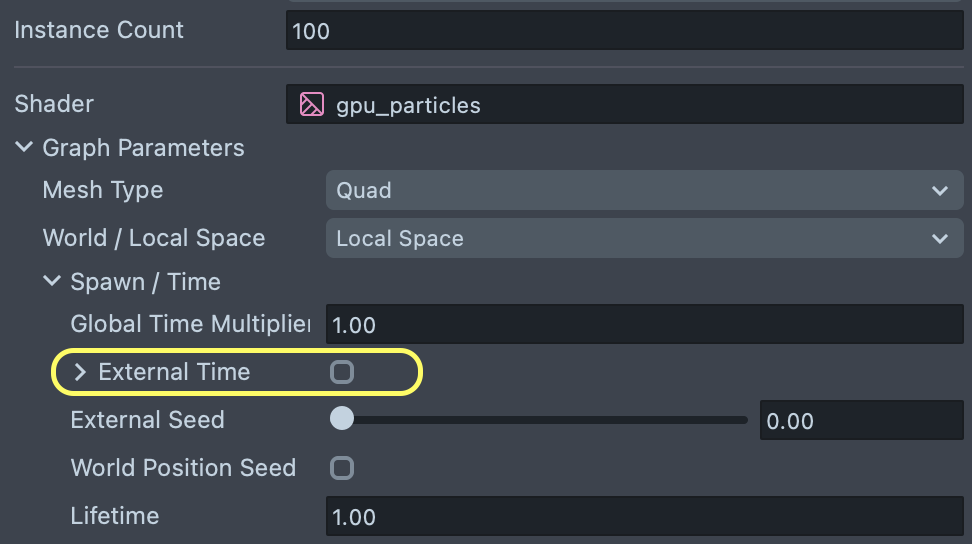
Enable External Time
To enable the External Time option, select the "Particles Emitter Material" in the Asset Browser panel and in the Inspector panel, tick the box next to External Time.
At this point you won’t see the particle emitting, this is normal.
The External Time option allows us to control at which point in time the particle simulation is in.
Script The Event
Next, add a script to pass in the time. In your Asset Browser panel, press + -> Script. Then select your particle object, and drag the new script into the Inspector panel. We’ll run the script on Initialized since we need to bind a couple events: one to start the particles and one to update the particles over time.
Then in the Asset Browser panel, select your new script and copy and paste the following in the Inspector panel:
// What event to trigger particle on
var triggerEventName = 'MouthOpenedEvent';
// Get the Particle's Mesh Visual
var meshVis = script.getSceneObject().getFirstComponent('Component.MeshVisual');
// Variable to store what time particle started
var startTime;
// Update the particle time every frame when needed
function update() {
  if (startTime) {
    // Calculate how many seconds have elapsed since we've triggered particles
    var particleTime = getTime() - startTime;
    // Pass it in to our Particle Material
    meshVis.mainPass.externalTimeInput = particleTime;
  }
}
var updateEvent = script.createEvent('UpdateEvent');
updateEvent.bind(update);
// On an event, store the time when particle is triggered
function startParticle() {
  startTime = getTime();
  meshVis.enabled = true;
}
var particleTriggerEvent = script.createEvent(triggerEventName);
particleTriggerEvent.bind(startParticle);
In this case the script triggers the particle when the user opens their mouth. You can modify eventTriggerName to change this. For example: replacing MouthOpenedEvent with TouchStartEvent will start the particle when the user taps the screen instead. Take a look at the Script Event page to see different types of events.
If you are using Instant Spawn, you will need to utilize this script or similar to start the particle.
Stopping Particles on Event
In some cases you may want to stop the particles from emitting. You can add an additional event to the script above to do this.
// What event to stop particle on
var stopEventName = 'TouchStartEvent';
// On an event, stop particle by setting particle time to 0
function stopParticle() {
  startTime = 0;
  meshVis.mainPass.externalTimeInput = 0;
  meshVis.enabled = false;
}
var particleStopEvent = script.createEvent(stopEventName);
particleStopEvent.bind(stopParticle);
Particles Control Helper
Alternatively, you can import the ParticlesControlHelper script to help you control particle start and stop time. ParticlesControlHelper is a script that allows you to trigger an effect via the Inspector panel by giving you a drop down with a list of possible events. Additionally, there is an option to set an event to stop the particle.
To use it, download Particles Control Helper from the Asset Library, and drag the JavaScript file inside into your Asset Browser panel. Then in your Scene Hierarchy panel, select your Particles object, and drag the script into the Inspector panel to add it. As above, make sure External Time is ticked in the Inspector panel of Particles Emitter Material.
Trails
Trail rendering is a new feature added in Lens Studio 5.4.0. To quickly add trails to your scene, add the GPU Particles Trails preset from the Scene Hierarchy panel.
Trails allow you to create particles that stretch across each particle’s path over time. Trail particles change color and size as they move based on the particle’s main settings. Trails can be configured to render just the trail or include a head particle. For examples, check out the Particles Template Guide's section on Trails.
To render trails, you must use a specialized trail mesh. Additionally, you must have Trails enabled on your GPU Particles material.
We have provided two ways to quickly build trails:
GPU Particles Trailsobject preset in Lens Studio (Scene Heirarchy -> + -> GPU Particles Trails). This preset includes a quad head particle and a trail with 100 segments.GPU Particles Trail Mesh Builderin the Asset Library. This asset includes a script that lets you specify the number of segments in the trail geometry, as well as the option to add or remove the head particle.
To create your own custom particle mesh that supports trails, use the following guidelines:
-
Trail Geometry:
- Create a grid or plane which is split into multiple rows / horizontal segments. More segments means greater ability for particles to stretch and bend, but also increases the amount of vertices that need to be processed.
- Assign UVs to the grid. The UVs should range from 0-1 across the entire grid.
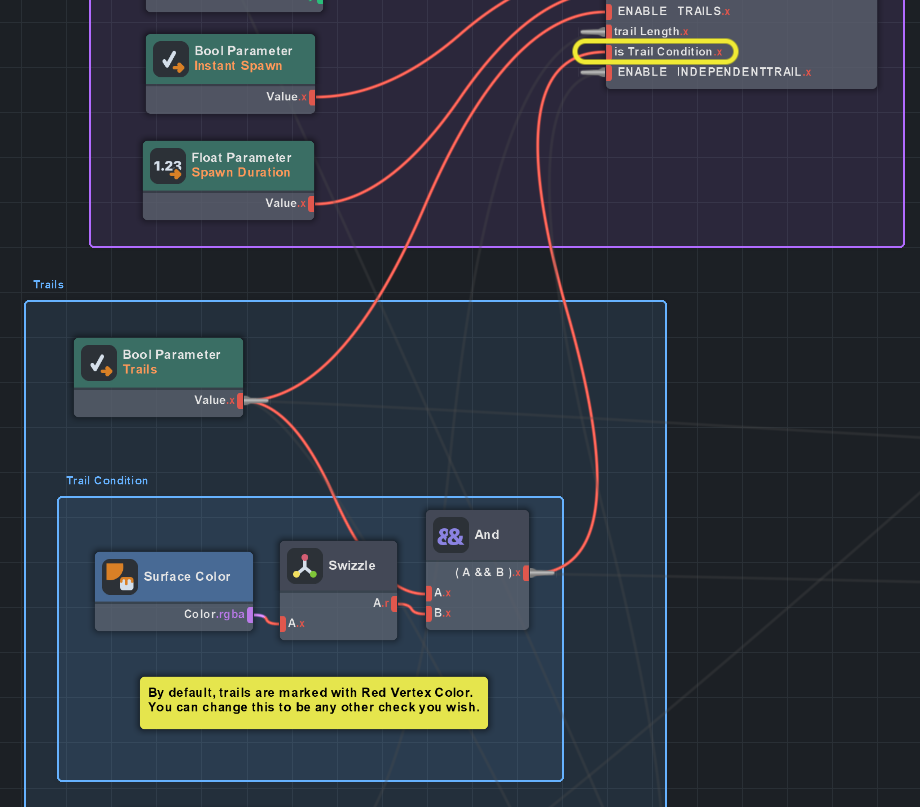
- Assign Red vertex color to the trail geometry. This tells the GPU Particles shader that this geometry is part of a trail.
-
Head Particle Geometry (optional):
- Create geometry for the head particle based on the
Mesh Typeyou plan to use. For 2D particles, create a 2D quad. For 3D Particles, create any 3D shape you like. - Assign Black vertex color to the head geometry. This tells the GPU Particles shader that this geometry is not part of a trail.
- Create geometry for the head particle based on the
You can change the Is Trail condition in the GPU Particles shader if you want to use a different attribute to mark trails. For example, you could use a second UV set instead of Vertex Color.
Updating Particles
In Lens Studio 5.xx, it is easy to update to new versions of GPU Particles by updating the material's shader. Updating shaders should still preserve all of your material's settings.
Update Flow:
- Go to
Asset Browser -> + -> GPU Particlesto bring in the most recent GPU Particles material and shader. - With your material selected in the
Inspectorpanel, swap theShaderto be the newgpu_particlesshader. - Check that your mater
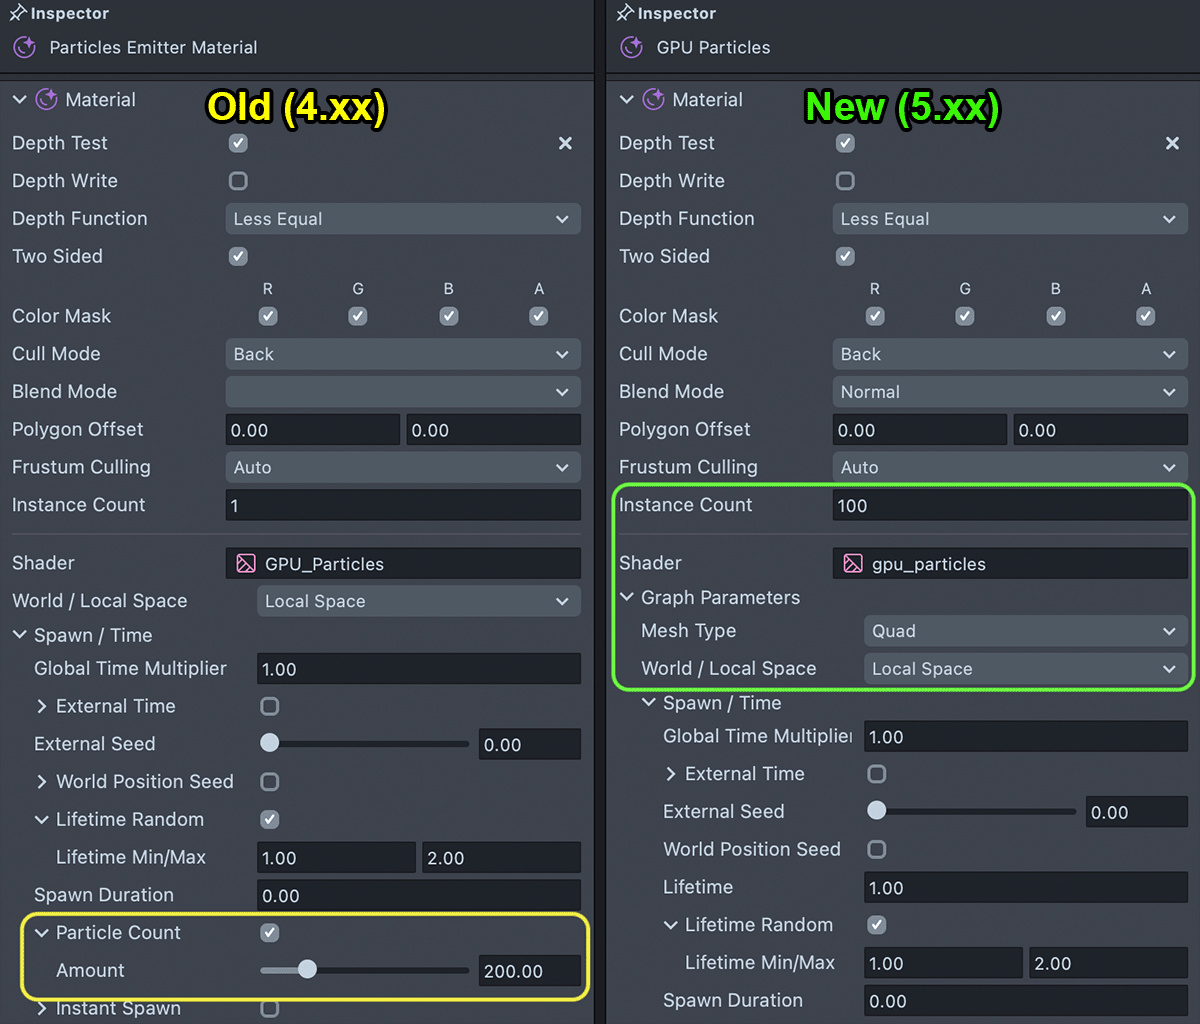
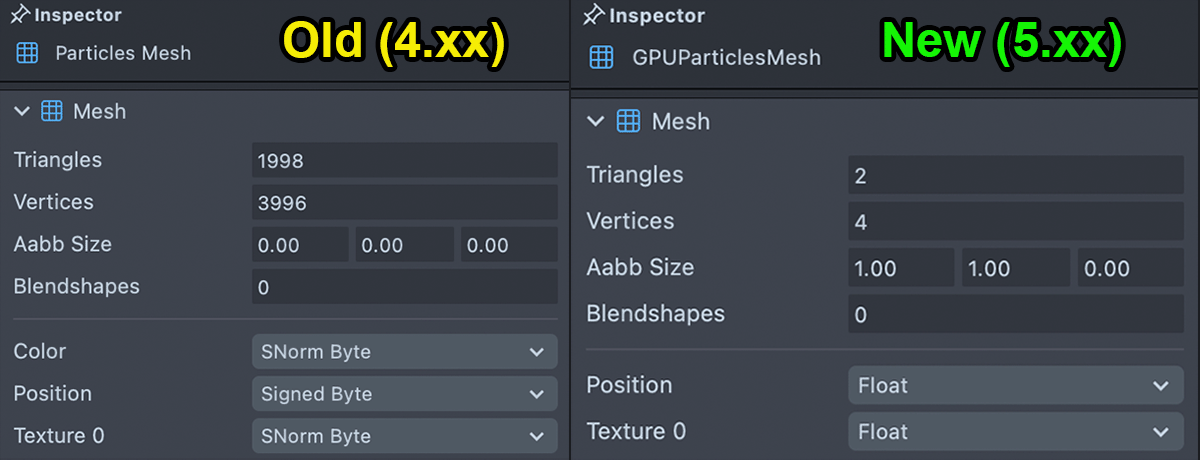
When updating GPU Particles created in Lens Studio 4.xx, you will likely also have to update the Particle Mesh. This is because older versions of GPU Particles used a specialized mesh and had a limit of 1000 particles, while the current version uses a quad mesh and instancing to control particle count.
If your material has a Particle Count Parameter, follow these additional update steps:
- Bring in a new particle mesh by going to
Asset Browser -> + -> Plane.- Alternatively, you can add the GPU Particles preset to your scene (
Scene Heirarchy -> + -> GPU Particles) and use itsGPUParticlesMesh.
- Alternatively, you can add the GPU Particles preset to your scene (
- Update the mesh on each Render Mesh Visual component that uses your GPU Particles material.
- Set the material's
Instance Countequal to the previous version'sParticle Count. - Check that other parameters such as Random Size and Random Color match your original material.
Particles Material Options
Here we'll cover the features and parameters of the material that controls the particles. Each object that we treat as an emitter has a material applied to it for emitting particles.
Changing a materials parameters will apply across all objects with that material applied to it. If you want to create another emitter object with the same material but slightly different settings then make sure you duplicate the material first and then apply that to your new object.
You can script any property material by hovering over the property name to get its scriptable variable name. Then, you can modify the material's mainPass to change it!
Particle Count, Instance Count, and Mesh Type
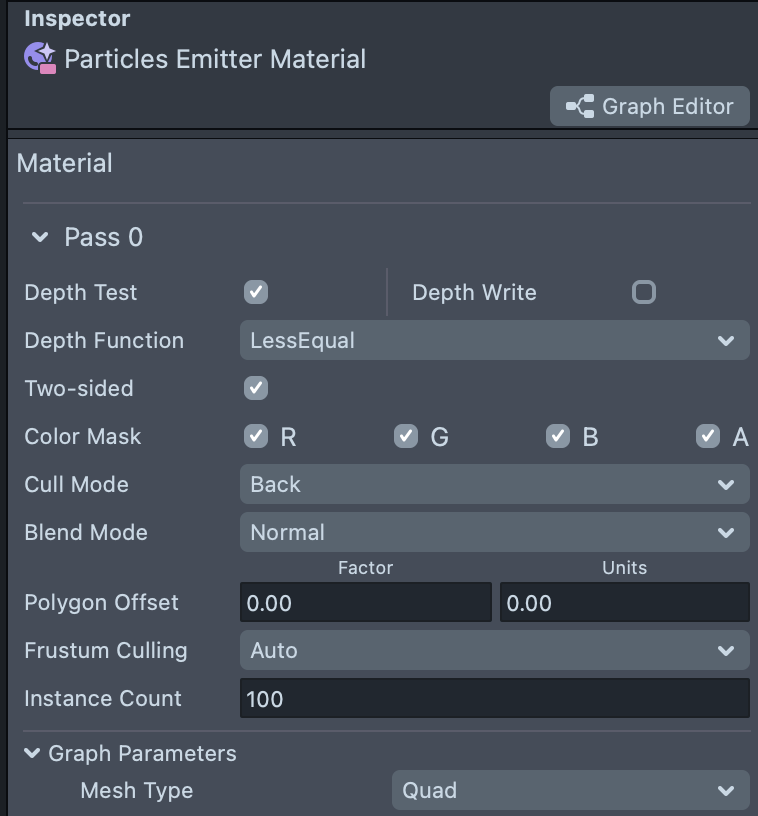
GPU Particles are capable of supporting Instancing, which is the ability to render the same mesh multiple times using the same material. This not only improves efficiency, but also allows particles to support complex meshes.
- Instance Count (int): used as Particle Count. This controls how many instances of the particle are created. Instance Count is a standard feature on all graphs.
- Mesh Type (dropdown): Controls which type of particles are being rendered.
Quadis the default setting for Mesh Type. Quads are used to render 2D particles that face the camera. This is the most common type of particle, and is useful for effects that only need textures (like sparkles and snow). When using this mode, ensure that Double-Sided rendering is enabled and Depth Write is disabled.3D Meshallows you to render entire 3D objects as individual particles. This mode is useful for particles that benefit from complex rotation and lighting (like asteroids and crowds). When using this mode, make sure that Two-Sided rendering is disabled and Depth Write is enabled. Because this mode is rendering entire meshes with potentially thousands of vertices, it is more computationally expensive than Quad rendering.
Check out the Particles Template for examples and information on using 3D Mesh particles.
Spawn / Time
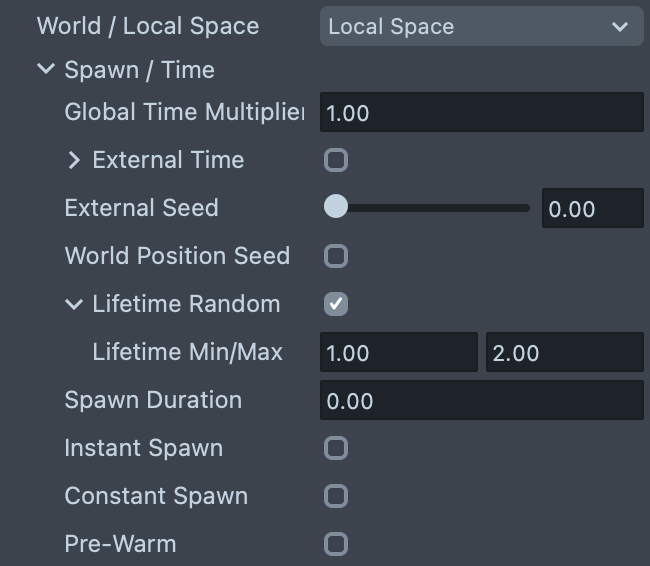
Spawn / Time controls lifetime of particles. You can customize these options to spawn particles over time of a burst of particles all at once.
- World / Local Space: Specifies the space in which rotation is applied
- Global Time Multiplier(float): A multiplier of time across the entire effect which can be used to make the effect move faster or slower
- External Time (bool): Enables the use of external time controlling the particle effect
- External Time Input (float): The external time input from an outside source such as script
- External Seed (float): Assigns a seed value to the effect which allows you to control the randomness of particles while still keeping them synced with other effects sharing the same seed value
- World Position Seed (bool): Takes into account the world positions when using the seed value
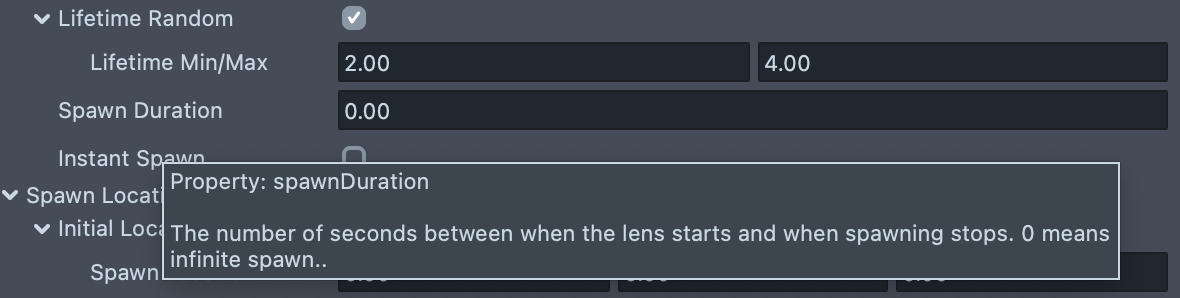
- Lifetime Random (bool): Enables random lifetime duration for each particle
- Lifetime Min/Max (float): The range, in seconds, of each particle's lifetime is randomly assigned
- Instant Spawn (bool): Spawns all particles at time 0. This is often used with "External Time" enabled, where time is passed in through a script. Refer to the Starting Particles on Event section above for information on passing in time to particles.
- Constant Spawn (bool): Spawns particles consistently over time. Otherwise, particles have a slightly randomized spawn rate. Both spawn rates are calculated automatically based on particle lifetime and particle count.
- Pre-Warm (bool): Particles spawn as if the system has been running for a long time. Otherwise, particles begin spawning in at time 0.
Older versions of GPU Particles have a “Particle Count” parameter, and were limited to 1000 particles. Newer GPU Particles instead control the particle count using Instance Count.
Spawn Location/Shape

Spawn location allows you to define the area in which particles will spawn. You can control this by defining the dimensions of the volume in which the particles will emit from.
- Initial Location / Spawn Location (bool / vec3): When enabled allows you to define the initial location where an effect will spawn offset from the origin of the object which the material as applied to
- Initial Box Spawn / Spawn Box (bool / vec3): When enabled will allow you to define the dimension of the box volume in which particles will spawn
- Initial Sphere Spawn / Spawn Sphere (bool / vec3): When enabled will allow you to define the dimension of the sphere volume in which particles will spawn
Textures
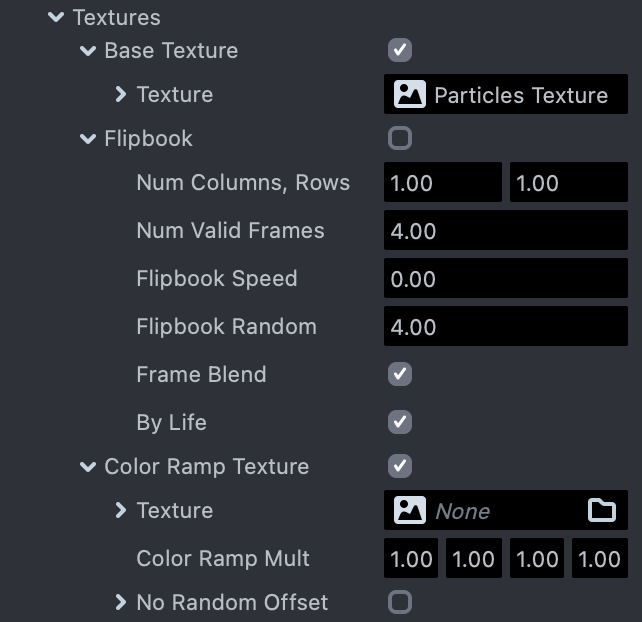
Textures allow you to define custom color and alpha textures you’ll apply to each particle. You can define a flipbook texture to play animated image sequences per particle. You can also define a ramp texture to control fading particle or add a gradient of color to particles over their lifetime. This is great for fiery smoke effects.
- Base Texture / Texture (bool / texture): Allows you to specify a texture to apply to each particle
- Flipbook (bool): Enables use of a flipbook (sprite sheet) texture to animate on each particle over its lifespan
- Num Columns, Rows (vec2): Sets the flipbook texture atlas grid size. x is the number of columns, y is the number of rows in the atlas
- Num Valid Frames: Number of valid animation frames. May be set to at most columns*rows. May be set to less if there are unused frames at the end of the grid
- Flipbook Speed (float): Controls the playback speed of the flipbook animation
- Flipbook Random (float) - Controls a random value between 0 and the number you define to randomize the flipbook
- Frame Blend (bool): Will "fade" the images of the flipbook between each other to create a smooth transition
- By Life (bool): When enabled will animate the flipbook sequence over the lifespan of the particle
- Color Ramp Texture (bool / texture): Unlocks a texture to multiply the color and alpha on top of your particles over their lifespan
- Color Ramp Mult (color): Color that is multiplied against the "Color Ramp Texture"
- No Random Offset: Color that is multiplied against the "Color Ramp Texture"
Color / Alpha
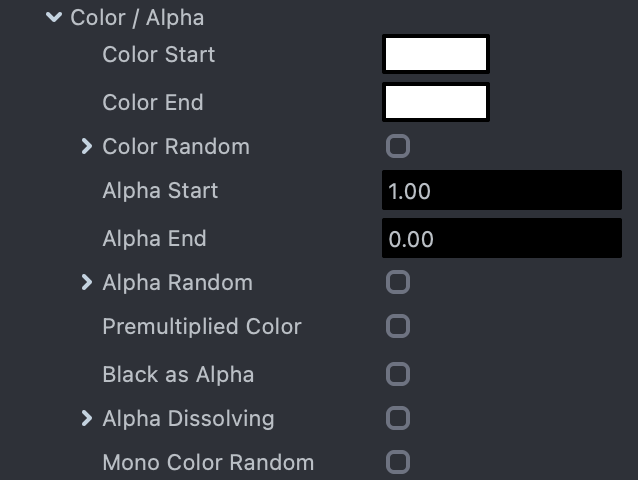
These parameters control color and alpha being applied to your particles. You can specify random color and alpha values for each particle over its lifetime.
- Color Random (bool): Enables a random color applied to each particle
- Color Min/Max Start (color): The start of the color range used to randomly assign each particle's color
- Color Min/Max End (color): The end of the color range used to randomly assign each particle's color
- Alpha Random (bool): Enables a random alpha applied to each particle
- Alpha Min Start/End (float): The minimum value of the range used to randomly assign each particle's alpha
- Alpha Max Start/End (float): The maximum value of the range used to randomly assign each particle's alpha
- Premultiplied Color (bool): Enabled will multiply the color values against the Base Texture if one is defined so that the particles will look correct in premultiplied alpha mode
- Black as Alpha (bool): Enabled will treat the black value of the Base Texture as the alpha value for each particle
- Alpha Dissolving (bool / float): Allows you to "erode" the alpha of particle over their lifespan
- Mono Color Random (bool): Keeps random color values within the expected spectrum based on the color picker otherwise the random values lean more towards random mathematical values
PBR
(3D Mesh only) PBR enables you to apply lighting to your materials. It also provides basic controls for metallic, roughness, and normals. For more information about PBR, check out the PBR (Lighting) Node Overview.
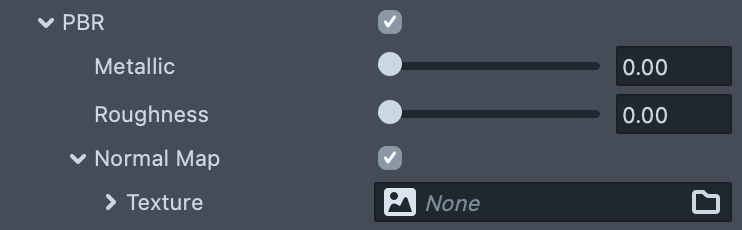
All of the PBR settings are applied after the Particles Pixel shader. This means that they are able to be edited using the Material Editor. Use this flexibility to your advantage to customize your particles as you see fit!
- PBR (bool): Toggle to enable or disable PBR settings.
- Metallic (float): Controls how metallic the material is. The value ranges from 0 to 1, 0 being non-metallic and 1 being metallic. When the metallic level is higher, it means the mesh surface reflects more and its base albedo color becomes less visible.
- Roughness (float): Controls how blurry or sharp a specular reflection is. This controls the amount that light is diffused when it bounces off the mesh surface. Rougher surfaces are less reflective and have broader specular highlights.
- Normal (bool / texture): Allows you to apply a Normal Map to your particles.
Noise
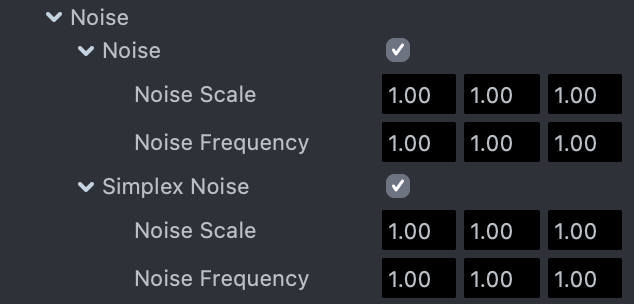
Noise allows you to control how much random movement you’d like to add to your particles.
- Noise (bool): Enables the noise functionality
- Noise Scale (vec3): Defines the 3D intensity of the noise applied
- Noise Frequency (vec3): The 3D frequency of the noise
- Simplex Noise (bool): Enables the simplex noise functionality which can be used as a cheaper alternative to standard noise and can also act as a second layer of noise for added detail
- Simplex Noise Scale (vec3): Defines the 3D intensity of the simplex noise applied
- Simplex Noise Frequency (vec3): The 3D frequency of the simplex noise
Velocity
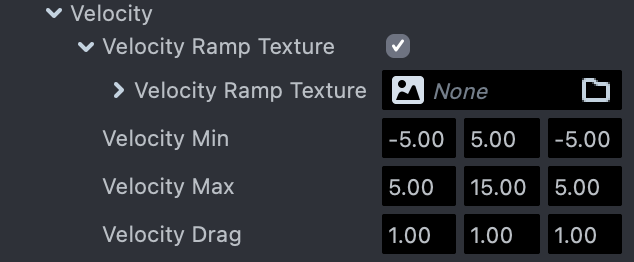
Velocity controls the movement speed of your particles. You can specify random 3 dimensional directions to apply to your particles.
- Velocity Ramp Texture (bool/texture)- Enables use of a texture to define the change in velocity
- Velocity Min (vec3)- Defines the minimum of the range from which each particle's velocity is randomly assigned
- Velocity Max (vec3)- Defines the maximum of the range from which each particle's velocity is randomly assigned
- Velocity Drag (vec3)- Defines the amount of drag applied to each particle's velocity over time
Rotation
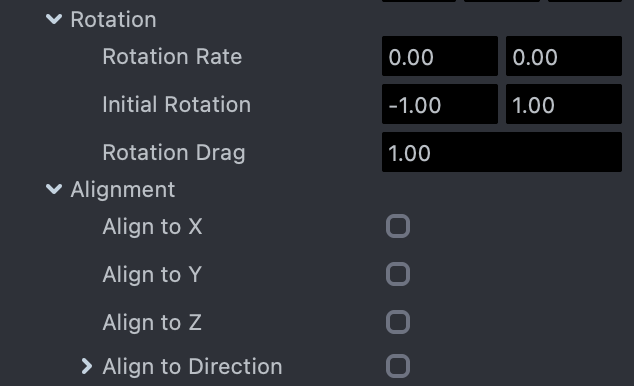
Rotation allows your particles to spin over their lifetime. Rotation is applied around the center of the particle for Quad particles, and about the local origin for 3D particles. The values you specify are random ranges to rotate around this center point.
- Rotation Rate (vec2): (Quad mesh) The min and max complete rotations each particle will have rotated over their life
- Initial Rotation (vec2): (Quad Mesh) The min and max rotation in radians each particle will have at birth
- Rotation Drag (float): The power applied to the rotation rate on each particle
When using the 3D Mesh mode, Rotation Rate and Initial Rotation provide controls for all 3 axes:
- Rotation Rate X/Y/Z (vec2): (3D Mesh) The min and max number of complete rotations a particle will complete about each respective axis during its lifetime. If any alignment settings are enabled, then only Z Axis rotation is applied.
- Initial Rotation X/Y/Z (vec2): (3D Mesh) The min and max rotation in radians about each respective axis each particle will have at birth. If any alignment settings are enabled, then only Z Axis rotation is applied.
Alignment
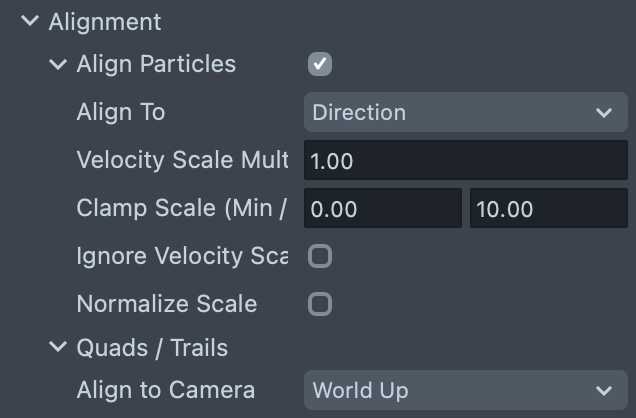
Alignment controls which direction particles face. By default, Quad particles face the camera, and 3D particles rotate freely in the world based on rotation settings.
- Align Particles (bool): Enables alignment options.
- Align To (dropdown): Which vector particles will align to.
Direction: This aligns particle to their movement, based on velocity, noise, and forces. Quad particles face the camera and stretch along the direction vector. 3D particles align their local +Z axis to the direction vector.X Axis: aligns particles to the world X axis.Y Axis: aligns particles to the world Y axis.Z Axis: aligns particles to the world Z axis.
- Velocity Scale Mult (float): (Align to Direction only) Multiplier on velocity stretch.
- Clamp Scale (Min/Max) (vec2): (Align to Direction only) Limits velocity stretching. This is helpful when you want particles to stretch a little bit but not too much, especially in systems where particles have strong forces and/or high velocity magnitudes.
- Ignore Velocity Scale (bool): (Align to Direction only) Particles will not use velocity magnitude to scale. Velocity Scale Mult can still be use to stretch particles. This is particularly useful for 3D mesh particles.
- Normalize Scale (bool): (Align to Direction only) Velocity Stretching will be normalized to the particle's transform scale. This helps prevent excessive stretching when the transform scale is large.
- Align to Camera (droplist): (Quad / Trail particles only) Determines which up vector is used to align particles to the Camera.
World Up: Particles face the camera using the World Up vector. Particle rotation is affected by camera rotation, because particles remain consistent to the world.Camera Up: Particles face the camera using the Camera Up vector. Particle rotation is not affected by camera rotation.
Scale
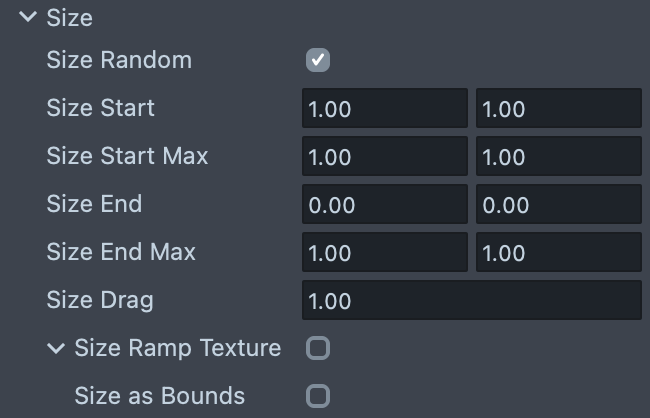
Scale controls the size applied to each particle between a random range of values.
- Size Random (bool): Randomizes particle size at the start and end of its life.
- Size Start (vec2 / vec3): The size of each particle at the start of its life.
- Size End (vec2 / vec3): The size of each particle at the end of its life.
- Size Start Max (vec2 / vec3): When Size Random is enabled, particle size at birth is randomized between [
Size Start,Size Start Max]. - Size End Max (vec2 / vec3): When Size Random is enabled, particle size at death is randomized between [
Size End,Size End Max]. - Size Drag (float): The power of the Size applied to the particles, which can be used to ramp up the scale of particles at birth.
- Size Ramp Texture (texture): Enables use of a texture to describe change in size over time (not available on low-end devices).
- Size As Bounds (bool): changes how the Size Ramp Texture value is applied. By default, Size Ramp Texture will ramp between 0 and
Size Start. WhenSize as Boundsis enabled, the size value is interpolated between [Size End,Size Start].
Force / Gravity
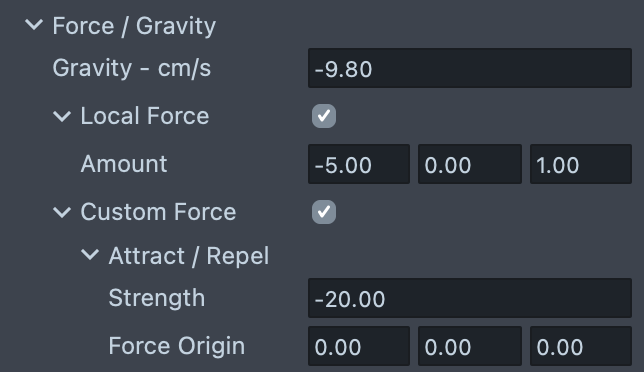
Force / Gravity controls the amount of gravity applied to your particles. A negative value sends particles toward the ground and positive values send the particles into the air.
- Gravity (float): The force of gravity applied to particles which is usually represented as -9.8 cm/s.
- Local Force (bool): Applies uniform directional force to the particles.
- Amount (vec3): The direction and strength of the directional force applied when
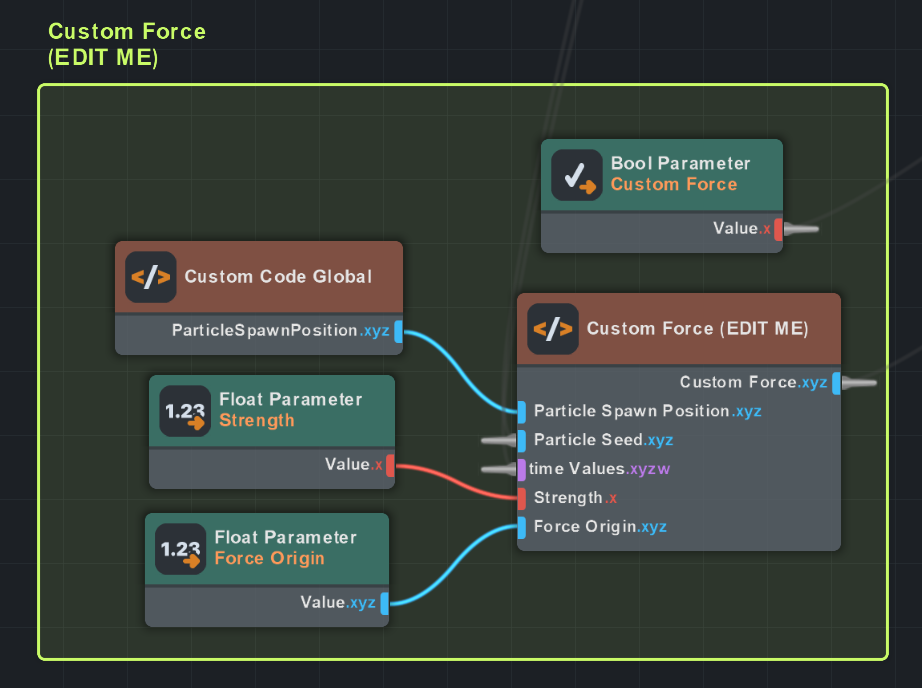
Local Forceis enabled. - Custom Force (bool): (Lens Studio 5.10+) Applies a custom force to the particles. The default is an Attract/Repel force.
- Strength (float): The strength of the Attract/Repel Custom Force. Positive Values pull particles towards the Force Origin; negative forces push particles away fromt the Force Origin.
- Force Origin (vec3): The source of the Attract/Repel Force, relative to the particle's transform.
You can write your own Custom Force using the provided ParticleSpawnPosition global and Custom Force (EDIT ME) Code Node found on the bottom left side of the GPU Particles Graph.
Trails
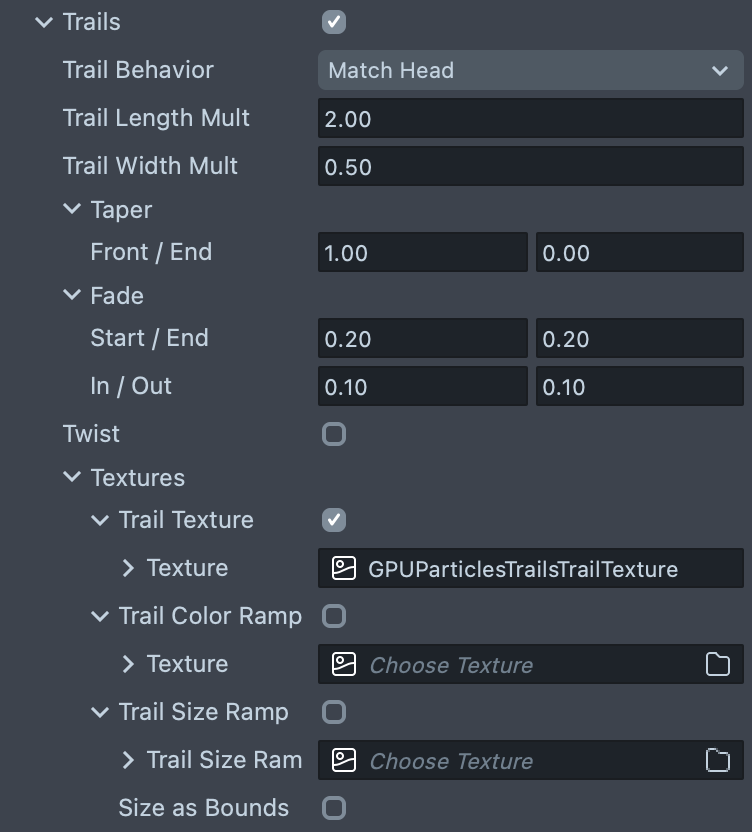
To quickly add trails to your scene, use the GPU Particles Trails preset from the Scene Hierarchy menu.
- Trails (bool): enables trail rendering. To properly render trails, you must use a specialized trail mesh in addition to enabling the
Trailsbool. To learn more, see the above section on Trails. - Trail Behavior (droplist): specifies how the trail acts relative to the head particle (or leading edge of the trail).
Match Head: trail color and size is applied uniformly across the entire trail following the head particle. Trails die when the head of the trail dies.Independent: trail color and size is applied across the particle over time. Each part of the trail has its own lifespan, which is affected byTrail Length Mult. The total lifetime of the entire trail = particle life + trail length mult.
- Trail Length Mult (float): increases the overall length of the trail. Trail length is heavily influenced by how far the particle moves over its lifetime. When
Trail Behavioris set toIndependent, this value increases the overall lifetime of the particle. - Trail Width Mult (float): scales the width of the tail relative to the head.
- Taper Front / End (vec2): the amount of tapering applied to the front and end of the particle, relative to the particle’s length. 0 = a sharp taper, 1 = no taper.
- Fade Start / End (vec2): the amount of fading relative to the particle’s length, applied as a gradient to the ends of particles.
- Fade In / Out (vec2): (Trail Behavior = Match Head only) the amount of time it takes relative to the particle’s lifetime for particles to fade in (on birth) and out (on death). This fading is applied uniformly to the entire particle.
- Twist (bool): when enabled, trails will twist along the particle’s path using the particle’s Rotation settings. (Note: for 3D particles, twist is based on
Rotation Rate ZandInitial Rotation Z). - Trail Texture (bool/texture): enables the use of a base texture for the trail. Note that trails use their own texture instead of the main particle
Base Texture. - Trail Color Ramp (bool/texture): enables the use of a color ramp texture to color particles over time. Note: this value is applied in addition to all other color settings, except
Base Texture. - Trail Size Ramp (bool/texture): Enables use of a texture to describe change in size over time (not available on low-end devices).
- Size As Bounds (bool): changes how the Size Ramp Texture value is applied. By default, Size Ramp Texture will ramp between 0 and
Size Start. WhenSize as Boundsis enabled, the size value is interpolated between [Size End,Size Start].