Physics Toys
This guide will cover physics features in Lens Studio, including Physics Matters, per-object world settings, and cone and cylinder collider shapes, using the Physics Maze and Physics Racetrack assets.
To learn more about Physics in general in Lens Studio, visit the Physics Guide.
Getting Started
You can find the Physics Maze or the Physics Racetrack assets in the Lens Studio Asset Library and import it into your project. Click here to learn more about using assets from the Asset Library.
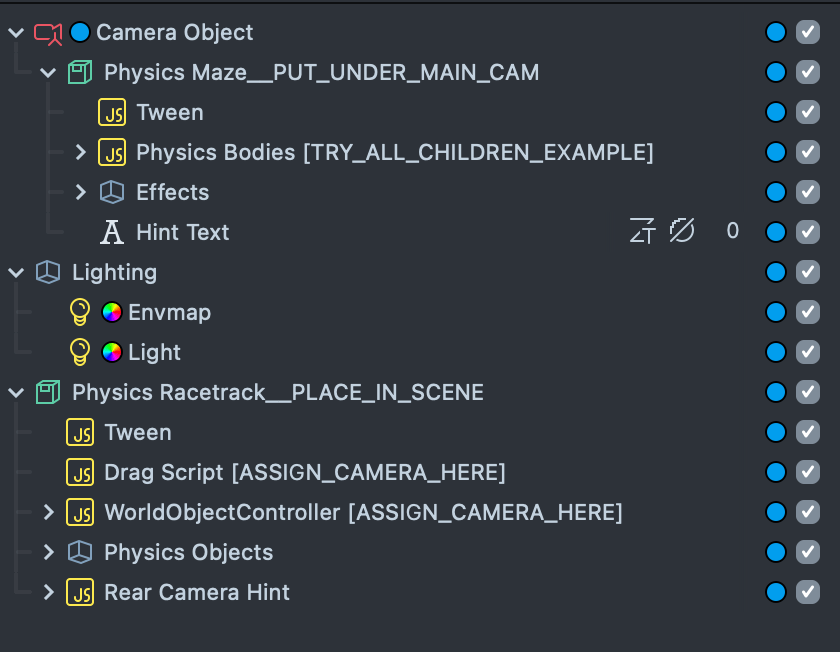
Once imported, locate the Physics Maze or the Physics Racetrack prefab in the Asset Browser. Drag and drop it under an Orthographic Camera in the Scene panel.
If you don't have an Orthographic Camera, add one by clicking the "+" button in the Scene panel and searching for "Orthographic Camera."
To edit the asset's contents, right-click the prefab in the Asset Browser and select Unpack for Editing. Click here to learn more about Asset Packages.
The Physics Toys collection contains two independent components:
Physics Maze
- Demonstrates interactive physics objects with customizable material properties
- Features head-attached environments with drag-and-drop functionality
Physics Racetrack
- Implements vehicle physics with torque and constraints
- Includes slow-motion zones and collision effects
Physics Maze
This component creates an interactive maze that responds to head movements, allowing the ball to roll naturally. For optimal viewing, ensure your preview window is using the Front camera and select a preview video with a person in it.
Physics World Settings
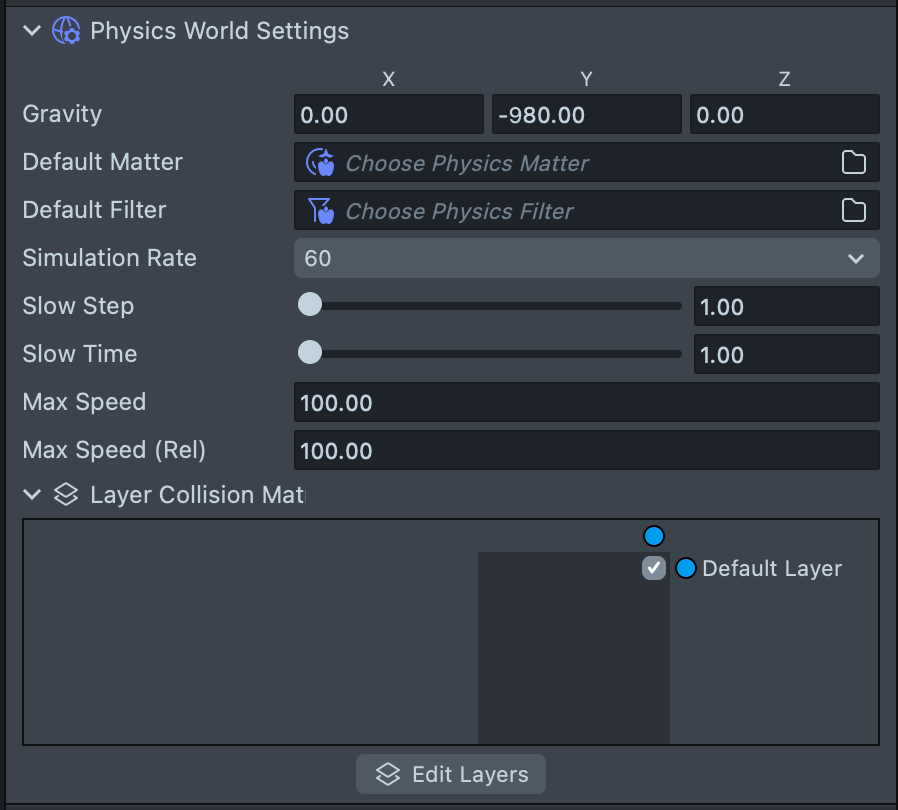
Physics World Settings, as the name suggests, are settings that apply to the entire physics world in a project. A Lens Studio project can have multiple physics worlds, each with its own settings. If you select the Prefab Physics Racetrack in the Scene Hierarchy panel, you will see it has a Physics World component. The Settings field of the component is linked to a World Settings asset. All children of the Prefab will inherit the Physics World Settings asset.
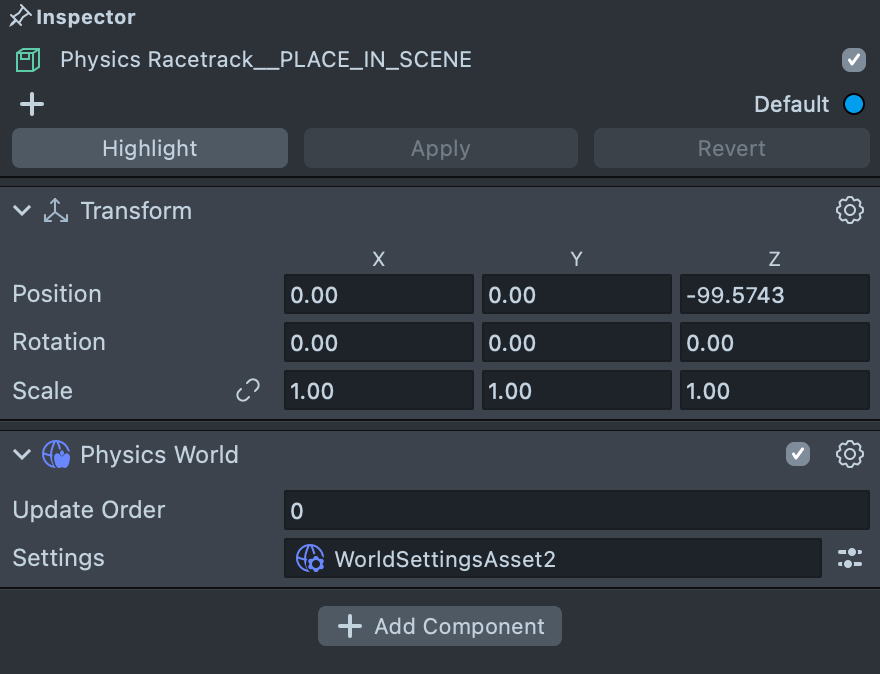
Right click on the Asset linked in the field Settings and choose Highlight, the asset will get highlighted in the Asset Browser panel. Click on the asset, you can find these and edit variables:
- Gravity
- Default Matter
- Simulation Rate
- Slow Step
- Slow Time
- Max Speed
- Max Relative Speed
To learn more about Physics World Settings, visit Physics Assets and Components.
Drag Script
The included custom script, Drag Script, enables you to drag objects using raycasting. Raycasting projects a ray into a scene and determines whether the ray collides with any object in the scene. In this template, a ray is cast when you tap on the screen. If the ray collides with some object, the object follows your finger until you release the screen.
Try dragging the objects in the scene listed below:

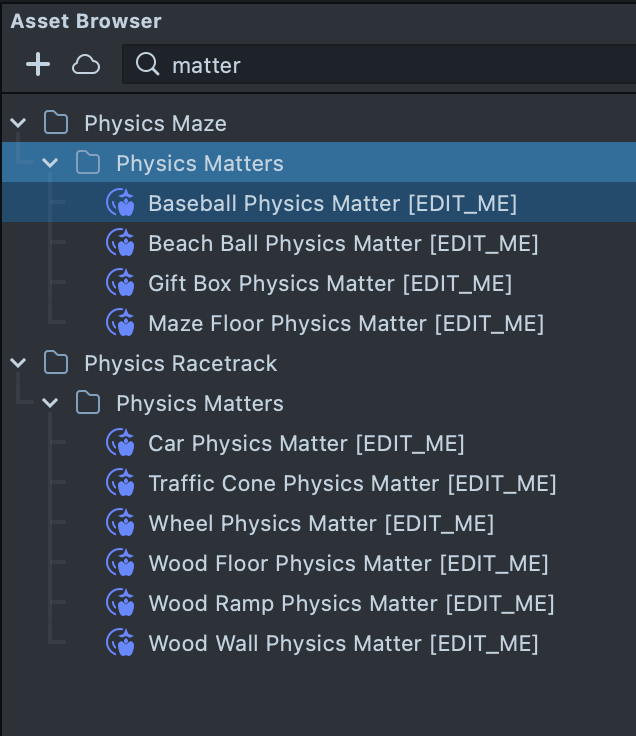
Physics Matters
Attach a Physics Matter asset to each Physics Body and Physics Collider component. Within each Physics Matter asset, you can adjust the component’s friction and bounciness.
In the Asset Browser panel, find the Physics Matters folder under each imported asset. You will find several Physics Matter assets with varying settings. For example, notice that the bounciness of the asset used for the beach ball is higher than that used for the baseball. Even though the Physics Body shapes are the same, the balls bounce differently after colliding with the floor.
To learn more about Physics Matter, check out Physics Assets and Components
BindTransform script
Once the physics simulation starts, the physic objects (scene objects with dynamic Physics Body components) move in world-space. The Head Binding effect allows the maze physics objects to track your head. Since you cannot make the Physics Object a child of the Head Binding, utilize the BindTransfrom script to bind the Physics Object's initial transform to a pivot point on the Head Binding object.
![]()

Enable Smoothing
Navigate to Physics Maze__PUT_UNDER_MAIN_CAM > Effects > Maze Colliders > Floor 1 > Floor. In the Inspector panel, you can find a Physics Collider component on the Floor object.You can then find the Smoothing option. This option smoothly interpolates between changes to help reduce noise. This template uses Smoothing to reduce motion tracking noise.
There are more than one colliders used in this example! Check out the rest of the Floor objects to see how they are set up.
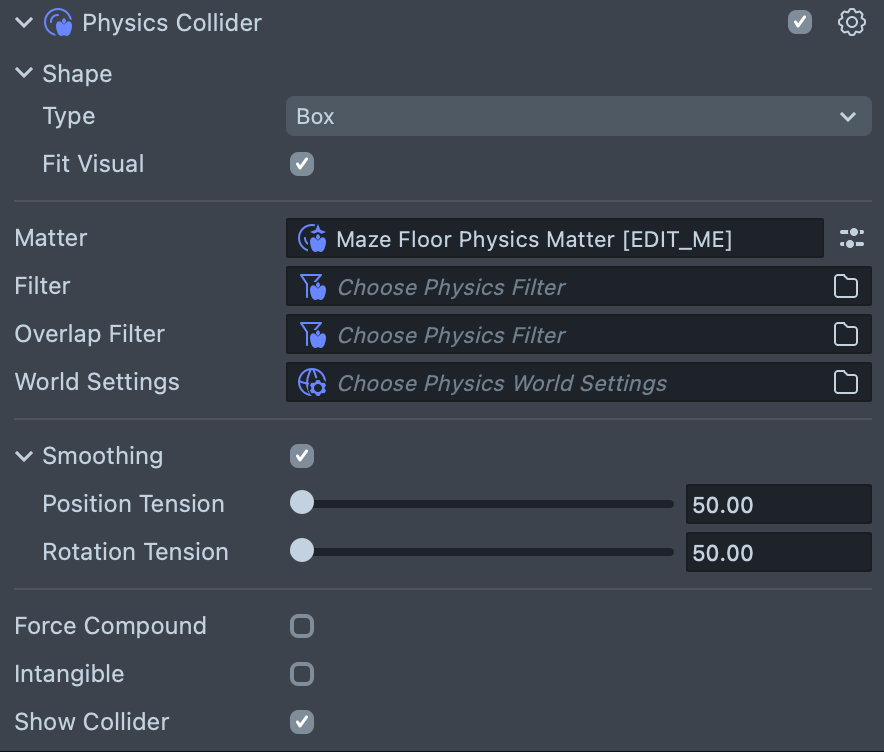
Enable the Show Collider field to see the smoothing effect.
Overlap Events with the Behavior script
The Maze example uses a Behavior script to:
- Set up overlap zones for Physics Overlap Events.
- Trigger the rotation of each floor.
- Trigger the position of the lift.
View each Behavior script to see how it's configured.

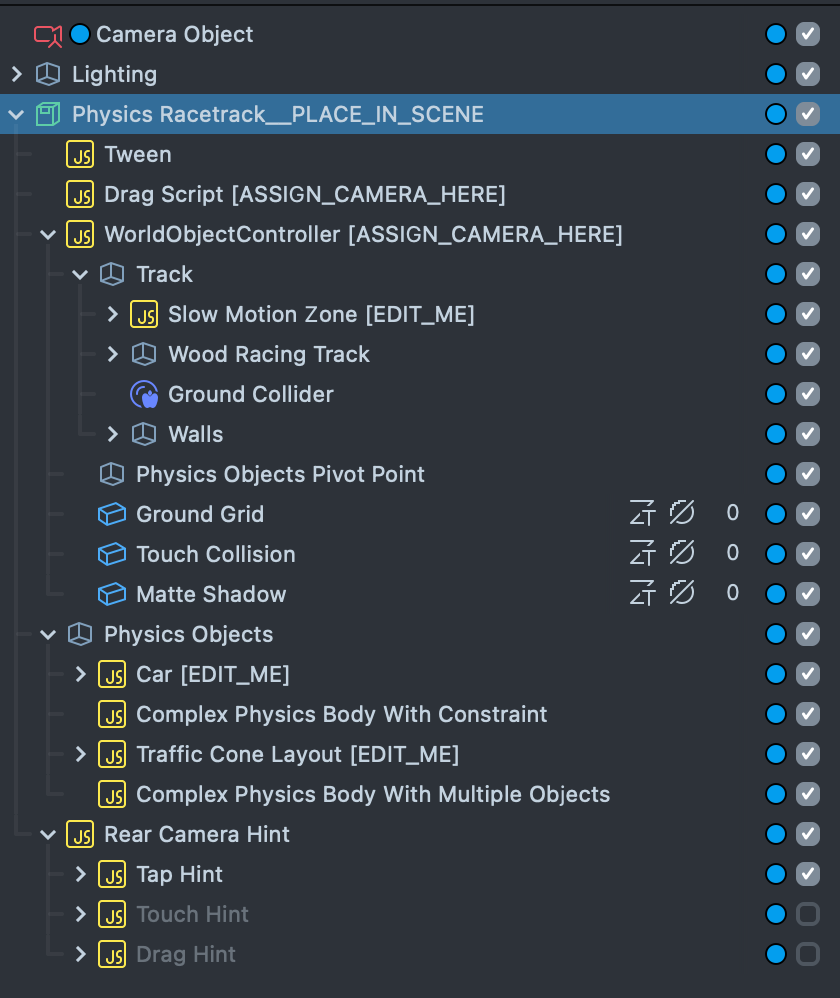
Physics Racetrack
The racetrack example applies torque to the wheels of a toy car. When friction is enabled on the wheels and race track, the car moves forward.
Disable the Maze Example before testing the Race Track Example.
The racetrack example mainly uses the device’s rear camera. To test the example:
- Click the Switch Camera button in the
Previewpanel, located at the top right corner of the panel. - Tap on the screen to enable the car.
- Keep pressing on the screen to move the car forward.

Physics World Settings and slow motion
The racetrack example has two World Settings Asset. They are used on multiple objects in the scene. The WorldSettingsAsset1 asset is used for the three Balloons and the WorldSettingsAsset2 asset is used for the Car, the Slow Motion Zone. The Drag Script also need to reference the WorldSettingsAsset2 asset.
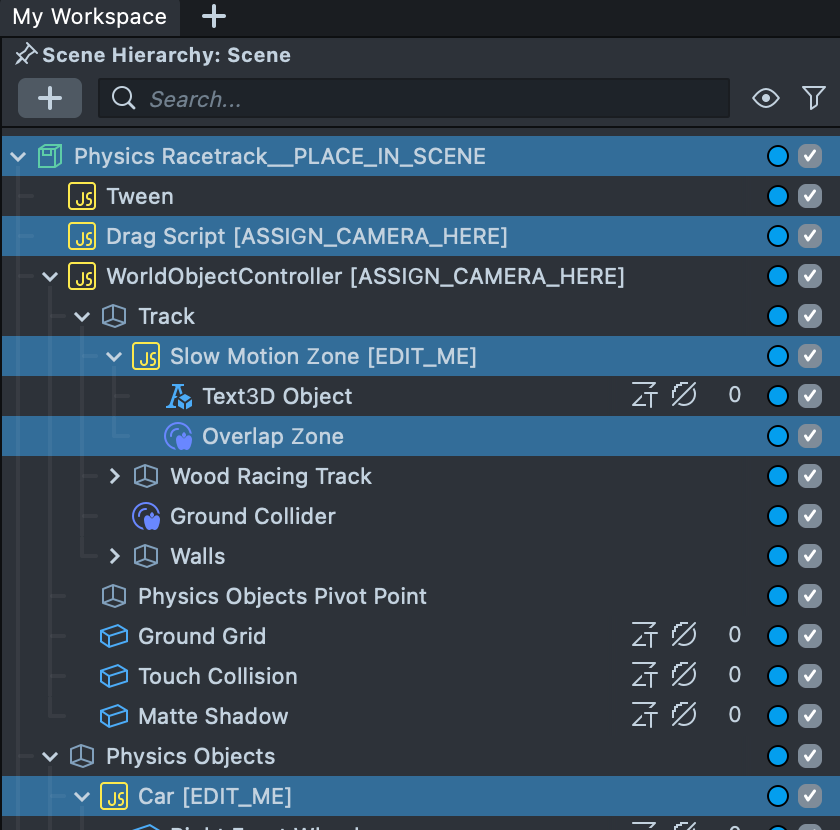
TheBehavior script on the Overlap Zone object calls the functions in SlowMotionSetting.js. Whenever the car passes through the Slow Motion Zone, the script triggers the slow motion effect. Modify the effect’s Slow Step and Slow Time attributes in the Physics Back Camera World Settings asset.

Collision Events with the Behavior script
This example also uses Behavior scripts to handle Physics Collision Events and to change the Wall alpha to show the border of the Ground Collider and Wall Colliders.
BindTransform script
This example uses the BindTransform script in two places: one on Physics Objects > Complex Physics Body With Constraint and another on Physics Objects > Complex Physics Body With Multiple Objects.
They both bind the respective objects to the Physics Objects Pivot Point object, which is a child of the WorldObjectController object.
Car
Navigate to Physics Objects > Car > Car. You can find a Physics Body component on the Car object. The Car object is composed of multiple meshes, many with a Physics Body component. You can also find a Physics Constraint component, often attached to Scene Objects named Constraint. These Constraint components are linked to the Physics Body with their Target field and thus affect the Physics Body.

Per-object World Settings
View the Balloons object under Physics Objects > Car.
Click on Balloon 1 under Balloons. Notice that in the World Settings field, we have the WorldSettingsAsset1 assigned here.
Right-click on the field and click Highlight, then click on the highlighted asset. In the Inspector panel, you can see the World Settings asset has a different gravity setting, which creates a floating effect.

If you increase the gravity setting, the mass of the balloon's physics body components, and the balloon count in ObjectsLayout.js, you can cause the upward force from the balloons to be greater than the downward force from the car.
Cone and Cylinder Colliders
Navigate to Physics Objects > Traffic Cone Layout > Traffic Cone. You can see that the physics bodies of the traffic cone are composed of two bodies: one with the Type field set to Cylinder on the TrafficCone parent Scene Object, and another on the Cone Body child Scene Object with the Type field set to Cone.

To learn more about the Physics Body Component, visit Physics Assets and Components.
Apply Force
Click on Physics Objects > Car, where you can find the WheelController script attached to the Car object. Find the script in the Asset Browser panel and double-click to open it in a script editor.
Notice the addRelativeTorque. The addRelativeTorque method applies torque to each of the four wheels when you tap the screen without dragging an object.
Set the friction between the racetrack and the wheels in the Wheel Physics Matter, Wood Floor Physics Matter, and Wood Ramp Physics Matter assets found in the Asset Browser panel. The combination of gravity, torque, and friction moves the car forward.
Preview Your Lens
To preview your Lens in Snapchat, follow the Pairing to Snapchat guide.