Pin To Mesh
The Pin To Mesh Component allows constraint transforms to be set on a targeted mesh. This allows you to attach one object to another object's mesh surface. Pin to Mesh constraints set in Maya and 3ds Max are also supported. When using mesh constraints in an external 3D software, the Pin To Mesh component will be automatically added during the FBX import.
Adding a Pin To Mesh Component
You can add a Pin To Mesh Component to any SceneObject. Select an object in the Scene Hierarchy panel, then in the Inspector Panel go to Add Component`` -> 3D -> Pin To Mesh.
Configuring the Pin To Mesh Component
With your Pin To Mesh object selected, you'll see a number of settings for the Pin to Mesh component in your Inspector panel.
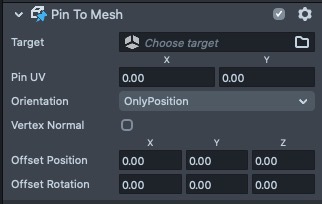
- Target: The target mesh for this Scene Object to be constrained upon
- Pin UV: The UV coordinates on the chosen target mesh to pin this Scene Object to.
- Orientation
- Only Position: Pins only the position. Rotation is independent from the target mesh
- Position And Direction: Pins both the position and direction. The normal of the target mesh is the Y axis. The U texture coordinate of the target mesh's UV is the X axis
- Vertex Normal: When Position and Direction is chosen in the Orientation setting, if Vertex Normal is enabled, vertex normal of the target mesh will be used as the Y axis for the rotation pinning. Otherwise, face normal will be used
- Offset Position: Sets the X,Y,Z position offset values from the targeted mesh
- Offset Rotation: Sets the X,Y,Z rotation offset values from the targeted mesh. Only works when Position And Direction is enabled in the Orientation setting
The Pin UV field is automatically generated from the object's transform in relation to the target object. When you move a Pin To Mesh object in the Scene panel, the component's Pin UV field will be automatically updated based on its position relative to the target object
Related Guides
Please refer to the guides below for additional information: