3D Body Tracking
The 3D Body Stick Figure, 3D Body Dancing Mark, 3D Body Two Spacesuits and 3D Body Abstract Gear Assets allow you to track the position and rotation of joints on the body in 3D. You can track one or more bodies at the same time, as well as partial bodies.
You can track your or your friends' Bitmoji to the body. Take a look at the Bitmoji 3D guide to learn more!
Assets Walkthrough
This guide covers four different examples of how you can use 3D Body Tracking.
The 3D Body Stick Figure, 3D Body Dancing Mark, and 3D Body Two Spacesuits assets have a 3D model rigged to a skeleton that matches what the tracker sees. This allows the Lens to map the movement of the body to the movement of the model. In the last asset, the 3D Body Abstract Gear, we have individual objects attached to individual joints of the body.
This guide will go through each of these assets, as well as how they are made.
Importing and Setting Up the Assets in Your Project
Find the asset in the Asset Library and import it into your project. Click here to learn more about how to use assets in the Asset Library.
Once you import the asset from Asset Library, you can find the package in the Asset Browser.
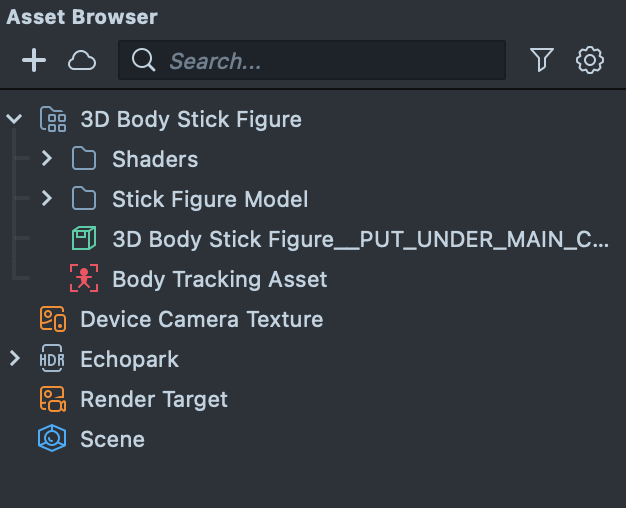
Follow the instructions and drag the prefab 3D Body Stick Figur into Scene Hierarchy to create a new scene object.
You can right-click and select Unpack for Editing from the drop-down menu to unpack all assets stored in the bundle. Click here to learn more about Asset Packages. Once you unpack the package, you can then edit its content.
Stick Figure
Let's take a look at how our rigged model is set up. The 3D Body Stick Figure asset shows the most straightforward use case.
To see how it works, unfold the 3D Body Stick Figure scene object in the Scene Hierarchy panel by pressing the triangle next to it, and select the 3D Body Tracking scene object.
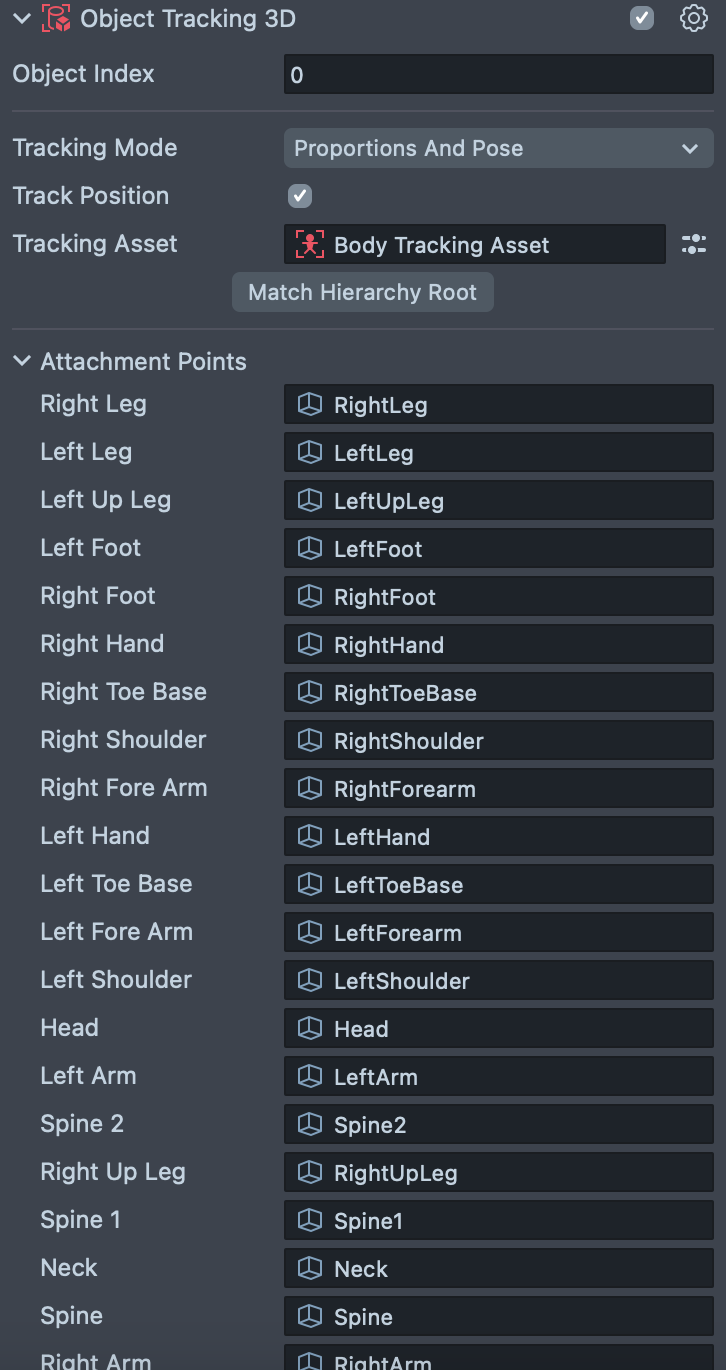
In the Inspector Panel, you'll see that this object has an Object Tracking 3D component which has a mapping of the model's joint to the trackers.
The component requires that the character you use have a certain skeleton structure so that it knows how to correctly drive the model.
You can drive separate pieces by attaching them to the corresponding slots of the component, and it will work just fine too! We'll cover this in more detail a bit later.
The character you want to manipulate as a whole should have the following hierarchy and naming convention:
![]()
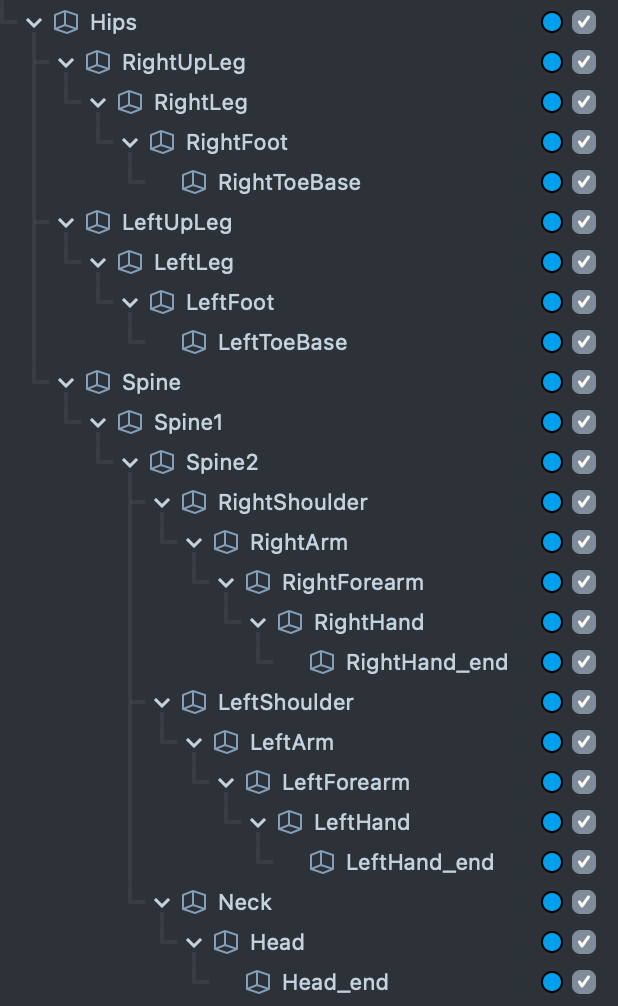
Having proper hierarchy and naming allows you to use the automatic way to assign each of the joints to its corresponding slot in the tracking component.
The tail joints with _end suffix at their name are auxiliary and are not used by the component.
An important step of the workflow with body tracking is that the character should be in T-pose. Like in the image above. The object tracking component takes into account the initial rotations of the character’s joints and adds the person’s movements into those initial values. So, for the best results, even if your character initially is not in perfect T-pose, you can rotate its joints a little bit to make it match T-pose.
Finally, for the best results, the character itself should face the camera. In other words, it should have zero rotations in its parent transform.
Hand Tracking
Optionally, the 3D Body tracker can also track joints in the user's hand. A standard rigging hierarchy is added to support movement in the hands:
- LeftHandThumb1
- LeftHandThumb2
- LeftHandThumb3
- LeftHandThumb2
- LeftHandIndex1
- LeftHandIndex2
- LeftHandIndex3
- LeftHandIndex2
- LeftHandMiddle1
- LeftHandMiddle2
- LeftHandMiddle3
- LeftHandMiddle2
- LeftHandRing1
- LeftHandRing2
- LeftHandRing3
- LeftHandRing2
- LeftHandPinky1
- LeftHandPinky2
- LeftHandPinky3
- LeftHandPinky2
You can enable this option by selecting the Body Tracking Asset in the Asset Browser panel, then ticking the Track Hand checkbox in the Inspector Panel.
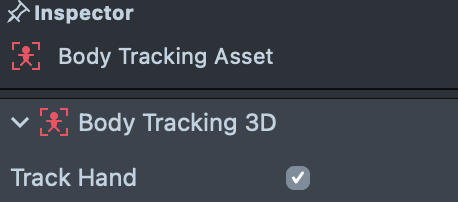
You can take a look at the 3D Body Two Spacesuits asset to see Hand Tracking in action.
While similar, the 3D Hand Tracking provided by the body tracker is different than the dedicated 3D Hand Tracking. If you are more focused on precise hand tracking, using the dedicated 3D Hand Tracking would be a better option. Learn more in the ObjectTracking3D Guide
Adding a Character
Once you are sure your character satisfies the requirements, it is time to bring it into Lens Studio.
First remove the Stick Figure [REPLACE_ME] Scene Object. Then, drag your 3D model from your computer to the 3D Body Tracking scene object to make it its child.
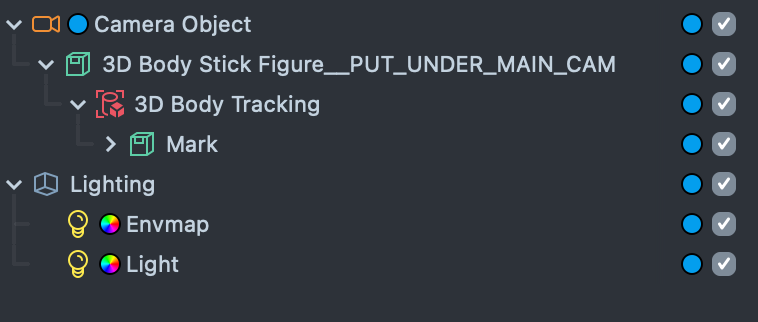
If you don't see your 3D model in the Scene Hierarchy panel, you might have brought them into your Asset Browser panel. Find the prefab that was made from your 3D Model, and drag it into the Scene Hierarchy panel to instantiate it.
To be able to use automatic mapping of the character’s joints to the corresponding slots of the Object Tracking 3D component you must place your character under the root of the body tracking scene object.
With your model placed under the 3D Body Tracking scene object, you can select the object and link the joints of our character to the joints of the body. To do this, in the Inspector Panel, press the Match Hierarchy button.
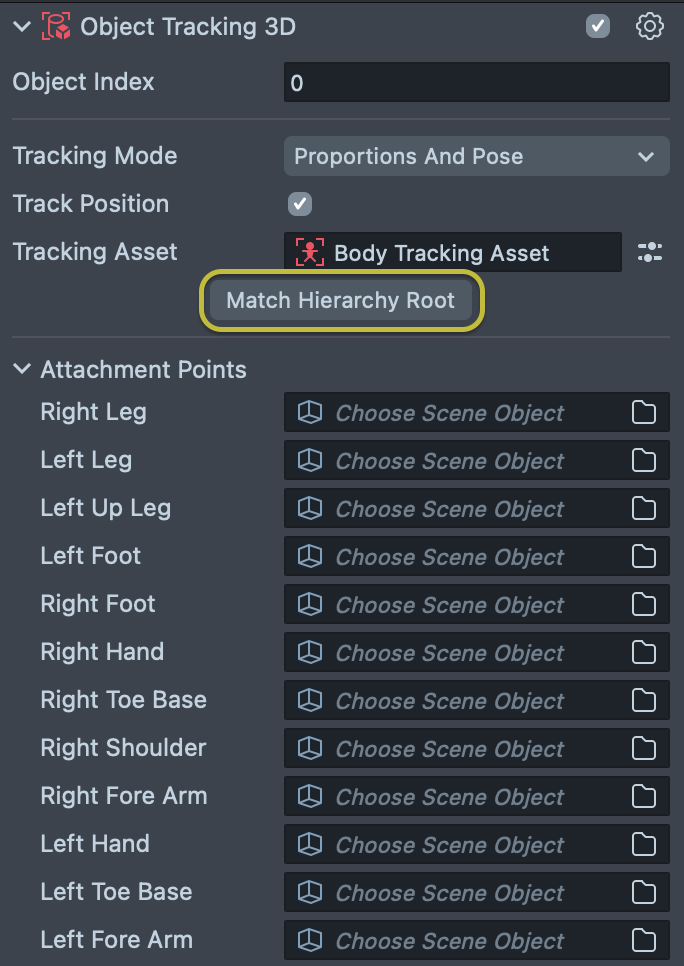
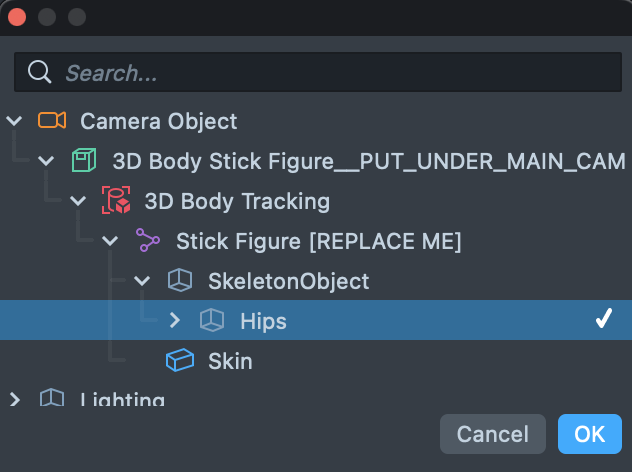
Then select the Hips scene object of your character. This will assign joints of the character into the inputs of the component.
And with that you should be able to see your character is copying movements of the person on the preview video!
If you don’t see any changes in the preview or some misplacements of the character try refreshing the Lens by hitting the Reset button in the top right corner of the Preview Panel.
Make sure that your character does not have any animation by removing or disabling any Animation Mixer components on it. Affecting the joints of the character by scripts or constraints can lead to unexpected results as well.
Dancing Mark
Next, let's take a look at the 3D Body Dancing Mark asset. In this asset, you'll notice that we have our character detached from the Snapchatter. There are two settings in the Object Tracking 3D Component, found in the 3D Body Tracking 0 scene object, to consider when doing this: Track Position, and Tracking Mode.
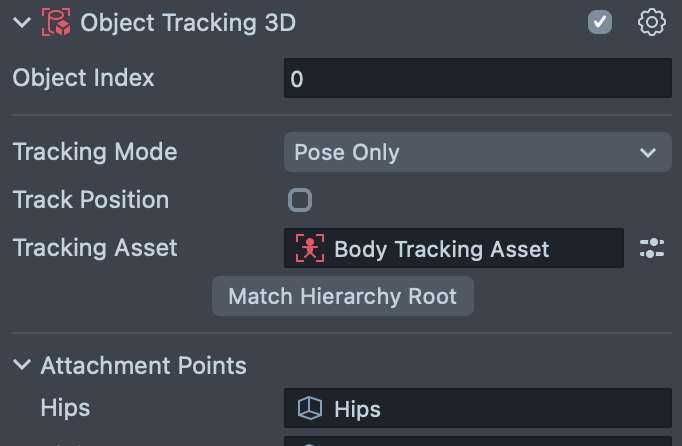
In this example, Dancing Mark is freely movable and not attached to the user, so we disable the Track Position option.
Secondly, the Tracking Mode is set to Pose only. This is because we don't want the shape of Mark's character to be modified by the Snapchatter.
Here we use a Manipulate Component to allow the user to move Mark around. Notice that under the Mark [REPLACE ME] scene object, there is a Touch Collision scene object with a box that determines where the user can touch the screen to move Mark. Don't forget to resize this box when replacing Mark with your own character.
Two Spacesuits
You can also use 3D Body Tracking to apply 3D models as a suit on a person rather than as a separate character. Let's take a look at the 3D Body Two Spacesuits asset to see an example of this.
Here, unlike before, we enable the Track Position checkbox, so that our 3D model moves with the Snapchatter's body.
Sometimes your 3D model may appear slightly oversized or undersized compared to the person in the camera. For example, the shoulders might be wider, or the character itself could be taller. To solve this, we can use the Proportions And Pose Tracking Mode.
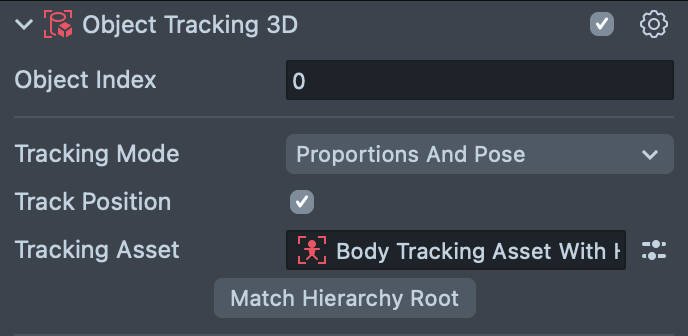
In the Preview panel, you can see how the 3D model's proportion is modified based on the two Snapchatters in the camera.
This option works best with human sized characters. That is why it will not change the proportions a lot. If you go back to the Marks example and play around with the parameter you will not see much difference in the proportions of Mark's body.
The best way to understand this option is to treat it as fine tuning for the proportions of human sized characters.
To ensure that your character is placed properly over the person on the video, you should parent the 3D Body Tracking scene object is under the Camera hierarchy and set its scale to 1
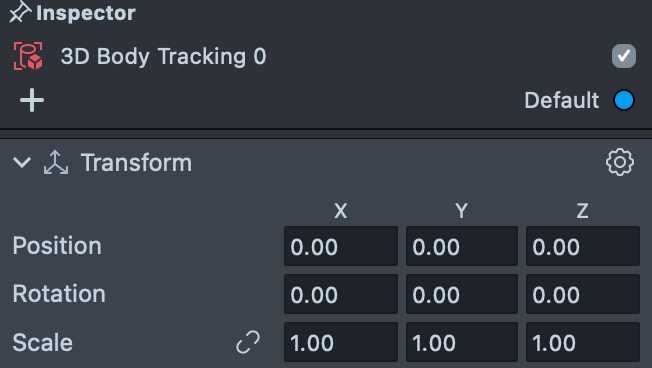
Note that any child scene object of the root scene object of your character will also affect placement and scale of the skeleton even if Proportions And Pose mode is active. In other words, in Proportions And Pose, only the scene object with the Object Tracking component on it (3D Body Tracking scene object in our case) does not affect placement of the character. Any other transforms, except for Hips, upper and lower in the hierarchy that affect placement of the skeleton will keep affecting it.
For example, Spacesuit With Finger Joints [REPLACE_ME] and Skeleton objects affect placement and scale of the Spacesuit even though it is set to track position and proportions. It is advisable to check that the scale of these auxiliary scene objects is set to 1 and positions to 0.
To have your character stretched properly you need to assign ALL the joints to the Object Tracking 3D component.
Multiperson Support
Of course one of the coolest features of this technique is that you can track more than one person at a time!
To see this all in action, make sure that you still have the Two People Dancing 1 preview in the Preview panel, select the body tracking scene objects and see that one of the components has the Object Index property set to 0, another to 1. 0 being the first person detected, and 1 being the second person detected, and so forth.
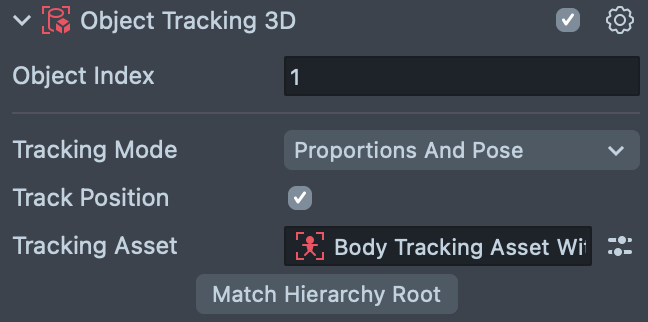
Although we are working only with two people on the previews, the body tracking feature is not limited to two people.
This is similar to the Index options that can be found in Head Attachment!
Hiding Geometry
Sometimes, when the people in the camera overlap, it is impossible to know the position of the invisible parts of the body. In this case, the Object Tracking 3D component will disable (hide) the joints that are not being tracked automatically!
If the pieces of the mesh of your character are parented to its joints you don’t need to do anything. If the component cannot track a joint it will hide it, and as the mesh is part of its hierarchy, it will become invisible as well.
However, if you have the mesh in its separate group and not referenced by the Object Tracking 3D Component, you will need a simple script that will disable the pieces of the mesh if the corresponding joint is disabled. You can see an example of that script attached to the 3D Body Tracking scene objects in the Spacesuit scene object hierarchy.
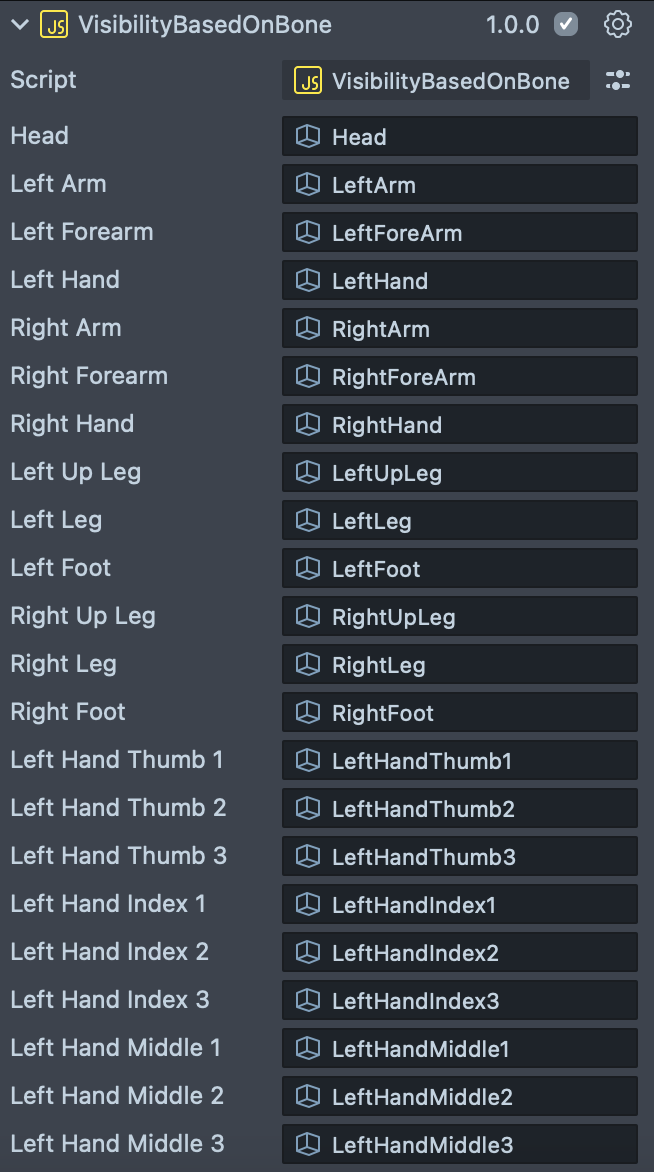
In the Space Suits example, we use Head Attachments to attach a visor to the face. Although the 3D Body Tracking system callows you to attach things to the head, you will get more accurate tracking with the dedicated Head Attachment component.
Attaching Separate Pieces
Alternatively, it is also possible to attach individual objects, rather than a skeleton rig to the body. You can simply attach separate objects for the user’s joints and that will work just fine.
You can import the 3D Body Abstract Gear asset into your project to see how it’s done.
Unfold it and select 3D Body Tracking 0 scene object. In the Inspector Panel, you will see that only three objects are connected to the related joints field in this case.
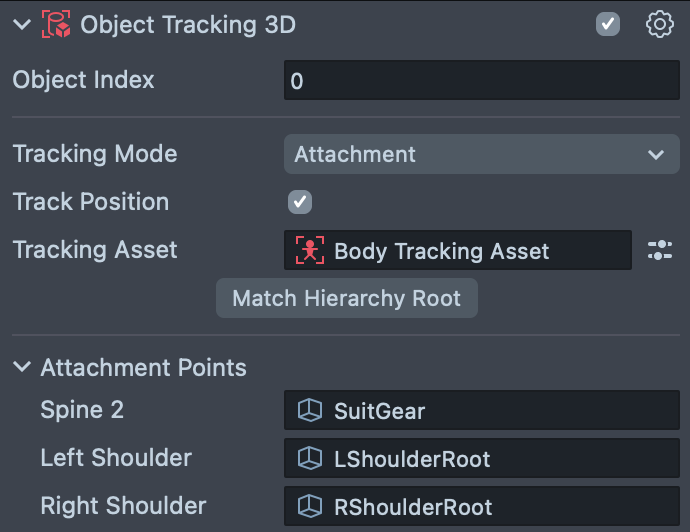
This is a great way to attach objects to parts of your body (like a tie, or shoulder pads), as the attachment works even when the user is close up.
Previewing Your Lens
You're now ready to preview your world Lens experience. To preview your Lens in Snapchat, follow the Pairing to Snapchat guide.