Screen Space Normals Generation
The Screen Space Normals asset generates normals from the depth buffer of a Camera component. This is useful in contexts where normals may be difficult to generate, for example vertex animation, or when sampling other object's normals in the scene, for example with particle collisions. This guide will walk you through how to use Screen Space Normals to get the best results.
Add this asset to your project through the Asset Library.
How It Works
To generate normals based on the camera view, we need access to the depth stencil buffer. In Lens Studio 4.19, we added the Depth Texture Render Target resource for easy access.
The depth buffer from a Camera is generated as part of the rasterization process during rendering. Since we need to perform additional passes on the depth buffer to produce normals, just grabbing the depth buffer as-is results in a delay between the final image and the screen space normals.
To get around this, the Screen Space Normals asset will duplicate all objects flagged for normals generation and create a new depth buffer before the final image is created. In doing so, we skip the fragment shader for these duplicated objects which makes the process more efficient.
Once we have this depth buffer, we can then sample it in a second pass. Combined with the camera transform and the UV coordinates of the depth sample, we can reconstruct world space coordinates and world space normals that can be used in a PBR material.
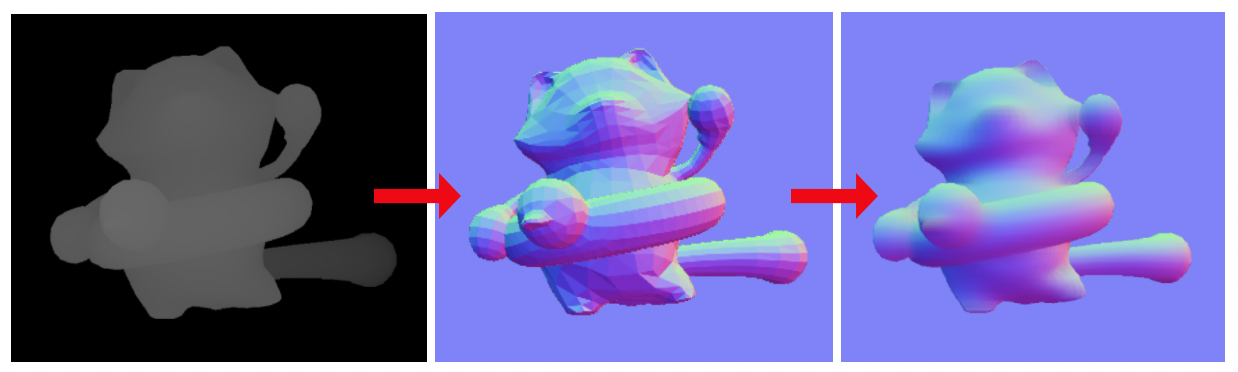
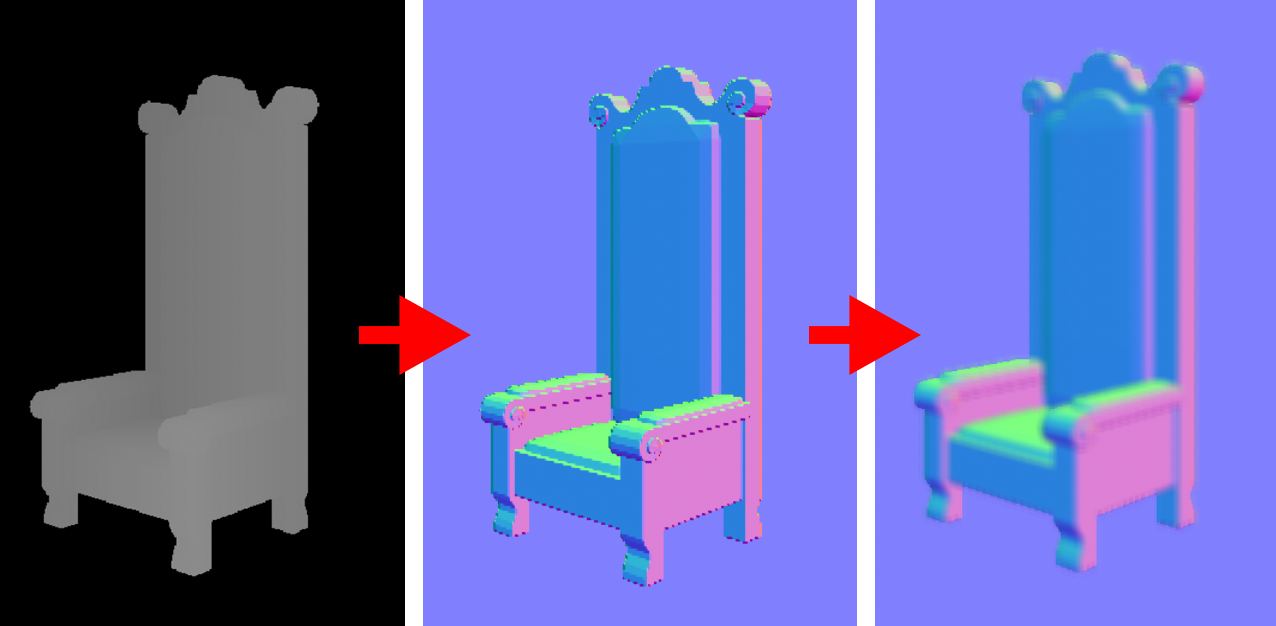
The technique for generating normals is based on partial derivatives, which inherently produce faceted normals. For some cases this is sufficient, such as with particle collisions, but for a more pleasing final image when used in a PBR material we have provided a fast blur shader that preserves separation between objects.
Parameters
Objects For Normals Generation
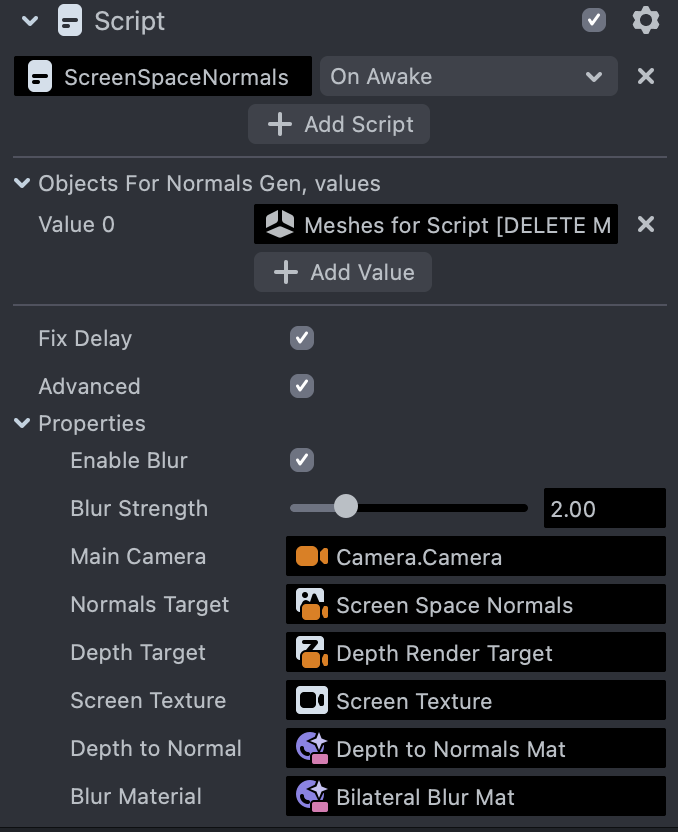
Scene objects added to this input will be included in the Screen Space Normals setup.
The script will do a deep copy of every Scene Object added to this input, meaning all children of a given Scene Object will be copied and flagged for normals generation. This is a feature to ensure transform hierarchies are maintained while making it easy to add many objects to the script. The copies will only process their vertex shader to produce depth data.
Enable Blur & Blur Strength

When enabled, adds a blur pass to the Normals Target. Blur Strength controls the size of the blur.
Fix Delay
As we mentioned above, there will be a notable delay between the final image and the screen space normals, especially when working with animated objects, so here is when Fix Delay comes into play to fix that issue. If you are working with static objects, or when accuracy is not a concern (checkout the Depth Render Target Template Guide), disabling this option can optimize your project.
When Fix Delay it’s enabled, the script will do a deep copy of every Scene Object added to Objects For Normals Generation input, meaning all children of a given Scene Object will be copied and flagged for normals generation. This is a feature to ensure transform hierarchies are maintained while making it easy to add many objects to the script. The copies will only process their vertex shader to produce depth data.
Camera

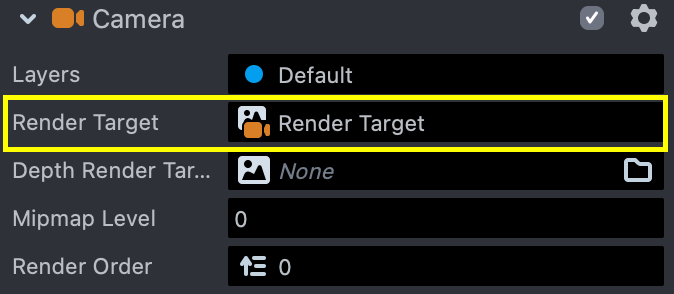
The depth stencil texture is generated from a clone of this camera. This is normally set to the main render camera of your project.
Normals Target

The render target that will contain the screen space normals. Use this with the Uber PBR Screen Space Normals material provided with the asset.
This is the final output of Screen Space Normals asset.
Depth Target

The Depth Render Target is not a regular color Render Target but a unique texture resource, when it’s assigned to a Camera, all depth information of rendered geometry from this camera will be rendered to this Depth Render Target. This input does not need to be changed.
In this Screen Space Normals asset, the Depth Render Target is assigned to a camera by the script:
script.mainCamera.depthStencilRenderTarget.targetTexture = depthStencilTexture;
Aside from this asset, the Depth Render Target can be found from the Resource panel, you can assign it to a Camera either by script or from the Inspector panel.
Blur Material

Blurs the screen space normals texture. This does not need to be changed.
Visualization

If you can’t see your object in the Visualization image, it might be because it’s too far away. Tune the Depth Visualizer material parameters, for example increase the Max Distance and/or Multiply parameters.