Preview Your Lenses on Web
Overview
Lenses in development can be previewed directly in your Camera Kit integration using the Push-to-Web feature. Once implemented in your Camera Kit website, the testing and workflow for the Lens will follow that of the traditional Send to Snapchat process that Lens developers are familiar with. This feature requires Login Kit integration which is outlined below. Note that this feature should not be shipped to end-users, as it is meant for Lens development only.
Push-to-Web Extension
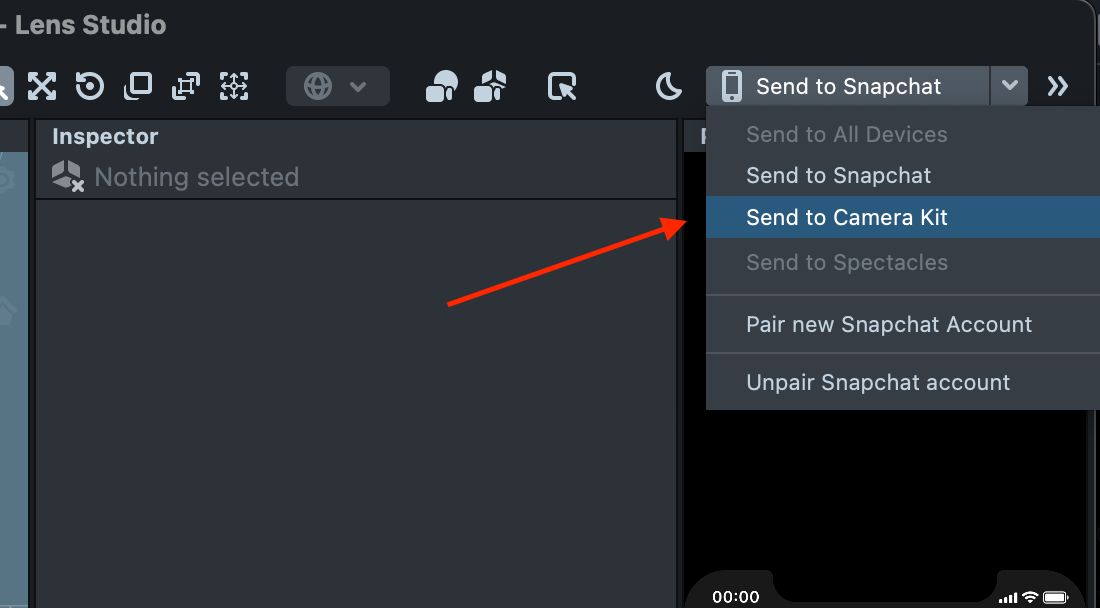
This extension for the Camera Kit Web SDK, allows users to send Lenses created in Lens Studio to their applications. Simply create a Lens in Lens Studio and then click the "Send to Camera Kit" button to see how your Lens will look in your application.
Prerequisites
Web pages should be integrated with Snap Login Kit in advance. This will allow users to sign in to your web page using their Snapchat account.
For quick integration, the Client-Side Only Web Application Integration method can be used. This method does not require any changes to the server-side code of your web page. Instead, it uses JavaScript to interact with the Snap Login Kit API.
Please find more details about Login Kit and how to use it on your web page here.
Install the extension
Use the following command to install the extension
npm install @snap/push2web
Create an instance
import { Push2Web } from '@snap/push2web';

const push2Web = new Push2Web();
Events
Lens Received
The lensReceived event can be used to track when a Lens has been received by your application. This event contains a detail object with the following properties:
id: The ID of the lens.name: The name of the lens.iconUrl: The URL of the lens icon.cameraFacingPreference: The camera facing preference for the lens.
push2Web.events.addEventListener('lensReceived', (event) => {
  const {
    id,
    name,
    iconUrl,
    cameraFacingPreference, // "CAMERA_FACING_UNSET" | "CAMERA_FACING_FRONT" | "CAMERA_FACING_BACK"
    lensCreator,
  } = event.detail;
});
Error
The error event is fired when a Lens has failed to apply; typically due to a network communication error or if Lens is not compatible. You can find more information about the error in the detail property of the event.
push2Web.events.addEventListener('error', (event) => {
  const errorDetails = event.detail;
});
Subscription Changed
The extension is listening for events from Lens Studio. The subscriptionChanged event is fired when the subscription state in the communication stream has been changed. This could occur if there is a network error or if the stream is manually ended.
push2Web.events.addEventListener('subscriptionChanged', (event) => {
  const subState = event.detail;
});
Provide the extension to @snap/camera-kit
To enable push to web functionality for the main package, extension object should be in included into to the main package bootstraping process.
import { bootstrapCameraKit } from '@snap/camera-kit';

const cameraKit = await bootstrapCameraKit(
  { apiToken: 'API toke from https://developer.snapchat.com/' },
  (container) => container.provides(push2Web.extension)
);
Subscribe to incoming events
Subscribing to incoming events requires the use of a Login Kit access token. It is also important that the same Snapchat account is used on a web page and for Lens Studio.
Restrictions
At this time, only the staging oAuth token is supported for this feature. Additionally, all Snapchat accounts with access should be listed in Demo Users section for your application on Developers Portal https://developer.snapchat.com.
const loginKitAccessToken = '<Login Kit access token>';
const subscription = push2Web.subscribe(
  loginKitAccessToken,
  cameraKitSession,
  cameraKit.lensRepository
);
Putting it all together
This is how minimal extension setup is looks like, based on the examples above:
import { Push2Web } from '@snap/push2web';
import { bootstrapCameraKit } from '@snap/camera-kit';

const push2Web = new Push2Web();

const extensions = (container) => container.provides(push2Web.extension);
const cameraKit = await bootstrapCameraKit(
  {
    apiToken: '<API token from https://developer.snapchat.com/>',
  },
  extensions
);
const cameraKitSession = await cameraKit.createSession();

push2Web.subscribe(
  '<Login Kit access token>',
  cameraKitSession,
  cameraKit.lensRepository
);
Push-to-Device Workflow
Use your Snapchat account to log in to a web page and subscribe to push to device events. Open Lens Studio and log in to My Lenses with the same Snapchat account.
Open the project with the Lens you want to push and click the "Send to Camera Kit" menu item under the "Send to Snapchat" dropdown menu.
Your lens will be applied to a web page shortly.