Code Node Examples
The three raymarching material examples are available as finalized importable assets in the Asset Library, under the names: Raymarching (SDF) Texture Mapping, Raymarching (SDF) Nodes List, and Raymarching (SDF) Onion Slicing.
This guide aims to showcase several important Code Node functions. It is organized into three sections: Basic, Intermediate, and Advanced. Each section increases in complexity, starting with how to obtain UV coordinates and concluding with modular raymarching examples.
This document assumes knowledge of creating Code Nodes and basic GLSL syntax. New to creating materials in Lens Studio? For an overview of how the Code Node works, please visit the Introduction to Code Nodes guide.
Basic
In this section, you will learn how to create materials to alter UVs, change colors over time, and sample a texture file.
Output UVs
This material contains two Code Nodes which contribute to the final output: Output UVs and Expanding Circle.
Output UVs simply gets the first UV coordinate and assigns it to the Result output wire. It uses the system.getSurfaceUVCoord0() function, and the system command accesses built-in uniforms and functions.
// <Output UVs>
output_vec2 Result;

void main()
{
	// Get the first UV coordinate and set it to the output port
	vec2 uv = system.getSurfaceUVCoord0();
	Result = uv;
}
The other Code Node, Expanding Circle, will draw a circle using a sine wave and puts the result into the alpha channel. This function takes two inputs, one for the circle size and one for the UVs which were created by the Output UVs node.
// <Expanding Circle>
input_float CircleSize;
input_vec2 UV;
output_vec4 Result;

void main()
{
	vec2 center = vec2(0.5);
	float alpha = 1.0;

	// Compare distanceToCenter with CircleSize to draw a circle
	float distanceToCenter = distance(UV, center);
	if (distanceToCenter < CircleSize) alpha = 0.0;

	Result = vec4(UV, 0.0, alpha);
}

Creating a new Code Node and switching the Example Code to one of the built-in examples makes it easy to see how to use special syntax, including a complete list of system functions.
Time Varying Colors
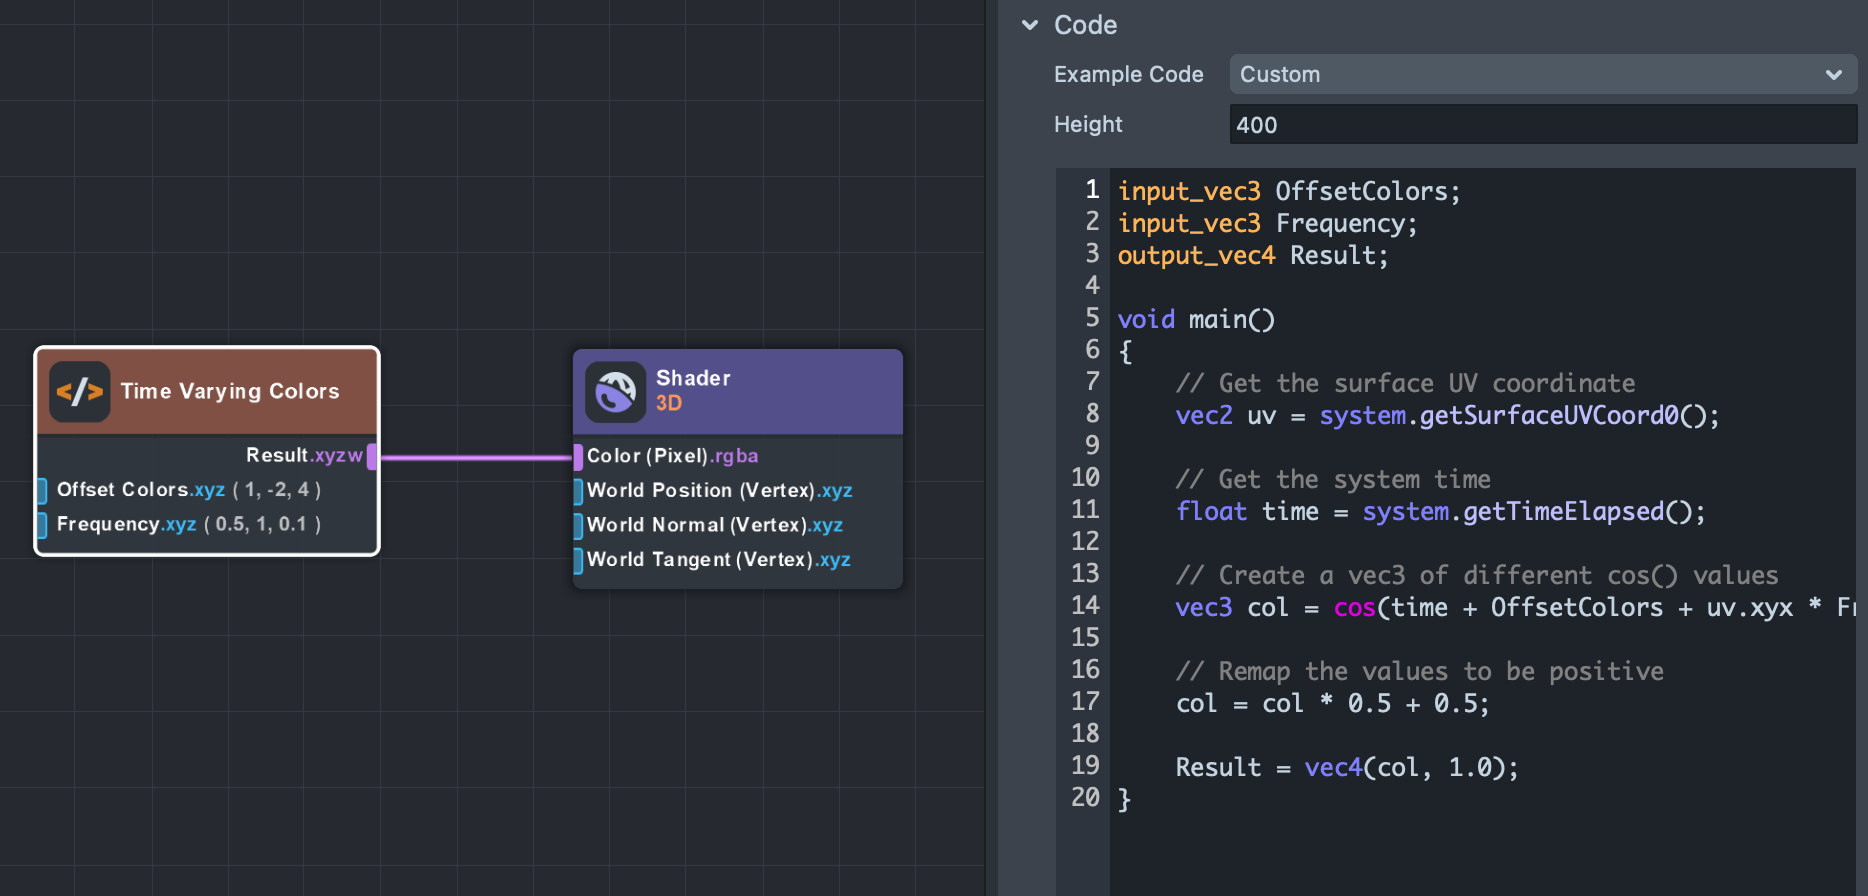
This material uses the system.getTimeElapsed() function to return the current lens time. By creatively modulating a cosine function along with different input parameters for offset and frequency, you can get a pleasing color changing effect.
Sample Texture
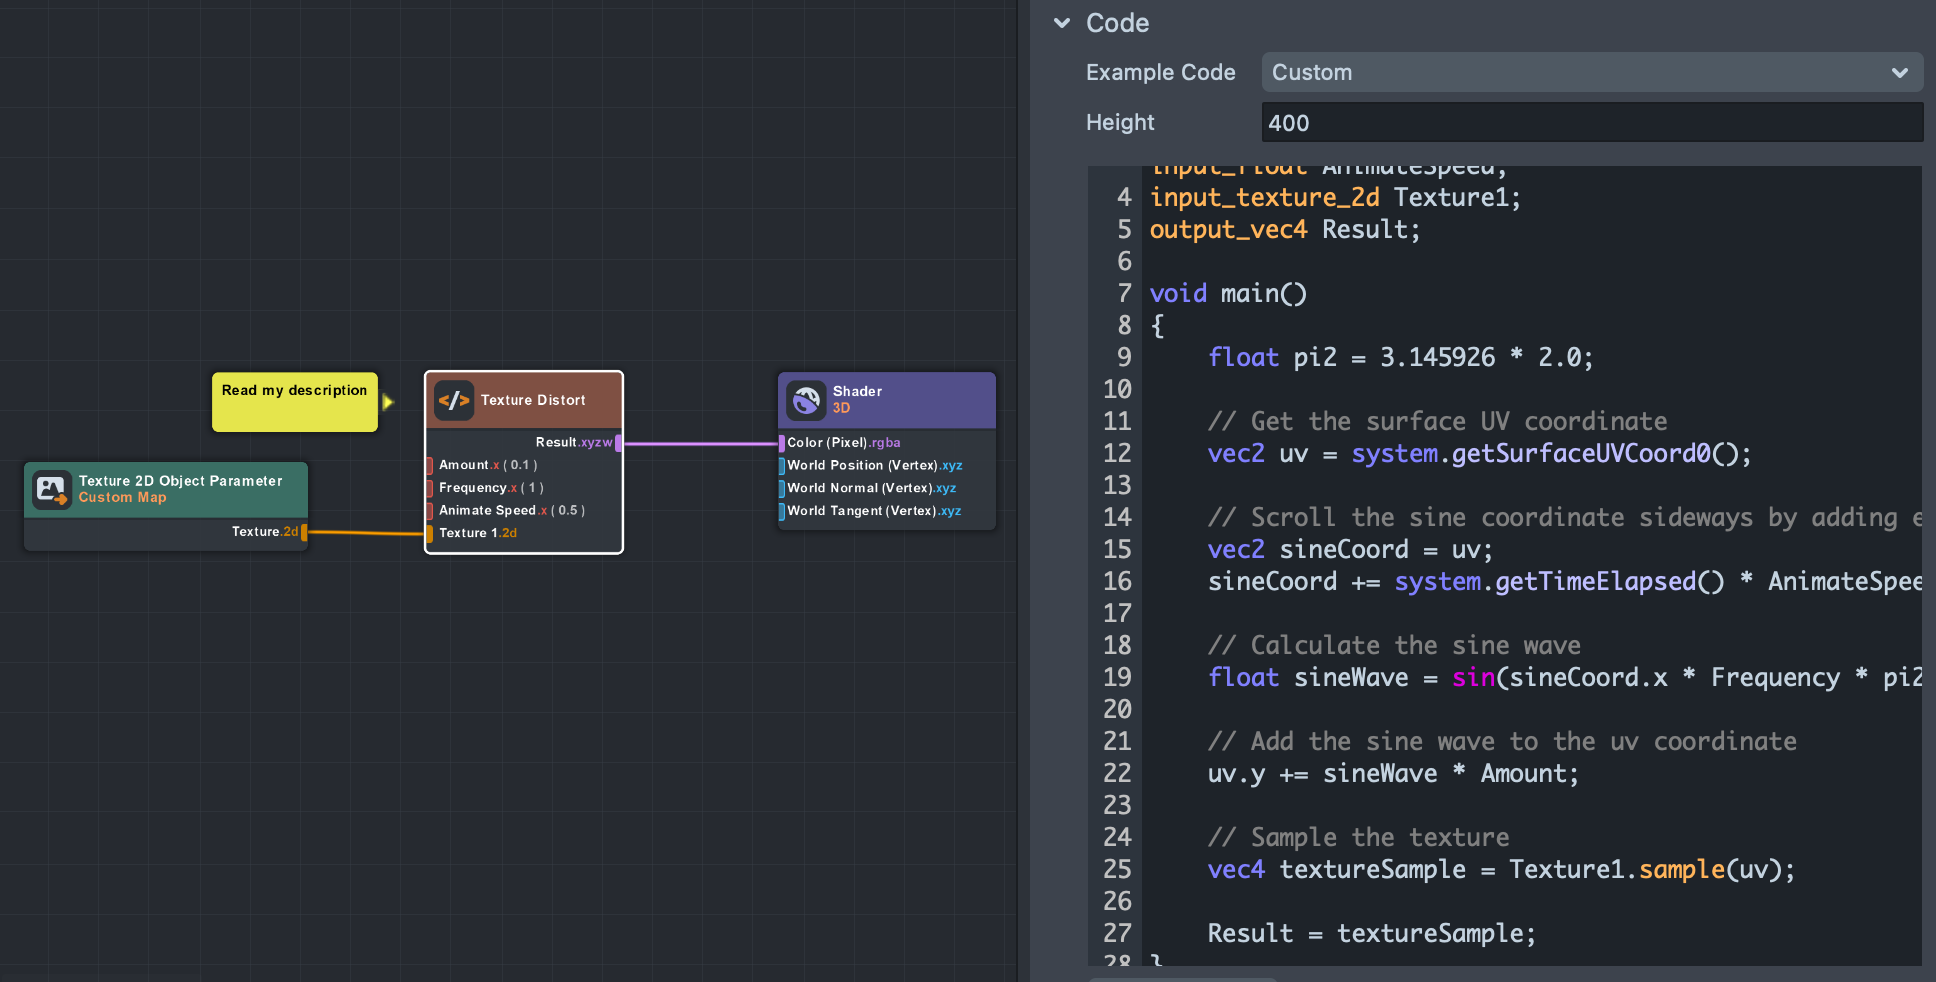
The Sample Texture material demonstrates how to sample a texture in a Code Node. The Code Node uses the special .sample() function to sample a texture at a given UV coordinate.
This example not only samples a texture, but also distorts the texture's UVs first to create a wavy texture animation.
Intermediate
In this section, you will learn how to translate subgraphs into Code Nodes, an extension of the lighting loop Code Node example and how globals work with Code Nodes.
Subgraph to Code Node
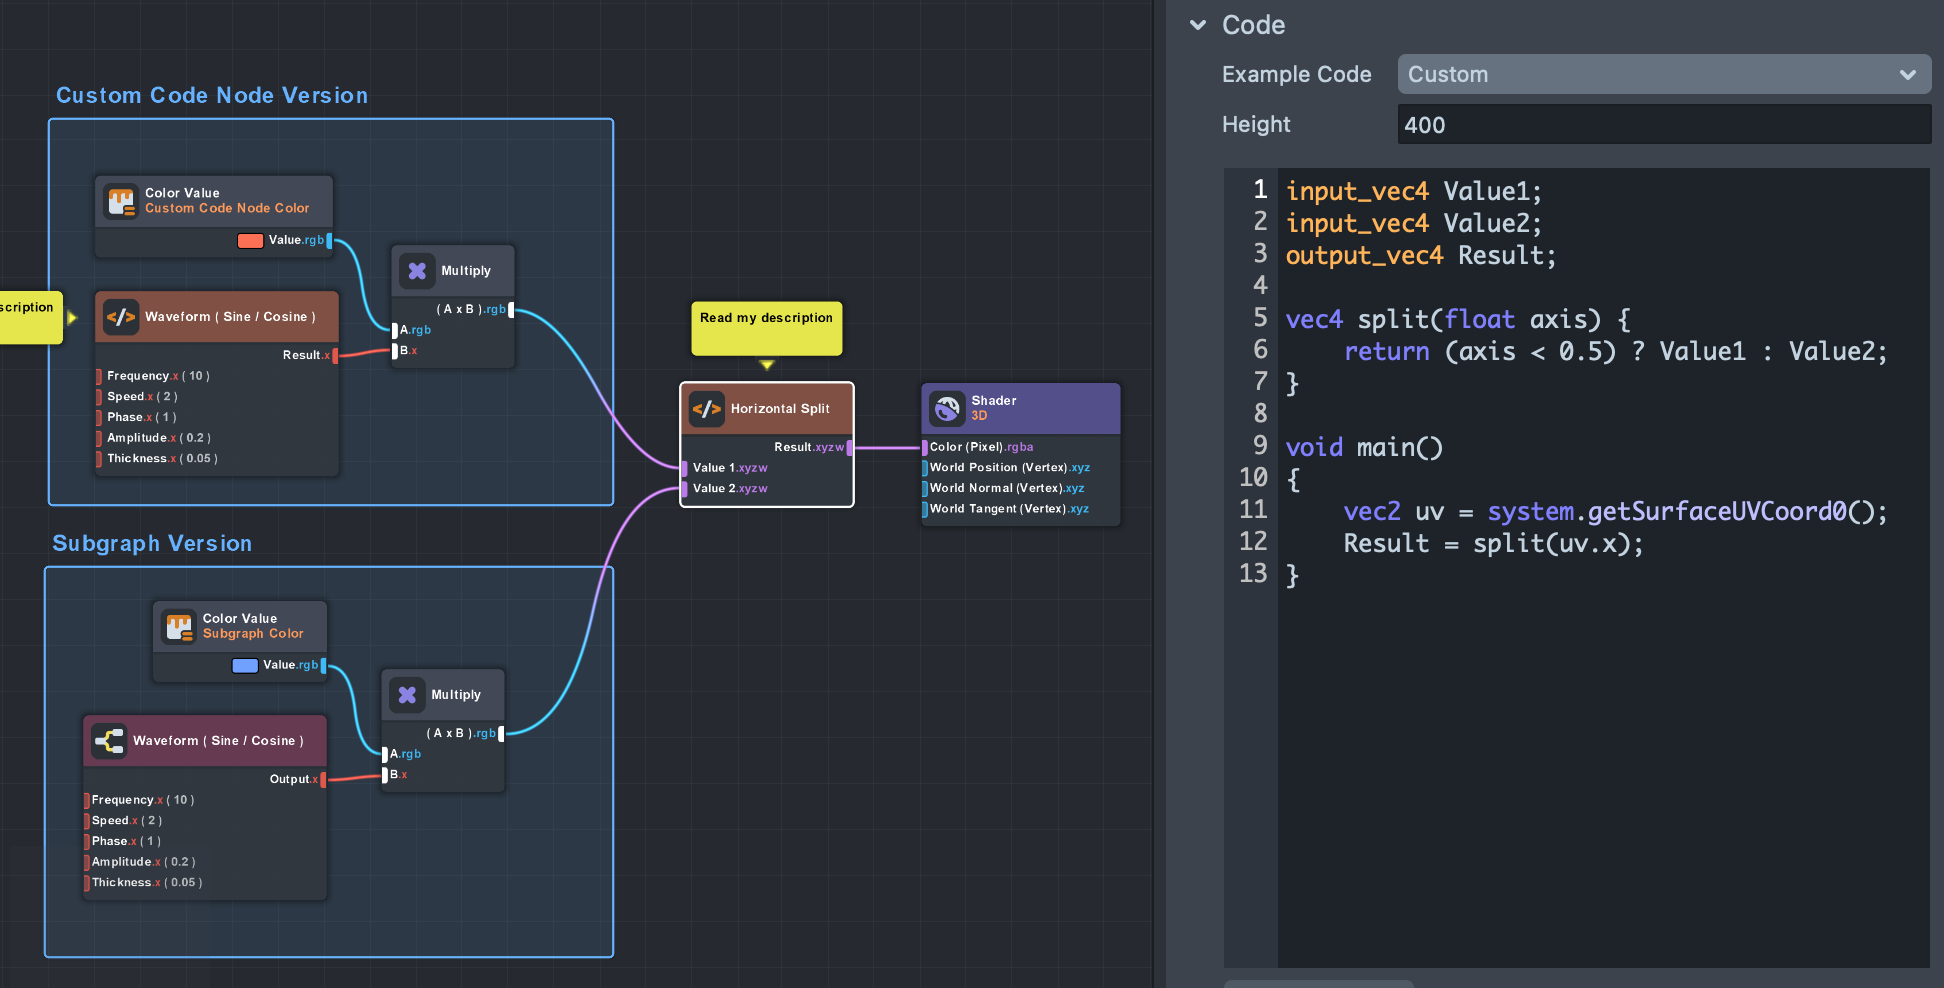
These three materials demonstrate what it looks like to transcribe a subgraph to Code Nodes. Code Nodes are similar to subgraphs in that they encapsulate portions of the graph to a single node, and have their own user-defined inputs and outputs.
Anything a subgraph can handle, the Code Node will be able to handle as well.
Each of these materials splits the output horizontally: red shapes on the left are computed by the Code Node and blue shapes on the right are computed by subgraphs.
At the end, another Code Node called Horizontal Split handles the actual separation logic.
Lighting Loop
The Lighting Loop example is simply the output of the built-in Lighting Loop from the Example Code dropdown list. This code uses several system functions to get lighting information from the scene.
This material also features a vertex shader created using nodes which spins the object, altering its positions and normals.
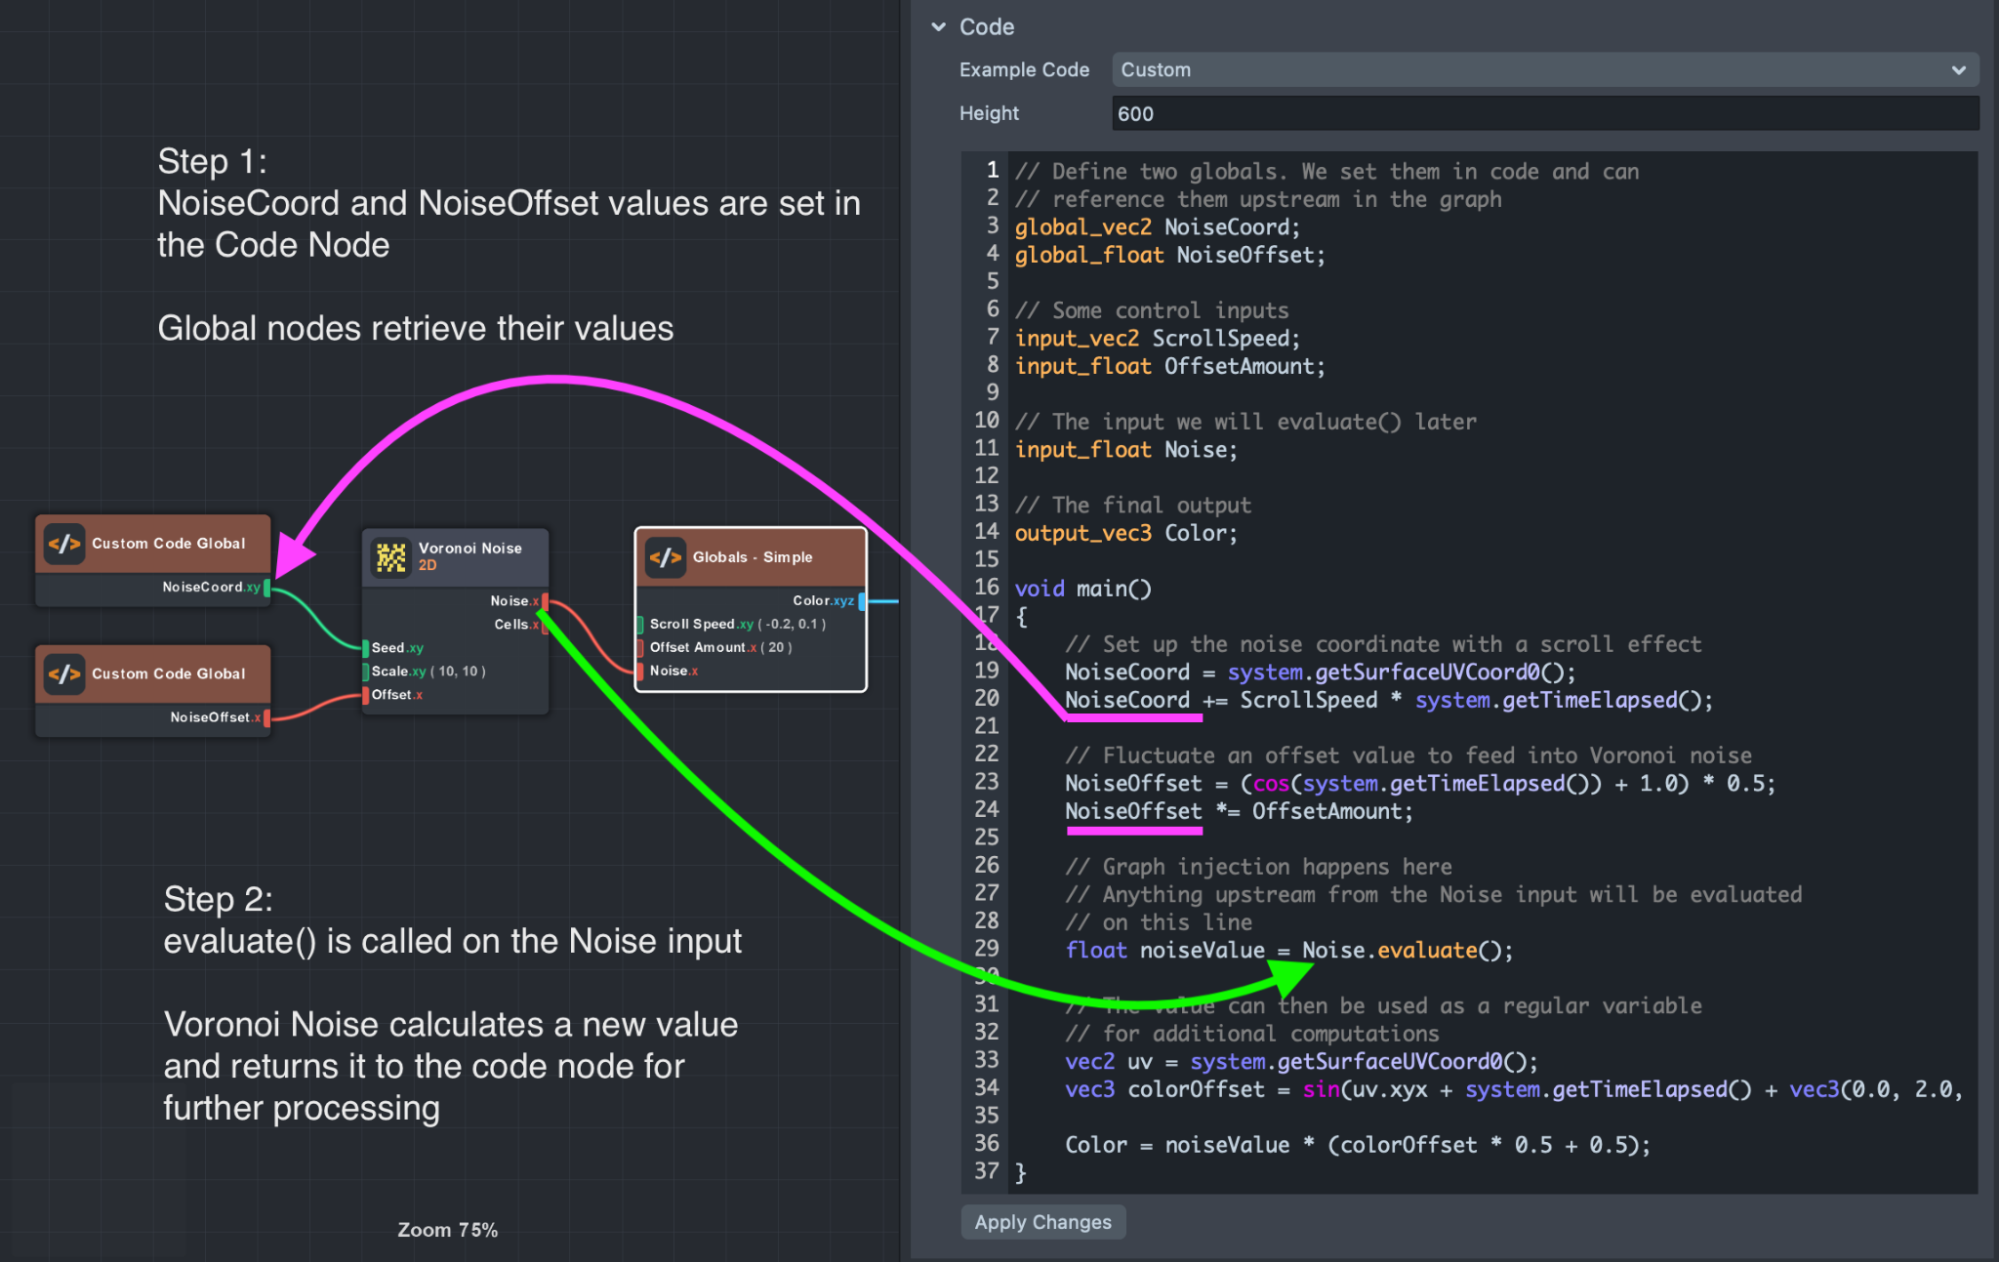
Custom Code Globals
Globals are powerful tools unique to Lens Studio. They provide a way to declare and operate on custom variables that can then be referenced in the graph system, upstream from the Code Node itself. These Global variables can be accessed in the graph by adding a Custom Code Global node. When you have the globals setup, nodes’ dropdowns will be populated with global variables defined from Code Nodes in the same subgraph level.
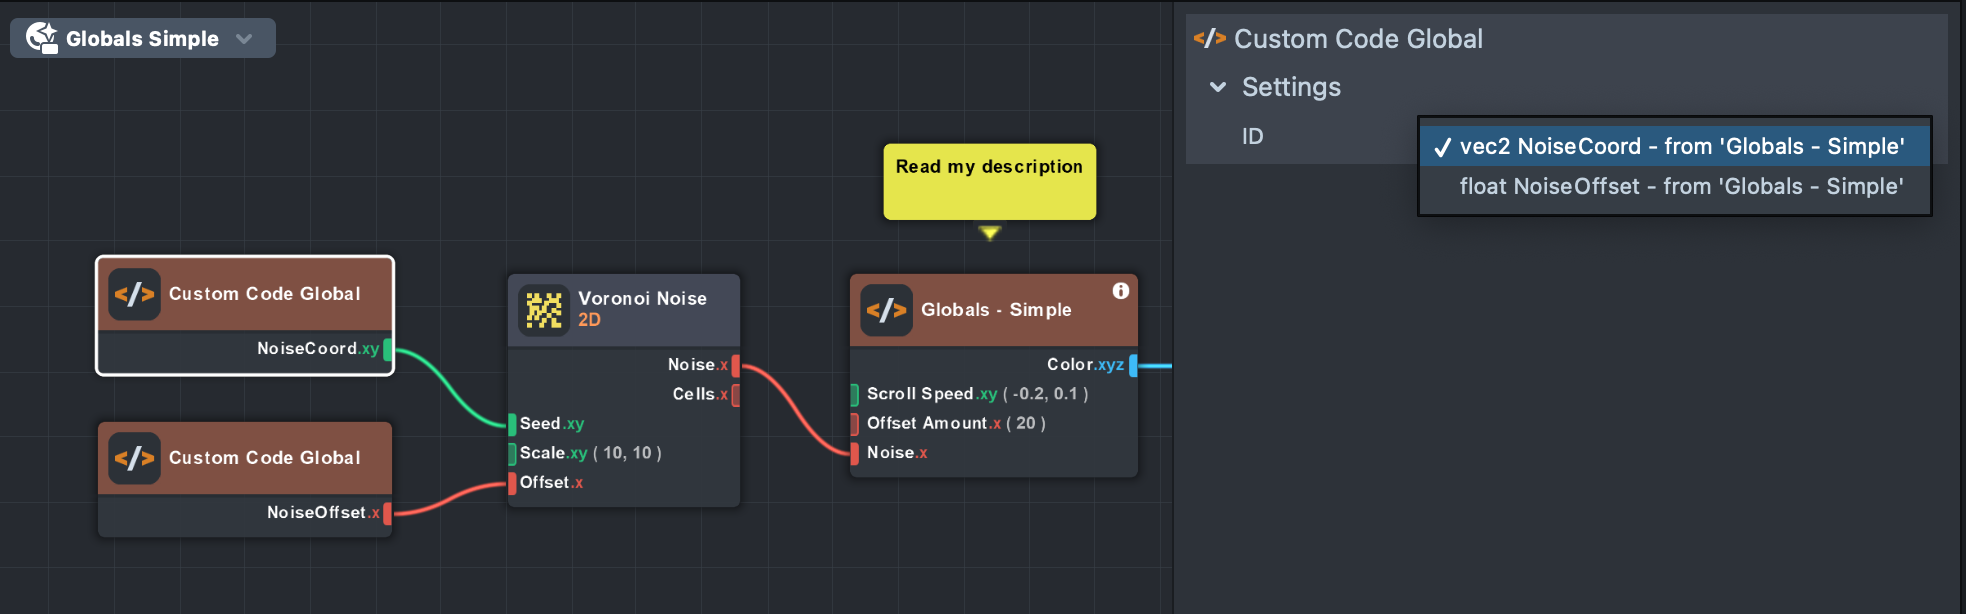
When a Custom Code Global node is a dependency of one of the inputs on your Custom Code node, evaluate() can be called on the input variable name to inject the graph logic from that input into the section of code. This makes it a powerful tool for merging graph and code logic.
Advanced
Finally, in this Advanced section, you will learn how Code Nodes work in the VFX Editor, and how they enable the use of Raymarching.
VFX
Code Nodes can also be used in VFX Editor. For VFX graphs, the free-floating Code Node is available from Material Editor, as well as special versions that can be added to each particle execution stage.
These container Code Nodes do not allow output ports to be created, but do allow setting particle attributes. All VFX Code Nodes also have additional getters for particle attributes and system settings, as well as special functions for generating unique per-particle random numbers.
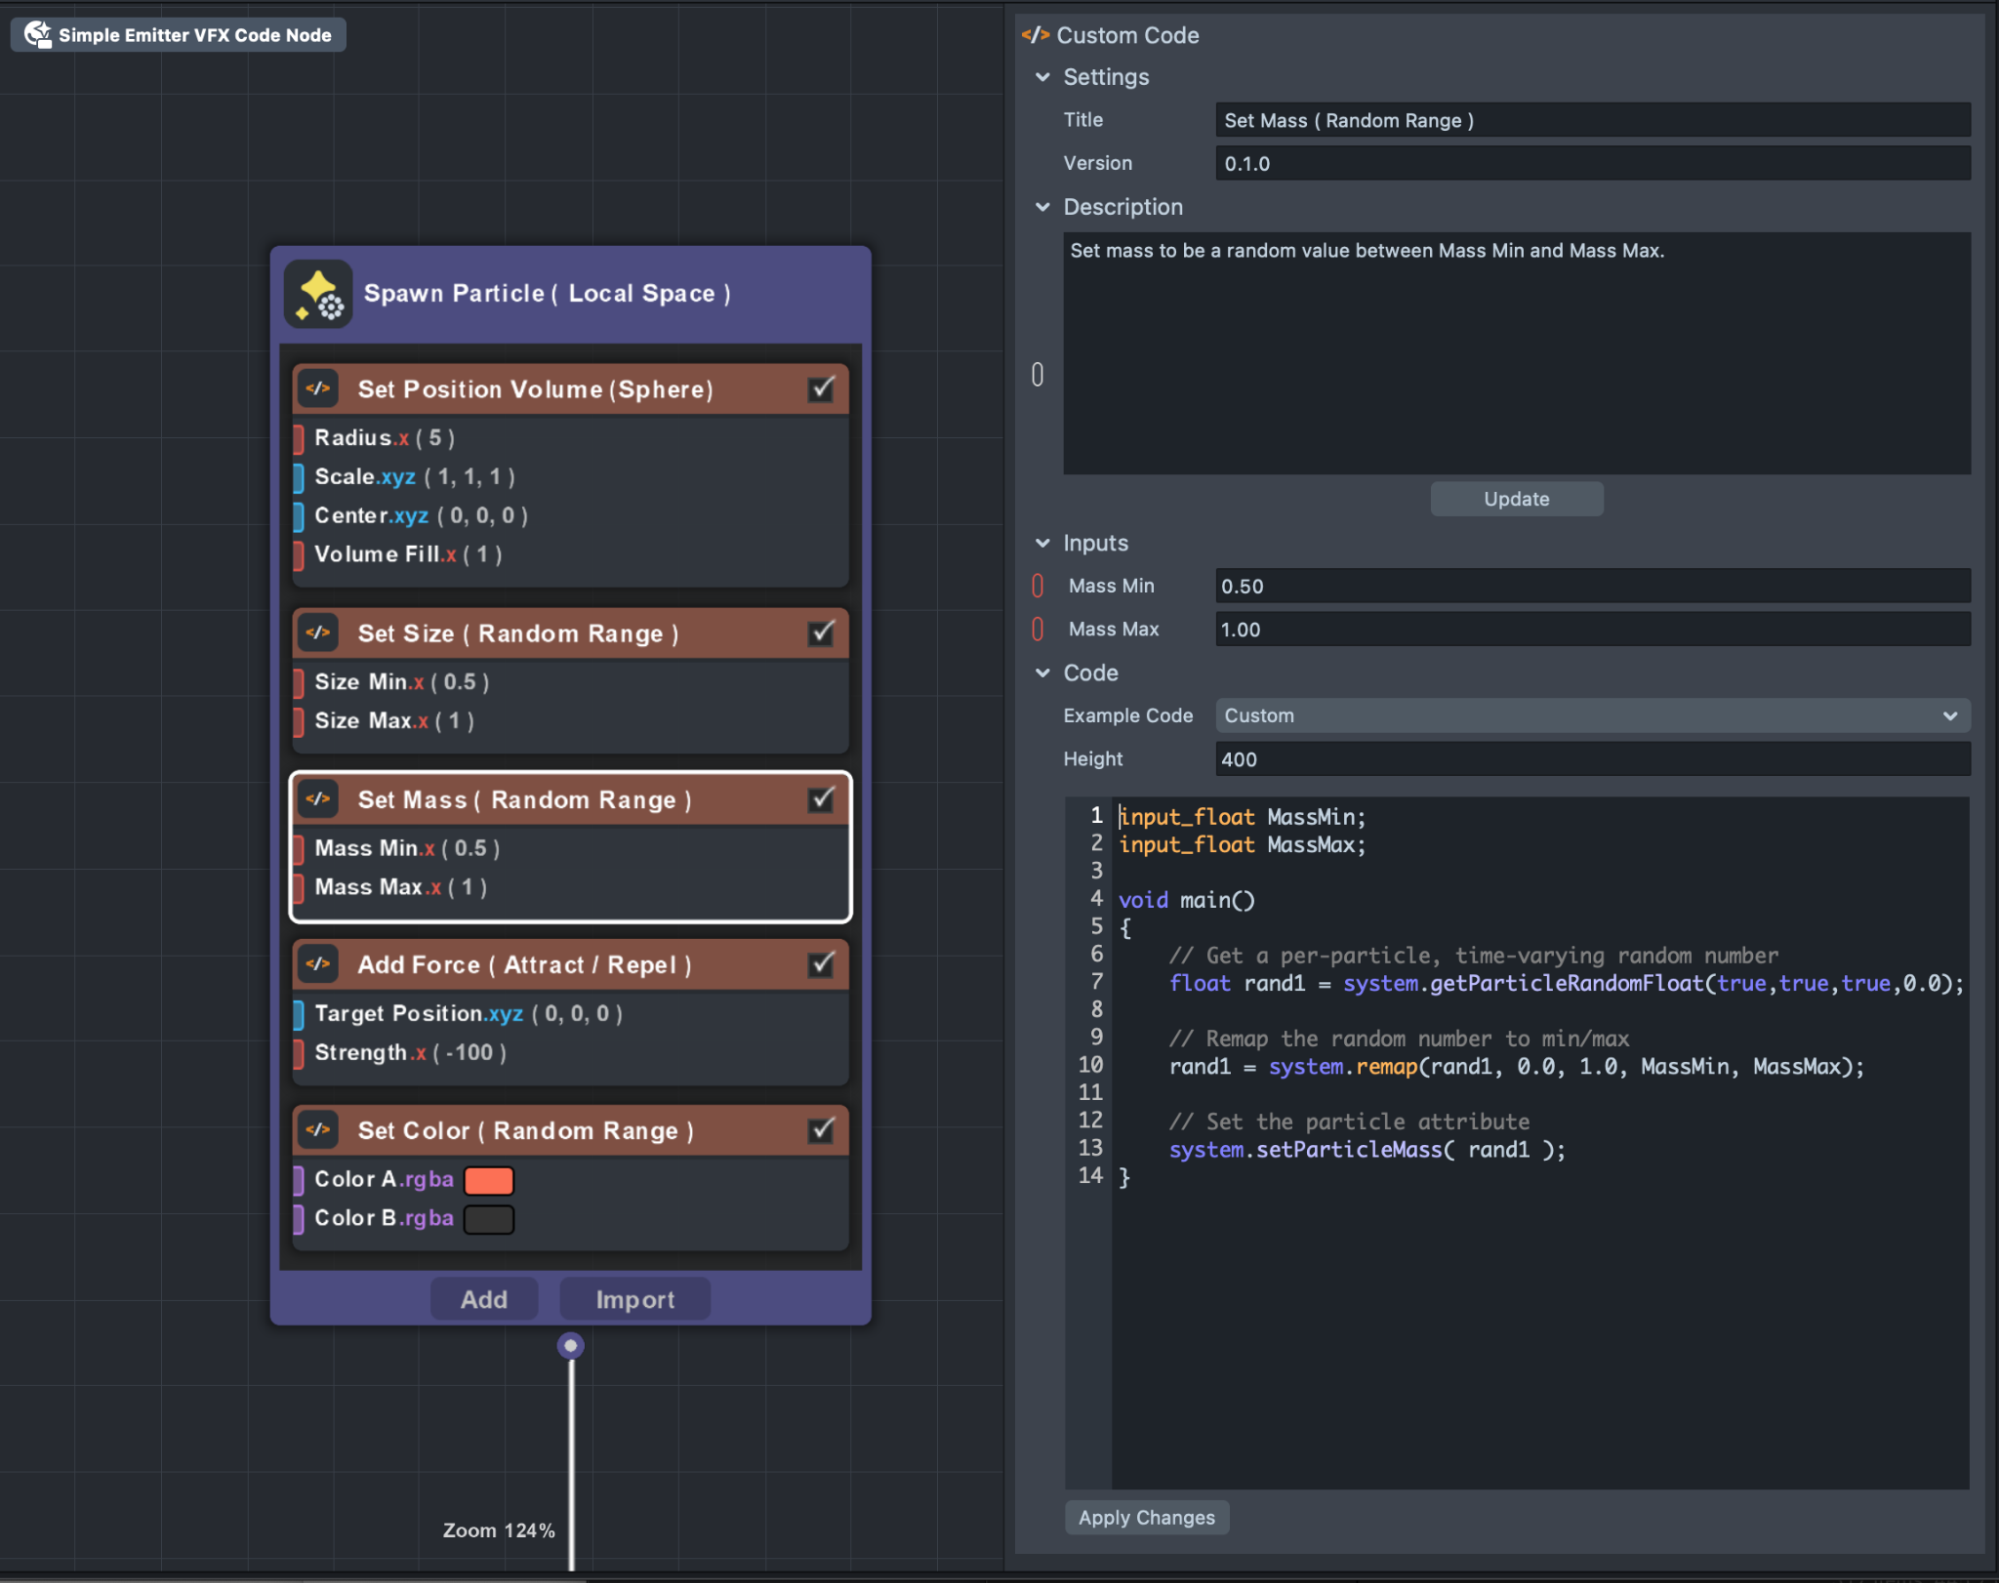
In this example, the entire Simple Emitter asset was recreated using only Code Nodes. The output is the same, but the graph loads much faster in Studio due to fewer node connections that need to be evaluated.
Each container node (node contained within Particle block) works to show how to get and set particle attributes, create per-particle random numbers, and modify vertex and pixel shaders, all within Code Nodes.
Vertex Shaders
Depending on where the Code Node is used, it may be evaluated in either the vertex or pixel shader. If it is a dependency of the World Position, Normal, or Tangent inputs on the Shader node, it will be evaluated in the vertex shader.
This allows for some powerful effects, opening the door to interesting animation and instancing opportunities.
Here the screenshots show two examples of vertex shaders:
- Ripple: A vertex displacement shader where a Code Node draws a ripple function. The wave not only modifies vertex position and normals, but is also output separately and interpolated to be available in the pixel shader for custom shading.
- Instancing Sunflower: This example uses instancing to turn a single mesh into an animated sunflower. The golden ratio and other math functions are used in the Code Node to control the final shape.
Raymarching
Before the Code Node was available, effects like raymarching were not possible in Material Editor. With Code Nodes, performing complex logic operations is easy, unlocking a new class of rendering techniques.
You can find the provided Raymarching materials (Raymarching (SDF) Texture Mapping, Raymarching (SDF) Nodes List, and Raymarching (SDF) Onion Slicing) in the Asset Library. They demonstrate the full capabilities of the Code Node. These examples show how Custom Global variables allow for modular raymarch loops that interface with the graph system. Various SDF and boolean operations can be visually organized while maintaining deep integration with Lens Studio's node-based workflow.