Debugging with Logger
Lens Studio provides two main ways to log messages to the Logger panel (visible at the bottom of the screen, or via Window → Utilities → Logger).
The simplest method is print('your message') which prints log on the device it was called from.
For more control, use console.log(), which can take multiple arguments like console.log("You can also", "pass in", "multiple arguments!") and supports substitution strings for formatting output. Substitution strings let you insert values into your messages using placeholders: %s for strings, %d or %i for integers, and %f for floats. For example: console.log("Player %s scored %d points with accuracy of %f%%", playerName, score, accuracy) would output something like "Player Alex scored 150 points with accuracy of 95.5%".
The console object also offers different log levels: console.debug() for detailed debugging, console.info() for informational messages, console.warn() for warnings, and console.error() for errors.

When connecting a device to Lens Studio, any logs from the lens on the device will also show up in the Logger panel. You can clear the Logger history with the Clear button, copy messages by right-clicking them, and filter logs by device or script using the top-right filter.
For performance tracking and debugging, the console provides built-in timers and tracing tools. Start a timer with console.time("TimerName"), check progress with console.timeLog("TimerName", "optional message"), and stop it with console.timeEnd("TimerName") to see total elapsed time.
Use console.trace() to print a stack trace showing the function call path.
For more information, visit the console documentation.
You can also dive deeper into what's happening in your Lens using the Mobile Monitor.
You can clear the Logger's history by clicking the Clear button on the left side of the Logger. To copy the text of a log message to your clipboard, simply highlight the message, right-click, and select Copy.
You can use the filter on the top right of the Logger panel to show logs only from certain devices or scripts.
Logging on Device
You can use the Text Logger asset to view log messages on the device itself.
There are three ways to get the Logger asset.
-
As a Prefab: You can import the
Text Logger V2Lens Studio Object from theToolssection of the Asset Library to get the Logger Custom Component and an example of its usage. This is useful when you are grabbing the Text Logger V2 for the first time to see how it works. -
As a Custom Component: You can install the
Text LoggerCustom Component from theCustom Componentsection of the Asset Library. Installing this Custom Component in your Lens Studio will make it easy for you to add the Text Logger to any project in the future. Once installed, you can add it to an object to have access to Text Logger. The Custom Component provides a UI to modify how the Logger looks, as well as puts the Logger into the global name space, so you can use it from any script.You can right click any Custom Component found on in the
Asset Browserpanel (e.g. from the Text Logger LSO), right click, and pressRegister this Custom Componentto add the Custom Component to your Lens Studio so that you can easily access it in any project. -
As a Module: You can import the
Text Logger Modulewhich contains the core functions of the Text Logger, which the Custom Component wraps around. This is mostly useful to customize the text logger to your need, or if you only need to call the text logger from one script.
When using this on Spectacles, the logs will display on a screen in front of you rather than attached to the camera which should make it easier to read.
Using TextLogger
Make sure you place the Logger at the top of your Scene Hierarchy panel, so that your following scripts can access it! See the Script Events guide for more information on events.
Adding Log Entries
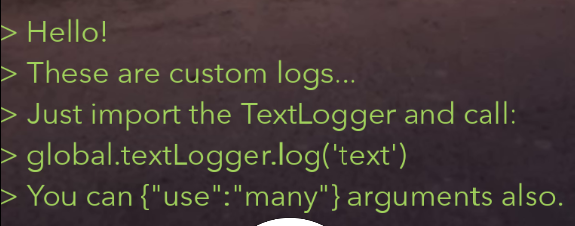
From any script, call global.textLogger.log() to show a message on the screen.
global.textLogger.log('Hello!');
global.textLogger.log('These are custom logs...');
global.textLogger.log('Just import the TextLogger and call:');
global.textLogger.log("global.textLogger.log('text')");
global.textLogger.log('You', 'can', { use: 'many' }, 'arguments also.');
You may have previously used the now deprecated global.logToScreen() function. We recommend using the new global.textLogger.log() function as it allows you to print objects and multiple arguments, similar to console.log.
Settings
You can change settings by selecting the TextLogger object and making changes in the Inspector panel.

Logging Enabled
Disabling this will stop log messages from appearing on screen. This makes it easy to switch between development and production, since you'll probably want to disable logging before submitting a finished Lens. You can also set this in script:
// Disable logs appearing on screen
global.textLogger.setLoggingEnabled(false);
Text Color
Text Color controls the color of all text logs displayed. It's also changeable in script:
// Change text color to red
global.textLogger.setTextColor(new vec4(1, 0, 0, 1));
Log Limit
LogLimit specifies how many log messages TextLogger allows on screen at a time (4 by default). If this limit is exceeded, previous log entries will start being removed. There's also a script interface:
// Only one log entry will be shown at a time
global.textLogger.setLogLimit(1);
// Clear all existing log entries
global.textLogger.clear();
Text Size
TextSize specifies how big you want your logs to appear. There's also a script interface:
global.textLogger.setTextSize(50);
Custom Display
You can optionally assign your own Text Component to the Custom Display field in the Text Logger Custom Component to customize how you want your logs to be displayed (e.g. font, position, etc.)
