Classification
This guide teaches you how to utilize Machine Learning model to determine whether a thing of a certain class is detected or not and apply an effect based on this information. It comes with a model example to determine whether a person is wearing glasses or not and show some effects when state changes.
The Glasses Classification example is available in Lens Studio Asset Library. Import the asset to your project, create a new Orthographic camera and place the prefab under it.
Guide
You can skip to the Triggering Effects section if you’d like to use the Glasses Classification model. Or, if you already have a binary classification model, you can skip down to the Importing Your Model section below.
Creating a Model
This example relies on a machine learning model to predict the probability of something. While an example ML model is included, you can create your own model to predict whether something is in the camera feed. The following section will teach you how to train your own binary classification model.
Prerequisites
To create a model, you’ll need:
- Machine learning training code: code that describes how the model is trained (this is sometimes referred to as a notebook). Please find our example notebook here.
- Data Set: collection of data that our code will use to learn from (in this case we will use the CelebA).
Training Your Model
There are many different ways you can train your model. For our example, we will use Google Colaboratory. To see other ways of training, take a look at the ML Frameworks page for more information.
Head over to Google Colaboratory, select the Upload tab, and drag the python notebook into the upload area.
Provided example is using the famous CelebA dataset for training the model. It's a dataset of images with celebrities' faces. Every image is labeled with a set of attributes. One of them is the presence of eyeglasses, so the dataset suits perfectly for our task.
You can swap out MAIN_ATTRIBUTE parameter for a different one from list_attr_celeba.txt in the notebook before running it to change what your model is trained to predict!
Running the notebook will install all the necessary libraries and mount Google Drive. To train a model, however, you have to provide the training dataset (images, annotations, and train/test partition lists) from the official CelebA Google Drive.
Connecting your data set to the notebook
Next, we need to provide our code to have a reference to the data. One way to do this is to place them in a folder named CelebA at the top level of your Google Drive, and then let Google Colab access your Google Drive. To do this, uncomment #copy_files_from_drive() From the notebook.
After uncommenting this line, do not re-run the code cell since it’ll interrupt the flow of computation.
Alternatively, you can bring the files directly to Google Drive by uploading it to the sidebar. Make sure the directory matches directory called in the code.
If you upload the dataset to your notebook, it will only be stored there temporarily.
Train your model
With our files added, you can run the code by choosing Runtime > Run All in the menu bar. This process may take a while to run, as creating a model is computationally intensive.

When using a data set to train your model, make sure that you adhere to the usage license of that dataset.
Downloading your Model
You can scroll to the Train Loop section of the notebook to see how your machine learning model is coming along.
Once you are happy with the result, you can download your .ONNX model!
We would like the model to be small and fast to make our Lens experience optimal for the user, so for this simple task, it would be a good decision to train a small model from scratch rather than use transfer learning from a large pre-trained model.
Importing your Model
Now that we have our model, we’ll import it into Lens Studio.
You can drag and drop your file into the Asset Browser panel to bring it into Lens Studio.
Setting up MLComponent
If you are using the built-in ML model, you can skip this section.
Next, we’ll tell the Lens Studio to use this model. In the Scene Hierarchy panel, select ML Component. Then, in the Inspector panel, click on the field next to Model, and then in the pop up window, choose your newly imported model.
After the model is set additional build, run, input and output settings become available in the ML Component UI.
To learn more about what each setting does take a look at the ML Component Guide.

MLComponent has an Auto Build checkbox selected, this means the model will be built automatically after the lens is initialized.
By default we have the Auto Run checkbox disabled since we want a more fine control about how our model works. Specifically, this example uses Behavior to configure how the model is run.
In this case, we set the model to run on every frame and with both start and end timing set to FrameTiming.Update. You can find more information about run modes and frame timing here.

You can modify these settings if you want a different behavior, for example, to run the MLComponent on tap or other interactions.
Input
Our model was trained on the CelebA Dataset that consists of the square images of people’s faces. We can use Face Crop Texture, which crops an area from Device Camera Texture based on a person’s face to feed similar input to our model.
Face Crop Texture can be created by clicking the + button on the Asset Browser panel and selecting Face Crop Texture. It is initialized with default settings - Device Camera Texture as an input.
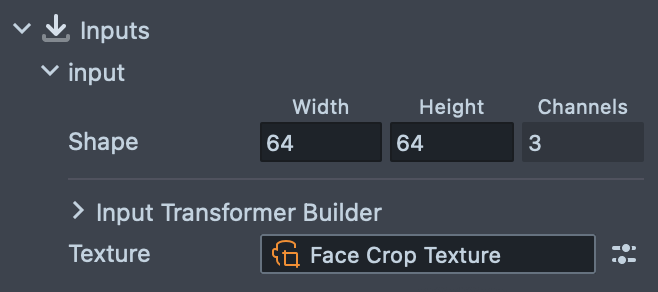
When a face is not detected by the camera - Face Crop Texture will stop updating and model will not run.
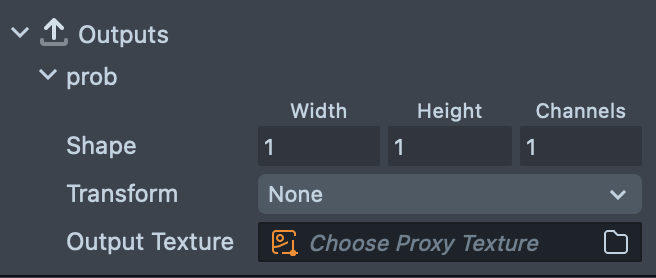
The output of this ML Model is an array of probabilities. Because we have only one class - output array length is 1.
The output data is represented with an array (Float32TypedArray) of size 1 (1x1x1) which is processed by the Glasses Classification Controller script.
Customizing your Lens Experience
If you are using the built in ML model, you can skip this section.
With our model hooked in, let’s take a look at the Glasses Classification Controller [EDIT ME].

Select the object in the Scene Hierarchy panel, and then take a look at the Inspector panel for the following settings:
ML Component: - set your MLComponent here.
Output Name: - set this input to match the output name of your neural network in order to access its data.
You can see this name in the ML Component we just set up.
Class Index: is an index of desired class in your neural network. In this example we have an output array of length 1, so the index is equal to 0.
As we already mentioned our model provides us with the probability of whether glasses are present or not. So this example allows you to trigger an effect , when the object was just found or just lost.
The Threshold: parameter defines what probability is counted as found or lost. The default value is 0.5.
Scripts With Callbacks: parameter is a list of scripts with specific API functions: script.onFound and script.onLost. It will call these API functions when the probability provided by our model crosses the threshold number.
Add scripts to the list to add more effects to trigger, or delete scripts from the list if you don’t need them.
Show Debug: enables a debug progress bar to visualize probability. You can use this to figure out whether or not the model has been hooked up properly, as well as what value you should use for threshold.
Disable this checkbox before publishing your Lens if you don't want to show the predicted probability!
Triggering Effects
This example includes a few helper scripts and methods to trigger effects based on the Scripts with Callbacks list mentioned above.
The Simple Text Example provides a simple scripting example of modifying a text of a Text component. Please use the ClassificationExampleHelper script as a base of your own script.
// Do something when glasses are found
script.onFound = function () {
  // set the text on a Text Component
  script.text.text = 'Glasses';
};
// Do something when glasses are lost
script.onLost = function () {
  // set the text on a Text Component
  script.text.text = 'No Glasses';
};
To learn more about APIs and scripting, check out the Scripting Overview guide.
The ClassificationBehaviorHelper script to Send Custom Triggers when class is found or lost.
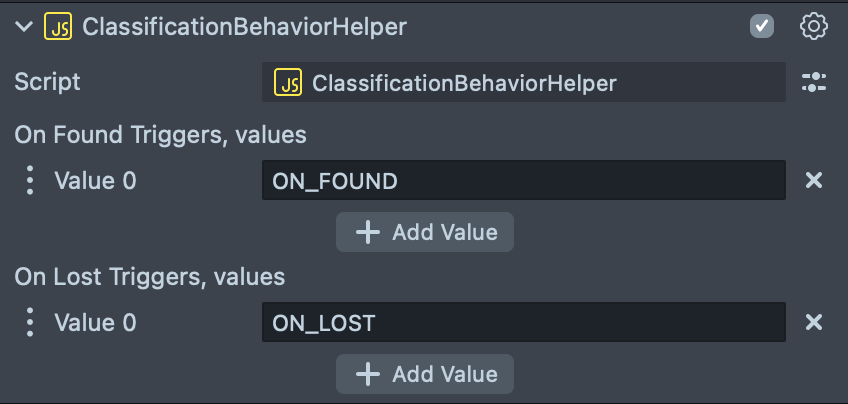
In the Scene Hierarchy panel, select the Behavior Example scene object and customize custom Behavior script triggers and responses.
Take a look at the Behavior guide for more information on what you can trigger with Behavior.
Previewing Your Lens
You’re now ready to preview your Lens! To preview your Lens in Snapchat, follow the Pairing to Snapchat guide.