Migrating to Lens Studio 5
Lens Studio 5 comes with a lot of changes to make Lens development faster. In order to make these upgrades, and to improve the Lens development process, some fundamental changes were made. This guide aims to help you transition your project and workflow.
Some features may not be available, such as: In Lens Digital Goods, Share your feedback on UserVoice!
Project Compatibility
Projects from current Lens Studio 4 and below cannot be opened in the Lens Studio 5. While there are many reasons for this, one reason for this change is we wanted to enable true git friendly project file format.
Take a look at the Working with Git guide to learn more about the new Lens Studio file format!
Projects can be differentiated by their file type – Lens Studio 5 projects are saved as .esproj, whereas current Lens Studio projects are saved as .lsproj.
Mixing and Matching Projects
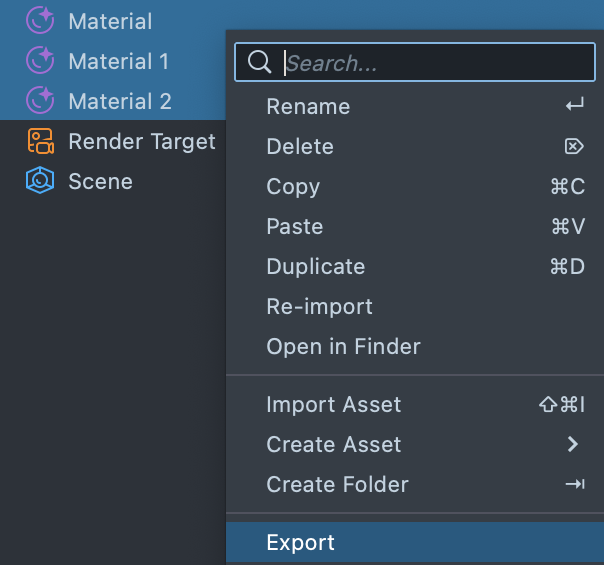
If you would like to bring in previous Lens content, you will need to export your project or parts of your project as an .lso or .lsmat from the current build of Lens Studio, and import the .lso or .lsmat into Lens Studio 5.
If the .lso or .lsmat contains a resource that is currently unsupported in Lens Studio 5, an error will show in the Logger. It is recommended to save your project before importing.
You can open Lens Studio 4 and 5 simultaneously. You will need to open Lens Studio 4 first. It is recommended to keep Lens Studio 4 opened in the background to facilitate troubleshooting (i.e. everything looks as you expect!).
Tips when working with LSOs
If you want your .lso to contain a prefab, you’ll want to make sure a script has a reference to the prefab. Otherwise, Lens Studio will assume you just want to export the objects within it.
//@input Asset.ObjectPrefab myPrefab
If your .lso contains other Render Layers beside Default and Orthographic, the layer name will not be imported.
Native Export
While importing from Lens Studio 4 and below is supported, .lso itself is now a deprecated format. Instead, you can use the improved Native Package .lspkg format instead.
The Native Package format allows you to package various types of format together for export and import.
For example, you can package both materials, prefabs, and even another package inside one package for easy export!
If you want to package an object in the Scene Hierarchy panel, you can drag the object into the Asset Browser panel to make it into a prefab. Then, you can package the prefab, a long with anything else you'd like.
Project Setup
Some of the panels in Lens Studio 5 have been renamed to be more accurate. The Objects panel is now the Scene Hierarchy panel and the Asset panel is now the Asset Browser panel. You can learn more about the UI changes in the Lens Studio UI overview guide.
Component Editors
Prior to Lens Studio 5, when you select an object with an Image, Face Mask, Face Liquify, and other objects which have their own editors, their respective editor would take over the Scene panel.
In Lens Studio 5, these editors have been separated into their own panel. You can double click on the object to open their respective panels. Additionally, you can open their editors by clicking on the cog-wheel of their specific component.
Scene Asset
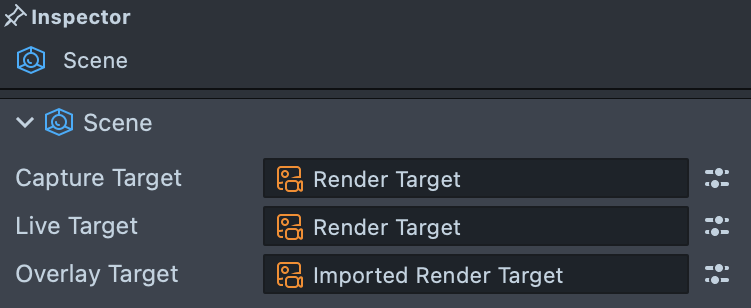
There is a new Scene asset type. The Scene asset replaces the Scene Config panel in current Lens Studio. You can use this asset to set which Render Target will be visible on Snap capture, on the live camera, and which will be just shown as an overlay (rendering at native screen resolution). Take a look at the guide to learn more.
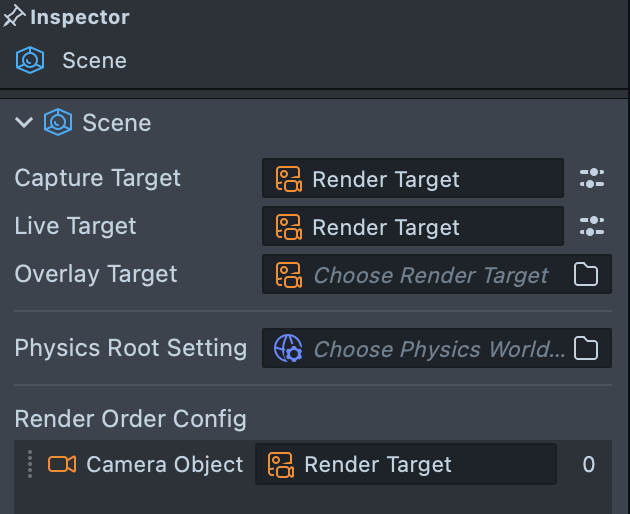
In addition to Render Target settings, Physics Root Settings can also be added under the Scene Asset.
Physics World Setting Asset no longer gets added to a project by default. You can add it via the Asset Browser -> + -> Physics World Settings.

Materials
In Lens Studio 4 and older, materials contained shaders within it, which means that if you wanted to change how a material works (e.g. using the Material Editor) in multiple materials, you’d have to make the change in multiple places.
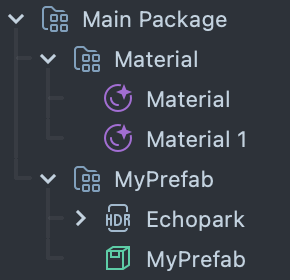
In Lens Studio 5, a material is now a container for one or more shaders, referred to as passes. Passes can be built and edited via the Shader Graph editor (previously Material Editor).
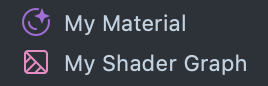
In the Asset Browser panel, materials and passes can be distinguished by their icons. For example, My Shader Graph is a pass used in My Material which is a material.
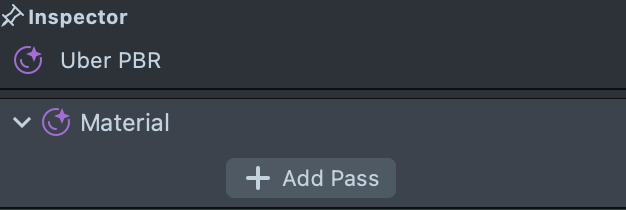
Double clicking on a pass in the Asset Browser opens the Shader Graph editor. Double clicking on a material in the Asset Browser opens the Inspector panel.
To add a pass to a material, click + Add Pass in the material’s Inspector panel.
Using fewer shaders will improve project loading time. Exporting and importing lso into the same project might cause shader duplication. It is always good to remove the duplicated shader for different materials. You can simply replace the duplicated shader in the Material while keeping the parameter settings.
Materials can also be imported from the Asset Library or exported, and imported as an .lsmat from a Lens Studio 4 project.
GPU Particles
When migrating GPU Particles before 4.53 to 5.xx, you'll need to update both the material's shader and the particle mesh using the following steps:
- Go to
Scene Heirarchy -> + -> GPU Particlesto bring in the most recent GPU Particles preset (includes a mesh, material, and shader). - With your material selected in the
Inspectorpanel, swap theShaderto be the newgpu_particlesshader.- Swapping the shader should preserve most or all of your material's settings. However, some very old particle materials may have slightly different material parameter names, such as Random Color and Random Size. In these cases, you may need to adjust these manually to match your old settings.
- Update your mesh on the Render Mesh Visual to the new
GPUParticlesMesh.- Alternatively, you can also use a
Planemesh (Asset Browser -> + -> Plane).
- Alternatively, you can also use a
- Set your material's
Instance Countequal to the previous version'sParticle Count.
GPU Particles created after 4.53 already use instancing, in which case you only need to update the material's shader. To learn more, check out the GPU Particles Overview.
Scripts
Changes to the Script Component
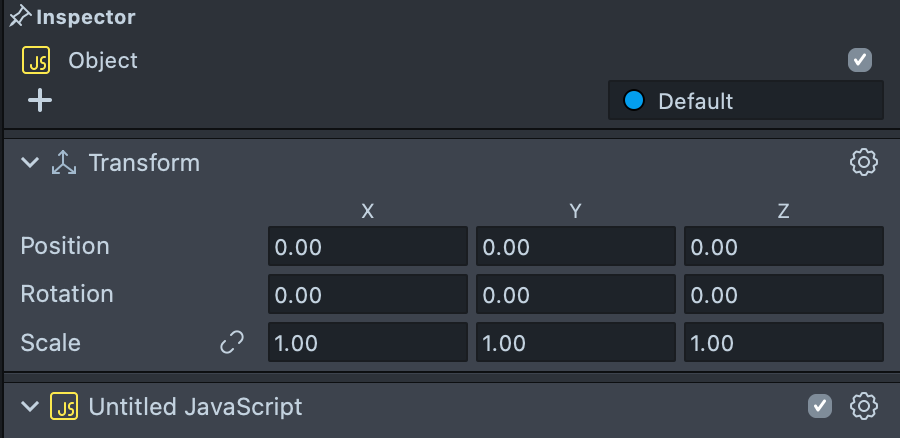
There is no distinction between scripts and Custom Components in Lens Studio 5.
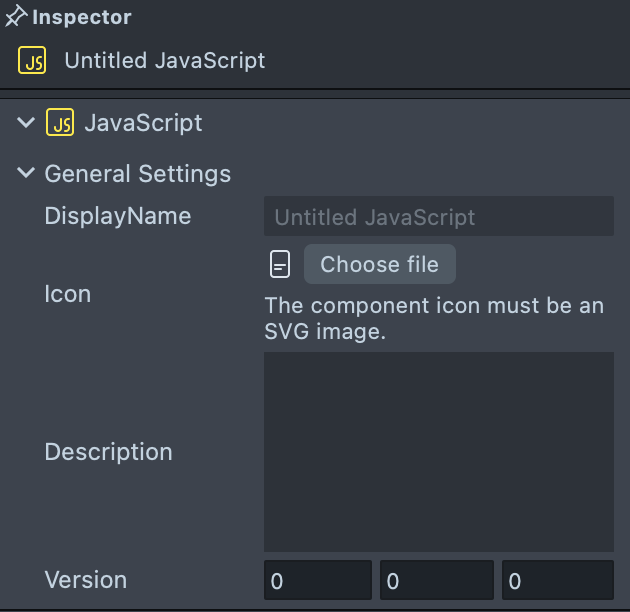
The Inspector for Script Assets provides the ability to set a display name, icon (must be an .svg file), description, version, and default input values.
The Script Editor panel functions the same as in current Lens Studio and script configuration in the scene has been simplified. The Script Component UI no longer has an input field for attaching a script. Now, a script can be added to the scene in three ways:
- Drag and drop the script from the
Asset Browserinto theScene Hierarchypanel. - Drag and drop the script from the
Asset Browserinto an existing object’sInspectorpanel. - Add a script to a scene object from the Inspector
+ Add Componentbutton. Scripts available in the project are listed underProject Component.

Script Components cannot have an empty script or multiple scripts attached. Instead, a Script Component corresponds to one script and shows the script’s display name.
This also means that you can not change the reference script on a Script component anymore.
Scripts added to a scene object are now automatically set to run On Awake. You may bind other events within a script. See all the available events in the Script Events guide.
const tapEvent = script.createEvent(“TapEvent”);
tapEvent.bind(function(){
    print(“Tapped!”);
});
There are many new capabilities in scripting: registering scripts to your library, being able to require assets and types, and more! Take a look at the Scripting section to learn more.
TypeScript
In addition to JavaScript, Lens Studio 5 now allows you to write in TypeScript. There are many benefits to TypeScript, such as the ability to declare types, to make it easier to find bugs in your code and work on large code bases. Take a look at the TypeScript guide to learn more!
Studio.log is currently not yet implemented in Lens Studio 5. This means that if your code had used it instead of print, you would not see anything in the logger!
Ordering of Objects
Part of the goal of Lens Studio 5 is to make it easier to reason about building a Lens. In previous Lens Studio, some things may happen behind the scenes that may be surprising or unclear. This also means that, in some cases, you will want to explicitly make changes to your Lens that was previously automatically done (i.e. hidden) from you.
Render Order
Render Order allows you to define which objects in a Lens should appear on top of another, which is very useful when dealing with 2D scenes (which image should be on top of another).
In Lens Studio 4.x, Render Order Auto is set by default, which increments every object by 1. However, this can become unpredictable, especially if you only wanted to have a specific object to appear on top. Furthermore, when exporting into a Lens, this number is then “baked-in”, which means that it’s not truly auto.
In Lens Studio 5.x, Auto has been removed, and everything will stay at Render Order 0, until you explicitly set it, if necessary, to be otherwise.
In most cases you will not have to change an object’s render order. In some cases you might, for example: when using a Post Effect Visual (e.g. color correction), and you want to make sure it’s above or below other things.
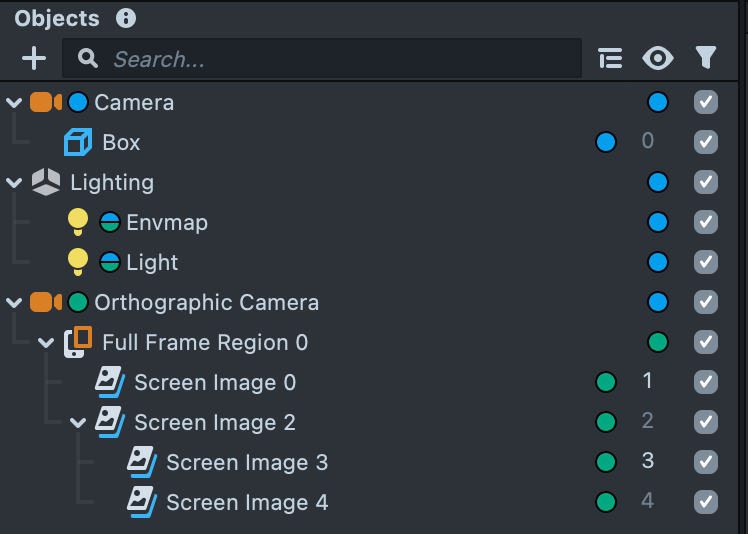
For example, you’ll notice if you set the Box object in these examples, in Lens Studio 5 it will not affect the Render Order of the Screen Images, since it would have been surprising that changing the Box object would affect all other Render Objects–even if they are not related at all!

If you’re importing an .lso from Lens Studio 4 and below, you might see that the last Render Order set by Auto has been baked in.
This means that the result of your Lens might not be expected–i.e. The imported screen image might be ahead or behind other things, because the objects you’ve added in 5 will all be at Render Order 0.
By default, the render order for objects under Canvas will use hierarchy, which is what auto mode did. You can, however, set the sortingType on the Canvas component to be based on Canvas.SortingType.Depth instead.
Screen Transform
When you add a new Screen Transform, the default z position is now 0. As with Render Order, this is done to reduce ambiguity, since you can also use Render Order to set which is in front.
In addition, the clipping plane of an orthographic camera is now set to -1, to ensure Screen Transform at z position 0 will still be rendered.
If you import something with a Screen Transform into Lens Studio 5.x and it is not showing up in the right order, take a look at the Render Order section above, as well as the z position of the object.

Render Target
In Lens Studio 4, when you import an LSO which contains a Render Target, Lens Studio would automatically guess how that Render Target should be combined into the current scene.
To make things clearer, in Lens Studio 5 you will need to explicitly set how the Render Targets should be added into your Lens.
For example, you might select your current Render Target and set its background to the imported Render Target
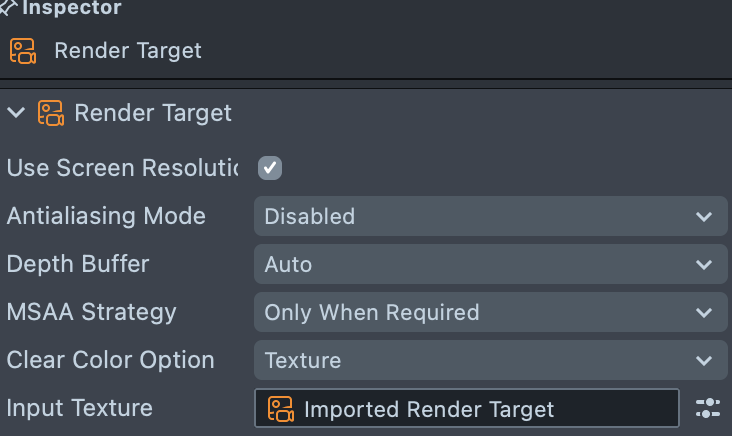
Or, set the imported Render Target as the Target to use as an Overlay (See Scene Asset section above).
Be sure to rename your newly added Render Target–as you may now have multiple assets named Render Target which can be confusing!
Default Meshes
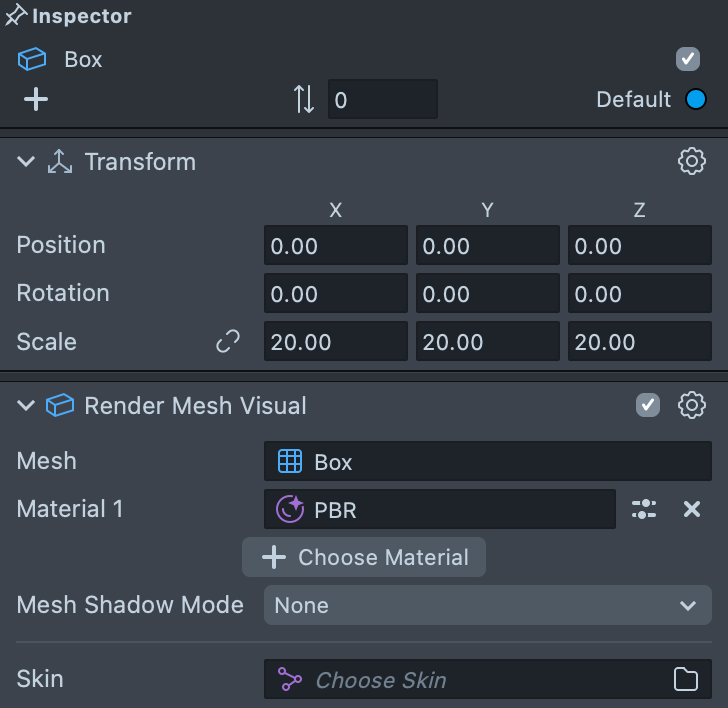
Default meshes added from the Objects panel (such as cube, sphere, plane, etc.) are now brought in as unit sizes, and then scaled by the Transform component. This makes it easier for you to specify a specific size of an object.
This is convenient when using Marker tracking and other scale accurate tracking methods. For example, this would mean that the default imported cube is 1cm when the height set in the Marker Asset is set to be the same as their real world counterparts! Learn more in the Marker guide.
Materials that create effects using the Surface Position node may not look as expected, since the meshes are much smaller than before. To fix this, you can use the Normalize to AAABB subgraph to make your material consistent across all mesh sizes.
Animation Player
When you import 3D models with animation in Lens Studio 5, it will use Animation Player (instead of Animation Mixer). While both components are available currently, Animation Player will be used going forward and is easier to use. To upgrade to Animation Player, you will need to import your source file into Lens Studio again.
Re-importing an LSO, or using the right-click menu to reimport on an already imported 3D model will not update your component.
Prefabs
In Lens Studio 5, Prefabs can now be edited in the Scene panel. To edit a Prefab in the Scene panel, you can double click a Prefab asset. To back back to the main Scene, you can double click the Scene asset. Combining the Scene Manager custom component with this feature, you can effectively treat each Prefab as a standalone scene and compartmentalize your lens design to improve maintainability and modularity.
Saving Prefabs
There are some differences in the behavior of Prefabs. In Lens Studio 4, you can press “apply” (save) a prefab when editing the prefab itself. This will allow you to save (only) an object scale and affect all instances. In Lens Studio 5, you can only “apply” the children of a prefab, since you might want the Transform / Enabled state of the parent to be different for each instance.
Pluginization
Certain built-in actions have been extracted and made as Plugins, such as Find Usage. You can install plugins through the Asset Library. Plugin is a new feature introduced in Lens Studio 5 which allows anyone to extend Lens Studio using the newly introduced Editor API. To learn more about Plugins and its creation in Lens Studio 5, please visit the Extending Lens Studio section.
Limitations
- You will need to create animated textures outside of Lens Studio (e.g. gifs) and then bring it into Lens Studio. You can also use video files like (.mp4) for longer animations.
- Detailed Lens Size is currently not available. You can find the Lens Size in the
Project Settingswindow. - Some features may not be available, such as In Lens Digital Goods. Share your feedback on UserVoice!
Where to find 4.0 templates
To make it easier for you to mix and match different effects, templates are now componentized into Assets in the Asset Library or Sample Projects in the Home Page.
| Template | Sample Project and Assets |
|---|---|
| 2D Animated TTS | 2D Animated TTS Face, 2D Animated TTS Conversation |
| 2D Objects | 2D Head Art |
| 3D Body | 3D Body Two Spacesuits, 3D Body Stick Figure, 3D Body Dancing Mark, 3D Body Abstract Gear |
| 3D Hand Interactions | Grab Object With Hand, Gesture Trigger, Gesture Scissors Trigger, Rotate With Finger |
| 3D Hand Tracking | Default 3D Hands, Frog 3D Hands, Skeleton 3D Hands |
| 3D Hand VFX | Sample Project |
| 3D Objects | Head 3D Objects |
| 3D Text | 3D Text Languages Example, 3D Text Layout, 3D Text Countdown, 3D Text Change on Tap, Split 3D Text, Instanced 3D Text |
| Animated Object | Animated Object |
| Audio Analyzer | Audio Analyzer |
| Audio Classification | Audio Classification |
| Baseball Cap | Baseball Cap Controller |
| Bitmoji | Bitmoji 3D |
| Body Mesh | Objects On Body Mesh, Body Mesh Tap To Add, Body Mesh Spacesuit |
| Body Segmentation | Body Segmentation |
| Buckingham Palace | Buckingham Palace |
| Chain Physics | Chain Physics, Sample Project |
| Change Beard | Bald Character |
| Change Eyebrows | Bald Character |
| Classification | Glasses Classification |
| Cloth Simulation | Cloth Simulation - Tutu, Cloth Simulation - Bandana, Cloth Simulation - Vertex, Cloth Simulation - Sunny Doll |
| Cloth Simulation Try-On | Try On Pack - Dress, Cloth Simulation Coat, Cloth Simulation Hoodie, |
| Code Node | Raymarching (SDF) Texture Mapping, Raymarching (SDF) Nodes List, Raymarching (SDF) Onion Slicing |
| Configuration | UI Button, UI Toggle, UI Color Picker, UI Discrete Picker, UI Panel |
| Content Editor Tools | Content Provider Option, Content Editable, Content Provider, Content Storage, Content Editor, Content Provider Category, Content Persistable |
| Custom Location AR | Custom Location AR |
| Custom Segmentation | Custom Segmentation |
| Cutout | Cutout |
| Depth Materials | Depth Sweep, Depth Edge Detection, Depth of Field Post Effect, Underwater Depth Post Effect, Depth To Point Cloud VFX |
| Depth Render Target | Screen Space Normals, Depth Collision VFX |
| Distort | Face Distort |
| Earring Try-On | Sample Project |
| Eiffel Tower | Sample Project, US Capitol Building, TCL Chinese Theatre, Flatiron Building., Buckingham Palace |
| Eyewear Try-On | Sample Project |
| Face Expressions | Face Expressions |
| Face in Picture | Face in Picture |
| Face in Video | Face in Video |
| Face Landmarks | Face Landmarkers |
| Face Mask Classification | Face Mask Classification |
| Face Mesh | Shiny Face Mesh, Pin To Face Mesh, Face Mesh Extrude |
| Face Morph | Face Reprojection - Character, Face Mesh Geometric Shapes |
| Face Occlusion | Face Occlusion |
| Face Paint | Face Paint |
| Face Stickers | Face Sticker Controllers, Post Effect Controller, Face Text Controller |
| Facial Features Segmentation | Facial Features Segmentation |
| Flatiron Building | Flatiron Building |
| Footwear Segmentation | Footwear Segmentation Rainbow, Footwear Segmentation Black Light |
| Footwear Try-On | Sample Project |
| Full Body Triggers | Full Body Trigger - T Pose, Full Body Trigger - Screen, Full Body Trigger - Distance |
| Fullscreen | Sample Project |
| Garment Transfer | Sample Project |
| Green Screen | Image Picker Collage |
| Ground Segmentation | Ground Segmentation |
| Hair Color | Sample Project, Hair Color |
| Hair Simulation | Sample Project |
| Hand | Cat on Head, Hand On Head, Hand Tracking Controller |
| Hand Joints | 2D Hand Tracking Joints |
| Hand Segmentation | Hand Segmentation 3D, Hand Segmentation 2D |
| High Score | Sample Project |
| Keyboard | Scripting Keyboard, 2D Editable Text, 3D Editable Text |
| Keyword Detection | Keyword Detection |
| Look Around | Look Around |
| Makeup | 2D Makeup Helper |
| Marker | Marker Image, Marker Cube |
| Material Editor | Sample Project |
| Meme Sticker | Sample Project |
| ML Environment Matching | ML Environment Matching Metal Character, ML Environment Matching Gold Frame |
| Multi Class Classification | Multi Class Classification |
| Multi Object Detection | Multi Object Detection |
| Multi Segmentation | Multi Segmentation |
| Music Video | Sample Project |
| Necklace Try-On | Sample Project |
| Object Detection | Object Detection |
| Optical Character Recognition | Sample Project |
| Paper Head | Paper Head |
| Particles | GPU Particles Technical Demo, GPU Particles Effects Pack |
| Persistent Noteboard | Input Modal for 5.0 |
| Pet | Pet Face Detection |
| Photo | Photo |
| Physics | Sample Project |
| Physics Toys | Physics Maze, Physics Racetrack |
| Picture Frame | Picture Frame |
| Portal | Portal |
| Portrait Particles | Particles Controller |
| Portrait Relighting | Portrait Relighting |
| Portrait Skin Segmentation | Face Skin Segmentation, Body Skin Segmentation |
| Question Answering Service | Question Answering Service |
| Quiz | Sample Project |
| Scan | Scan - Get Car Price, Scan - Print On Tap, Scan - Checklist, Scan - Scan On Update |
| Scene Manager | Scene Manager |
| Segmentation | Background Image, Background Color |
| Segmentation Trails | Sample Project |
| Sentiment Analyzer | Sentiment Analyzer |
| Simple High Score | Simple High Score |
| Simple World Mesh | Spawn Object at World Mesh On Tap |
| Skeletal | 2D Skeletal |
| Soundboard | Soundboard |
| Spatial Persistence | Sample Project |
| Speech Recognition | Speech Recognition |
| Stock Market API | Alpaca |
| Style Transfer | Style Transfer |
| Sunglasses | Sunglasses |
| Sync Framework | Sync Framework Avatar |
| TCL Chinese Theatre | TCL Chinese Theatre |
| Team Celebrate | Face Logo, Screen Logo, Sample Project |
| Text To Speech | Text To Speech |
| Translate API | iTranslate |
| True Size Object | Sample Project |
| Try-On | Sample Project |
| Upper Garment Segmentation | Upper Garment Segmentation |
| US Capitol | US Capitol Building |
| VFX | Sample Project |
| VFX Collision | Advanced Plane Collision VFX, Simple Plane Collision VFX, Depth Collision VFX |
| Voice UI | Sample Project |
| Weather API | AccuWeather |
| What __ Are You | What X Are You Spinner |
| Window | Hole |
| World Mesh | World Mesh - Spawn On Surfaces |
| Wristwear Try-On | Sample Project |