Migrating from Effect House to Lens Studio
This guide serves as a way to help translate features, UI, and common workflows from Effect House to Lens Studio. Both platform have similarities: containing features like AI, physics, materials, uxer context, friends, and more. However there are differences in some concepts, like with: shaders, scripting, audio, and others.
Terminology
In some cases, both platform have similar features, but with different names.
| Category | Effect House | Lens Studio |
|---|---|---|
| Interface | Hierarchy | Scene Hierarchy: Scene |
| Assets | Asset Browser | |
| Scene | Scene: Scene | |
| Inspector | Inspector | |
| Component | Component | |
| Layers in Inspector and in Camera Component | Layers in Inspector, in Camera Component and Scene in Asset Browser | |
| Interaction | Behavior Script and Tween | |
| Preview | Preview | |
| Visual Scripting | Shader Graph and Scripts | |
| Subgraphs | Sub-Graph | |
| Material Editor | Shader Graph | |
| Visual Effects Editor | VFX Graph | |
| Asset Library | Asset Library | |
| Templates | Sample Projects | |
| Scene Objects | Camera (Perspective) | Perspective Camera |
| Environment Light | EnvMap | |
| Scene Object | Scene Object | |
| Basic Particles | GPU Particles or VFX | |
| Social Kit | User Context System | |
| Tracking | Head Tracker | Head Binding |
| Neck Tracker | Upper Body Tracking 3D | |
| 2D Keypoint Tracker | Facial Landmarks | |
| Avatar Body Drive | Body Tracking 3D | |
| 3D Hand Tracker | Hand Tracking 3D | |
| Hand Tracker | Hand Tracking 2D | |
| Fingernail Tracker | Nails Tracking 2D (3D also available) | |
| Target Tracker | Image / Marker Tracking | |
| AR Plane | Perspective Camera and add a Device Tracking component | |
| Pet Face Sticker | Pet Tracking 2D | |
| Materials | Standard | Uber Diffuse |
| Standard PBR | Uber PBR | |
| MatCap | Simple Reflection in Uber Diffuse Material | |
| Simple Skybox | Cubemap | |
| Face Paint | Face Mask | |
| Segmentation Material | Segmentation Texture with Image or Unlit Material | |
| Rendering | Render Texture | Render Target |
| Render Group Input Texture | Render Target and Camera Component Layer Combination | |
| Dynamic Environment Texture | Dynamic Environment Map | |
| UI | 2D Camera | Orthographic Camera |
| 2D Scene Object | Screen Transform | |
| Video Picker Texture | Media Picker Texture | |
| Generative Effects | Machine Learning Components | |
| 2D Text | Text or Screen Text | |
| 3D Text | Text3D | |
| Instructions | Hint in Project Settings | |
| Audio | Audio Player | Audio |
The Editor UI Comparison
The layout of Lens Studio follows a similar setup to Effect House. The panels can be moved by dragging them from the title and placing them where the highlighted blue indicators show. The layout can be reset to this default by going to Window in the toolbar and selecting Default Layout.
The main panels are:
- Scene Hierarchy
- Asset Browser
- Scene
- Logger
- Inspector
- Preview
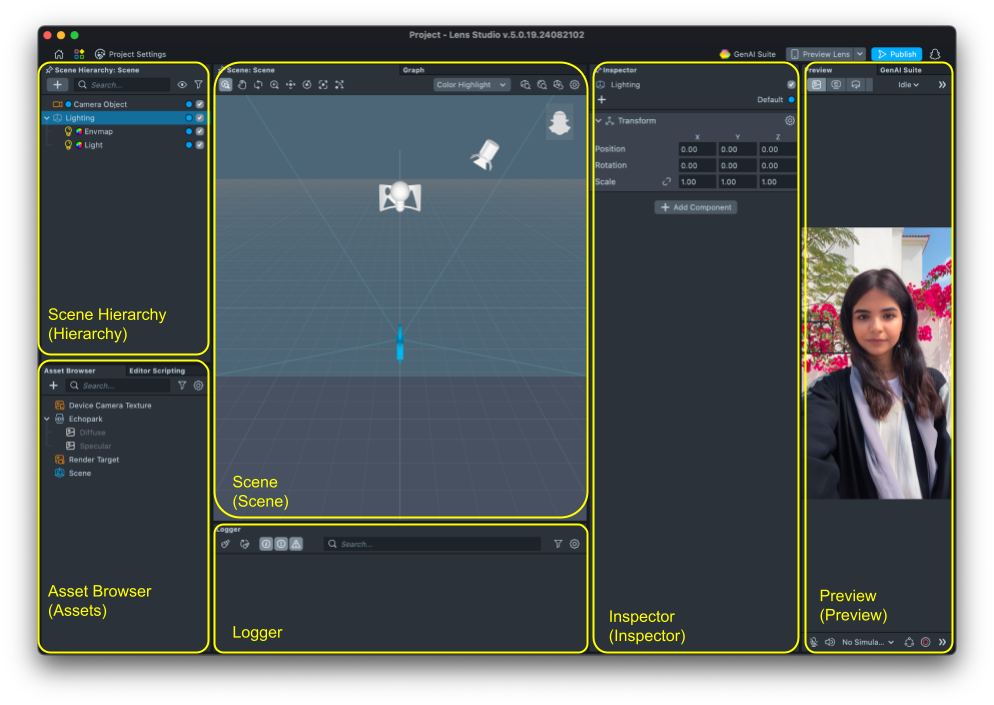
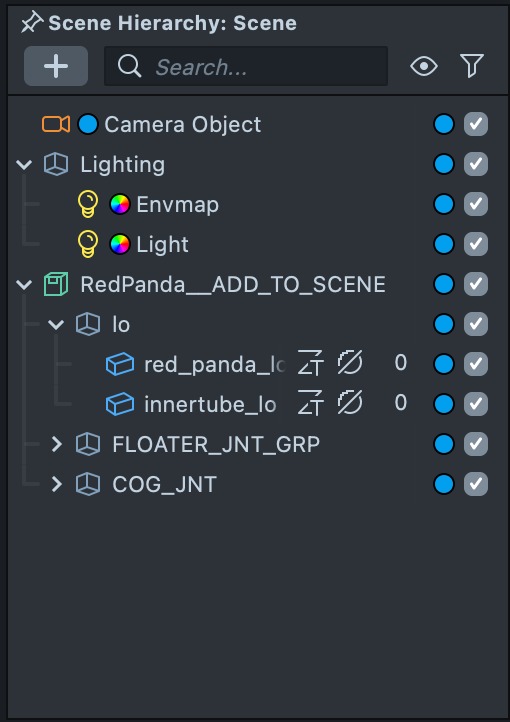
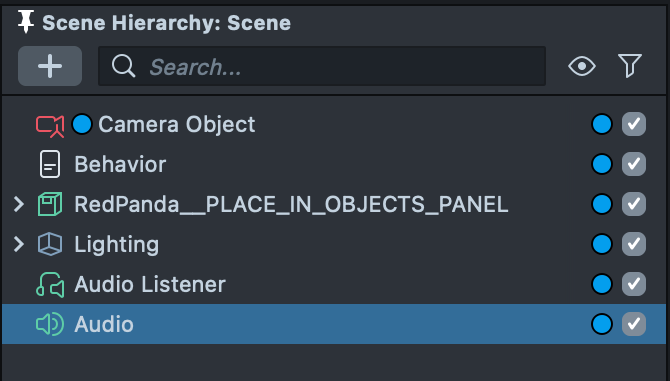
Scene Hierarchy (Scene)
Objects render and scripts run from top to bottom in the Scene Hierarchy. Objects can be added through the + icon or dragged up from the Asset Browser. As in Effect House, the checkbox is used to toggle if the object is enabled or disabled in the Scene Hierarchy and the Inspector.
Like in Effect House, coloured icons help identify the type of Scene Object quickly such as the orange camera icon for the Camera Object. Cameras can be set as Perspective or Orthographic with Render Targets and Layers. Here Layers are indicated by the color dots.
Inspector (Inspector)
The Inspector works like that in Effect House. When a Scene Object or Asset is selected, its properties and components show up in the Inspector panel.
The following shows when a Prefab in the Scene Hierarchy is selected. It shows its Transform settings which can be adjusted here or in the Scene with the Move, Rotate, Scale and Uniform widgets.
Every object in the scene has a Transform component that describes where the object is in the scene.
| Example Selection | Description |
|---|---|
 | This example shows the Inspector if a Mesh from the same Prefab is selected from the Asset Browser panel. As this Prefab has a Skin and Animation Player components, these are also visible. |
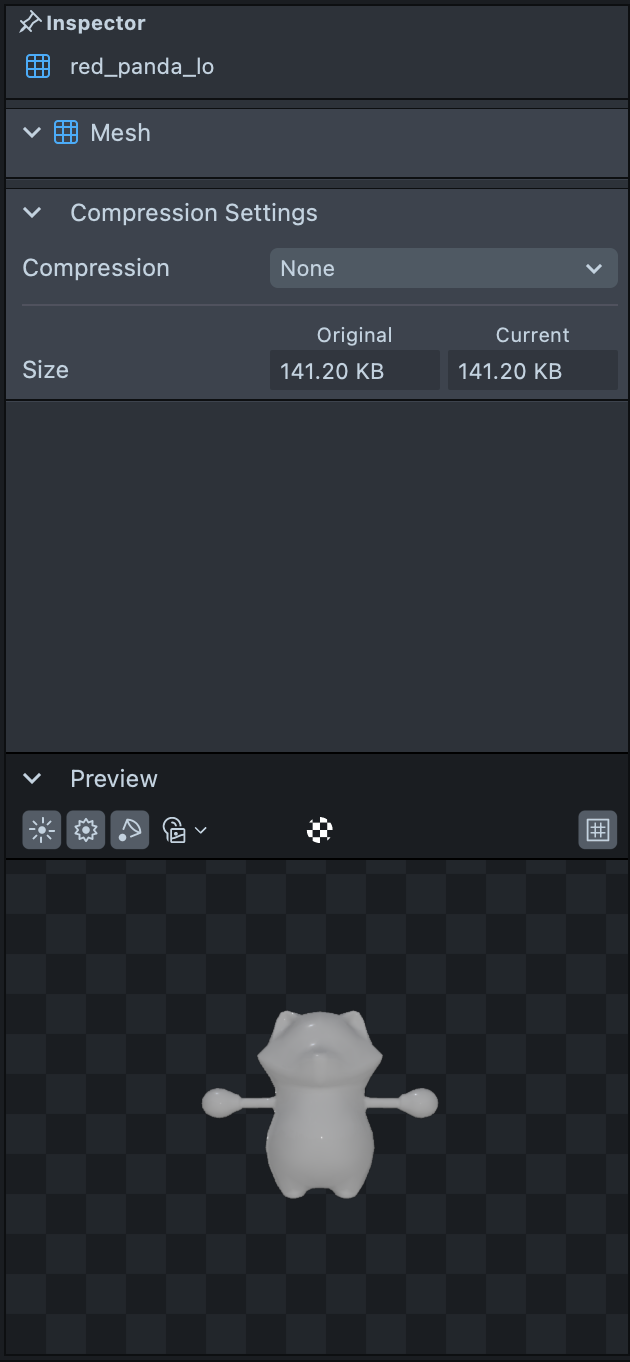 | For this mesh it shows a Mesh and Compression Settings that can be applied to it. The original and current file size is displayed as well as a 3D Preview of the mesh for visual aid. The lighting and EnvMap applied can be changed as well as toggling on the texture map and grid to help see if the mesh is as desired. Different assets show different options such as Material, Texture and Audio settings. |
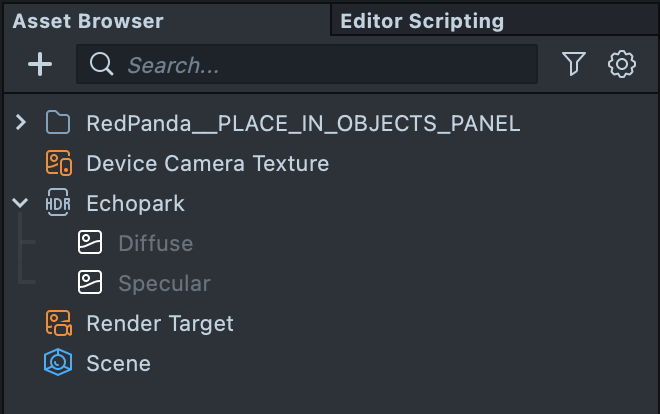
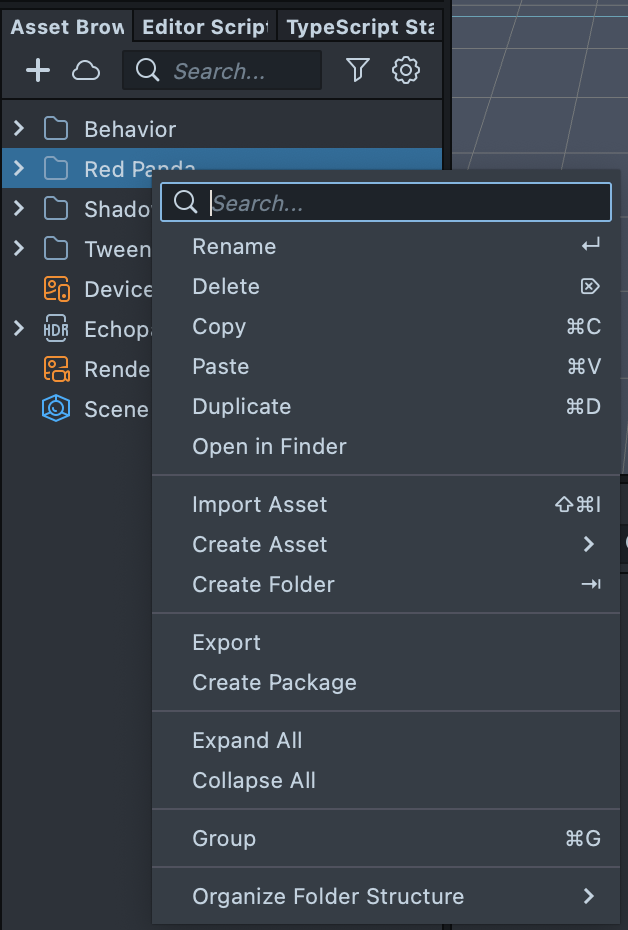
Asset Browser (Assets)
The Asset Browser is similar to the Asset panel in Effect House including being able to organize Assets in Folders. Assets such as Meshes, Textures and Audio can be added by dragging and dropping from local files or through the + icon and choosing from the available list or importing local files with the Import Asset button.
Device Camera Texture
Unlike in Effect House, Lens Studio adds a Device Camera Texture to the Assets panel. This is instead of only being able to directly access it through a Material’s Texture Built-In Assets dropdown menu. It can be accessed here or also through a pop up menu of assignable Textures to a Material’s Texture slot.
Scene
The Scene asset is where the Render Targets for capture, live camera view and as an overlay (rendering at native screen resolution) are assigned. These have settings which can be adjusted for the Target for Anti Aliasing, Clear Color and the Depth Buffer used. The Overlay Target can not be added to the final captured Snap
The order of different Camera objects and their Render Targets can be specified through the Scene asset’s Render Order Config list. A Physics World can be assigned if Physics is desired in the project.
Scene (Scene, Show 3D)
The top menu shows icons to maneuver around the Scene and manipulate Scene Objects.
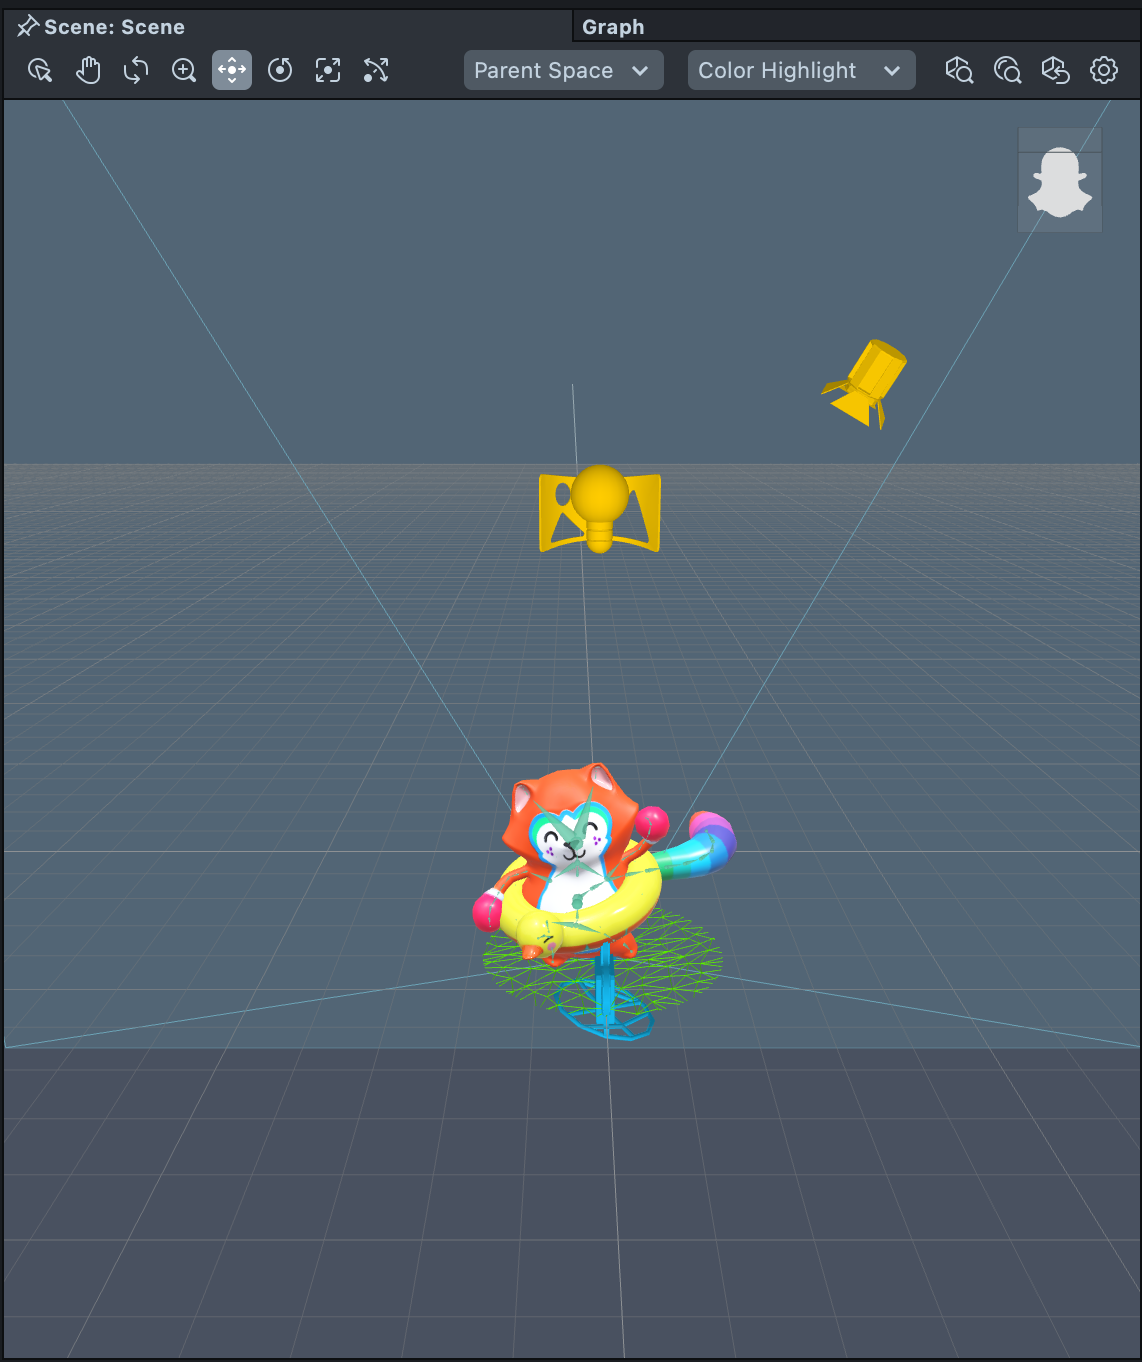
This 3D Scene shows a 3D Panda as a Prefab in the Scene with a perspective camera (blue), EnvMap and Directional light (yellow). The ghost in the box allows the scene to be oriented through clicking and dragging the box to rotate it. The icons in the menu with keyboard shortcuts from left to right are:
- Selection (Q)
- Pan
- Orbit
- Dolly
- Move (W)
- Rotate (E)
- Scale (R)
- Unified (Y)
- Global, Parent, Local Space which shows when Move, Rotate or Unified are selected
- Box, Color, Wire Highlight
- Zoom to All (A)
- Zoom to Selection (F)
- Reset to Home (H)
- Settings to show grid
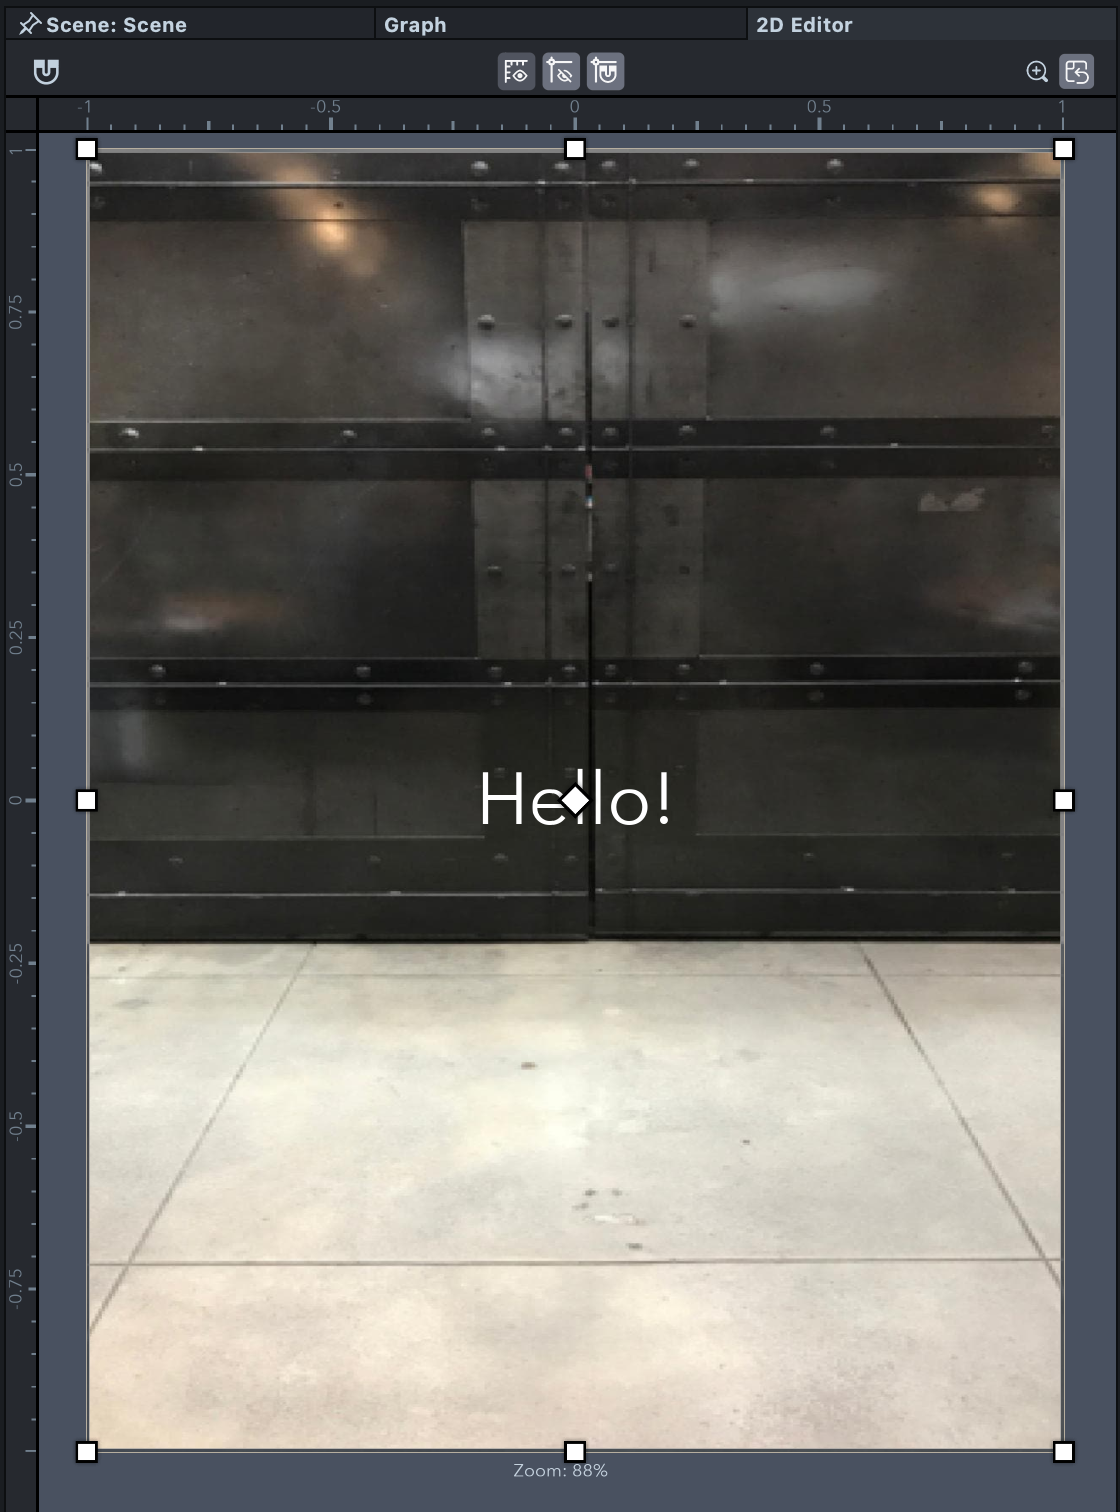
2D Editor (Scene, Show 2D)
Alongside a 3D Scene Editor, a 2D Editor is also available to edit 2D elements like Text, Screen Images, Face Stickers and Masks. It can be opened by selecting a 2D Scene Object from the Hierarchy and by going to Window from the toolbar -> Editor -> 2D Editor or double clicking a 2D Scene Object in the Scene Hierarchy.
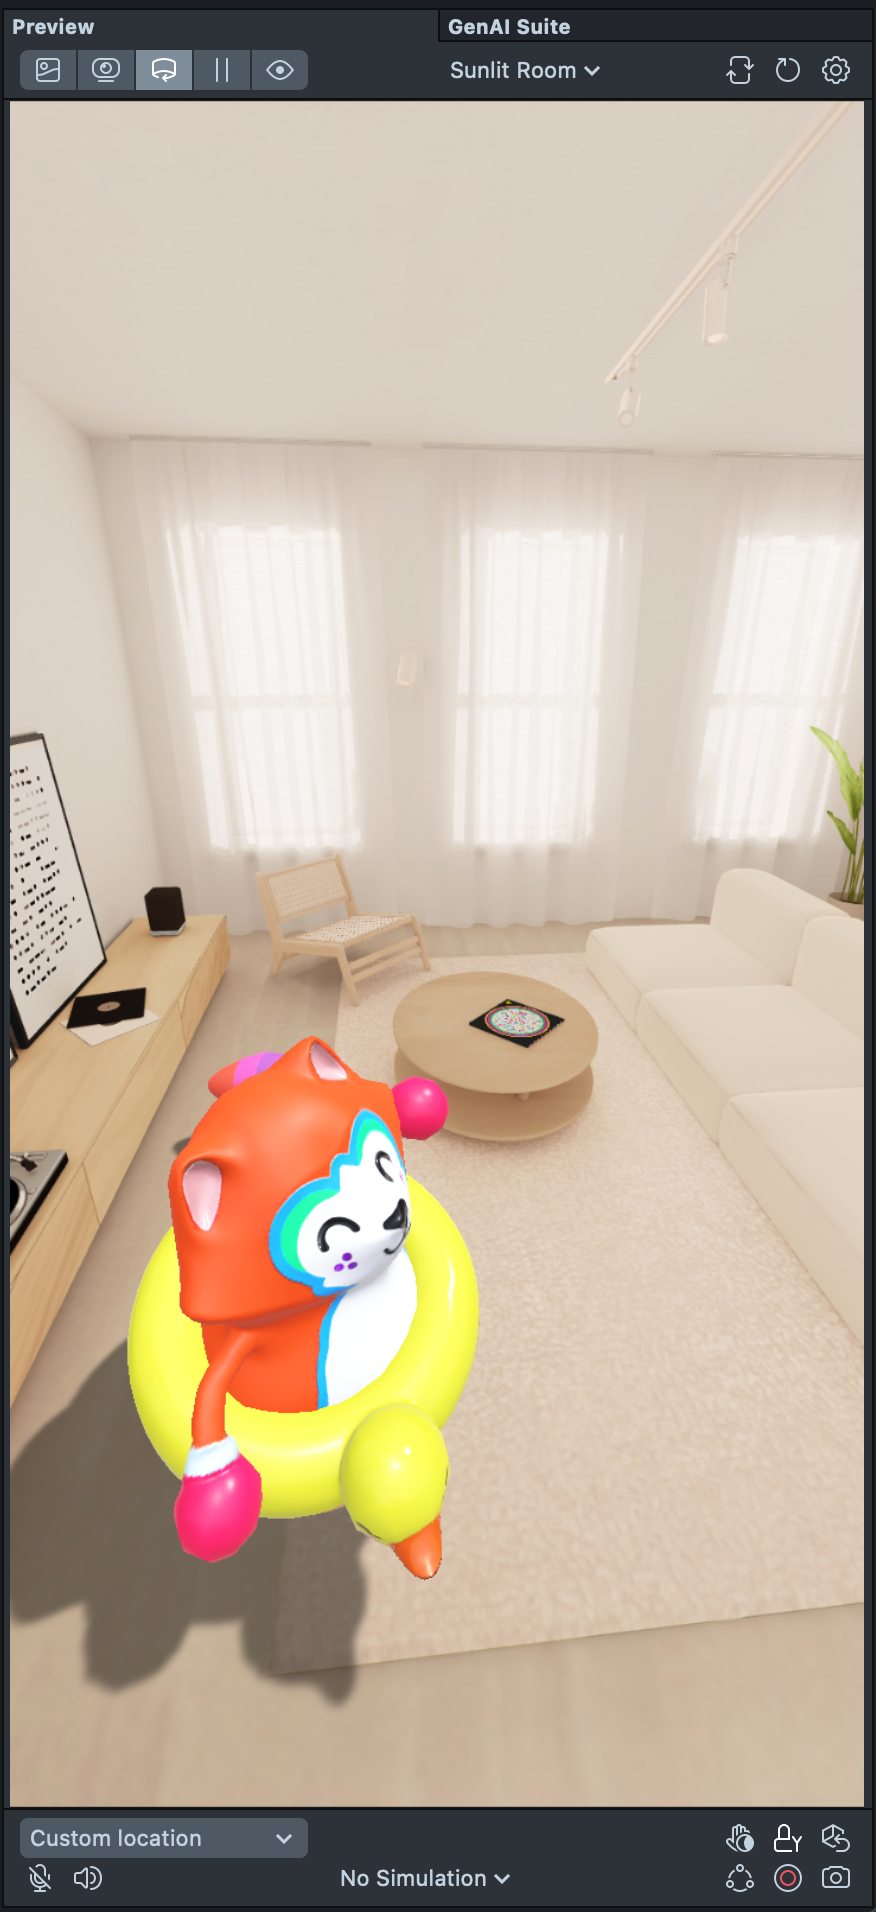
Preview
The Preview panel lets you view updates as they are made.
Different inputs are available such as Images, Videos, Webcam feed and Interactive Environments.
When using Interactive Enviroment, you can navigate the scene with WASD keys and can be looked around with right click and drag. This is useful for world Lenses such as world tracking.
The Lens can be reset from this window, audio muted, image and video previews captured, as well as activate the microphone. This is most important if your Lens processes audio.
Front and Back cameras are supported as well as previews for different devices such as: iPhone 14 Pro Max, Spectacles and Horizontal screens.
Different UI overlays help preview the experience from the end user’s perspective including Snapchat live view, capture view and no UI.
| Front Camera Preview | Rear Camera Preview | Interactive Environment Preview |
|---|---|---|
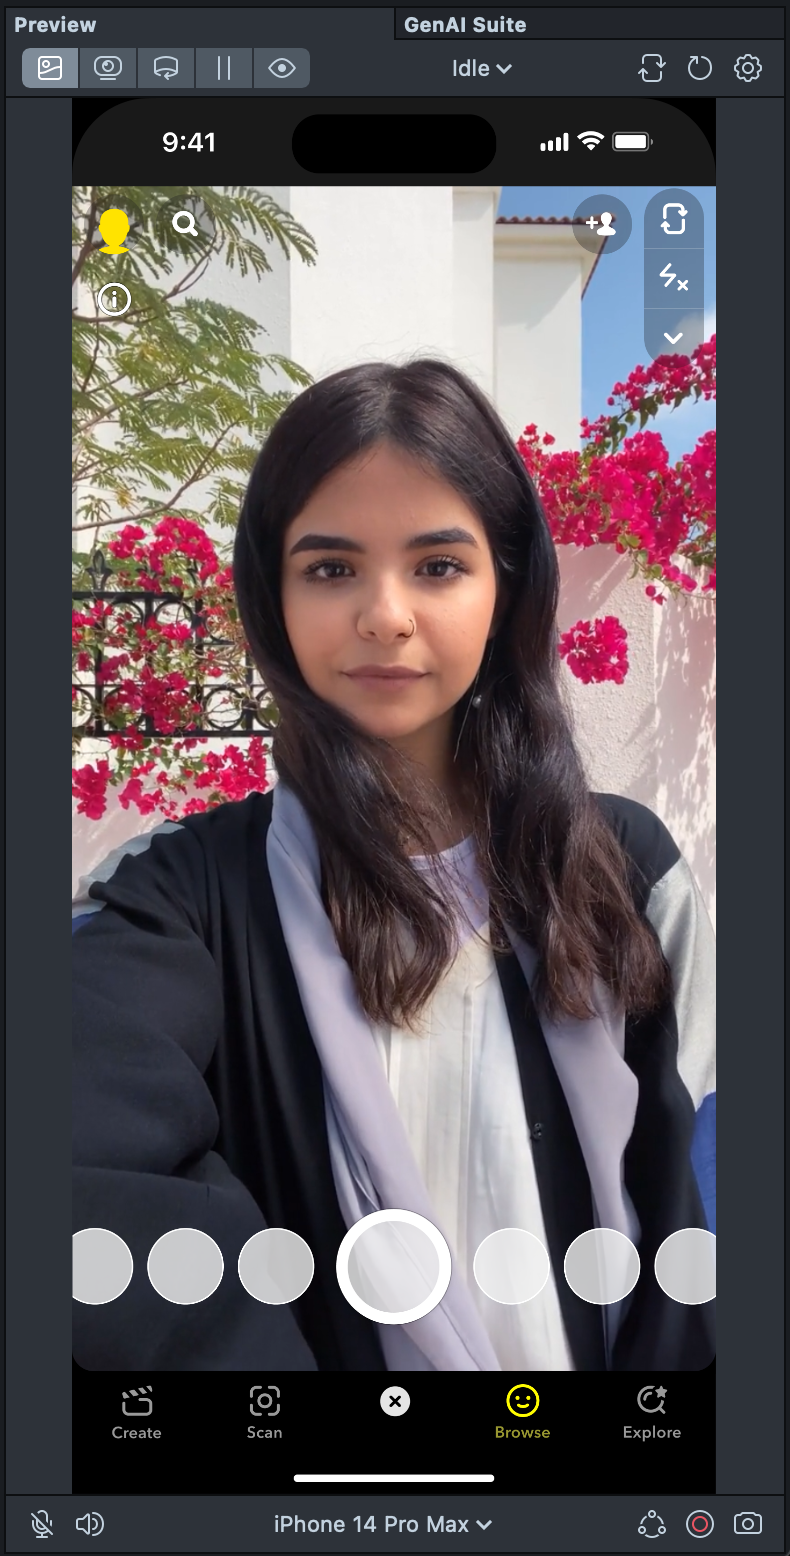 | 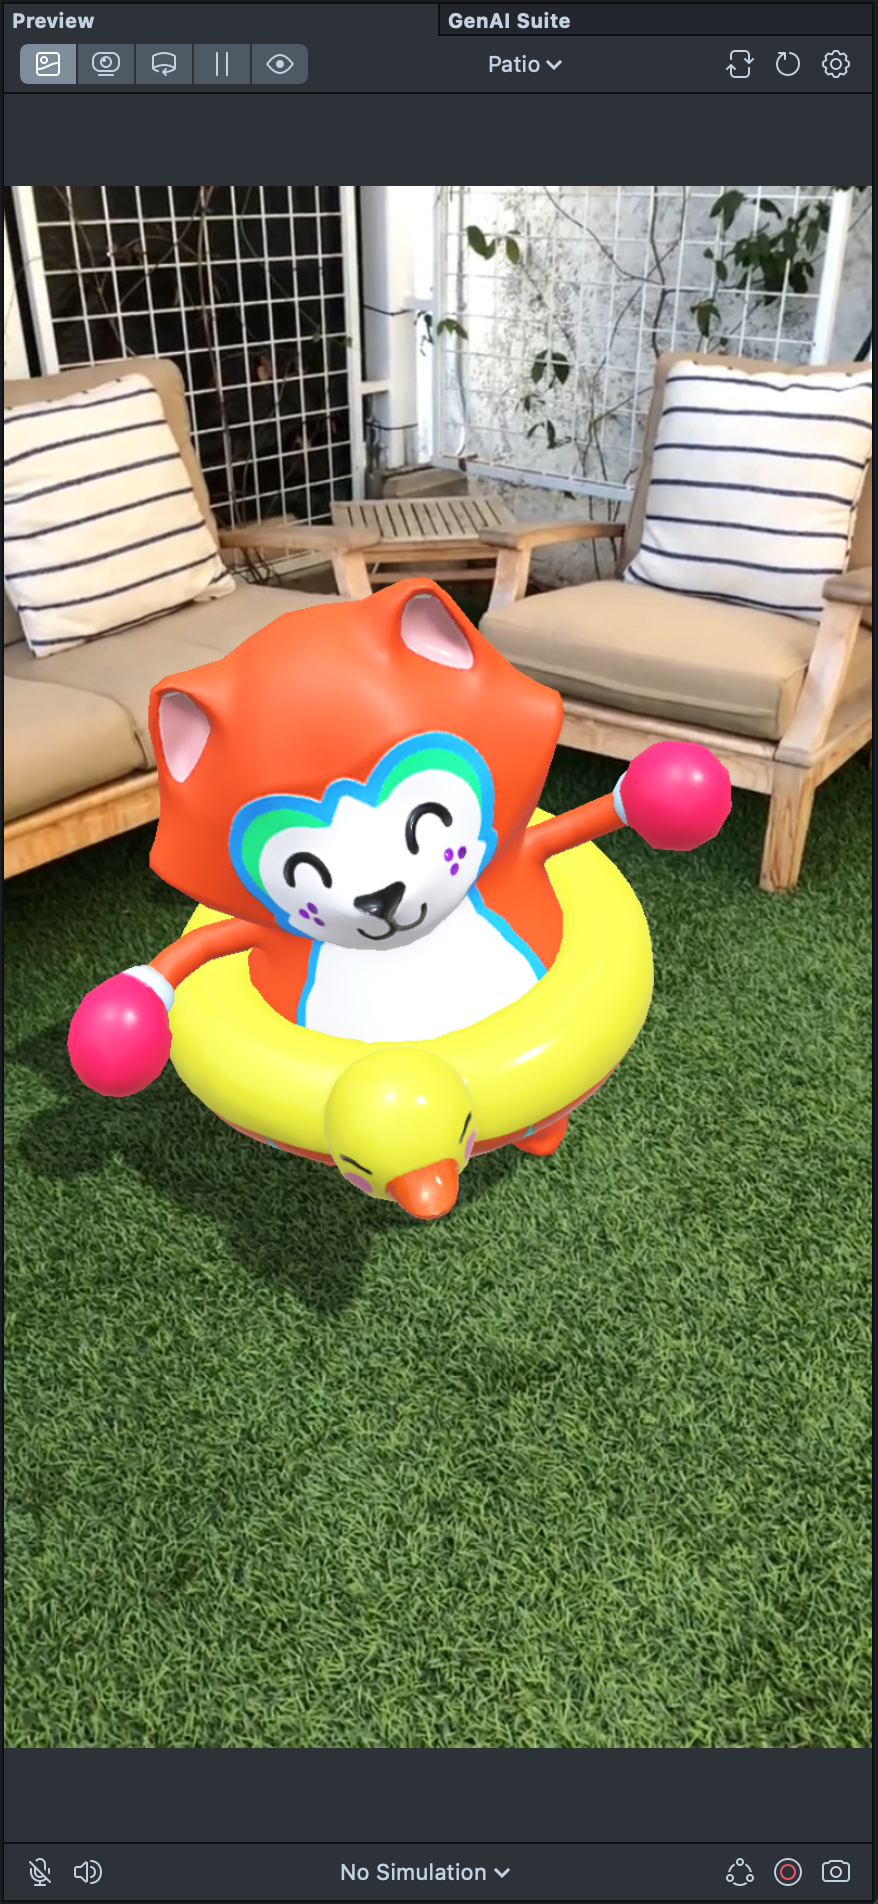 |  |
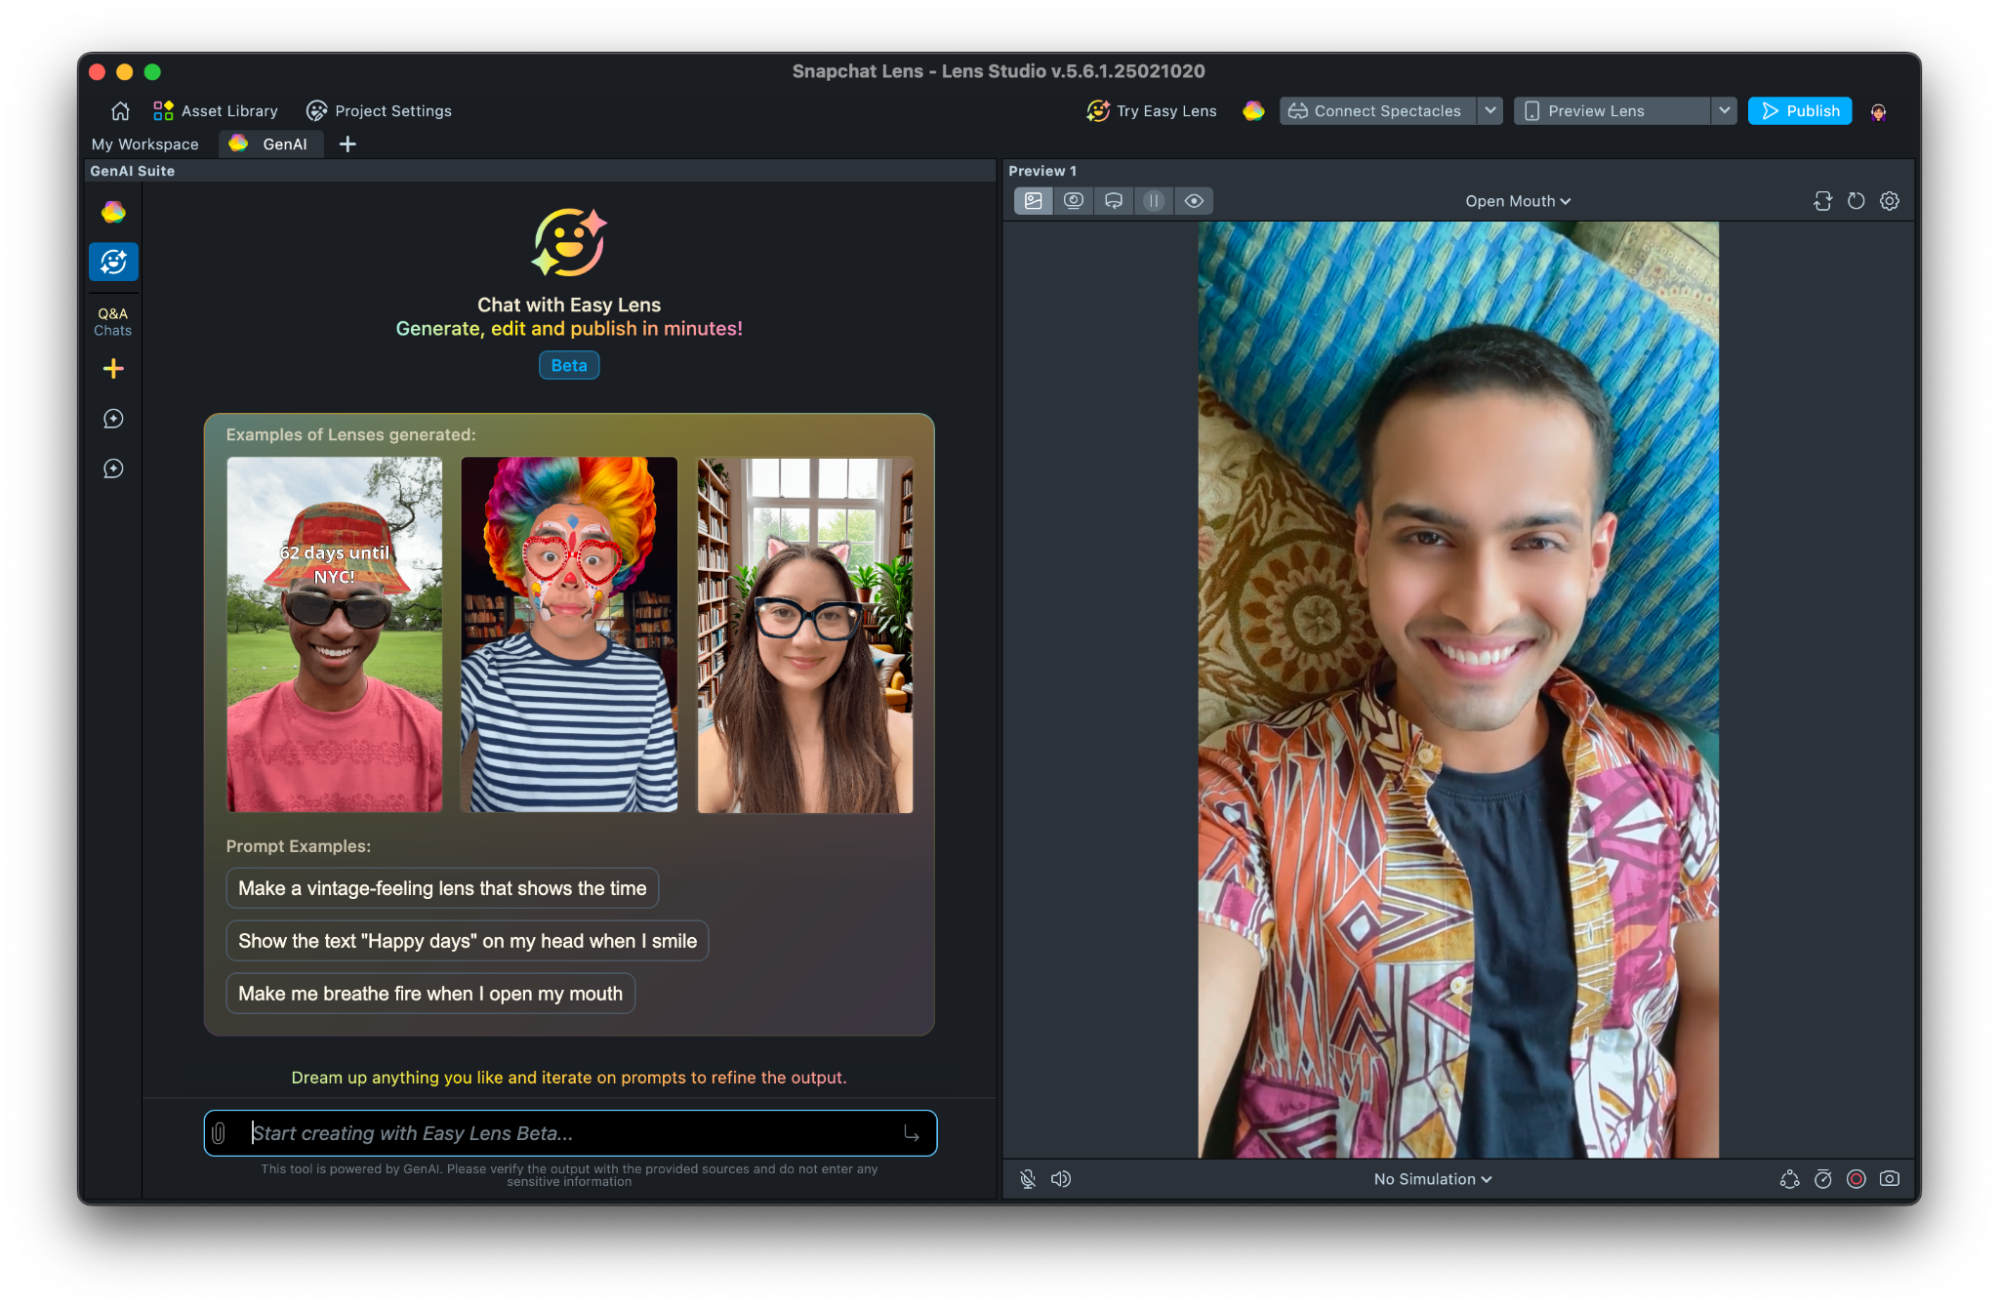
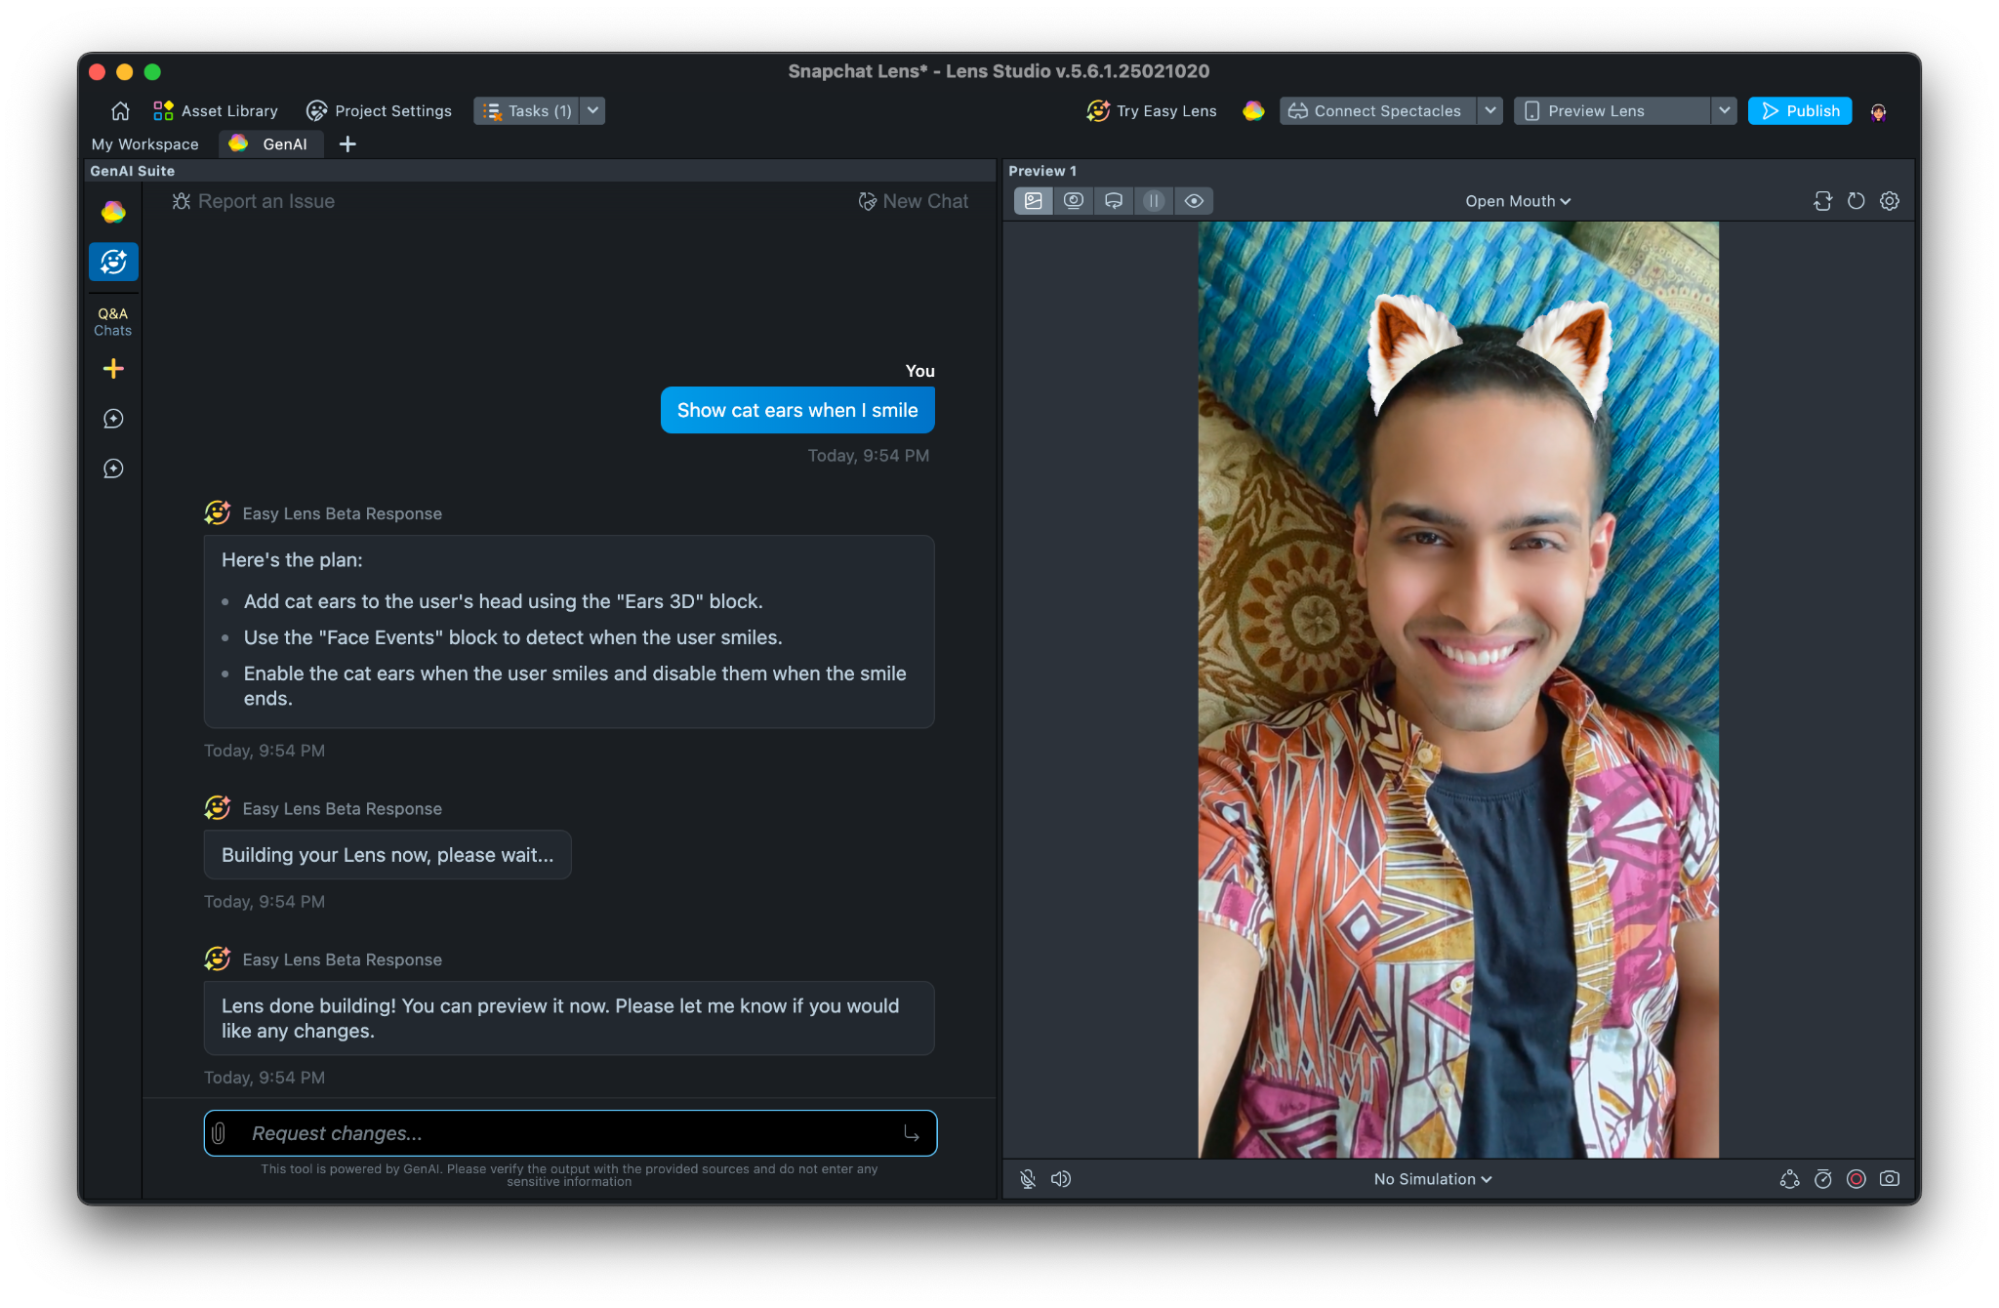
GenAI Suite (AI Assistant)
Lens Studio’s GenAI suite features capability such as Lens Studio AI.
Textures and 3D Assets can also be generated such as for face masks and 3D models with PBR materials including the associated textures such as normal maps. GenAI Suite has a Q+A Chat feature which helps to answer questions on how to build a Lens. It can also provide answers on how this would be implemented in Lens Studio, such as information on which object to attach a script component to. Immersive ML is like creating an AI Art Image in Effect House and turns the Scene into the generated style such as ‘Anime Style’.
Lens Studio AI is accessed through the GenAI Suite or through adding a new GenAI Workspace once a new Lens Studio project is opened. Click the Lens Studio AI icon to get started and a chat window will open in the GenAI Suite. A text prompt can be typed and sent for Lens Studio AI to start building a Lens. That chat can be continued to make edits until you are satisfied with the outcome.
| Starting an Lens Studio AI Conversation | Conversing with EasyLens to make a Lens |
|---|---|
 |  |
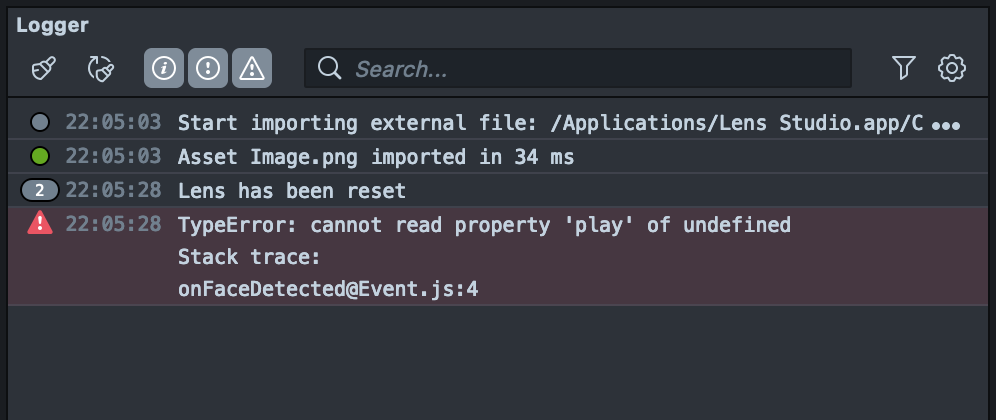
Logger
Unlike Effect House, Lens Studio has a logger to show messages such as indicating the Lens has been reset and when scripts have errors. This helps to fix any issues such as displaying which script is throwing the error as well as which line and character in the line is the beginning of the error.
Common Objects in the Scene
As you build your Lenses, you will frequently encounter differet objects that adds things to the Lens.
Scene Object
Scene Objects are the fundamental unit that components are added onto to add something to a Lens.
Much of Lens Studio’s Scene Objects follow a very similar format to Effect House. An empty Scene Object can be added which has a Transform component, just like in Effect House. From here, further components can be added that adds things to the Lens like rendering meshes, running scripts, and applying ML effects.
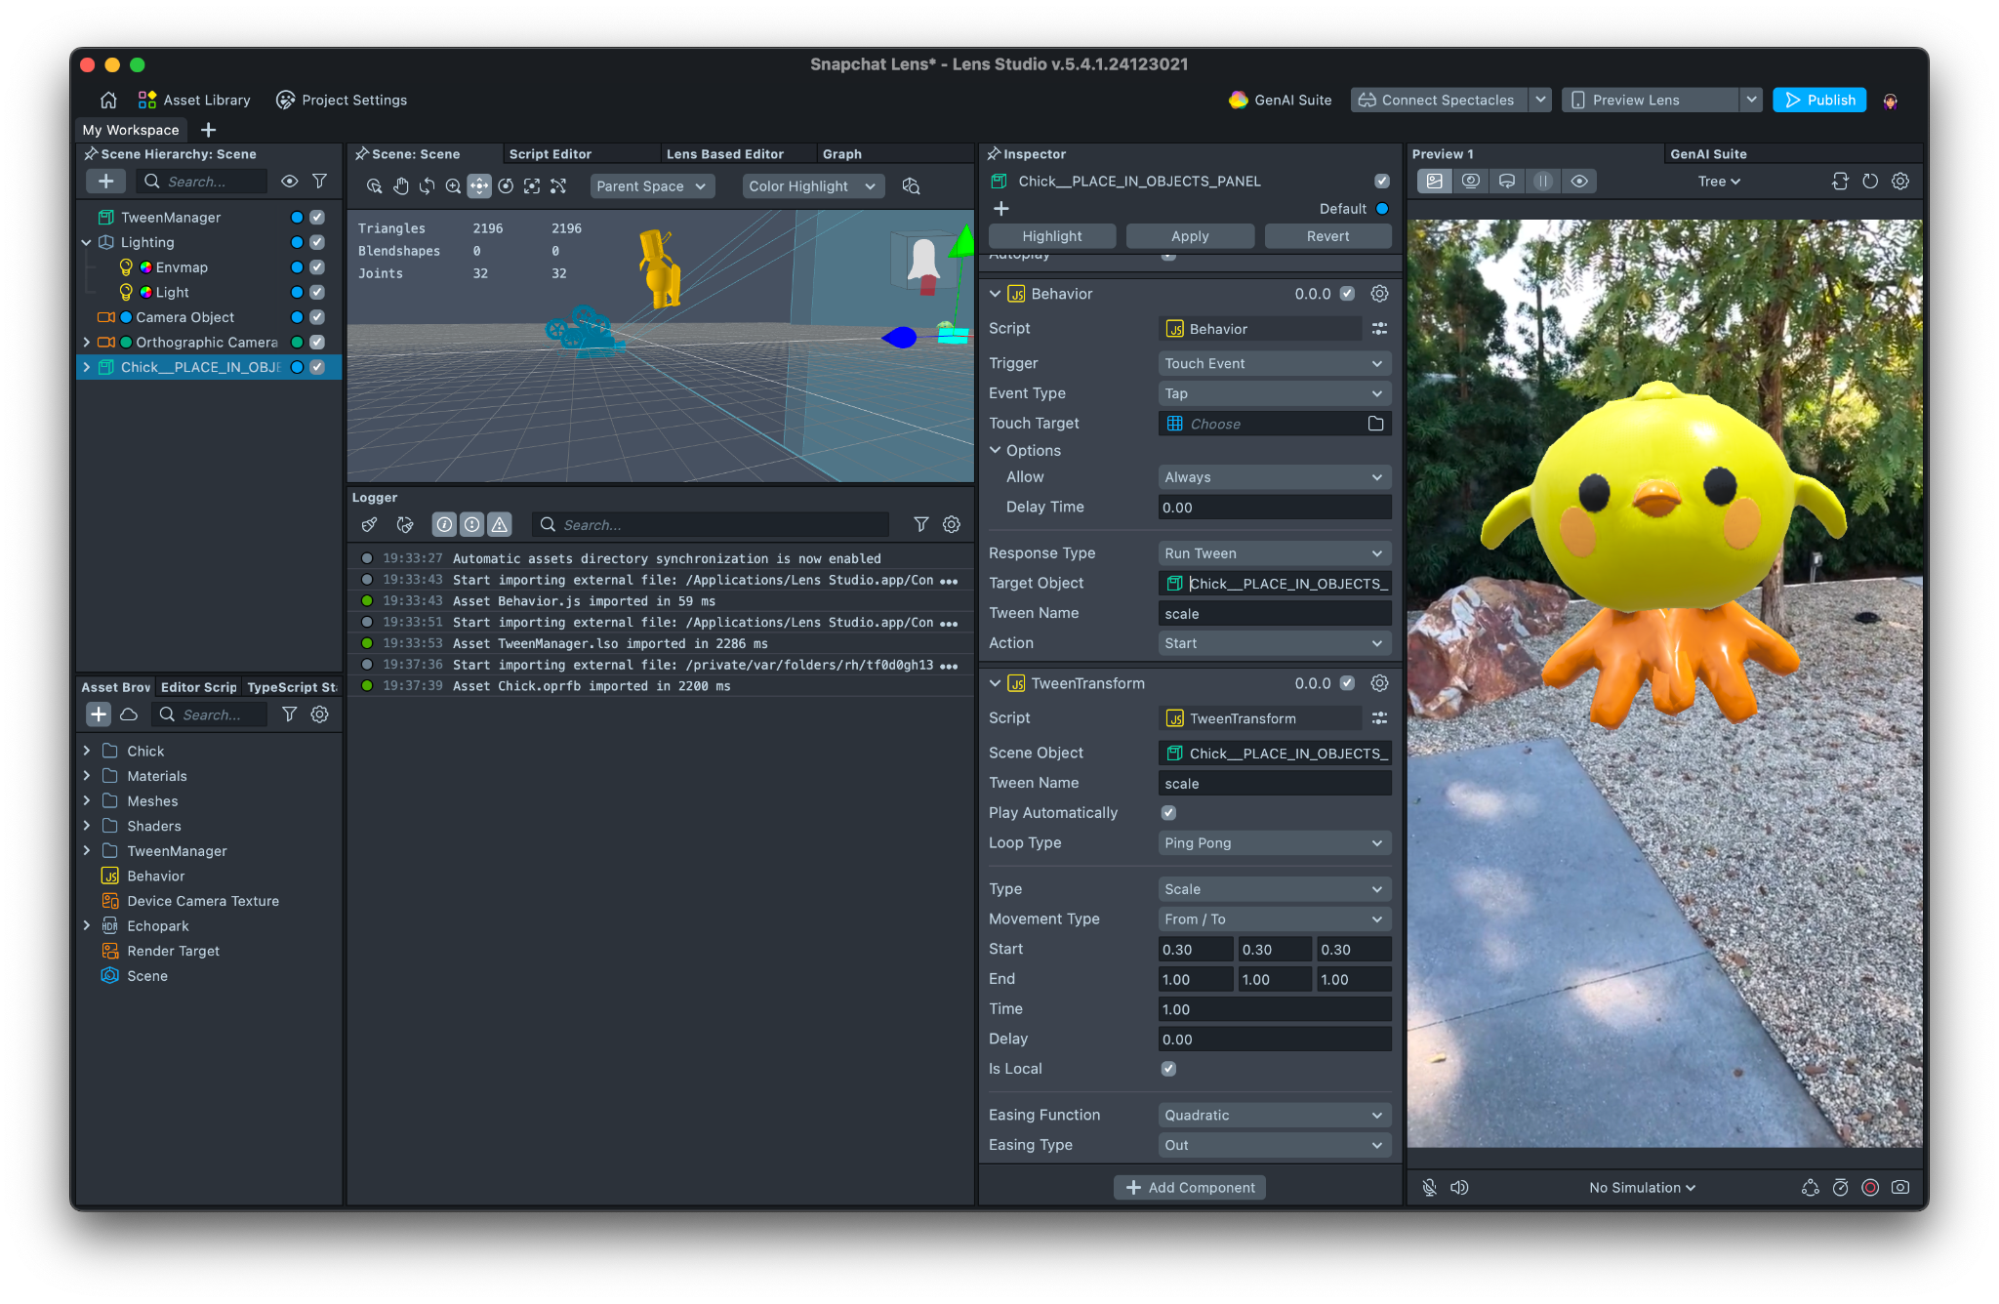
Behavior and Tween (Interaction)
Instead of adding an Interaction component, script components are added to create interactions and animation without needing to open the script itself.
Both Tween and Behavior scripts can be added through the + button at the top of the Scene Hierarchy. This will automatically add a new Scene Object, with the respective component on it.
Tween is used for animations and Behavior is used for interactions like Tap, Face Events and events like On Start. These can be combined to create animations that are triggered by a behavior.
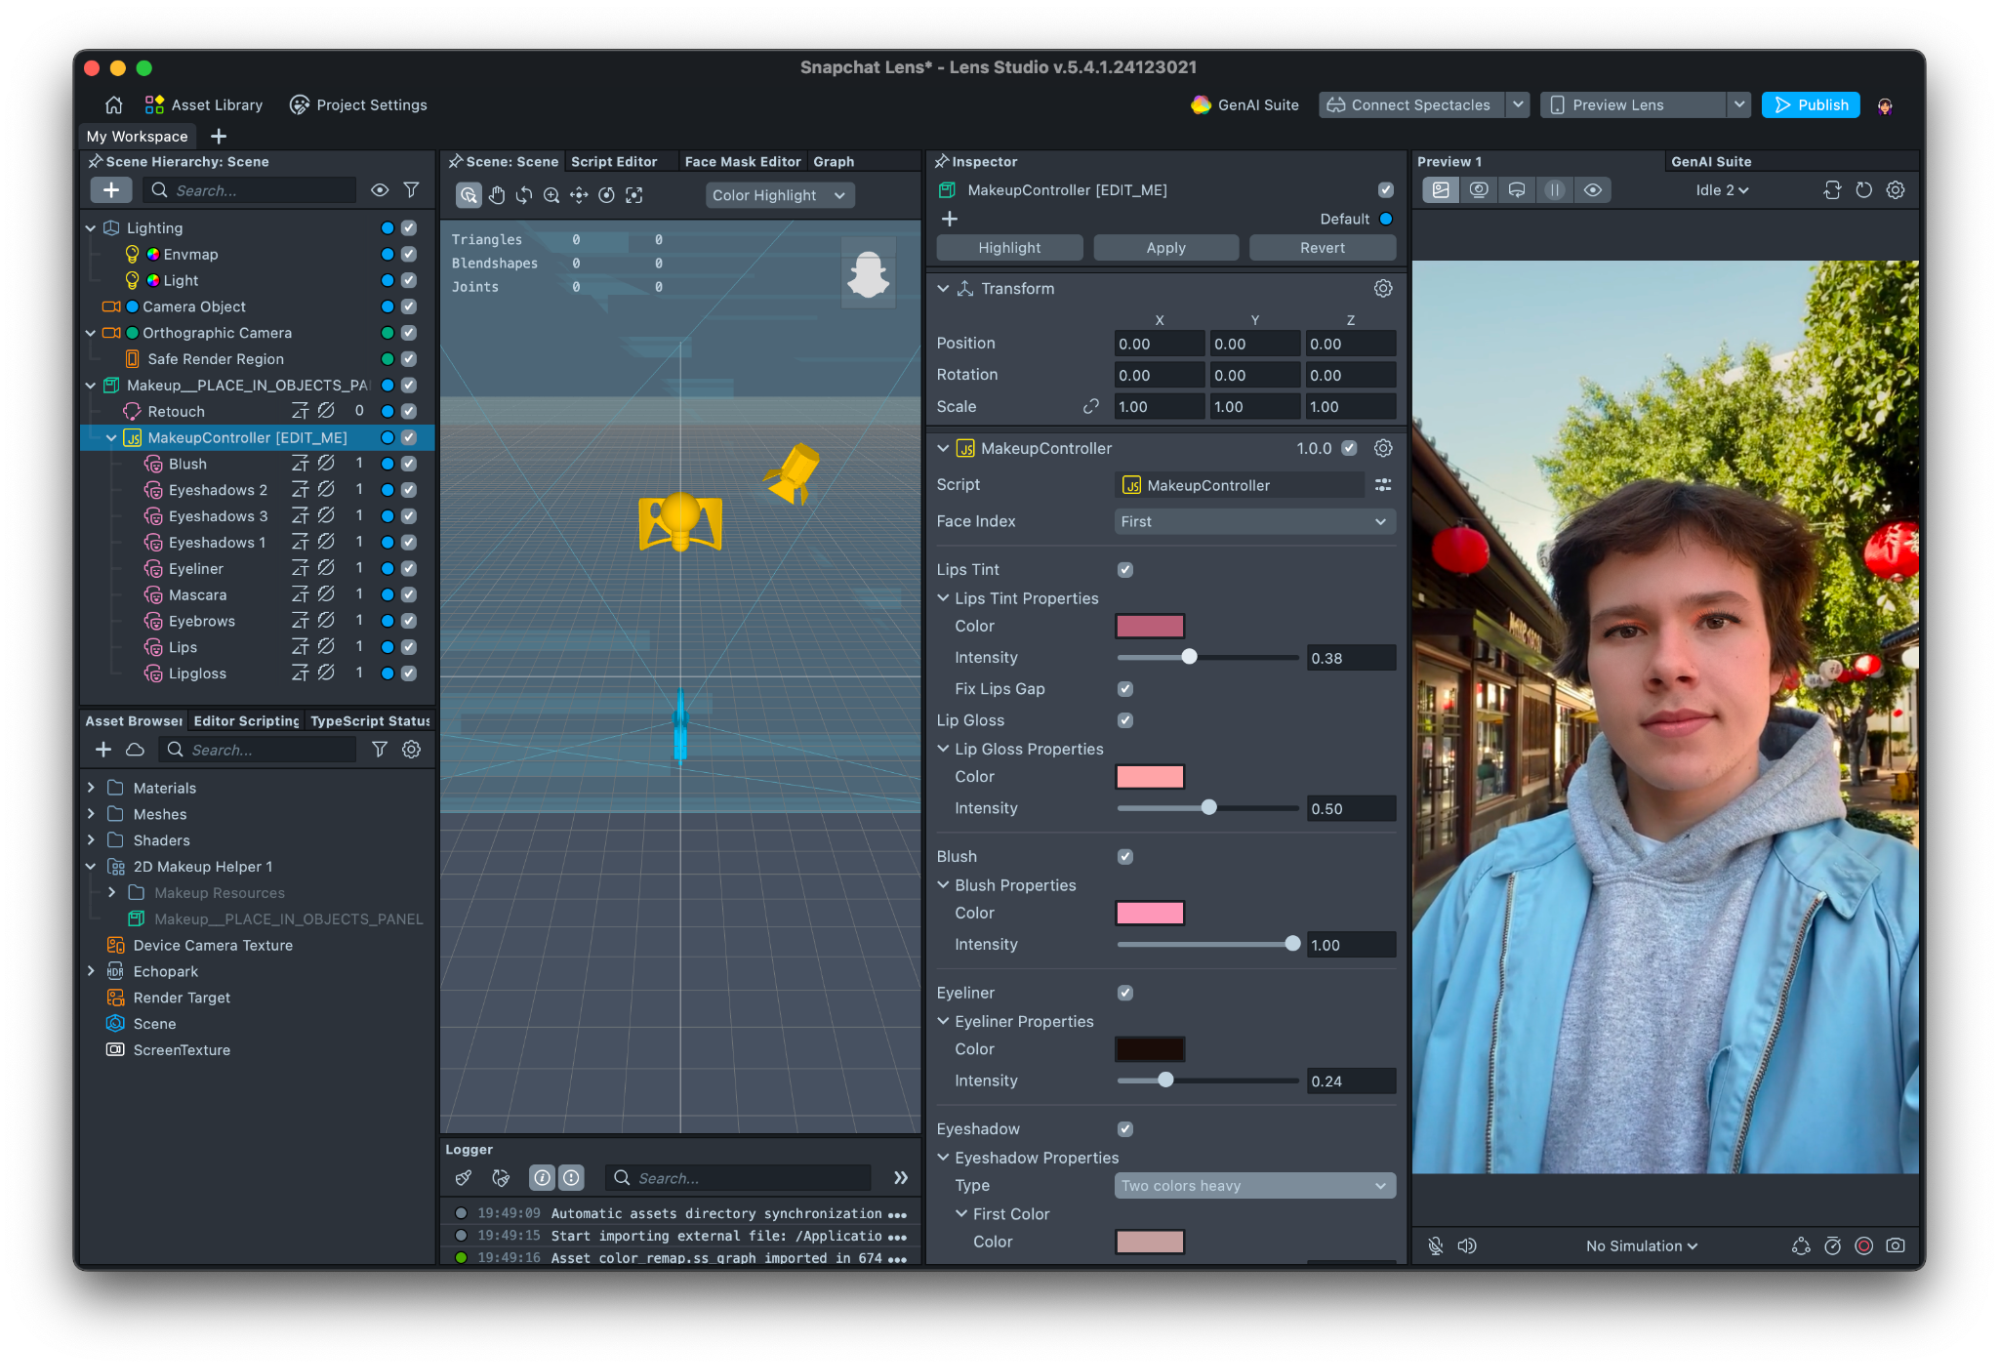
Makeup
Lens Studio does not have built in makeup objects. Instead, assets such as the 2D Makeup Helper, 3D Makeup Helper and Beauty ML are available. They can be imported from the Asset Library and added to the Scene Hierarchy to edit items such as blush, lashes and lip colors.
Post Effect
Post Effects can be added in the Scene with the plus button in the Scene Hierarchy under the Visual Effects heading. Unlike in Effect House, Post Effect objects can be edited. This is because they are assigned a material which can be opened in the Shader Graph where they can be edited or created. Notice the final node in the graph is a Shader node with the type set to Post Effect in the Inspector.
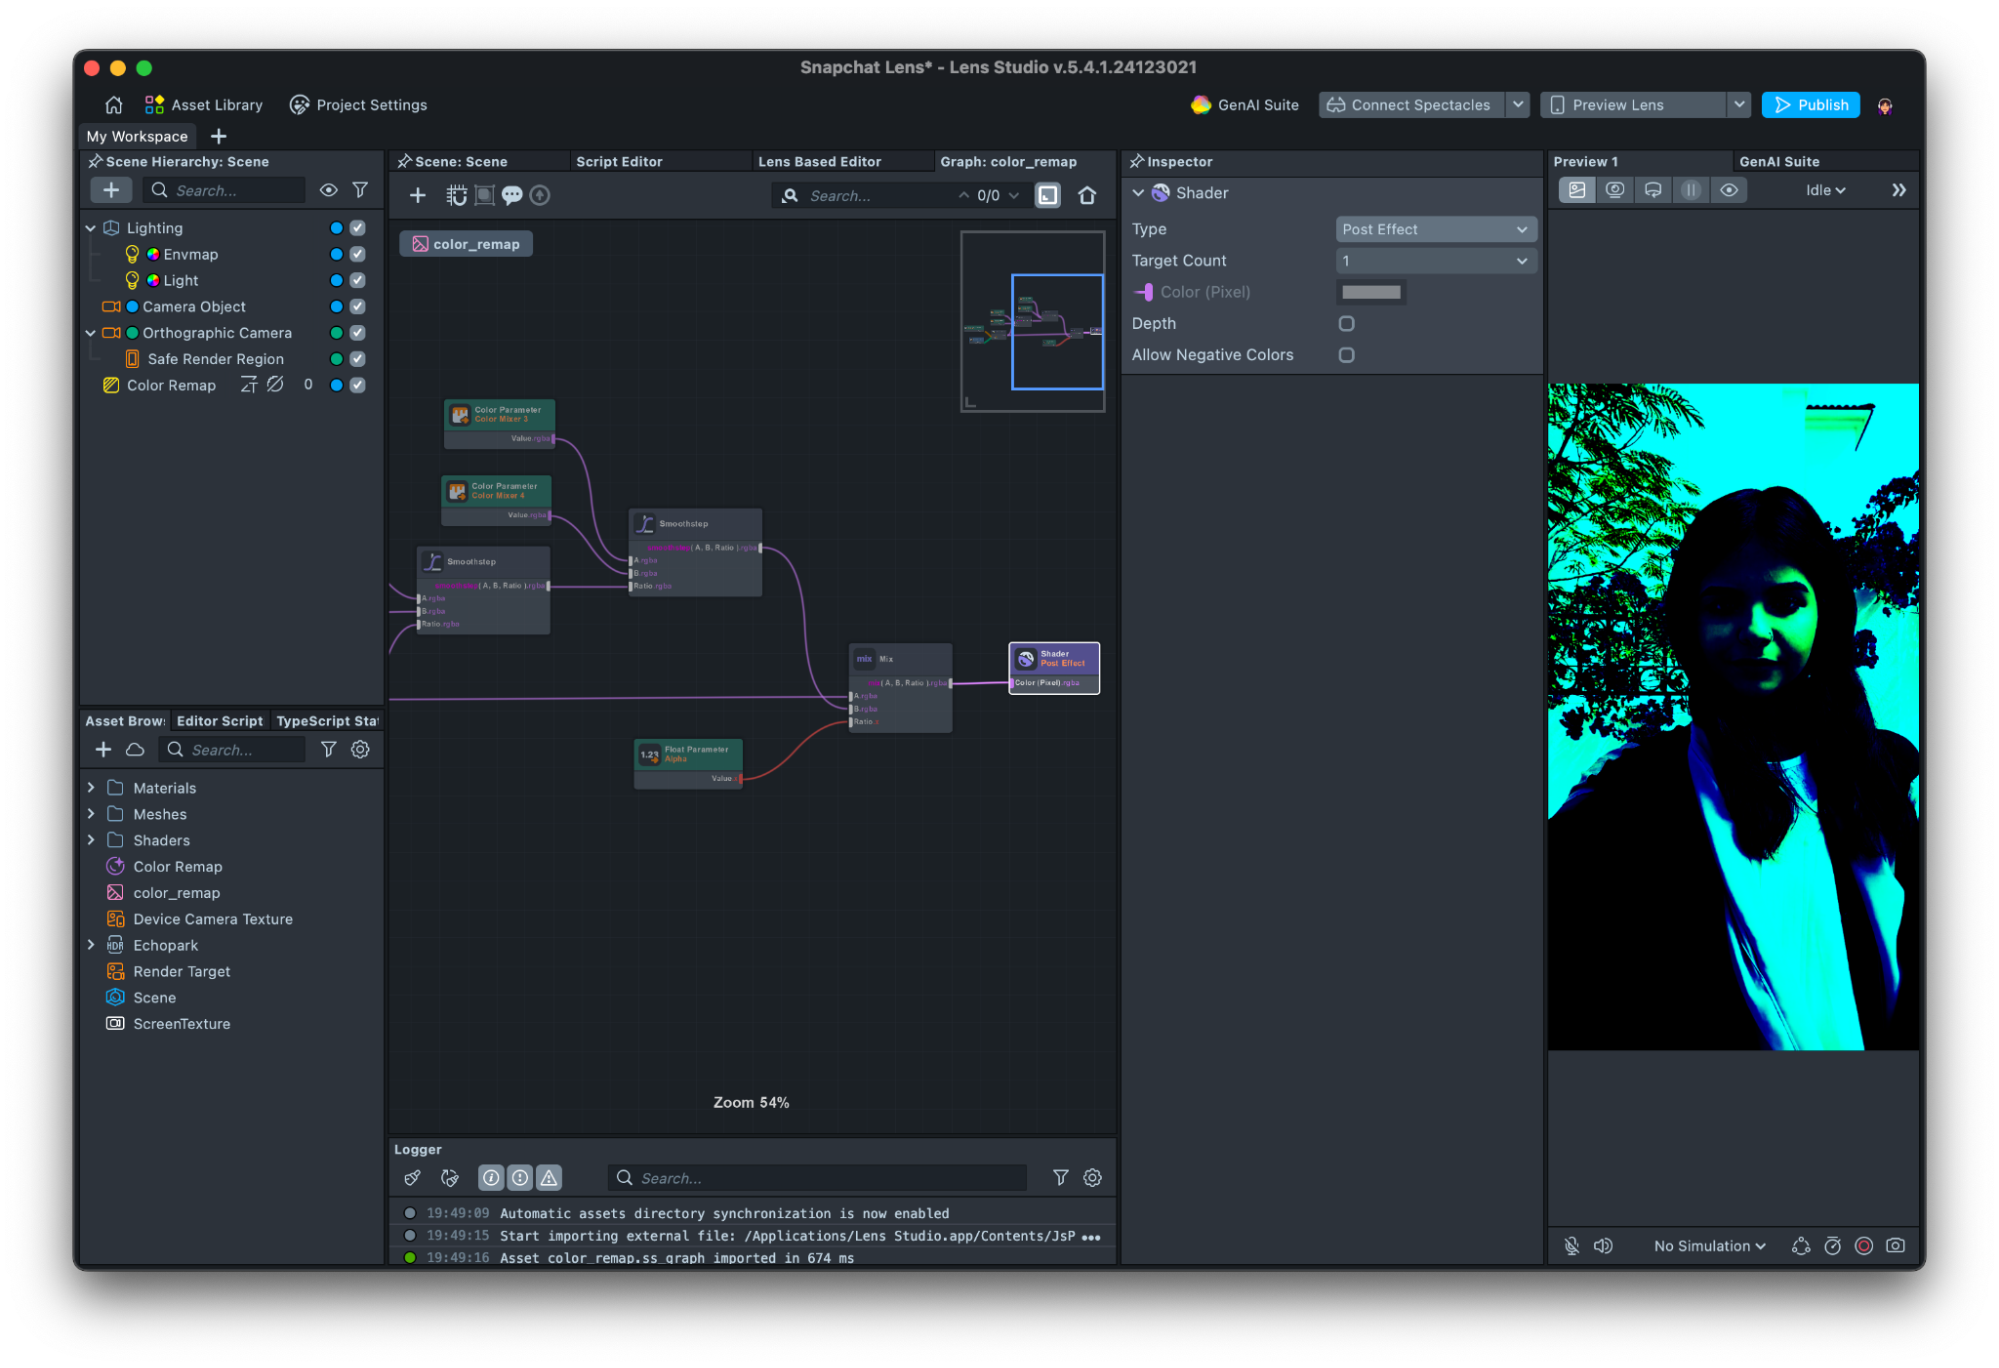
Color Correction is a Post Effect which adjusts the color of a Lens using a LUT (lookup table). A guide with a base lookup table can be found here.
User Context System (Social Kit)
The User Context System has a few components available to create Lenses that include a user’s friends’ data like the Social Kit does in Effect House. Some of these are the Leaderboard, Friends, FriendsInfo and Friends Carousel Components.
These can be found in the Asset Library and added to the Scene Hierarchy from there. Try the Friends This or That sample project to learn more.
Importing and Exporting
Importing is how custom Assets can be added to a project. This is simply done by dragging a compatible item from a file browser into the Asset Browser and by selecting the + icon in the Asset Browser and choosing Import Asset.
Assets can be exported for reuse through right clicking -> Export in the Asset Browser or the Scene Hierarchy. They will show as a .lspkg and Scripts as .lsc files in the File Browser. Script assets exported via the Asset Browser can be set to be editable or locked for more control over sharing them.
When an editable Asset is imported, it can be right clicked and the option Unpack for Editing allows the assets to be unpacked. After an asset is unpack, you can modify its assets (e.g. scripts)
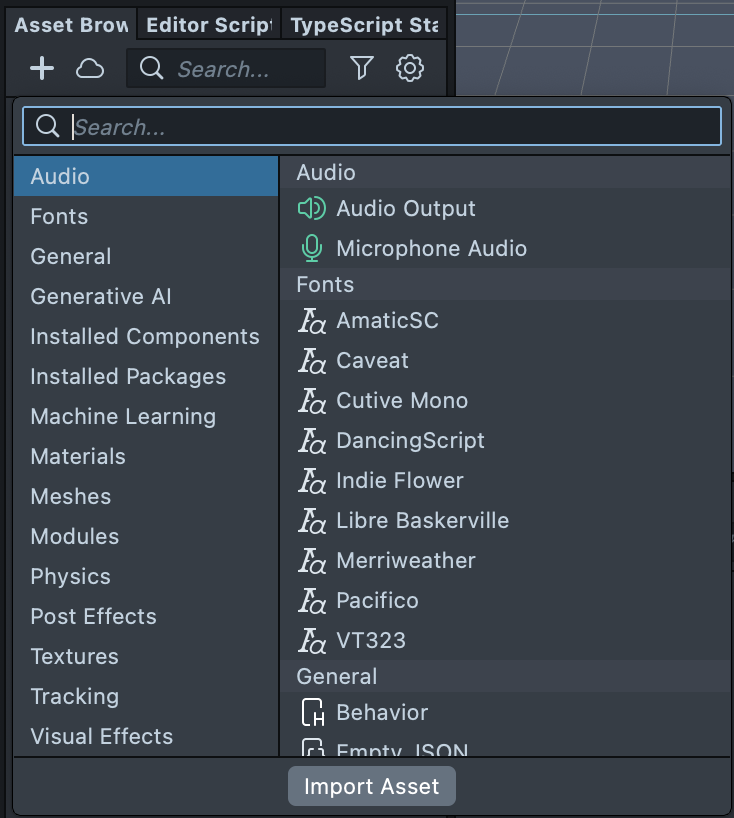
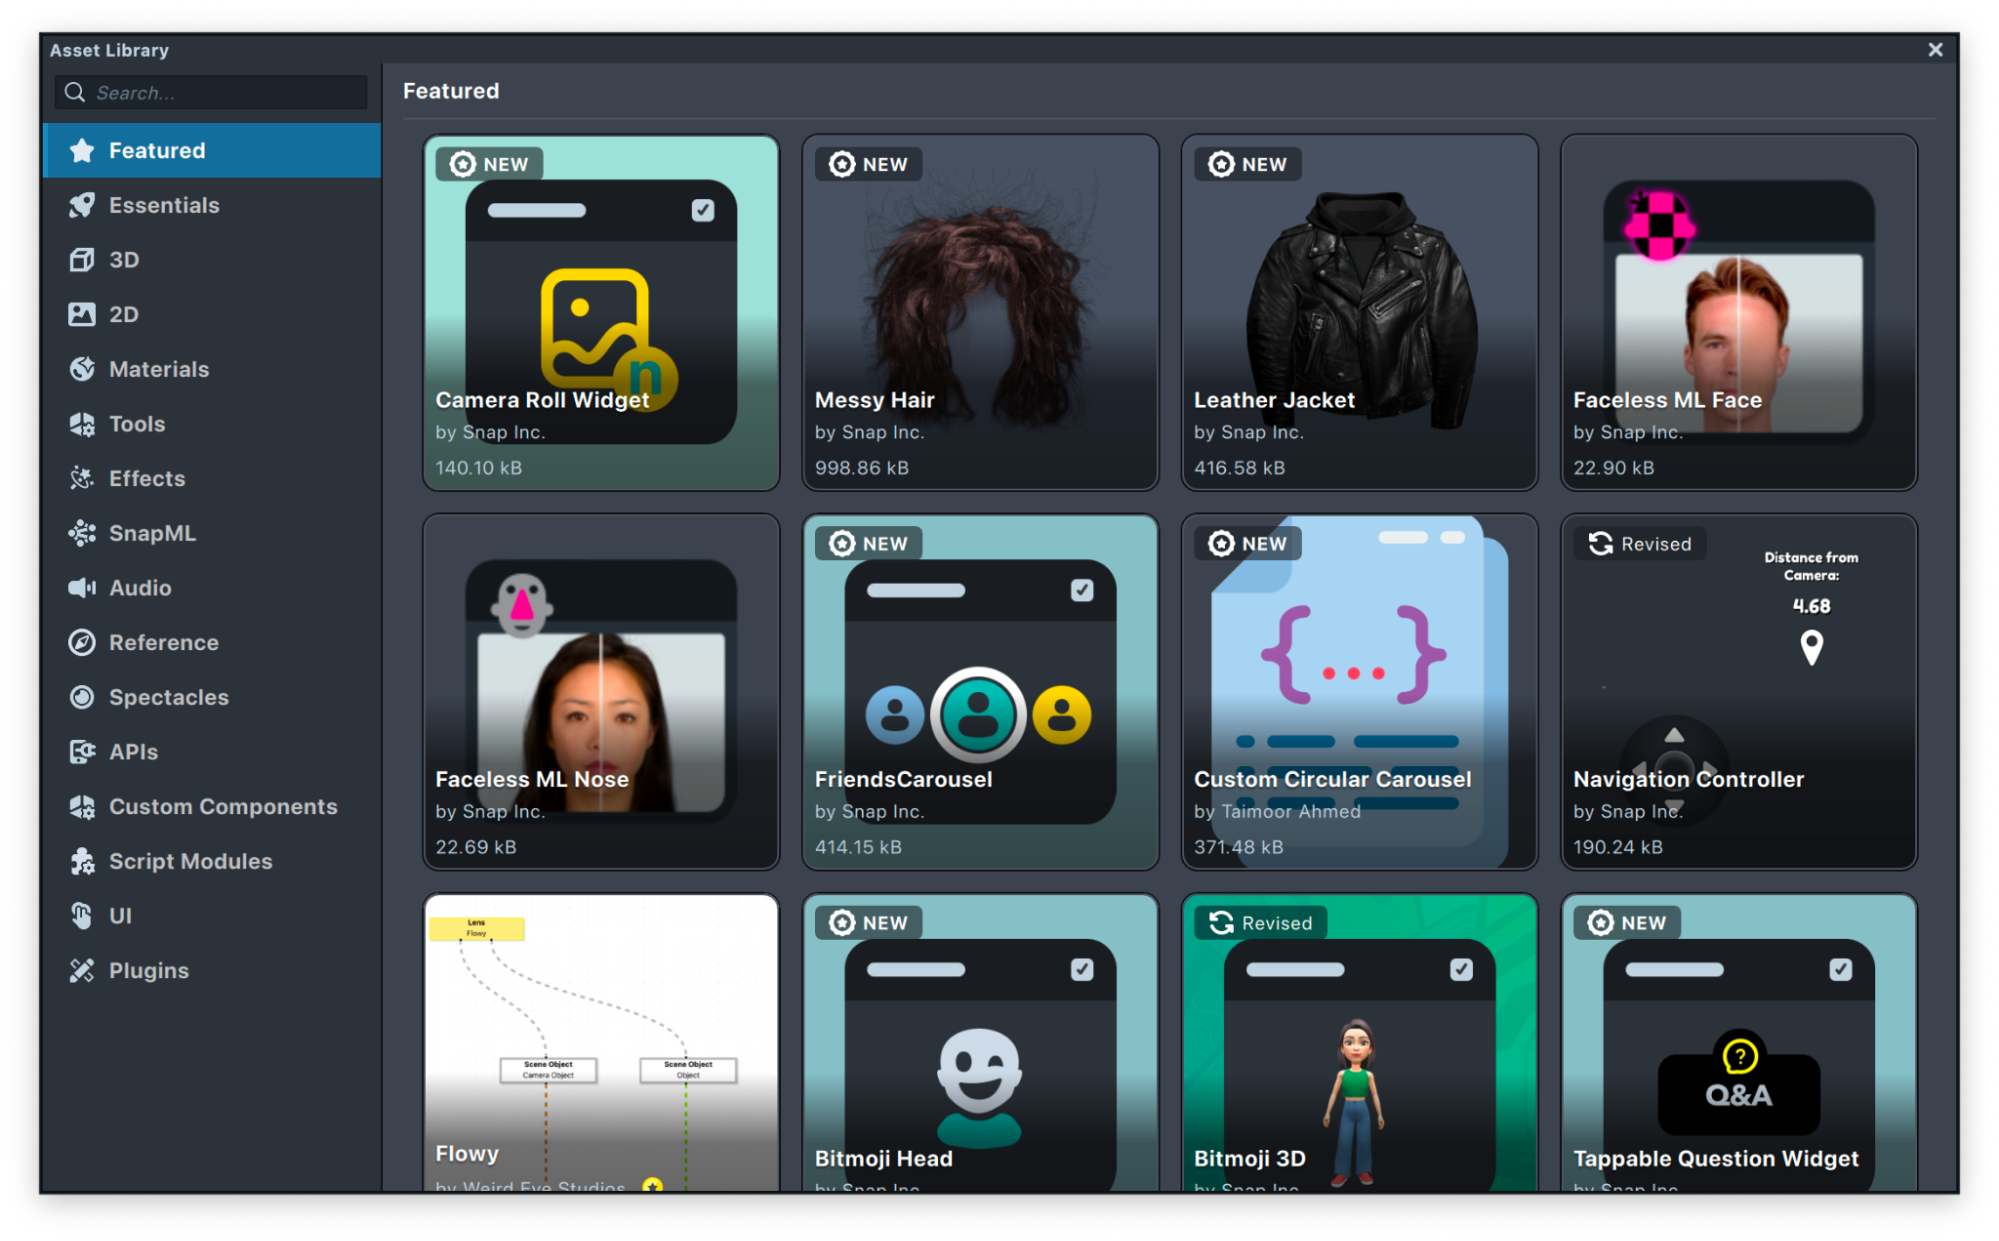
Asset Library (AR Library)
Like Effect House’s AR Library, the Asset Library provides a collection of assets that can be imported into a project. From the Asset Library button above the Scene Hierarchy a new window opens showing assets such as SnapML components, 3D objects, materials and VFX.
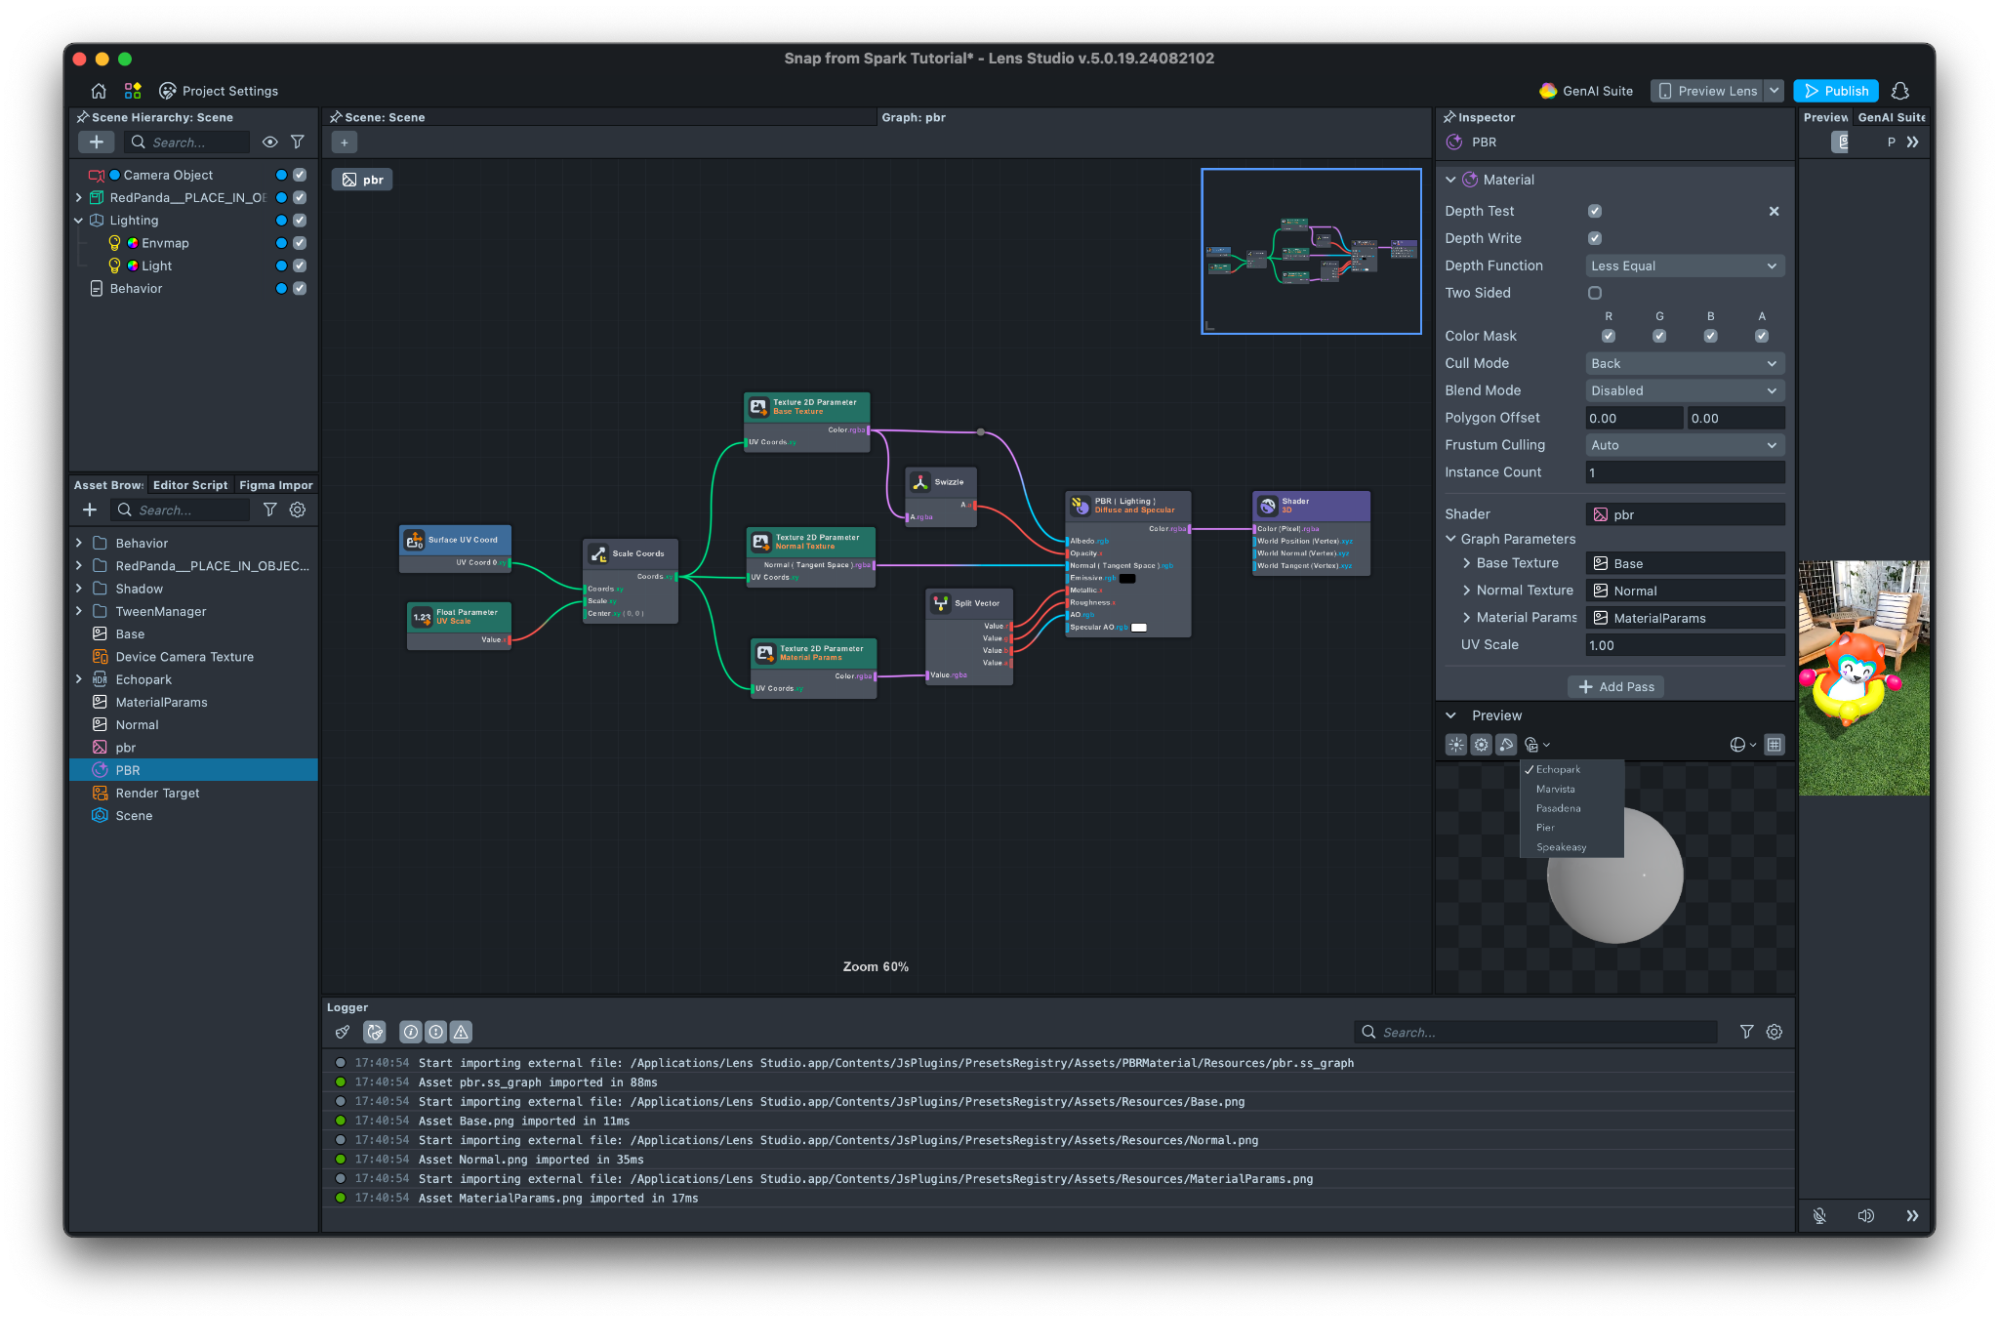
Shader Graph (Material Editor)
The Shader Graph is the equivalent of using Effect House’s Material Editor to create and edit materials. By double clicking a material in the Asset Browser, it opens in the Shader Graph panel. Any material can be opened and edited this way.
Shaders contain the logic of a material. One shader can be used in multiple materials. A material contains the configuration of a shader, and is what is used to render an object.
An Empty shader asset can be created in the Asset Browser and opened to show the associated graph. Each material has a shader assigned to it.
The Inspector panel shows different parameters and settings when a material vs a shader is selected whilst the graph will be the same for the shader and material that are linked.
When you are editing a shader, the Inspector panel will show the parameters of the current node selectedd. When you select a material, it will show you the parameter that has been exposed by the shader.
There are many similar nodes and materials such as PBR can be edited and created and output to a shader node.
Like in Effect House, inputs can be created, which are known as Parameters. For example a Float, Color, or Texture Parameter node can be added and passed into the material to control data such as speed of animation, size, position, color, normal map and much more.
These are then accessed like other inputs, which is through the Inspector window when the Material itself is selected instead of Effect House’s Set and Get node connections.
Variables are also not added through a side menu like Effect House but passed in as parameters. Behavior and Tweens can be combined to take Materials further with interaction driven values.

Here is how to get around the Shader Graph:
- Nodes can be added from the
+icon at the top of the graph or right clicking in the graph -> Add Node (with options from the library or Sub-Graphs) or by left clicking and dragging from a node’s output - Nodes and Sub-Graphs are categorized when adding them to the graph, like in Effect House, The search bar helps to easily find a node as the names and categories of specific nodes may be a bit different.
- To delete a node connection, left click on the connecting wire.
- Wire colors indicate the data type of the connection and match input and output colors.
- Right clicking an input or output on the graph and choosing Wireless allows for wireless connections like senders and receivers in Spark to create a cleaner looking graph.
- Empty Materials with Empty Shaders can be added to Assets which allow a choice of making custom materials with Shader type choices of 3D, Post Effect, Hair or Gaussian Splatting.
To create Cubemaps, refer to this guide.
Prefabs
Just like in Effect House, Prefabs can be imported, created, edited and exported for use across projects. Explore the Asset Library for a variety of Prefabs to use, or drag a hierarchy of objects into the Assets window to turn them into a new Prefab. Right clicking on the topmost object of a nested group in the Scene Hierarchy also shows the option to Save as Prefab.
Selecting the Prefab in the Scene Hierarchy shows an additional set of buttons at the top of the Inspector. Here changes can be saved across each instance of the Prefab through Apply, or removed after Apply was last clicked with Revert. When selected in the Assets window, Prefabs show options to enable lazy loading and retain assets.
Prefabs’ variables can be referenced via scripts to edit their properties and components and the Asset can be dragged into the exposed UI parameters in the script object’s Inspector.

Scripting
Scripting is how logic can be added to Lens Studio projects. This is instead of using Visual Scripting in Effect House. Example of what can be achieved through scripting includes creating animations, interactions, and events to create effects like making an object bounce.
Whilst they may seem different initially, scripting is made with writing text and visual scripting uses node graphs, a similar way of thinking can be applied. Consider a Visual Scripting graph that sets a 3D object’s position when the experience starts.
With text based scripting, the equivalent would be:
// @input SceneObject object

const newPosition = new vec3(1, 1, 1);

function onStart(eventData) {
  script.object.getTransform().setLocalPosition(newPosition);
}

const startEvent = script.createEvent('OnStartEvent');
startEvent.bind(onStart);
Lens Studio uses the ES6 version of JavaScript and TypeScript. Here are some key points to help understand scripts:
-
Similarities such as using a start event and accessing the object’s position can be seen.
-
Nodes are read left to right, whilst scripts read top to bottom
-
Double forward slash (
//) is used to write comments which help navigate and understand what different parts of a script do. Code written on the same line after this is not executed: e.g.// This section makes an object change color.- You can create a reference to objects in the scene by using the special comments
// @input. See the Custom Script UI guide to learn more.
- You can create a reference to objects in the scene by using the special comments
-
var,let, andconstis how data is saved as a variable, like the variable node.letandconstare more specific ways to define how a variable should be used.letmeans the variable’s data can be changed, whilstconstmeans the data cannot be changed i.e. stays constant.
-
Setting a variable is done with an assignment (
=). The variable name is on the left and the value to set it to on the right e.g.const newPosition = new vec3(1, 1, 1). -
Getting is done by referencing the variable by name where it needs to be read e.g.
script.object.getTransform().setLocalPosition(newPosition) -
A function is how a group of logic can be saved like a utility node. The code is written within the following layout:
function yourFunctionName(dataToPassIn) {
  // yourCodeHere…
} -
To actually use this function, like adding a node to a visual scripting graph, the name of the function is written and any data it needs to read is passed in through the parentheses () e.g.
yourFunctionName(someDataOrVariableToRead); -
The final two lines of the above example are extra steps that need to be added to make an event work in Lens Studio are covered under Script Events and Bind Keyword sections.
Like Scene Objects, scripts are run in the Scene Hierarchy from top to bottom. They must be added to the hierarchy to run. Scripts can be edited in the Lens Studio script panel or with an external code editor such as VSCode. Lens Studio provides a TypeScript definition file (d.ts) on project save, allowing you to get autocomplete on various external editors like VSCode.
The Behavior and Tween Scripts are examples of ready made scripts in Lens Studio that are available for use by adding them to the Scene Hierarchy. They do not need to be opened in an editor to be used as they have surfaced UI in the Inspector where parameters can be assigned. However, you can open them if you'd like, since they are standard scripts!
Custom scripts can also be created and added to Scene Objects as components.
Logging messages helps to check if scripts are running correctly. It is useful to place them at checkpoints in the script to help debug where issues might be. We can log messages using print('Hello, World!');
Example
This example makes an object bounce. In Effect House, the visual scripting setup may look like this.
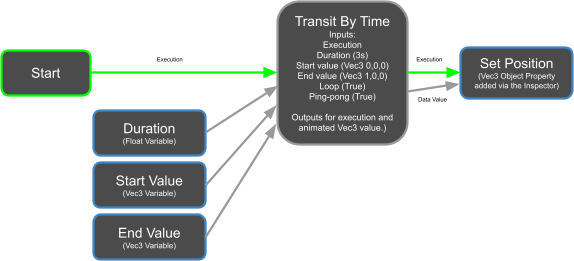
To make this work in Lens Studio, we will use scripting. To start, add a script component to a 3D Scene Object, right click to open the script editor, and copy in the following:
// Bounce.js

// Inputs
//@input float speed = 1.0 {"widget": "slider", "min": 0, "max": 10.0, "step": 0.01}
//@input float range = 10.0 {"widget": "slider", "min": 0, "max": 30.0, "step": 0.01}

// A global variable
global.xOffset = 5;

// A function
function bounce() {
  // A local variable
  var newY = Math.sin(getTime() * script.speed) * script.range;
  // Setting the object’s property
  script
    .getSceneObject()
    .getTransform()
    .setLocalPosition(new vec3(xOffset, newY, 0));
}

// Creating and binding the event to the function
var updateEvent = script.createEvent('UpdateEvent');
updateEvent.bind(bounce);
which will generate something like this:
Each part of the script is covered as follows.
Input
Inputs are defined with the //@input keyword to create UI surfaced widgets where assets, objects, components and other data can be entered through the Inspector. This is handy to make the script reusable as well as edit values without needing to open and edit the script.
In the above example, two sliders widgets are created to control the speed and range variables. The UI Guide provides further references.

Global Variable
The Global variable refers to the global object to access built in properties and methods with global scope. The full list can be found here.
-
global.scene: ScriptScene
Returns the global ScriptScene object, which offers information and controls for the current scene. -
global.getTime() : number: Returns the time in seconds since the Lens was started.
Custom Global methods, properties and variables can be created too. In the example, a global number is defined in the line
global.xOffset = 10;
Now xOffset can be accessed in any script within the project that runs after this script has been triggered.
Be careful when using global to store functions and variables, as it can make it confusing to figure out whre those functions and variables are defined and used!
Local Variable
Functions and variables declared with the keyword var/let/const are in the local scope. This means they can only be accessed within the script they were created.
var newY = Math.sin(getTime() * script.speed) * script.range;
Script Variable
To add a reference to an object/components other than the one the script is added as a component to, the object is passed in as an input and referenced inside the script object.
//@input SceneObject secondObject; // Create a field input
script.secondObject; // Use the input
Referencing Other Scripts
To connect scripts, you can find all the script components of an object using the getComponents('Component.ScriptComponent') method.
For example:
// Accessing script

// @input SceneObject myObject

const scriptsComponents = myObject.getComponents('Component.ScriptComponent');
let targetScript;

scriptsComponents.forEach(function (scriptToReference) {
  // Find the script component we want based on some variable it has.
  if (scriptToReference.varA === 5) {
    targetScript = scriptToReference;
  }
});
// scriptToReference
script.varA = 5;
If you know the script component you want is the first component, you can use the singular getComponent('Component.ScriptComponent').
Script Events
As mentioned, scripts in the Hierarchy will execute from top to bottom and all scripts are bound to On Awake.
OnAwaketriggers before any other event in a Lens and runs straight away on newly instantiated or copied objects in the Hierarchy.OnStartruns on the first frame, after OnAwake and before Update. It is used to initialize information that depends on inputs or data from other components that have used OnAwake to define their inputs and methods. Consider this the equivalent to Effect House’s Start node.OnDestroytriggers when the script component connected to the script calling this has been destroyed.OnEnabletriggers when the connected script component is enabled (checkbox ticked).OnDisableis triggered when the connected script component is disabled (checkbox unticked).Updatetriggers once per frame update and is used to run code that changes over time. This is like the Update node in Effect House.LateUpdatetriggers at the end of each frame, before rendering and after Update, Physics and Animation events.
An example to print the time in the Logger using Update is as follows.
function printTime(eventData) {
  // Print the elapsed Lens time
  print(getTime().toString());
}

// Bind the function printTime to the event UpdateEvent
var event = script.createEvent('UpdateEvent');
event.bind(printTime);
The following is an example of a tap event. An Interaction component must be added to the Inspector of the hosting Scene Object for it to be read--otherweise the full screen tap is considered.
//@input Component.InteractionComponent interactionComponent

// Subscribe to the onTap event
var onTapEvent = script.interactionComponent.onTap.add(function (tapEventArgs) {
  print('onTap!');
});

// Unsubscribe from the onTap event
script.interactionComponent.onTap.remove(onTapEvent);
Further events include face gestures, camera switch to front or rear and touch events. These can all be called in a script instead of nodes. A full guide can be found here.
Bind Keyword
Functions must be bound to events using the bind keyword so it runs when the event fires. The script itself is bound to a Lens’ OnAwake event. In the example above we created the event for whenever a frame is updated with script.createEvent('UpdateEvent') and bound our response, to run our printTime function (bind(printTime)).
You can also trigger things based on face event, such as face found, eyebrows raised, or mouth open, the following script shows how to do this.
//@input SceneObject exampleObject;

function setEnabled() {
    script.exampleObject.enabled = true;
}

var faceEvent = script.createEvent(“FaceFoundEvent”);
faceEvent.faceIndex = 0;
faceEvent.bind(setEnabled);
This can also be achieved by importing the Behavior helper script to the Scene Hierarchy, in the Inspector setting the Trigger to Face Event, Event Type to Face Found, response type to Set Enabled and assigning a Scene Object for it to apply to.
Event Listeners
This provides a way to create custom events such as keeping track of a score. Import the Event Module from the Asset Library to use the Event Module.
Event Module is a script module, which itself is just a javascript that other scripts can import. Learn more about Script Modules here.
Since this is a script module, this script should be referenced in another script with const events = require("./EventModule"); and not added to the Scene Hierarchy as a Scene Object.
In this example the module is imported into an existing script, the event created and what happens when it is triggered. The trigger here is the string “hello!” for example if this is the text output by another function e.g. from a Behavior script’s Set Text Response Type or simply another function returning the string “hello!” in this same script and it is accessed through this script.
var eventModule = require('./EventModule');

// Event Wrapper
var myEvent = new eventModule.EventWrapper();

// Add a callback to the event
myEvent.add(function (arg) {
  print('event triggered with parameter to say: ' + arg);
});

// Trigger the event
myEvent.trigger('hello!');
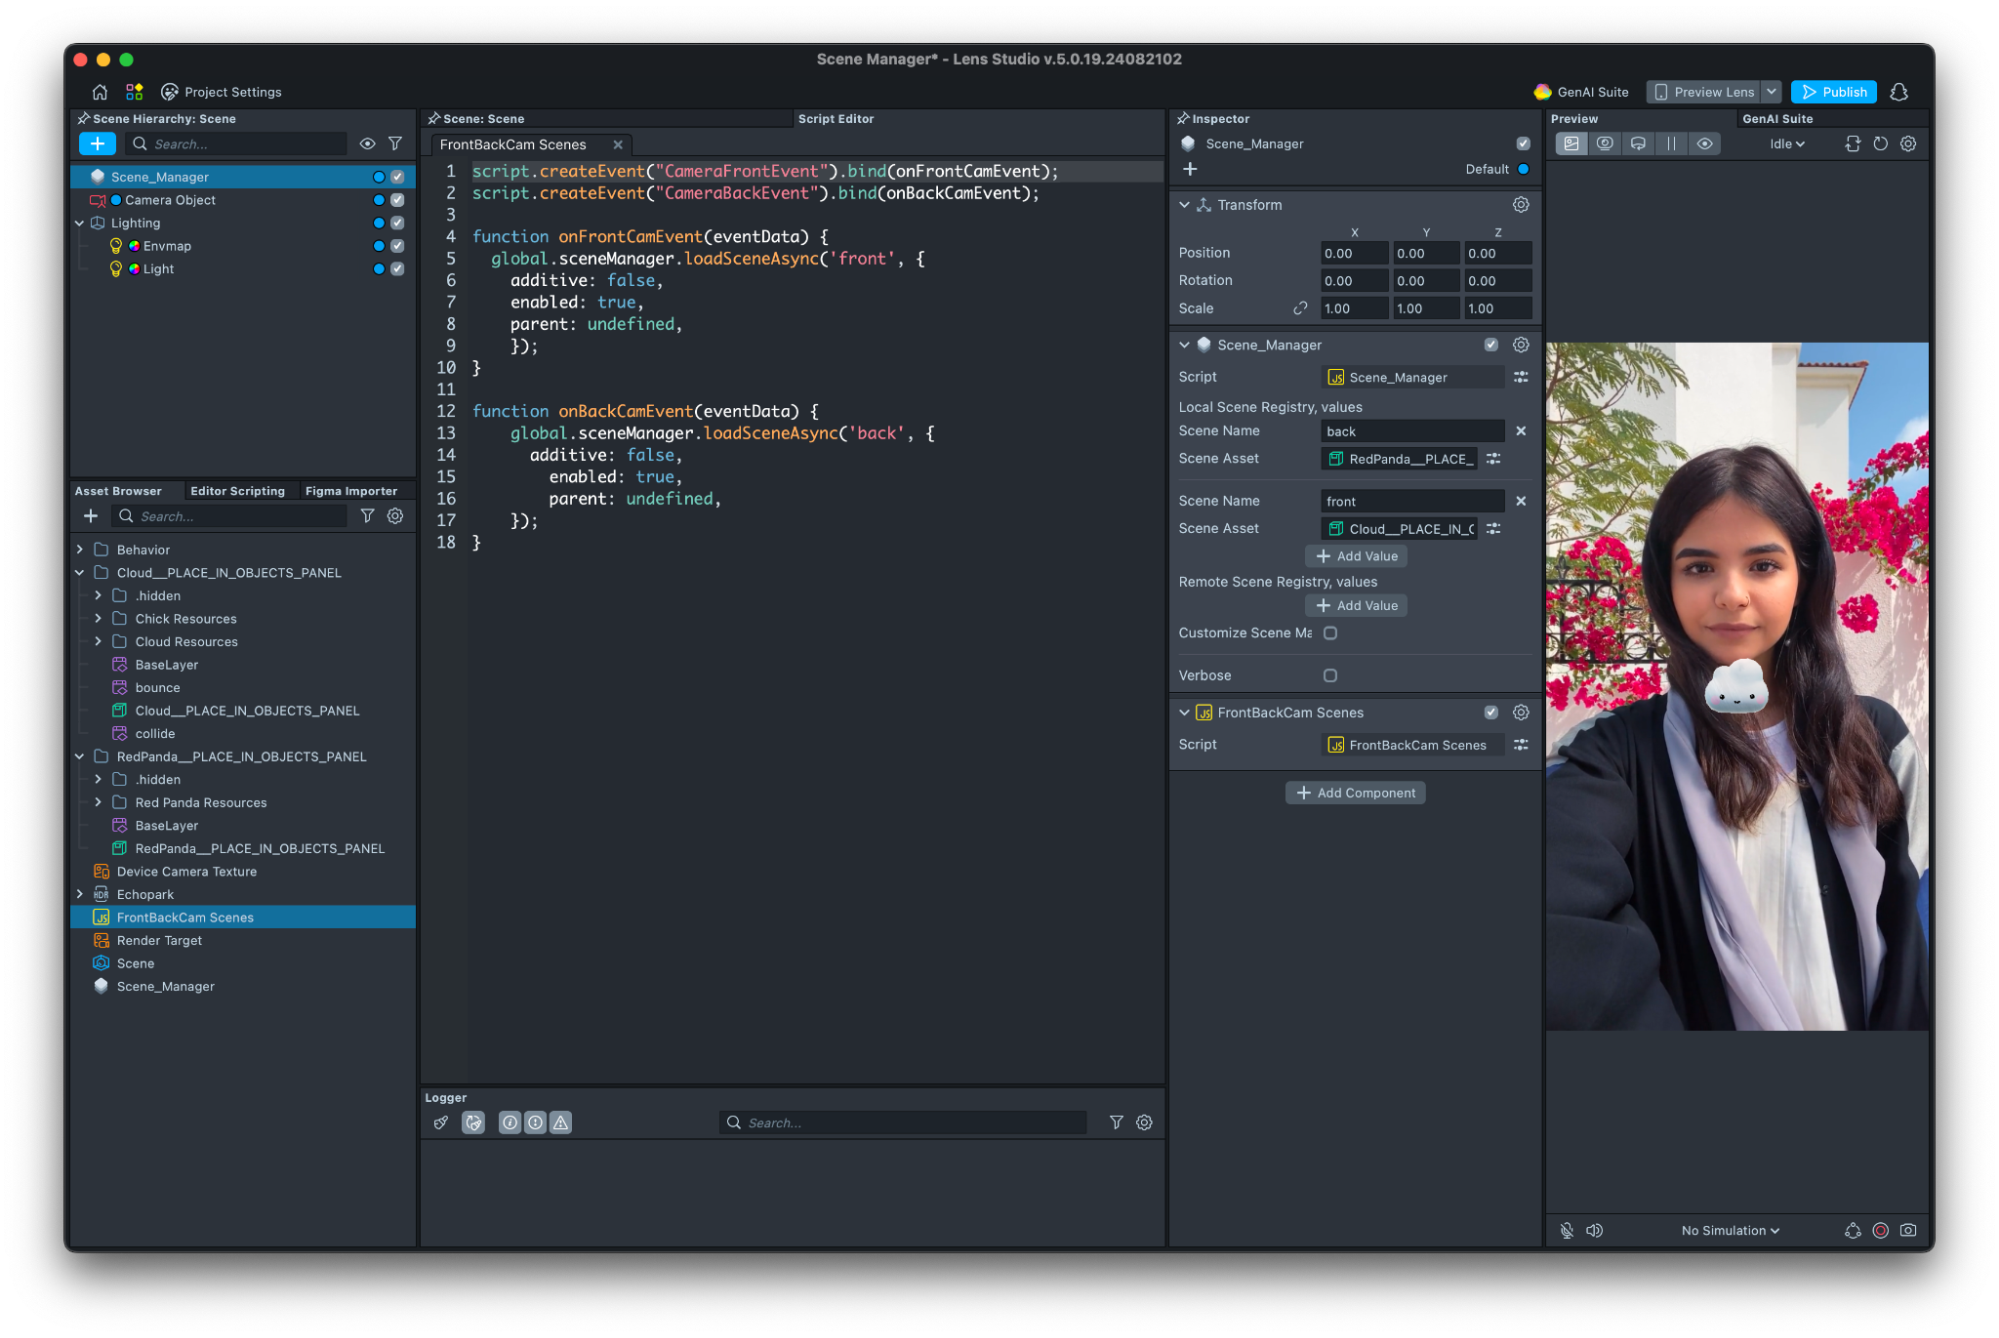
Scene Manager
The Scene Manager is a component that can be added to help organize multiple Scenes in a Lens, for example one scene for the front camera and another for the back.
This component uses Prefabs in a similar way to adding an ‘Enable For Utility Component’ to the Camera Objects in Effect House. It can be imported from the Asset Library and added as a Component to an empty Scene Object which is positioned at the top of the Scene Hierarchy. Scenes can be loaded non-additive meaning these can not exist with one another, or additive which can be combined like layers.
If using remote assets, only asynchronous loading can be used. The following loads a different prefab under the Scene Manager object for the Front and Back cameras as they are changed. Two different prefabs are assigned from the Asset Browser to the Scene Manager Object in the Inspector. And this custom script is added as another component to the Scene Manager Object.
script.createEvent('CameraFrontEvent').bind(onFrontCamEvent);
script.createEvent('CameraBackEvent').bind(onBackCamEvent);

function onFrontCamEvent(eventData) {
  global.sceneManager.loadSceneAsync('Front', {
    additive: false,
    enabled: true,
    parent: undefined,
  });
}

function onBackCamEvent(eventData) {
  global.sceneManager.loadSceneAsync('Back', {
    additive: false,
    enabled: true,
    parent: undefined,
  });
}
Learn more with examples here.
SceneManager is a standard script, so you can open it up too for an example of scripting!
| Audio Object in Scene Hierarchy | Audio Object in Inspector |
|---|---|
 | 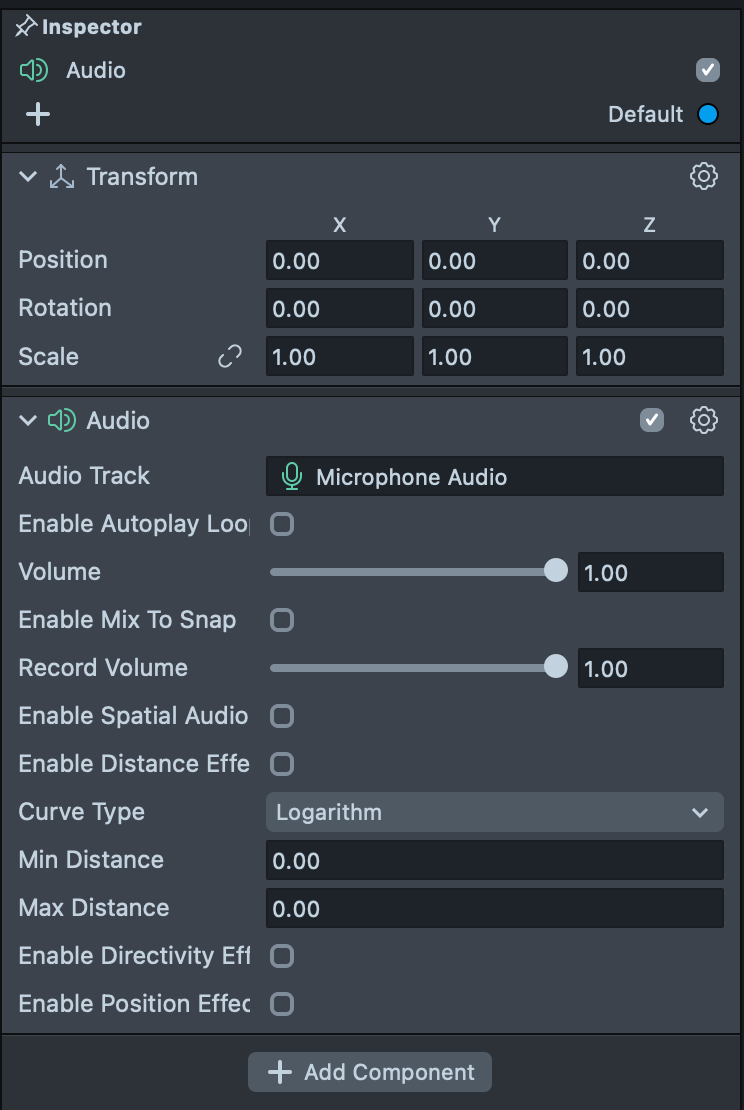 |
Audio
Sound effects and imported audio can be used in Lenses. TikTok sounds cannot be added to Lenses, however Licensed Music from the Asset Library can be.
An Audio object is added to the Scene Hierarchy with a track assigned in the Inspector. Here the track can be controlled and can be set to spatial which makes the audio louder, the closer the emitting object is to the device.
To use the Microphone’s audio, add an Audio From Microphone asset via the Asset Browser. Add this to a Scene Object in the Scene Hierarchy. This is instead of using the microphone node in Effect House’s Visual Scripting window without any Microphone Audio in the Hierarchy.
Explore further capabilities with Audio such as Spatial Audio with the Audio Listener.
Try the Music Lyrics asset from the Asset Library with a Licensed Music track to display the track’s lyrics in a Lens.
Physics
Physics in Lens Studio allows objects to act with gravity and forces like they would in the physical world. Capabilities include chain physics, collisions and cloth simulation.
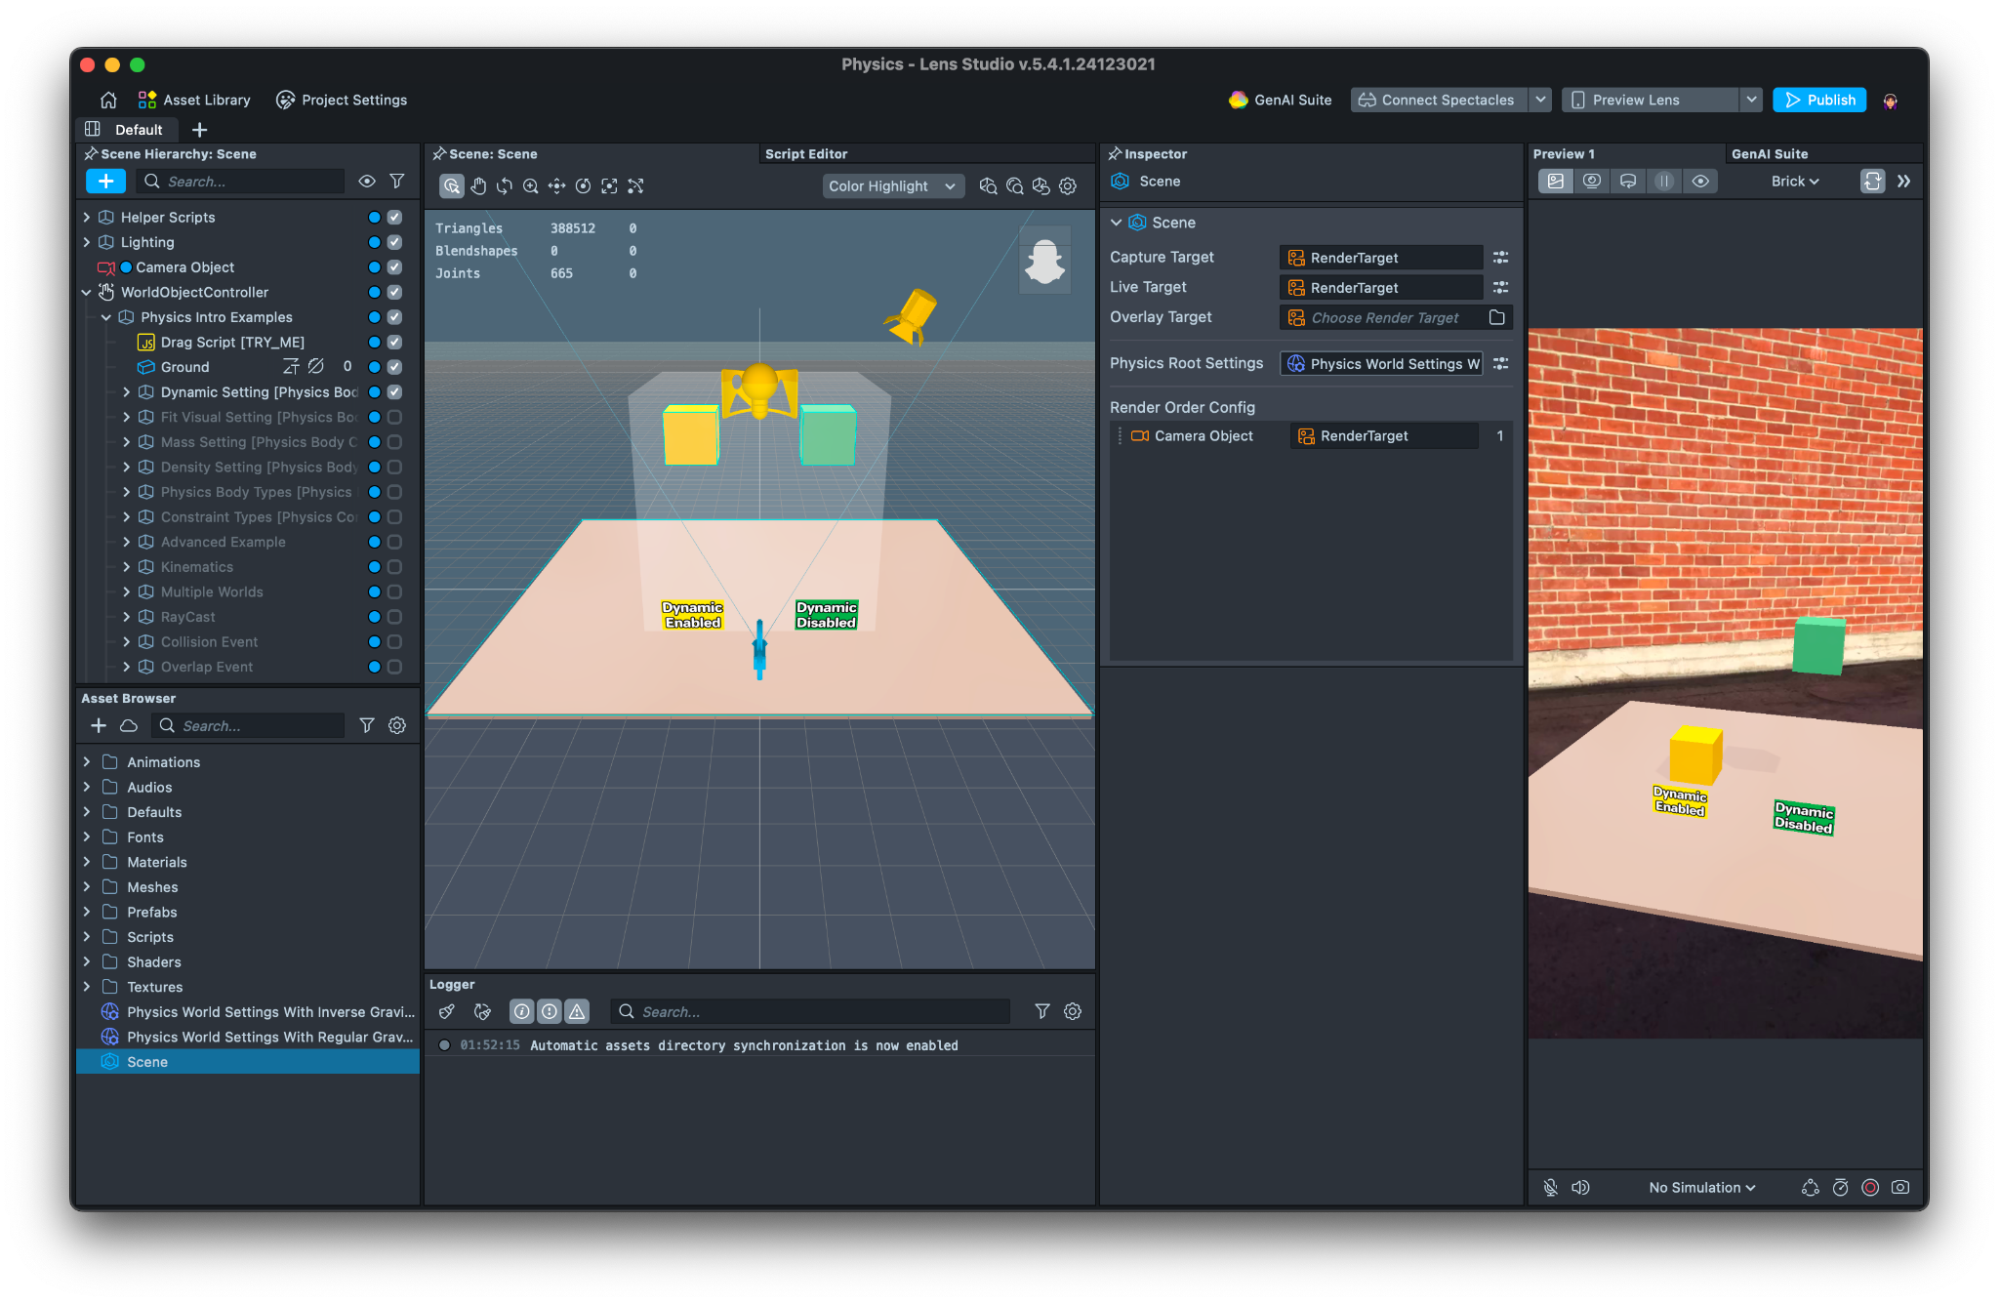
A key difference is that in Lens Studio a Physics World Root Asset needs to be added into the Assets window from the menu and then assigned to the Scene asset’s Physics Root Setting input.
To add Physics to an object, add a Physics Body or Physics Physics Collider component to it.
Matter assets can also be created to set properties such as friction and bounciness. These are assigned to the scene object’s Physics Body and Physics Collider components.
Make sure collision bodies that move are around 10 cm to 5 m and not moving too fast to pass through thin colliders.
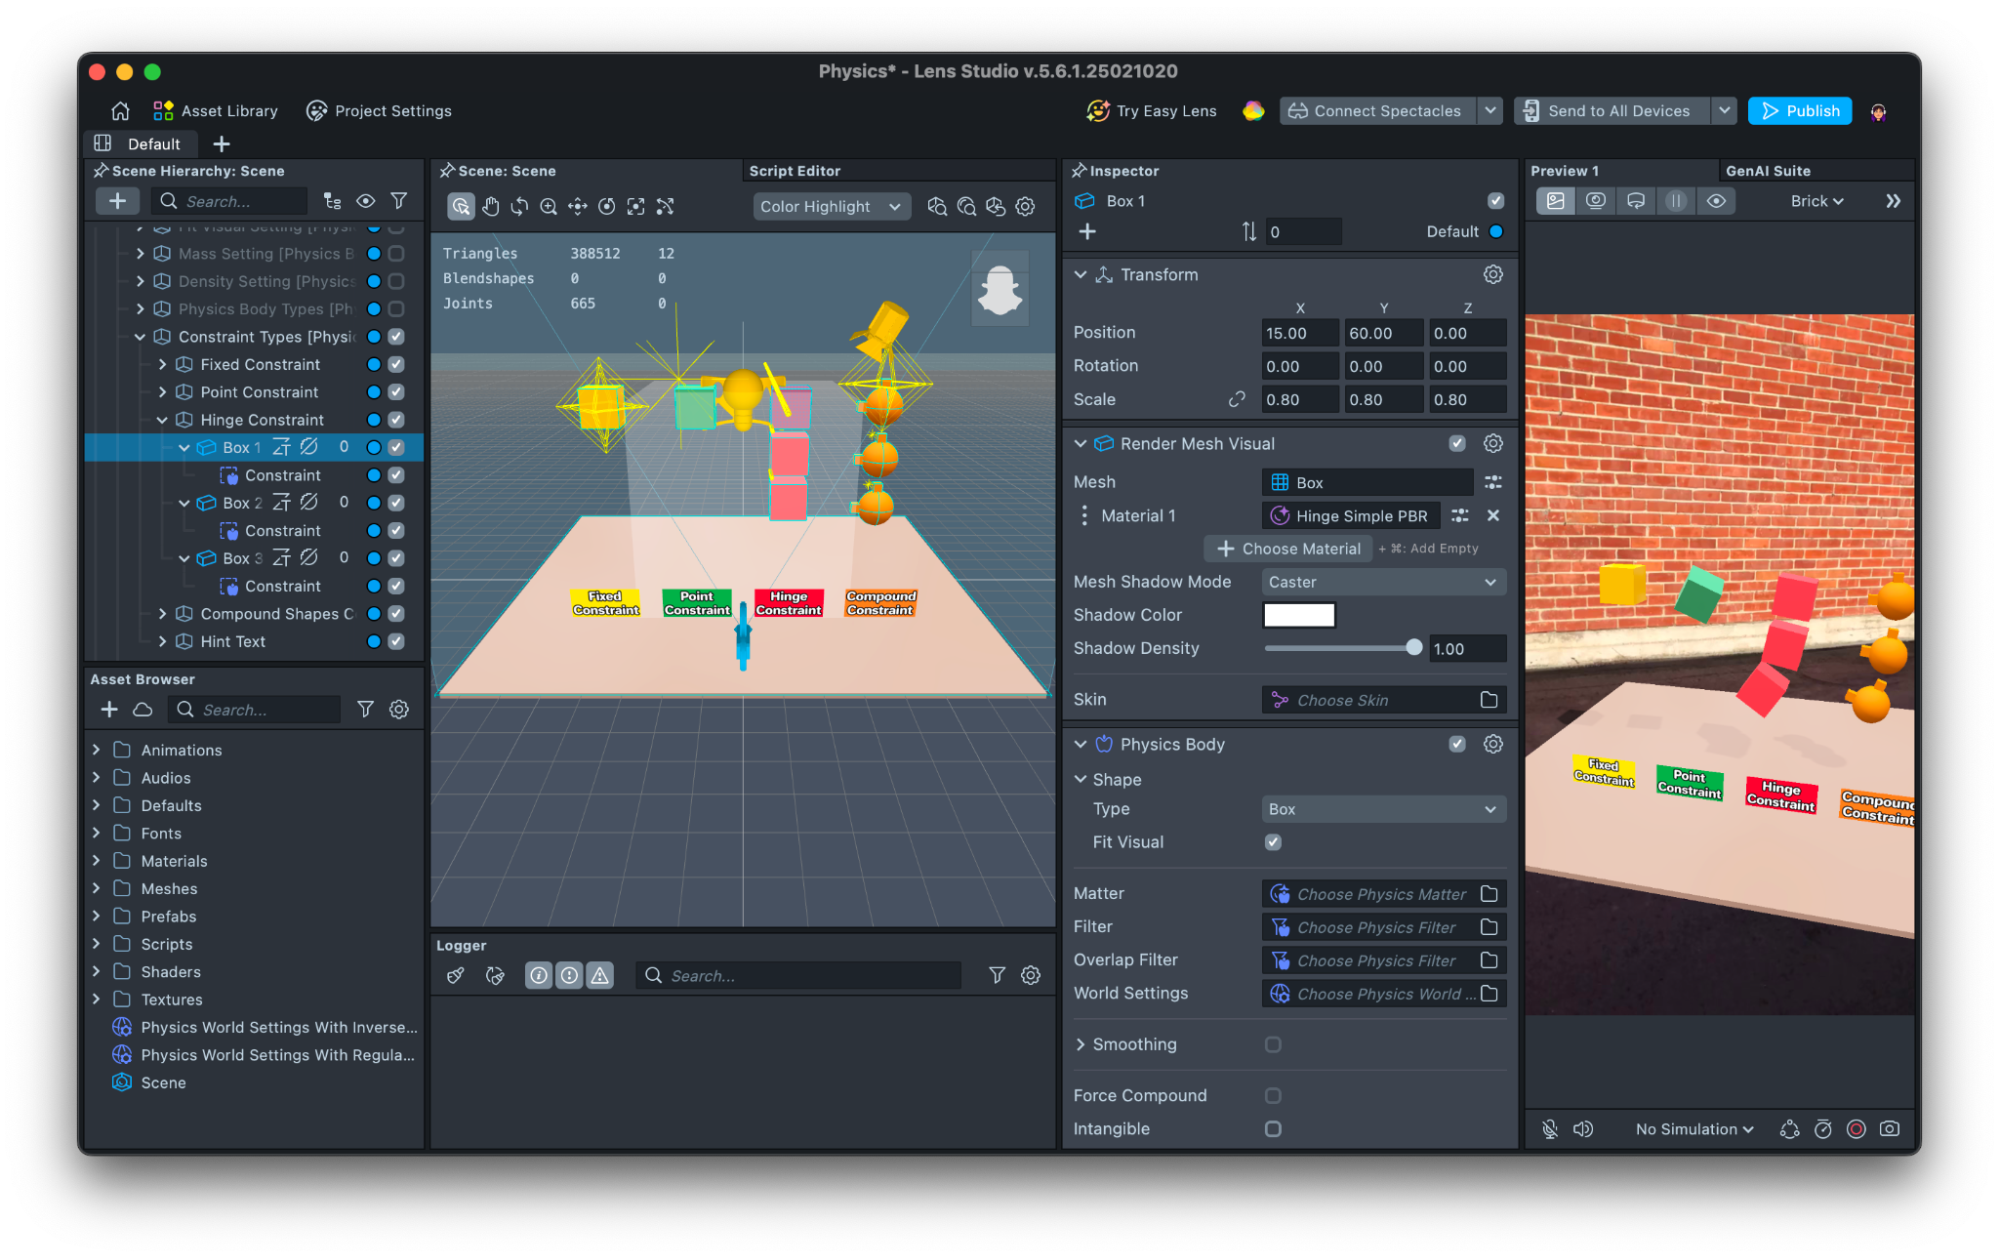
Physics Chain
To use Physics to create a chain, the Physics Constraint Component is added to a Scene Object which has a Physics Body Component on it. Assign the type to be a hinge which is a joint based movement like a Hinge Joint in Effect House. Find an example here.
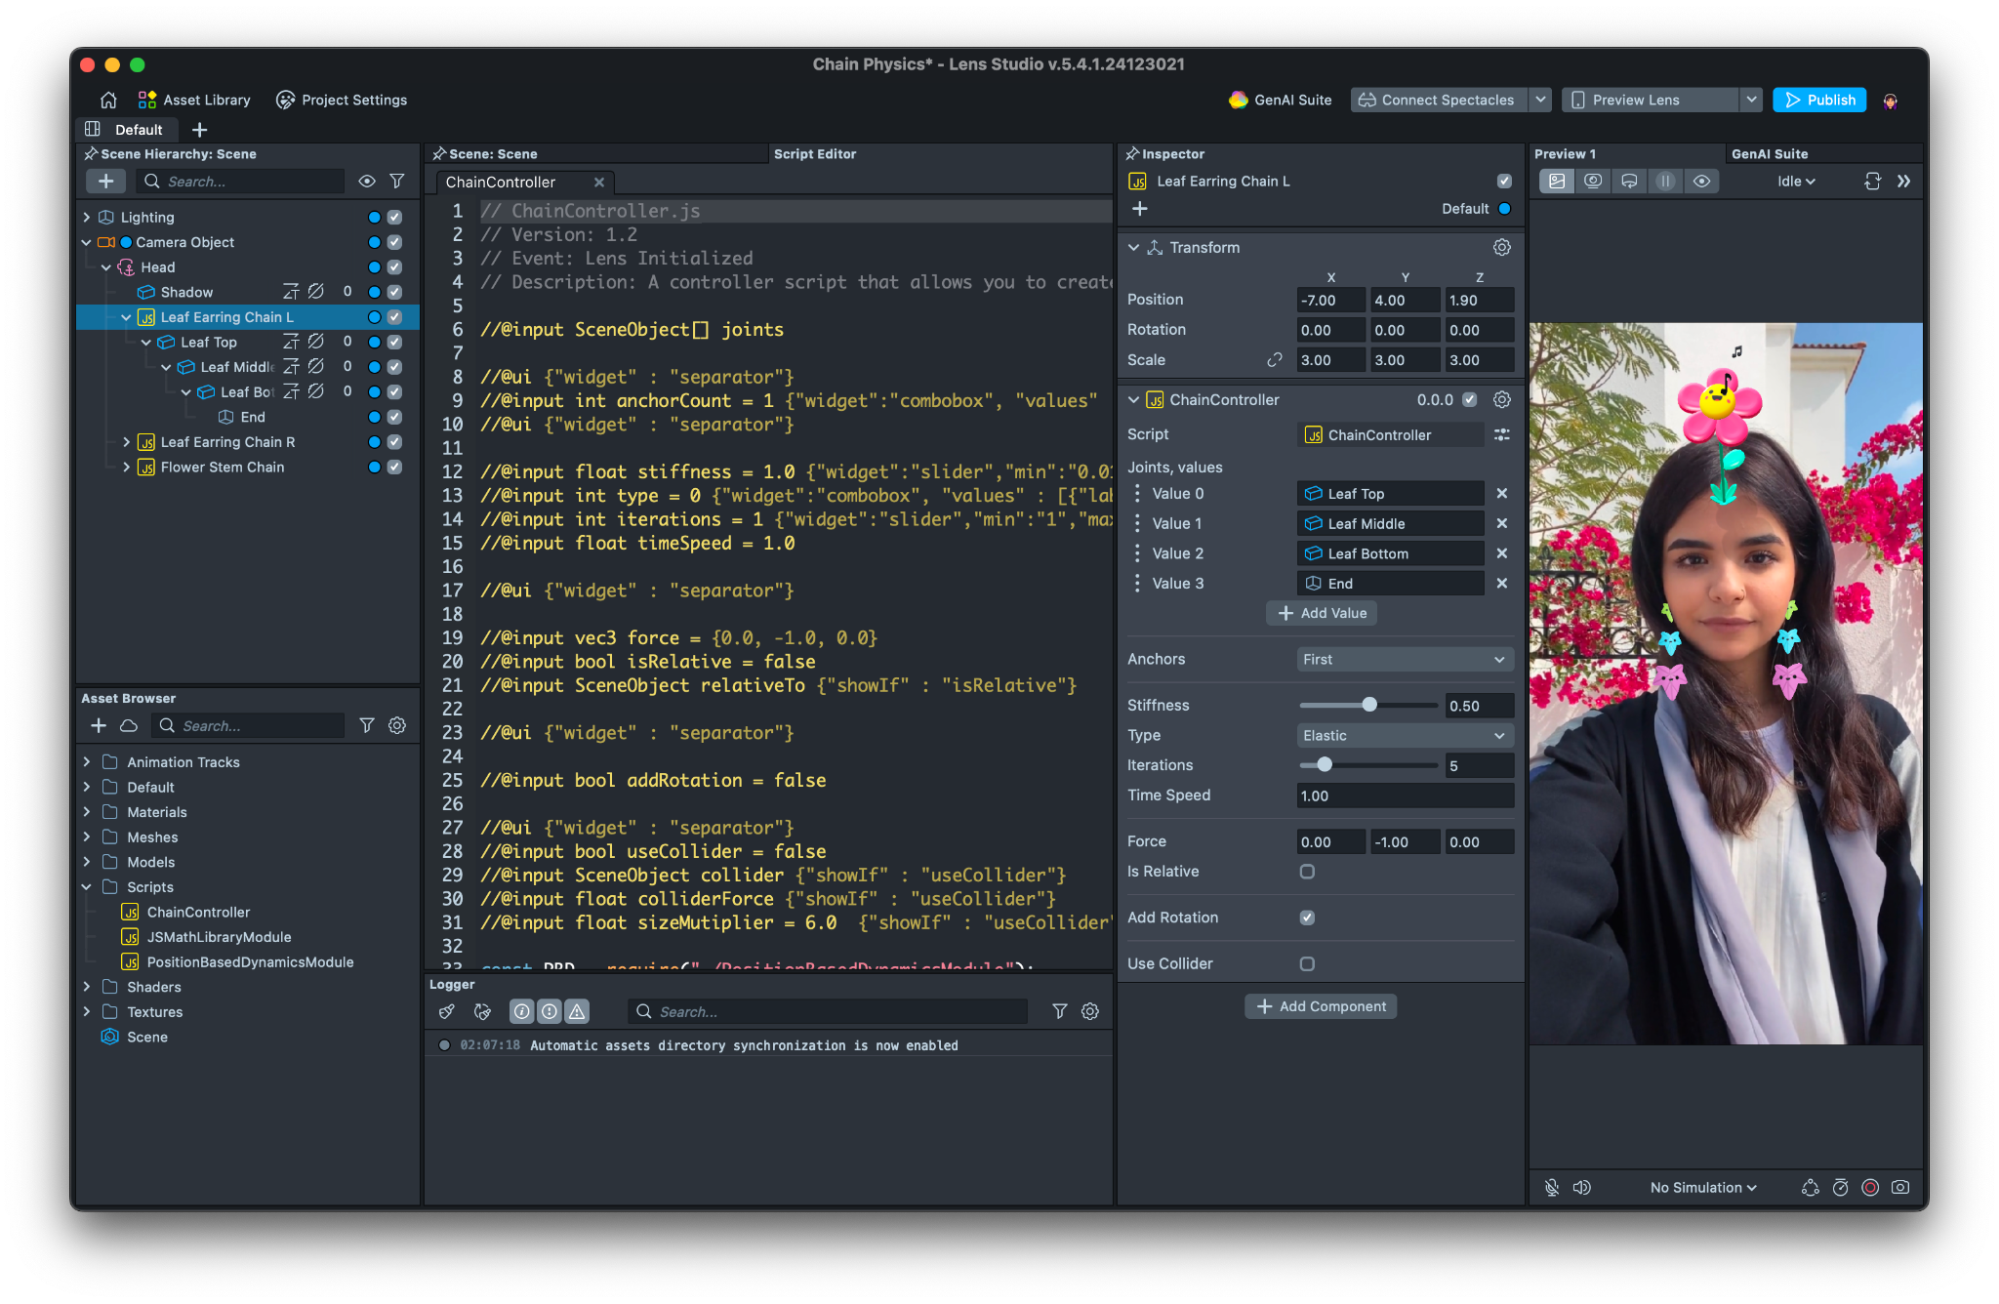
You can also make custom physics engine. Try the Chain Physics sample project to create movement like earrings and a swaying plant with scripting. This sample uses JavaScript rather than Physics to achieve the movement.
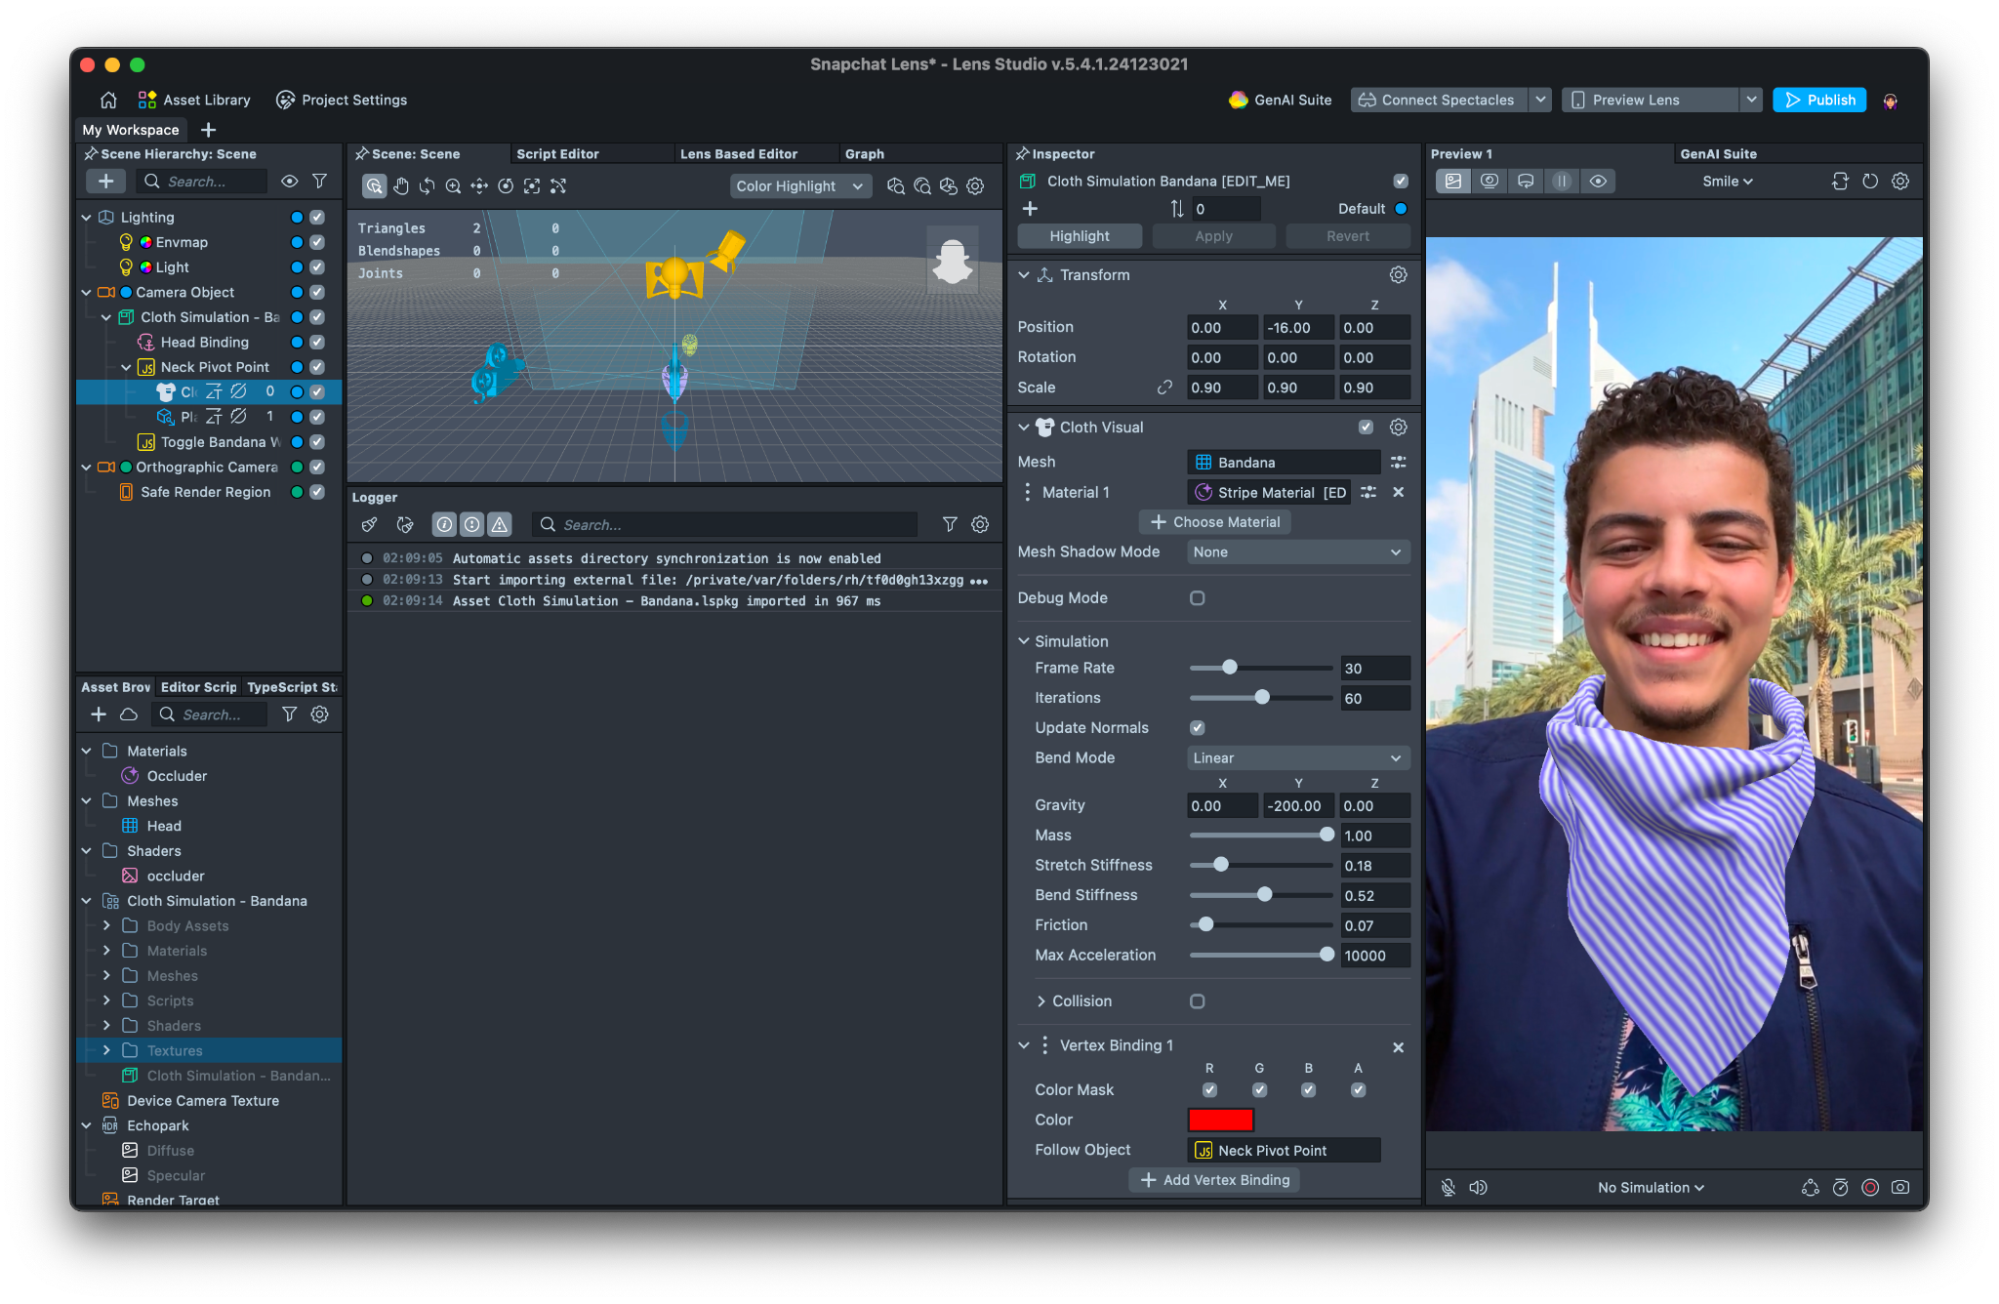
Cloth Simulation
Cloth Simulation is also possible in Lens Studio. The Asset Library has many different examples such as a scarf, bow and larger items of clothing using 3D Body Tracking. A Cloth Component is added to the 3D object which will be a cloth and meshes assigned need to have Vertex Attributes to the simulation.
Particles
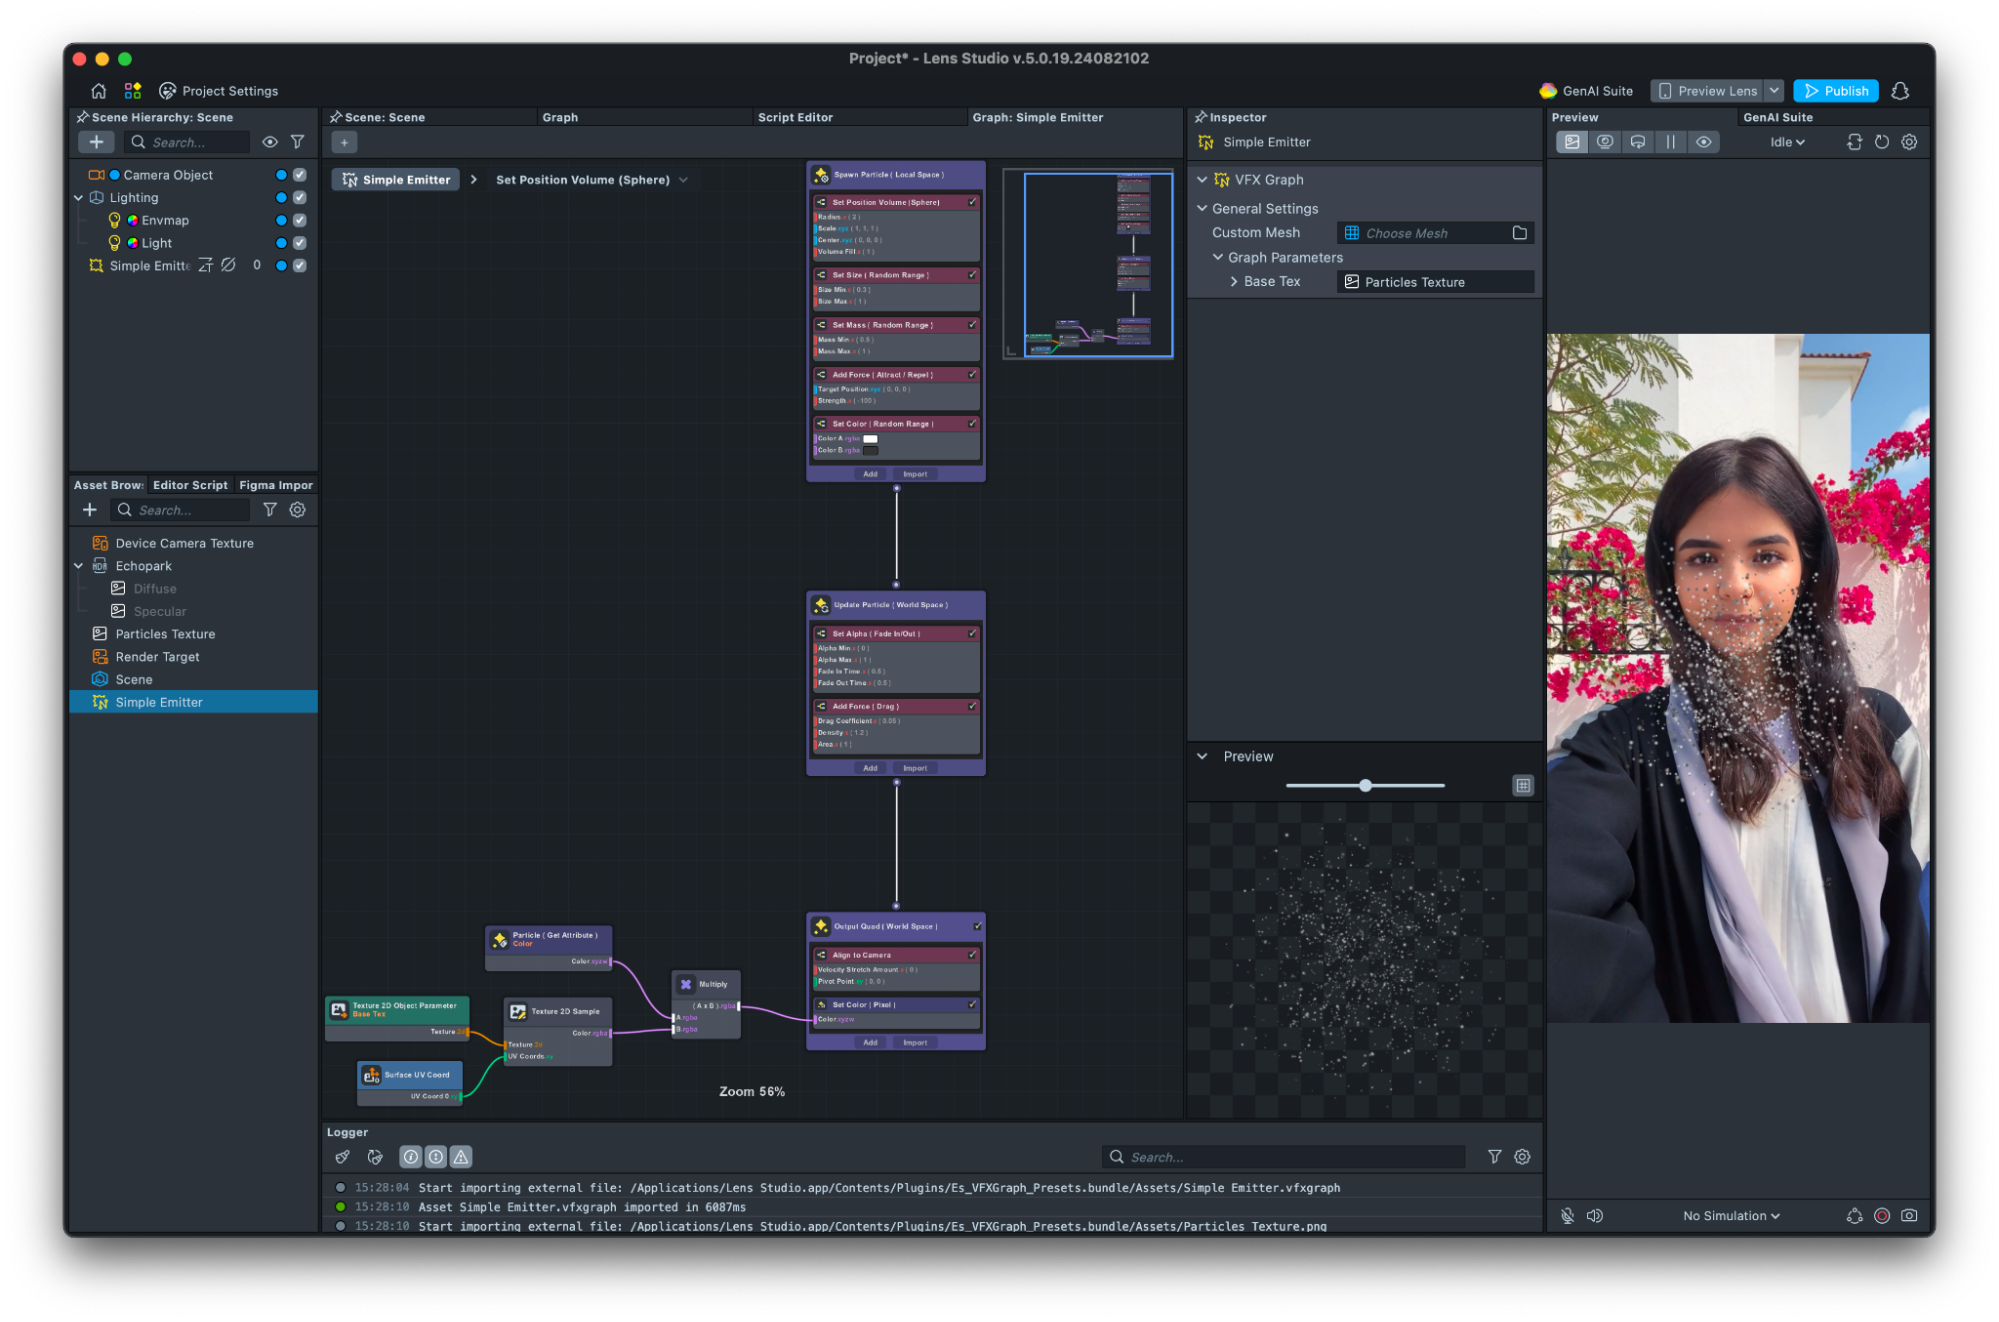
VFX
VFX are the most similar to Basic Particles in Effect House. It is similar to opening basic particles in the Visual Effects Editor with sections for different parts of the lifecycle. The asset is double clicked to open the VFX Graph. Additionally Custom Code GLSL nodes can be incorporated and collisions can be added.
The sections are:
- Spawn Space where initial properties are defined when the particle is created.
- Update is processed every frame during the particle's lifetime.
- Output is a material applied to a 2D square mesh to define how it is rendered.
Editable attributes for VFX are:
- Position (vec3)
- Velocity (vec3)
- Life (float)
- Force (vec3)
- Mass (float)
- Color (rgba)
- Size (float)
- Matrix (mat4)
- Custom (set by the user)
Get started with VFX here.
| Modify the VFX Asset in the VFX Editor | Using VFX Asset |
|---|---|
 | 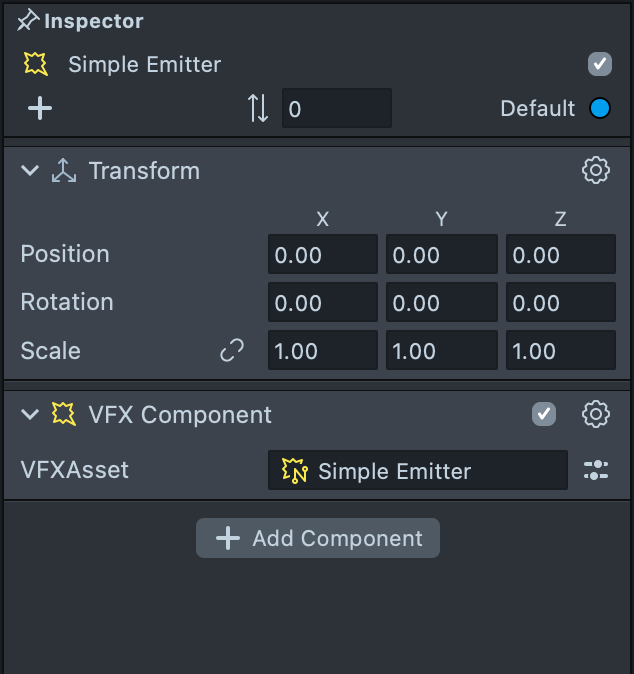 |
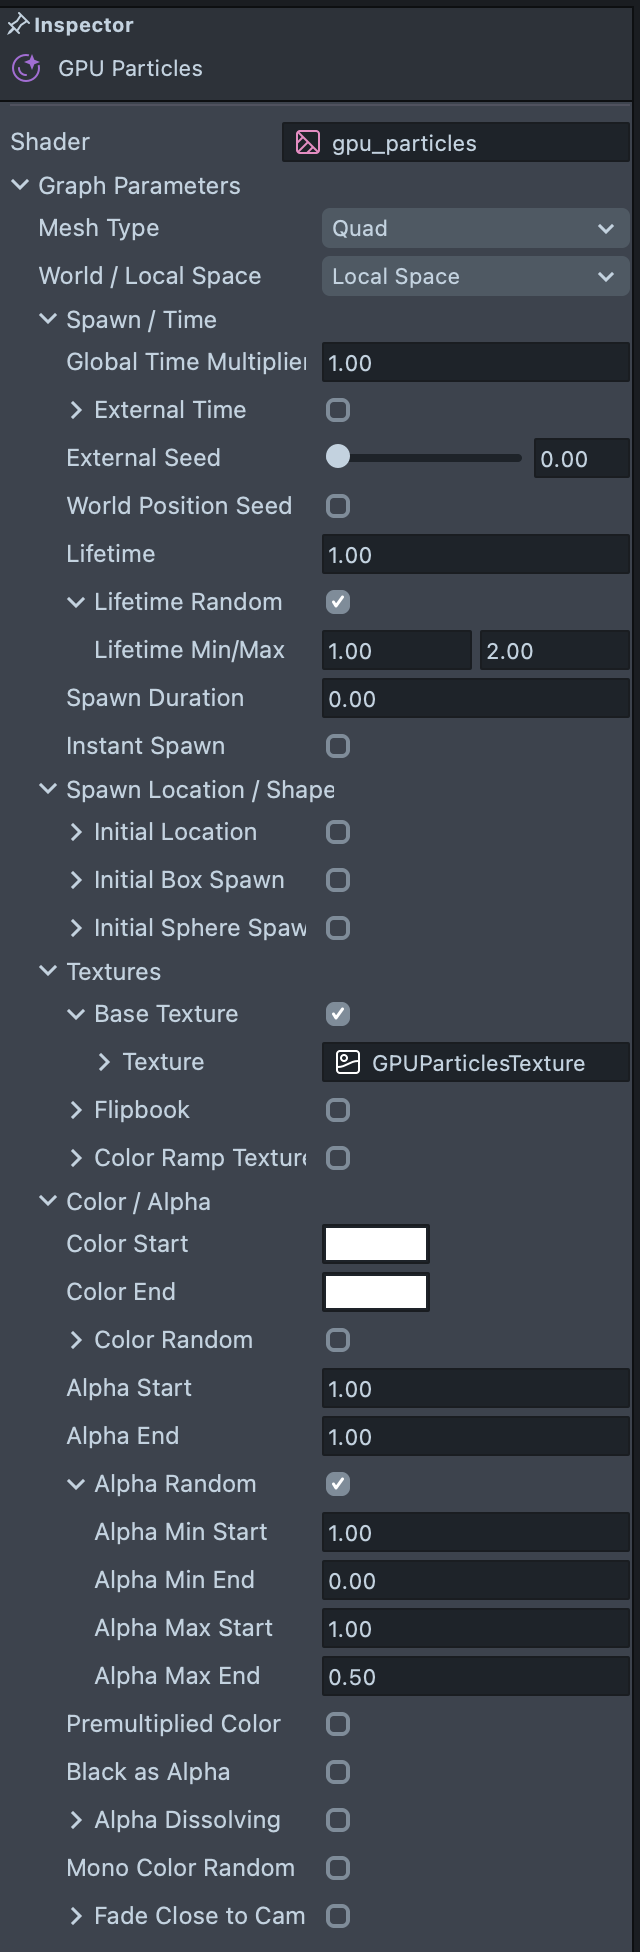
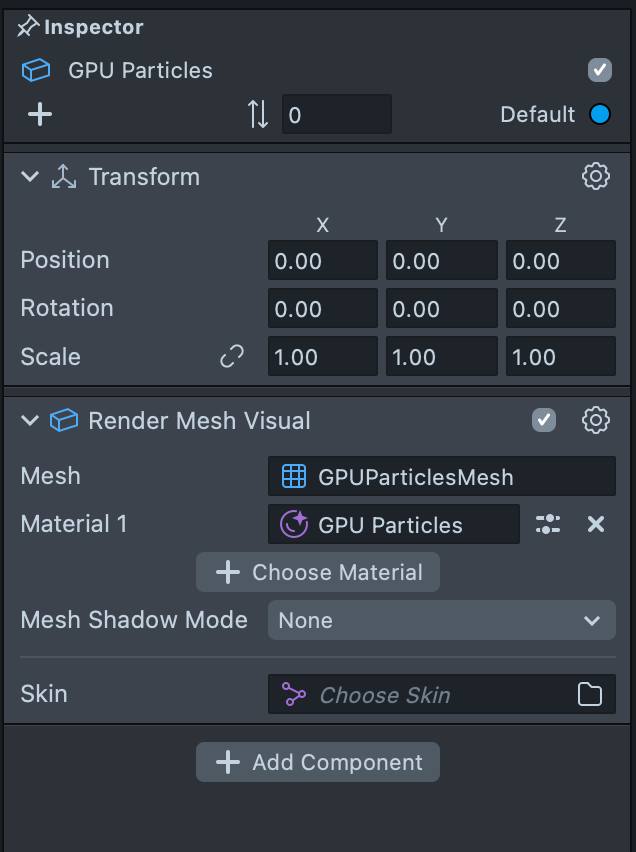
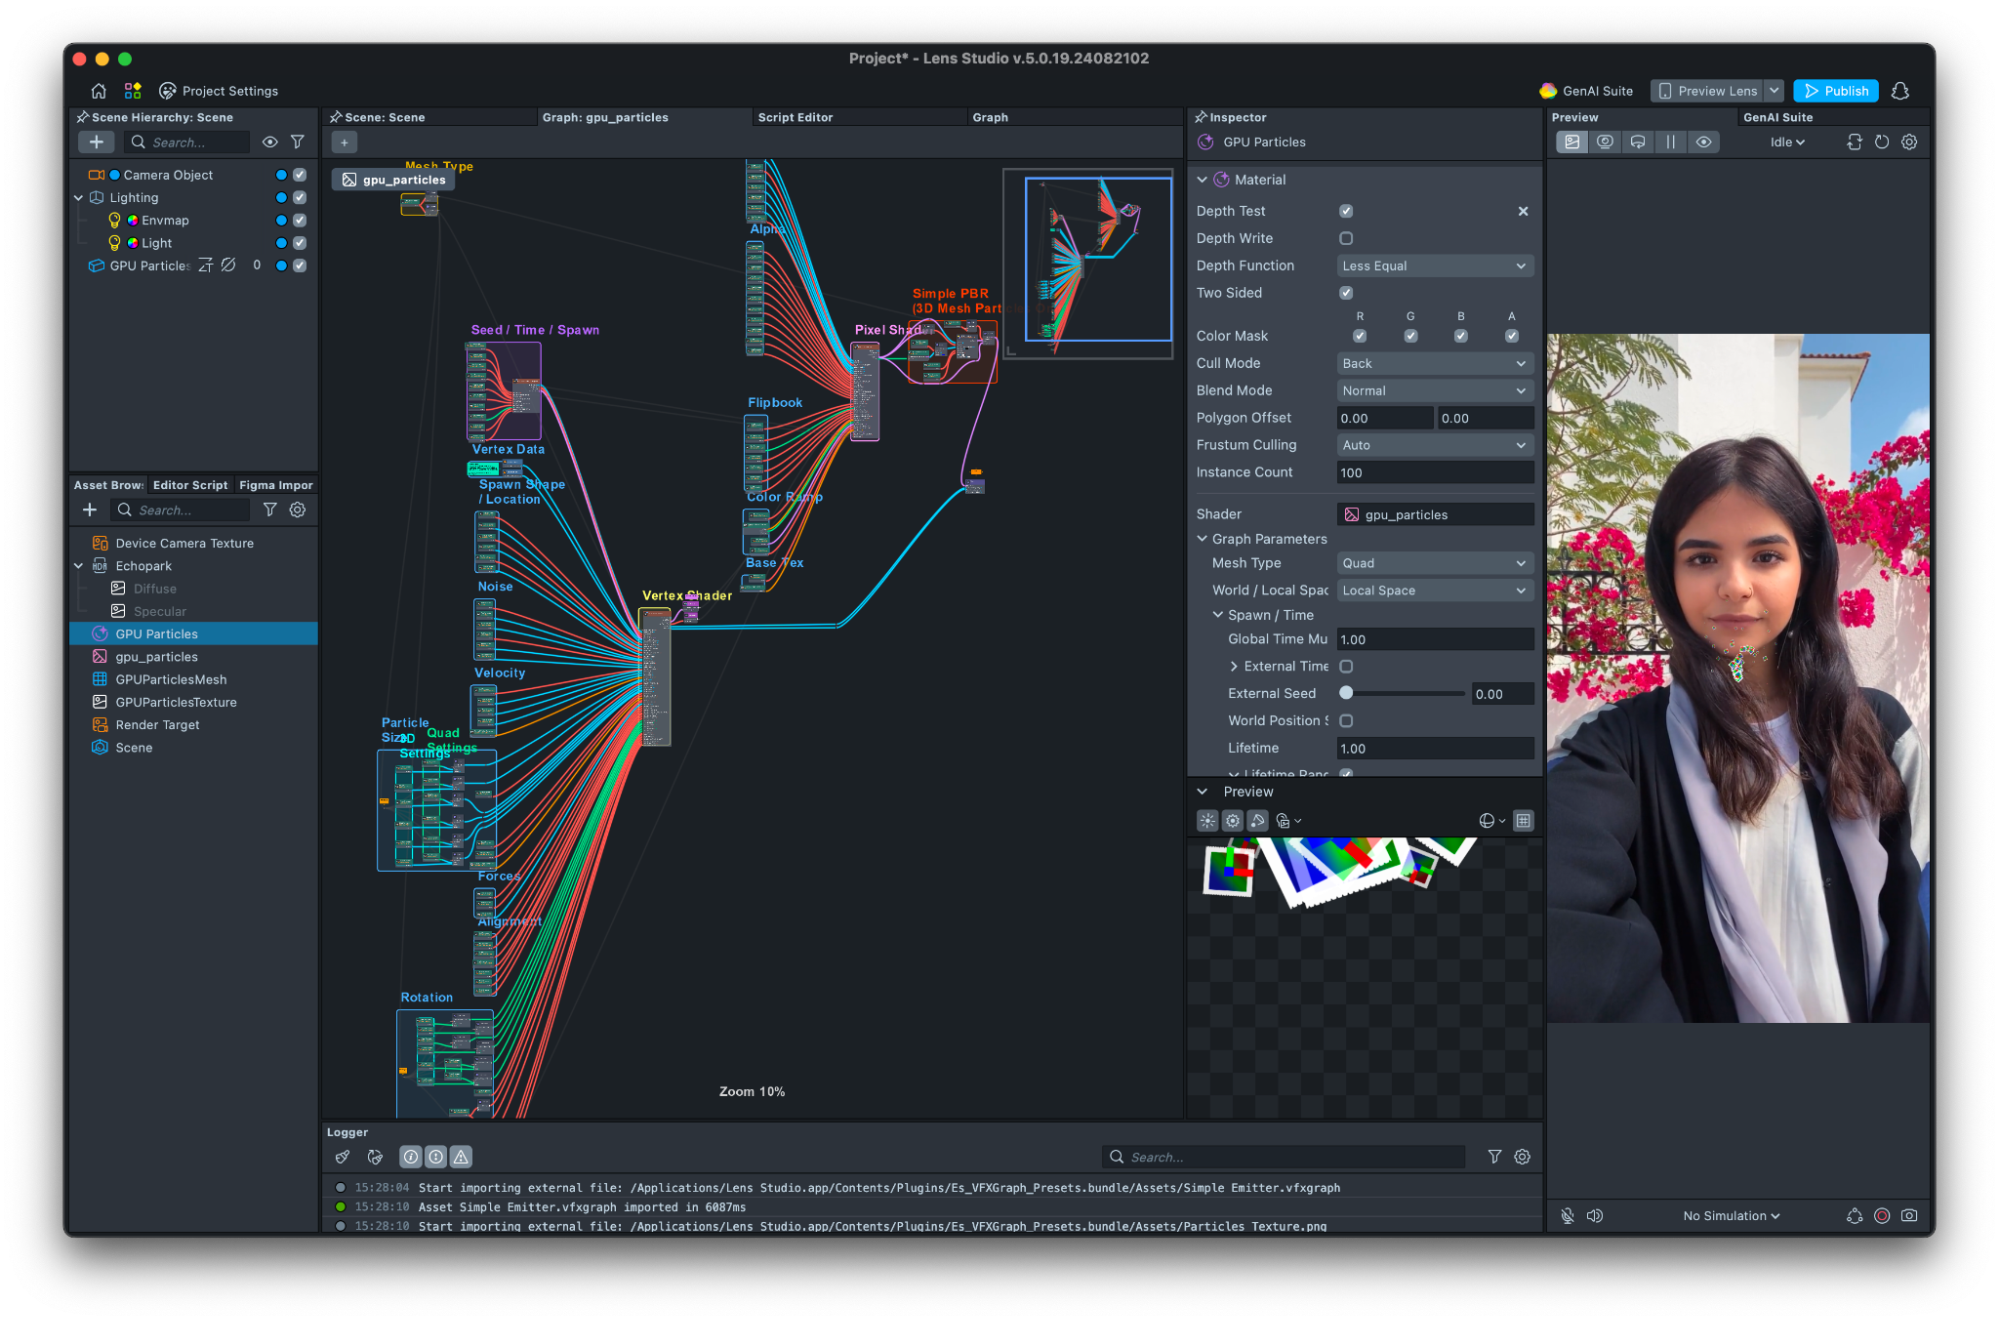
GPU Particles
GPU Particles have a set of predefined controls to edit its behavior and can be better for performance. When they are added to the Scene Hierarchy, a material, shader, mesh and texture are added to the assets.
In most cases, the particles can be modified without opening the editor. These controls can be accessed by selecting the material asset and editing values such as the Lifetime in the Inspector. This is great when a very custom VFX particle isn’t needed.
Opening up the material asset by double clicking it, shows the VFX's logic in the VFX Editor panel. The Inspector shows a long list of editable parameters which are used to edit the particles object using this component in the Scene.
Properties include:
- World / Local space
- Mesh type
- Lifetime
- Spawn shape
- Texture instead of material
- Color
- Alpha Start and End
- Particles Velocity
- Particles Rotation
- Size for Start and End
- Force and Gravity
| Modify the VFX Asset in the Inspector panel | Use tne VFX Asset |
|---|---|
 |  |
GPU Particles still uses the VFX Asset system. You can imagine them as a VFX system with a bunch of parameters to modify.
Plugins
Plugins can be considered as similar to Blender plugins to build extended Studio functionality and improved workflows by using the newly available Editor API in JavaScript.
For example, the GenAI Suite in Lens Studio is built as a Plugin and so is the Figma Plugin.
Instructions on how to build a Plugin can be found here and examples can be found on the Lens Studio Plugins GitHub repository.
For example, once the Figma Importer has been added to the project, it can be accessed through the menus’s Window option to see and use it as a new panel.
| Get the plugin from the Asset Library | Use the Plugin |
|---|---|
 | 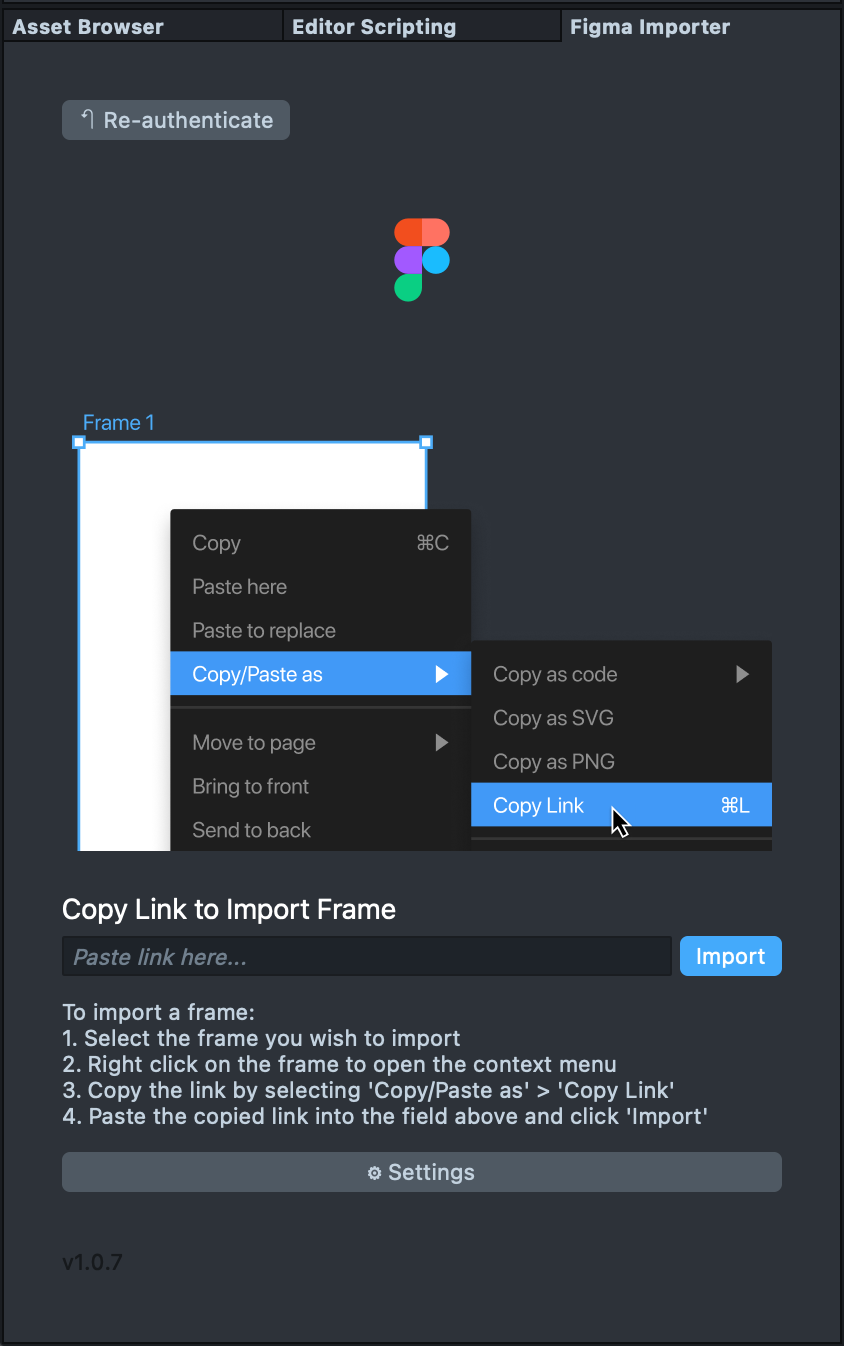 |
A Plugin is created externally e.g. using VSCode and can be imported from the Asset Library or locally added through the top menu Lens Studio -> Preferences -> Plugins-> Additional Libraries -> Add the Plugin directory that is a parent of the folder containing the JSON file.
Build and Release
Build and release in Lens Studio is simple and straightforward. Your Lenses will be hosted through one of the environments:
- Snapchat (Android, iOS and Web)
- Spectacles (Wearable)
- Camera Kit (publication process may vary)
Choose which platform the Lens is for through the initial home menu or Project Settings window, under the General tab. You can publish and update your Lens through the Publish Lens button in Lens Studio and manage them through My Lenses to see usage insights, similar to Effect House Portal.
Lenses can also be shared to users without them needing a Snapchat account or needing to download Snapchat by clicking the share WebAR Lens button in My Lenses. Now it is easily viewable on a web browser including a phone’s native browser such as Safari or Chrome by visiting this generated URL.
Examples
The following tutorials show how to set up common Effect House projects:
Further Capabilities
Lens Studio offers additional capabilities such as: