Lens Studio for Unity Developers
As AR technology has evolved, many developers and designers are migrating from Unity Game Engine to Lens Studio, a top of the line platform specifically designed for AR development. While Lens Studio may seem similar at first, there are many differences that you should be aware of. This guide serves as a way to help translate content and workflows from Unity to Lens Studio, covering various aspects such as physics, VFX graphs, scripting, and user interfaces.
Whether you are new to Lens Studio or have been using it for a while, this document can be used as a comprehensive resource or a quick reference guide.
"Unity" and some of its feature names may be trademarks of Unity Technologies or its affiliates.
Unity to Lens Studio Glossary
Listed below are some of the common terminology used in Unity and what it is called in Lens Studio.
| Category | Unity | Lens Studio | Note |
|---|---|---|---|
| Interface | Hierarchy | Objects | |
| Project (Assets) | Resources | ||
| Scene | Scene | ||
| Game | Preview | ||
| Inspector | Inspector | ||
| Console | Logger | ||
| Types | GameObject | SceneObject | |
| Component | Component | ||
| Prefab | Prefab | ||
| Materials | ShaderGraph | Material Editor | |
| Unity Visual Effect Graph (VFX Graph) | VFX | ||
| UI Components | Canvas | Canvas* | In Lens Studio, Canvas component's sole purpose is to display UI elements in "World Space" |
| Rect Transform | Screen Transform | ||
| Animation | |||
| Scripting | MonoBehaviour | ScriptComponent | Lens Studio supports JavaScript, and TypeScript |
| Physics | RigidBody | PhysicsBody | |
| Collider | Collider | ||
| Joint | PhysicsConstraint |
The Editor UI Comparison
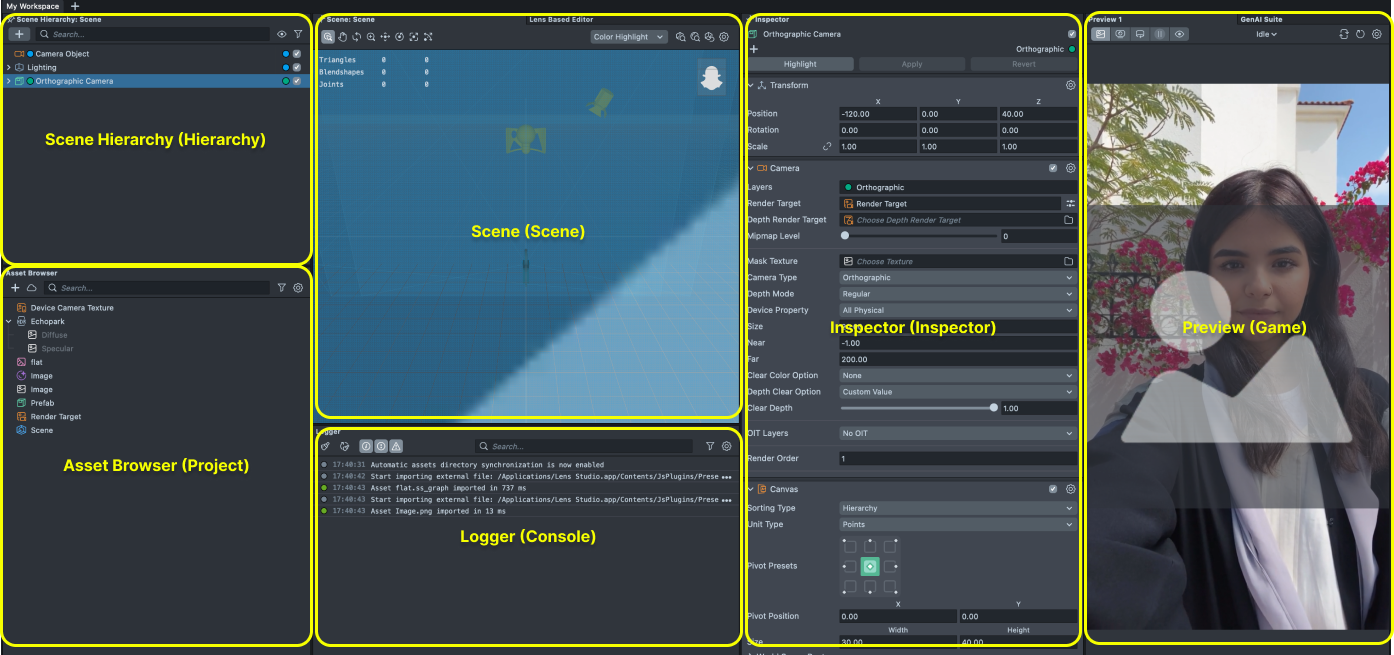
The default layout of Lens Studio is similar to Unity. There are six main panels in the Lens Studio interface:
Along with the Editor layout above, there are three editing panels for Script, Material, and VFX editing.
All panels can be dragged to your desired position and you can also reset those panels to default through the toolbar by selecting Window then Panels and select Default layout.
You can learn more about the panels in Lens Studio in the Panels guide.
Scene Hierarchy vs Hierarchy
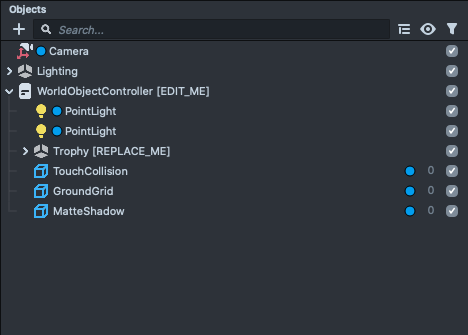
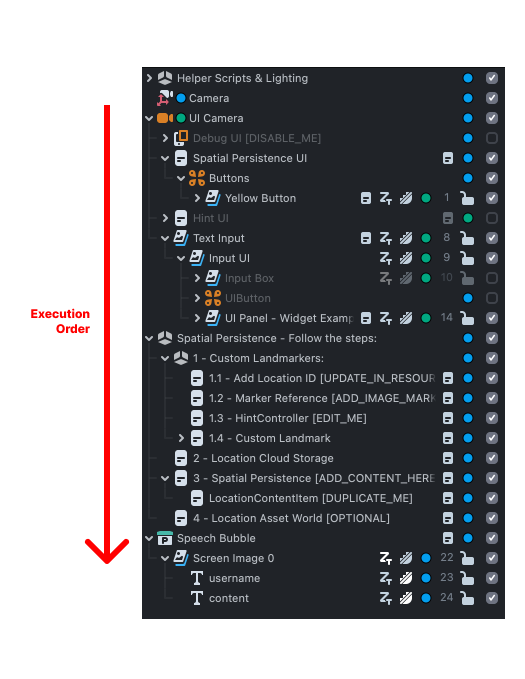
The Scene Hierarchy panel displays the hierarchy of all objects in your current scene, and allows you to enable or disable objects. The Scene Hierarchy panel also determines the render order and script execution order for objects in your scene. Objects at the bottom of the hierarchy will be rendered last, making them appear in front of objects at the top of the hierarchy.
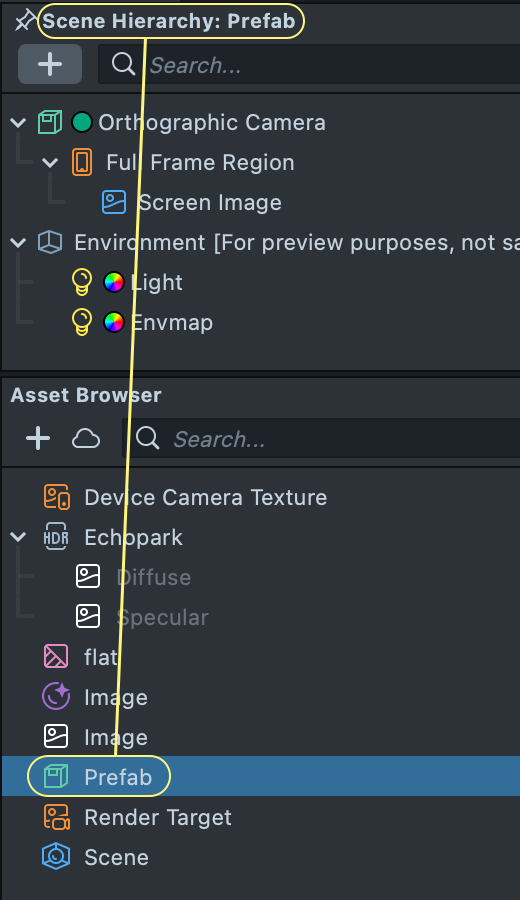
The active scene is displayed after the colon, such as "Scene Hierarchy: Scene". When you have a Prefab activated as the current scene, you will have "Scene Hierarchy: PrefabName" displayed. To go back to your main scene, find the Scene object in your Asset Browser panel and double-click it.
It’s easy to get confused by the term “scene” because it’s used in several ways in Lens Studio:
- "Scene" Asset – The default main top-level container of your Lens, often simply called “Scene.”
- "Scene" Panel – The 2D or 3D editing viewport where you move, rotate, and modify objects.
- "Scene" as Prefab – In Lens Studio, prefabs can be opened in isolation, effectively as a scene.
Asset Browser vs Project (Assets)
In Lens Studio, the Asset Browser panel serves the same purpose as the Project panel in Unity. It lists all the resources (assets) that are currently available in the project, including Meshes, Materials, Textures, Scripts, Sounds, and more.
To add a new resource to the project, you can drag and drop a valid file into the Asset Browser panel.
Scene vs Scene
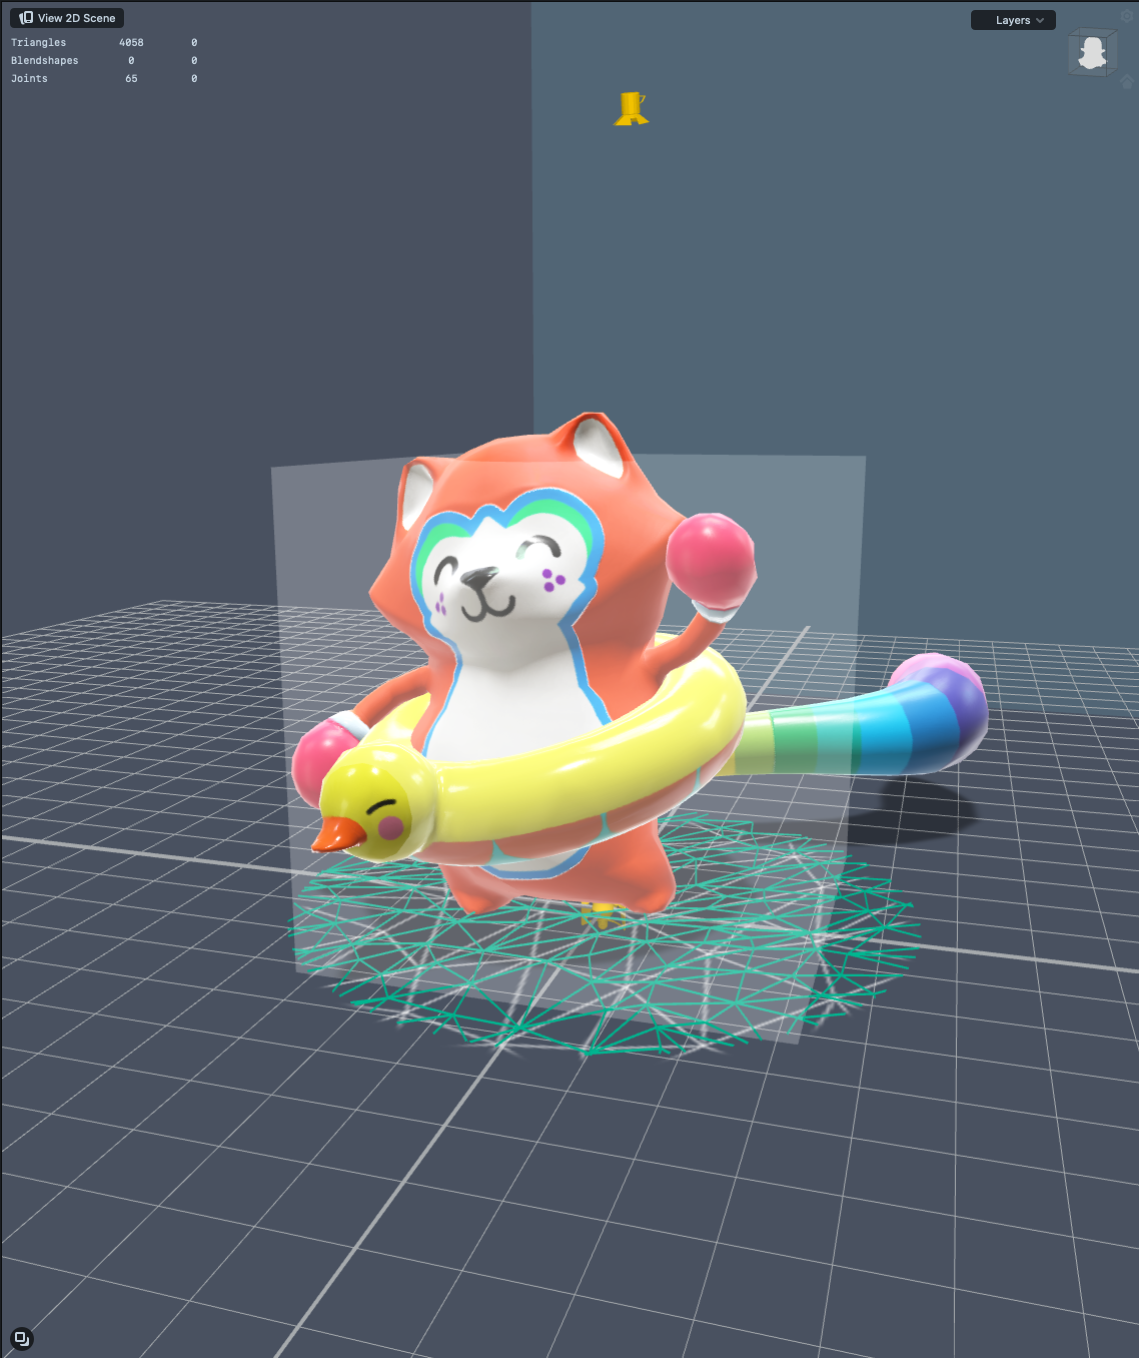
The Scene panel is where you can place and manipulate the objects in your scene. You can use the Scene panel to visually move, rotate, and scale objects, as well as access various camera controls through the panel's toolbar.
2D Scene and 3D Scene

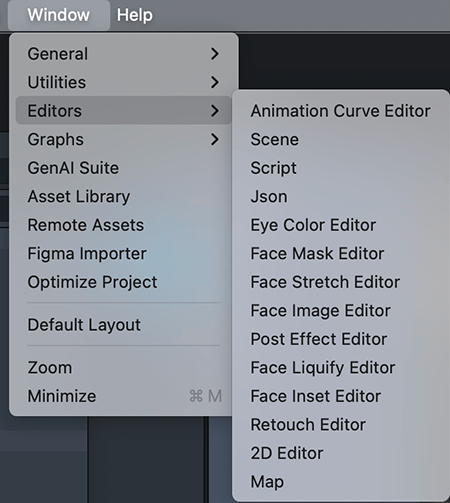
In Lens Studio, in addition to the default Scene view, there are a series of feature-specific editors available. You can find them under the Window -> Editors menu.
For example, the 2D Editor is for moving and editing Screen Transforms, making editing UI much more intuitive. Any objects with Screen Transform instead of regular Transform will be shown here.
For information on manipulating objects in both scene modes, you can refer to the Toolbar and Shortcutsguide.
Preview vs Game
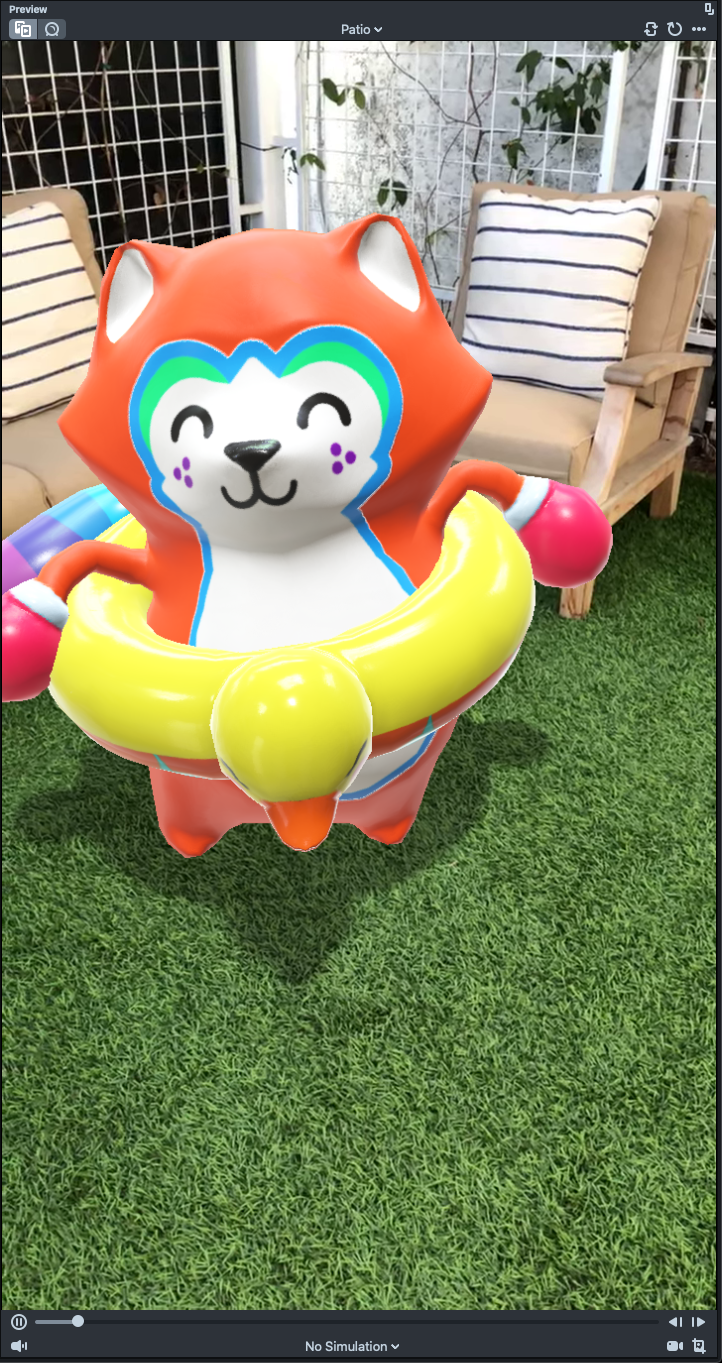
The Preview panel in Lens Studio allows you to see what your Lens will look like within Snapchat without having to upload it to a device. One major difference from Unity is that often there is no need to constantly play and stop the run in Lens Studio. By default, the Preview panel runs constantly and updates in real-time as you make changes to your scene, such as through scripting, material editing, or altering scene objects. You could choose to stop the run, but it is often unnecessary. You can also pair your device to Lens Studio to view your Lens on your mobile device. Once you've paired Lens Studio with your device, you can easily transfer your lens to the Snapchat app for further previewing.
You can also switch to webcam preview mode to view your lens through your device's camera.
Inspector vs Inspector
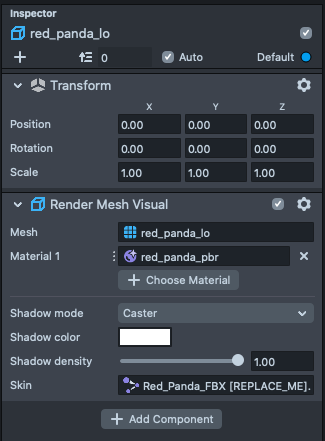
There is no difference between Lens Studio and Unity. The Inspector panel allows you to add and edit components on the selected object.
Logger vs Console
The Logger panel provides insights into the state of your Lens as well as Lens Studio itself.
Scene Objects and Prefabs
From GameObjects to Scene Objects
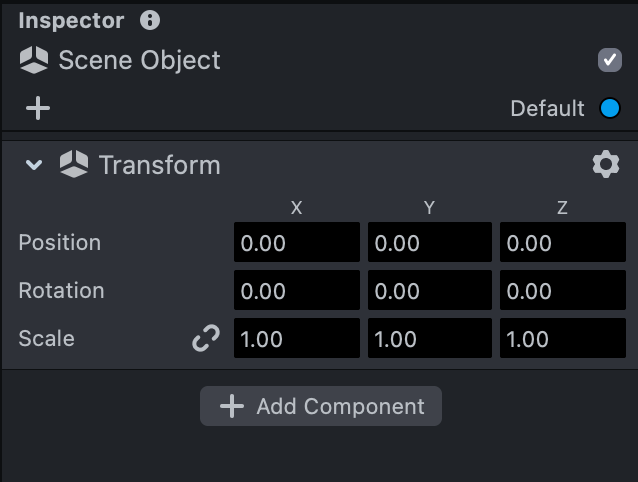
In Unity, GameObjects are the fundamental objects representing characters, props, and scenery. In Lens Studio, Scene Objects serve a similar function as containers for various built-in components, including image, audio, interaction, and script.
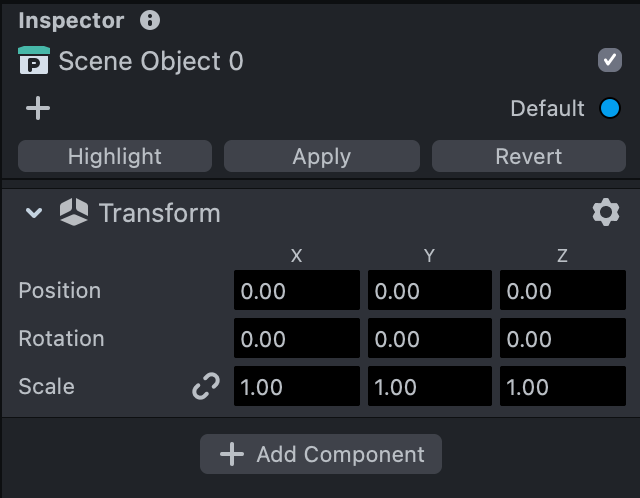
Every Scene Object has a non-deletable Transform component. Additional components that enhance functionality can be added by clicking the Add Component button in the Inspector panel. Depending on the type of object you're creating, you can add different combinations of components to a Scene Object.
Prefab and Multi-scene Setup
In Lens Studio, the Prefab system allows for the creation of reusable components, similar to Unity's prefabs. Lens Studio treats prefabs as scenes, enabling a multi-scene setup. Like Unity's scene files, you can double-click a prefab to open it in the current hierarchy, making it the active scene for editing.
To create a prefab, drag any Scene Object from the Scene Hierarchy panel to the Asset Browser panel. Prefab components can be instantiated at runtime or in the editor and exported as an .lspkg file, similar to Unity's .unitypackage, including all dependencies.
In Lens Studio, use the ObjectPrefab API to access prefab components or utilize the Scene Manager to manage multiple scenes in your project.
Editing a Prefab
Similar to Unity, you can edit a prefab by opening it as a scene or by editing an instance of the prefab within a scene. Changes made to a prefab can be applied to all instances by clicking the Apply button in the Inspector panel. You can also revert changes to the prefab by clicking the Revert button.
Scene Management
As mentioned earlier, Lens Studio treats prefabs as scenes. This means you can switch, instantiate, and delete scenes at runtime by loading and unloading prefabs. The Scene Manager, a custom component available in the Asset Library, helps manage multi-scene operations in your project. For more information, refer to the Scene Manager guide.
Exported Packages: .lspkg
Exported packages facilitate the modularization of larger projects, the transportation of standalone packages for troubleshooting, sharing with other creators, or publishing online for easy access. In most cases, exporting in Lens Studio generates a .lspkg file, while exporting a Custom Component results in a .lsc file. For more details, visit the Asset Packages Introduction.
Asset Library vs Asset Store
The Unity Asset Store and Lens Studio Asset Library are both repositories of assets and tools that can be used to create or enhance projects in their respective platforms. The Unity Asset Store contains a wide range of assets, including textures, models, animations, entire project examples, tutorials, and editor extensions, and is available for use in any project created in Unity. Some assets in the Unity Asset Store are free, while others are commercial and require payment.
In contrast, everything in the Lens Studio Asset Library is free to use. The Lens Studio Asset Library is specifically tailored for use in creating Lenses in Lens Studio and includes assets such as simple reusable assets and machine learning models. While assets from the Unity Asset Store can be used in other engines, those from the Lens Studio Asset Library can only be used within Lens Studio.
Persistent Storage and PlayerPrefs
Unity provides a built-in feature, known as PlayerPrefs, to preserve game data across sessions. PlayerPrefs is commonly employed to retain game progression and player configuration settings, with the load and save system being a prevalent use case.
Similarly, Lens Studio offers a comparable feature, known as the Persistent Storage system. In its default configuration, script variables hold their value only while the Lens is active. To transfer data between Lens sessions, one may use the Persistent Storage system by writing and retrieving data from storage. To illustrate, consider the following example:
var store = global.persistentStorageSystem.store;
var scoreKey = 'totalScore';
//read data
var currentGameScore = store.getInt(scoreKey);
//write data
store.putInt(scoreKey, 10);
To learn more about Persistent Storage, check out this page.
Scripting
Lens Studio uses the ECMAScript 2019 version of JavaScript and TypeScript.
Before diving into specific scripting content, you can view the full API list in the following link.
Getting Started with Sample Projects
Lens Studio offers a series of sample projects that can be a great way to start your journey with Lens Studio. While Lens Studio has its own unique legacy and way of doing things that may be different from Unity. Here are a few tips to help ease you in:
- Start from the top, and work your way down. This is due to the Lens Studio Execution Order.
- Lens Studio encourages creators to reuse existing helper scripts. Sometimes people trade a "perfect" design pattern in exchange for reusing a helper script to avoid repetitive work. So when you open a new sample project, the first thing you can do is to spend a bit more time in the editor, try finding all the Behavior and Tween scripts being used. For more information, take a look at the Official Helper Script section.
Execution Order
In Lens Studio, the order in which scripts are executed can be determined by the location of their associated SceneObjects in the Scene Hierarchy panel. SceneObjects at the top of the panel will have their scripts executed before those attached to SceneObjects lower in the hierarchy. This is why you may see helper scripts, such as TweenManager, placed at the top of the Scene Hierarchy panel. This ensures that necessary functions and variables are initialized before they are called upon by other scripts. In contrast, Unity has a Script Execution Order setting in the Project Settings to adjust the order in which scripts are run.
Script Module and Asset Library
If you are familiar with JavaScript, you may already know that it is a dynamically-typed language that does not use preprocessors like "include" or have the concept of "namespaces." However, it does have tools for modularization and connecting different scripts together. In Lens Studio, the Script Module feature allows you to structure your code in a more logical and organized way. It is highly recommended that you take advantage of this tool to streamline your workflow.
You can find more information about Script Modules in this link .
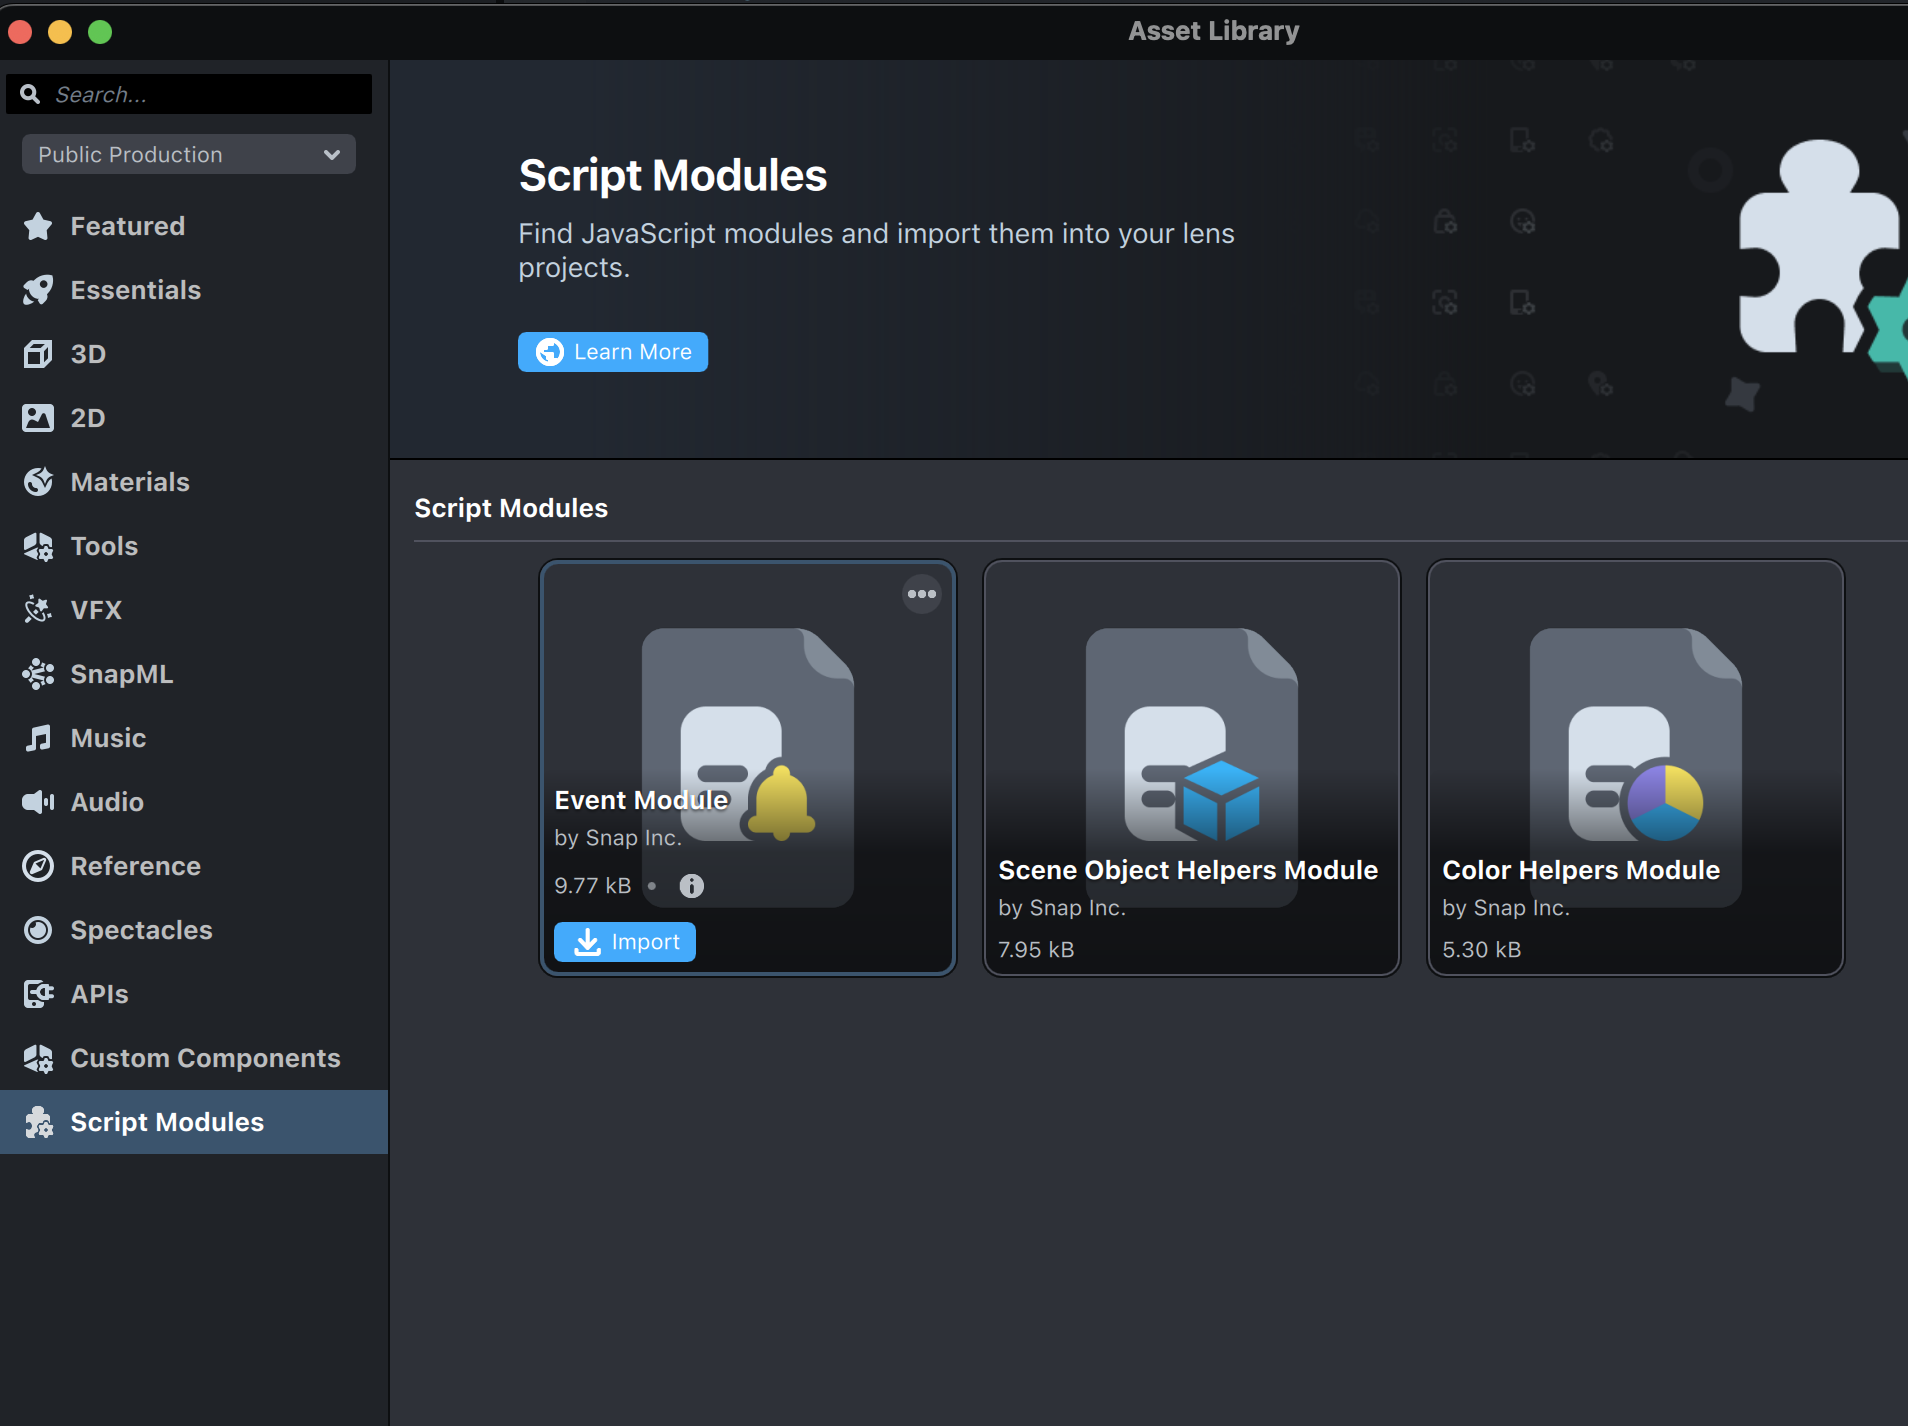
In Lens Studio's Asset Library, you can find a section dedicated to Script Modules, which includes some common modules that you may use frequently.
The global object
Built-in Global Methods and Properties
The global object in Lens Studio is a powerful tool that allows you to access built-in methods and properties, as well as store your own variables, functions, and prototypes. Some examples of built-in global methods and properties include:
Returns the global ScriptScene object, which offers information and controls for the current scene.
Returns the time in seconds since the lens was started.
You can find the full list here.
Store your own things on global
You can use the global object to store and access your own variables and functions in Lens Studio. This is useful because it allows you to access these values and functions from anywhere in your code, similar to how you use static classes and functions in C#. In the next few examples, you can see how you can utilize the global object including storing variables, and accessing them from anywhere in your code. You can also create and store global functions. Additionally, you can register your prototypes or classes on the global object for easy access throughout your project.
You can register/store variables on it, make them accessible from wherever you want. Similar to how you make static classes in C#.
global.myScore = 0;
//inside another script
global.myScore++;
You can register/store a set of functions in it, making those functions global. Again, similarly to how you use static functions.
global.makeBox = function(){//make a box}
You can register your prototypes/classes on it.
global.Car = function (color) {
  //do
};
global.Car.prototype.createNewCar = function () {
  //do
};
var newCar = new global.Car(red);
Event Listeners
Event listeners allow you to respond to specific events in your code. There are two ways to create event listeners in Lens Studio:
-
The Asset Library's Script Modules section features the Event Module, which enables you to design custom events. You can refer to the script header for helpful examples on how to utilize it effectively. To provide a brief overview of its usage, here is a minimal example:
//import the module
var EventModule = require('EventModule');
//create a new event
var onScoreChange = new EventModule.EventWrapper();
//register a listener to the event
onScoreChange.add(function (newScore) {
  print('score changed, new score is ' + newScore);
});
//call the event. all listeners added to the event get executed too
onScoreChange.trigger(10); -
Listening to built-in events, such as
InteractionComponent.onTap, by using the.add(function)method to add your callback functions to the event.
Helper Scripts
When coming from Unity, the idea of relying on helper scripts may be an unfamiliar workflow. It's important to note that while this approach may result in slightly different design patterns, it is generally a good trade off for AR apps, which tend to be less complex than Unity games.
You don't need to fully understand the inner workings of helper scripts in order to use them effectively.
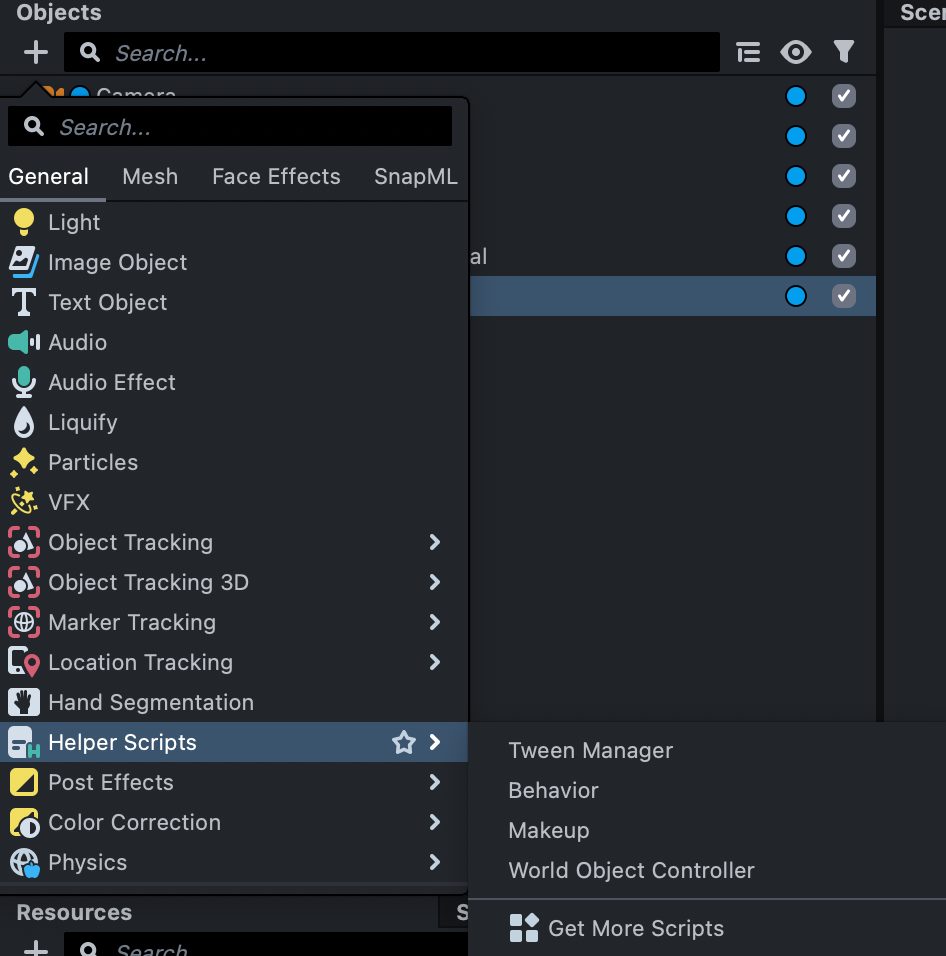
You can find helper scripts through the Plus (+) sign at the top left corner of the Scene Hierarchy panel.
Behavior.js
The Behavior script is a common type of helper script that can be found in many projects. It allows users to incorporate a wide range of common tasks into their projects without writing any code. The behavior script acts as a "if [trigger] then do [response]" system, with a variety of triggers and responses available. Even experienced developers can benefit from using the behavior script.
Tween
Tweening is a common technique in front-end JavaScript that is used to animate the position, scale, or other attributes of an element over time. If you have experience with front-end development, you may already be familiar with tweening as a way to add visual interest or polish to a project. While the primary function of tweening is often cosmetic, it can also be an important tool in interaction design, as it can significantly impact the user experience of a project. You can
Life Cycle Events
In Lens Studio, scripts that are attached to SceneObjects are typically triggered by an event, such as onAwake or onTouch. However, it is recommended to leave the trigger in the Inspector set to the default onAwake and bind actual triggers in the script. This can be done using the createEvent and bind functions, which allow you to create a Start() and Update() function similar to those found in Unity.
To create an update function and bind it to the UpdateEvent, you can use the following code:
function update() {
  // write your update code here
}
var updateEvent = script.createEvent('UpdateEvent');
updateEvent.bind(update);
By standardizing your script triggers this way can help improve the clarity of your code and make it easier for others to understand the trigger for each script without needing to switch back and forth between the Lens Studio editor.
For more information, please visit Script Events | Docs
Reference to other scripts and components
Assign Reference in Inspector
Similar to Unity, Lens Studio provides ways to expose variables in the Inspector panel you could drag other objects, no matter if it is a Prefab, a texture, a SceneObject or another script to the slots.
To create a script level object while exposing it in the Inspector panel, you can use the //@input keyword. The property is automatically added to the script object, and is treated as public, meaning it can be accessed by other scripts.
Here are few examples:
//primitive types
//@input bool myBool;
//@input vec3 myVec;

//Components
//@input Component.Animation myAnimation;
//@input Component.Image myImage;

//a Asset
//@input Asset.ObjectPrefab myPrefab;
//@input Asset.LocationAsset myLocAsset;

//you can access them by

var ani = script.myAnimation;
var prefab = script.myPrefab;
There isn’t a complete list of all the acceptable object types, but you could check out the Input Type list for all the primitive types, andthe Component list for all the Component types, and the Asset list for all the Asset types.
Cross Referencing Scripts
As of 4.0, there is no way to access a script specifically by name. You would just use getComponent("Component.ScriptComponent"). In the case that there are several scripts on the same scene object, you can use getComponents() which will return an array of components of that type. Once you have the list of ScriptComponents, you could check if a given script has a certain property of function to determine its "type."
/* ======================== */
/* main.js */
var scriptsComponents = myObject.getComponents('Component.ScriptComponent');
var targetScript;
scriptsComponents.forEach(function (sc) {
  if (sc.isFoo === true) {
    targetScript = sc;
  }
});

/* ======================== */

/* script Foo.js */

script.isFoo = true;
Physics
Lens Studio contains a fully featured built-in physics system for running physics solutions in real-time. The physics system contains some differences in organization compared to other physics engines, such as Unity.
PhysicsBody vs PhysicsCollider
For simplicity, you can think of Lens Studio's PhysicsBody as similar to Unity's Rigidbody, and Lens Studio's PhysicsCollider as similar to Unity's Collider. However, in Lens Studio, a PhysicsBody comes with a collider integrated by default and cannot exist without one. This means that if an object already has a PhysicsBody, you do not need to add a separate PhysicsCollider to it. On the other hand, you can turn a PhysicsBody into a collider-only object by disabling the Dynamic checkbox.
Physics Constraint (Joint)
Lens Studio has three types of physics-based joints: Fixed, Point, and Hinge. These are sufficient for most cases, and are known as Physics Constraints in Lens Studio. Like in Unity, a Physics Constraint (joint) requires a PhysicsBody (rigidbody) to function.
Physics World Settings
In Unity, world settings are located in the Project Settings under the Physics tab. In Lens Studio, Physics World Settings are assets that can be created and customized. You can add this setting via Asset Browser > + > Physics World Settings. To use the settings, in the Asset Browser panel, click on the Scene asset, and set it as the Physics Root Settings. Additionally, each Physics World component can optionally reference a specific Physics World Settings asset, or use the Physics Root Settings of the Scene by default. Lastly, WorldSettings can be applied per-collider.
To learn more, check out the Physics Asset and Components guide
UI
World Space vs. Screen Space
Screen Transform is the fundamental building block for displaying UI elements in Lens Studio, similar to Unity's RectTransform. In Unity, there is a Canvas component that has three different modes: Screen space (overlay), Screen space (camera), and World space. In Lens Studio, there is an equivalent to Screen space (camera), and World space. However, these modes are not consolidated under a single component like in Unity.
Screen Space (Camera)
In Lens Studio, to have screen space UI elements, you need to first have an Orthographic Camera, and then you can start adding Screen Transforms under it. Remember to set the layers of those Screen Transforms to Orthographic.
World Space
Lens Studio introduced the Canvas component in version 4.31. Canvas works similarly to Unity's Canvas, serving as a parent for other Screen Transforms like Text and Images. Because they are shown in the 3D world, you do not need to set their layers to Orthographic.
You can also add an Image or Text component directly into the world without using Canvas, as long as they have a regular Transform component instead of a Screen Transform. However, if you do this, your project will not be benefiting from the powerful layout tools that come with Screen Transform.
UI Elements
Lens Studio provides a set of Custom UI Components for creating common UI components like UI Button,, UI Toggle, UI Color Picker, Ui Scroll View, etc. You can find these Custom Components in the Asset Library.
Layout Elements
Similar to Unity’s Auto Layout tools, Lens Studio provides Horizontal Layout and Vertical Layout components for automatic layout. However, unlike in Unity, only children elements that have a Layout Element component are affected by the Horizontal Layout or Vertical Layout. For more information, you can refer to this documentation.
Rendering and Effects
As a mobile facing, all-tier friendly tool, Lens Studio provides standard rendering features for creating flexible, light-weight graphics.
Rendering Order and Passes vs Render Targets
In Lens Studio, the order in which objects are rendered is determined by their position in the Object hierarchy. Objects at the top of the hierarchy are rendered first, followed by those below them. The number next to the enabled checkbox indicates an object's position in the render order, with 0 being the first and 1 being the second, and so on.
Unlike Unity, Lens Studio only supports Forward Rendering. However, you can still customize your rendering by using Render Targets (which are similar to Unity's Render Textures) or Screen Texture (which is an implicit reference to the current render target). By organizing your Scene Objects in the Scene Hierarchy panel from top to bottom, you can effectively create a customized rendering "pipeline".
Case Study: Obtain the Depth Data
The Material and VFX editors in Lens Studio provide a Depth node, which returns the depth for a specific vertex or fragment. However, if you want to use depth data in your script, such as to manipulate UVs, you can follow these steps:
- Create a
Depth Render Targetin theAsset Browserpanel. - Assign the newly added
Depth Render Targetto theDepth Render Targetfield on the camera from which you want to obtain depth data. - Lens Studio will automatically write depth data to the render target.
- You can access the depth data in scripts, materials, VFX, or any other location where you may need it.
Learn more in the Depth Render Target guide.
The Depth Render Target assigned to the camera will contain the depth data of the Camera component, in contrast to the Depth Texture, which holds the depth data from the device's camera.
Materials and Shaders
Unity introduced ShaderGraph in 2019 and it allows users to construct materials in a node-based graph system. Lens Studio has something very similar called the Material Editor. Unlike in Unity where you can create custom materials both with written shaders in HLSL/ShaderLab and the ShaderGraph, the Material Editor is the only way to create custom shaders/materials in your Lens Studio project.
While you must use the Material Editor to create shaders and materials, you can still write shader code within the Material Editor using the Custom Code node. While Unity uses HLSL, the Custom Code node uses GLSL along with some special formatting for variables. All standard GLSL functions are available within Code Node.
VFX and Particle System
Lens Studio has a Visual Effects (VFX) Graph system that is similar to Unity's VFX Graph. The VFX editor in Lens Studio is a node-based editor that allows you to modify properties of particles at three stages: spawn, update, and output. Unity's VFX Graph has four stages: spawn, initialize, update, and output.
In addition to nodes, the VFX editor also has access to the Custom Code node, which allows you to write custom GLSL code to affect your particles.
While Lens Studio does not have a particle system that works directly with in-scene physics colliders like Unity's Particle System, the VFX Graph does provide several ways to create collisions for your particle systems similar to Unity's approaches. For more information, you can refer to the VFX Collisions documentation.
Asset "Particles"
Additionally, you can use the Particles asset, which uses a specialized material instead of the VFX graph to create a particle system. You can create the Particles asset by clicking the plus button on the Scene Hierarchy panel and selecting "Particles." This material already has options for many common particle attributes available to modify in the Particles material, such as spawn options, color ramps, noise, and velocity.
To learn more, here is where you can learn the basics of VFX in Lens Studio: Learn More
Post Effects
Lens Studio has a built-in system for adding post effects to your projects. To use this feature, you can add a Post Effect component to a Scene Object. There are many pre-made post effects available in Lens Studio, such as Smoothing, Blur, HalfTone, and Edge. You can access these by clicking the plus button on the Scene Hierarchy panel and hovering over the Post Effect option. In addition to these ready-made effects, you can also create and edit your own Post Effect materials using the Material Editor with an output Shader node set to "Post Effect."
To learn more about Post Effect, you can check out this page.
Build and Release
Build and release in Lens Studio is simple and straightforward. Your Lenses will be hosted through one of the environments:
- Snapchat (Android and iOS)
- Spectacles (Wearable)
- Camera Kit (publication process may vary)
You can publish your lens through the Publish Lens button in Lens Studio. For more detailed steps, checkout this guide. Although your lens has to exist on one of Snap's platforms, once it’s published, your AR application will be available to a vast global audience of active users.