Simple World Mesh
The Simple World Mesh Template showcases different ways you can take advantage of the World Mesh to understand the world around you and add effects that respond to them.
In the guide below we will take a look at each example and see how each one works.
This template uses the World Mesh, which capabilities can vary across devices. Take a look at the World Mesh guide to learn more.
Guide
The template comes with three examples. These examples can be found in the Object panel under their names. Try enabling the example scene object by pressing the tick-box to the right of their name.

Each of the examples contains a scene object called world mesh which contains the World Mesh asset.
You can push the Lens to your device as you would with any other Lens, but your device must support World Mesh. You can preview how it would look on a supported device in Lens Studio using the Interactive Preview mode in the Preview panel.
Tap To Spawn Example
This example allows you to spawn any prefab in the world. You can simply tap on the screen and see your prefab spawns in the world.
Set up Object Spawning
To change the spawning object, first we need to create a prefab from the object that we want to spawn. The easiest way of making a prefab resource is to right click on your object in the Objects panel and then selecting Save as Prefab. As soon as you click you can see the new prefab added to the Resources panel.
Since we have a backup of our object as a prefab in the Resources panel, you can simply delete the one in the Objects panel. However, make sure to keep the one in the Resources panel.
Now that we have our prefab ready, let’s modify the example so we can spawn our own prefab into the world. To do that first select the Tap To Spawn [EDIT_ME] object under the Tap to Spawn example.
Then in the Inspector panel, replace the prefab input with the prefab that we just created.
Now we can tap on the screen and see our new object is getting spawned in the world!
Set up Scene Effect
This example also comes with a custom graph material that lets you easily design patterns and attach it to the world.
You can find this material by selecting the World Mesh Visualization object in the Objects panel. Then in the Inspector panel, right click on world_mesh_visualization material and click the Select option.
Now you can change the Pattern input to your own image to create your own pattern and apply it to the world.
Feel free to play around with values to create your own amazing pattern!
Depth VFX Collision Example
This example shows how we can combine the World Mesh with VFX to spawn particles that collide with the world. This example use a collision sub-graph for the VFX editor. To learn more about the subgraph please visit the VFX collision guide page.

In order to have our VFX collide with the World Mesh, we need to pass its data to the VFX asset. The ScreenSpaceNormals helper script lets you convert and send data from the world mesh to a VFX asset(s).
To find this select the Screen Space Normals object under the Depth VFX Collision Example [TRY_ME] object, in the Objects panel.

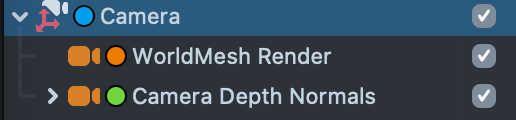
In order to get the mesh data from world mesh, we use a camera dedicated to only rendering world mesh (and everything else that we want our particles to collide with). Everything else that we don't want to have any collision with, like the cloud, needs to be rendered on another camera. In this way we make sure the cloud’s mesh information will not be sent to the VFX asset.

Now that we know the basics of how this example works we can easily modify the VFX by selecting the VFX Depth Collide object under the Cloud Anchor > Cloud scene object.
To edit the VFX asset simply right click on the VFX asset input in the Inspector panel and click on select. Then double click on the VFX asset in the Resources panel to have the VFX opened in the VFX editor window. Now you can easily customize the particles to how you want them to look.
To learn more about VFX please visit the VFX Editor's guide page.
World Mesh VFX Spawn Example
This example works similarly to Depth VFX Collision, in which we use a helper script to send information about the World Mesh to a VFX asset, and then we use the VFX editor to spawn particles on the world.
This helper script is called DepthStencil which you can find under the World Mesh VFX Spawn Example [TRY_ME] object.
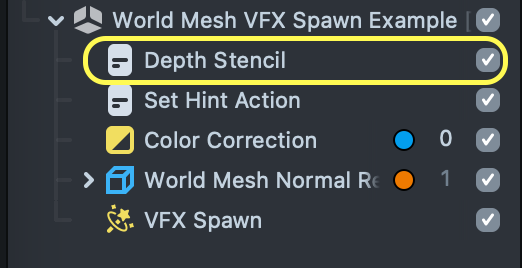
This script simply creates a Depth Stencil Render Target and passes the data from the depth stencil to the VFX asset.
As you can see the structure of this example is very similar to the previous example. This example also uses two extra cameras. One is to render the world mesh depth stencil and another one to use the information from depth stencil to generate surface normal information from that.
Now that we know the basics of how this example works we can modify the VFX by selecting the VFX Spawn object under the World Mesh VFX Spawn Example [TRY_ME] object. To edit the VFX asset simply right click on the VFX asset input in the Inspector panel and click on select. Then, double click on the VFX asset in the Resources panel to have the VFX opened in the VFX editor window. Now you can customize the particles to how you want them to look.
To learn more about VFX please visit the VFX Editor’s guide page.
Previewing Your Lens
You’re now ready to preview your Lens experience. To preview your Lens in Snapchat, follow the Pairing to Snapchat guide.
Related Guides
Please refer to the guides below for additional information: