Custom Locations
Overview
Custom Locations is an easy to use way of mapping real life areas and creating AR experiences around those locations. It uses the Custom Locations Lens to first create Custom Location maps of real-world locations, and then loading these Custom Locations into Lens Studio to author AR content.
The Custom Locations Lens can be used to map individual locations, to create groups of locations and to add additional localization viewpoints to a pre-existing location.
Previous Versions
This Lens and its components are an evolution of the Custom Location Creator Lens available on mobile.
The LocatedAtComponent is still used, and the Import Mesh to Lens Studio guide is still applicable.
What does each Custom Location contain?
A finished Custom Location contains:
- A colored mesh of the location scanned
- A series of localization viewpoints
The colored mesh will be visible within Lens Studio and can be used to help the developer move virtual objects to their correct location in the editor before deploying to device. The localization viewpoints are captures from which the resulting Lens -- the Lens you're developing at this custom location -- can localize against. When the user of your Lens is approximately in the same position as one of these viewpoints, the system will recognize its position in space and display your content appropriately.
Viewpoints
The Custom Locations Lens will capture many viewpoints during a scan; however, it is limited by where you scan from. For the best results when scanning, move laterally around the location and capture angles you expect users to be viewing from.
Yellow camera objects will spawn during a scan to indicate viewpoint locations and angles.
If a scan is later determined to be insufficient, a new Incremental Scan can be created with additional viewpoints. However, this will create a new ID and the Lens will need to be updated.
Example videos showing this progress are attached at the end of this document.
Saved IDs in the Custom Location Creator Lens are only stored locally. Be aware that factory resetting your device may lead to these location IDs being forgotten. Additionally, published locations remain public and do not get erased by local removal.
Getting started
Prerequisites
- Lens Studio 5.7 or later
- Spectacles OS v5.060.0422 or later
- [Optional] Spectacles Interaction Kit
Creating a Custom Location
The Custom Locations Lens can be found on Spectacles under the "All Lenses" section. On launch, there will be a "Scan New" button at the bottom. When you are at the location you wish to scan, this button should be selected, followed by "Begin Scanning".
For the best scan, the location should be observed from many different angles and with lots of lateral movement made during the scan. As the scan progresses the displayed mesh will update itself as Spectacles more accurately tracks the shape of what is present.
Once collected tap on the "Finish Scan" button to complete.
Finishing the scan
The "Finish Scan" button will appear as soon as the minimum requirements for a scan have been met, but it is recommended to continue for longer to get a sufficiently large number of viewpoints.
You will be required to accept the legal disclaimer, which is copied below, before publishing your location.
After you upload this Location to Snap, you will receive a unique reference ID. Anyone with access to this ID will be able to use this Location in Lens Studio to publish a Lens, so avoid uploading a Location that contains sensitive personal information.
Upon publishing, you will be presented with the newly created scan ID as well as an opportunity to name the scan. The name is only for local purposes within the scanning Lens and, at this time, does not propagate to Lens Studio.
Import Mesh to Lens Studio
After you have created a unique Location ID, you can import your mesh in Lens Studio.
Please make sure you are connected to the internet before importing a Custom Location or opening a project with a Custom Location imported.
-
Create new project in Lens Studio.
-
Navigate to the
Scene Hierarchypanel and selectWorld->Custom Location.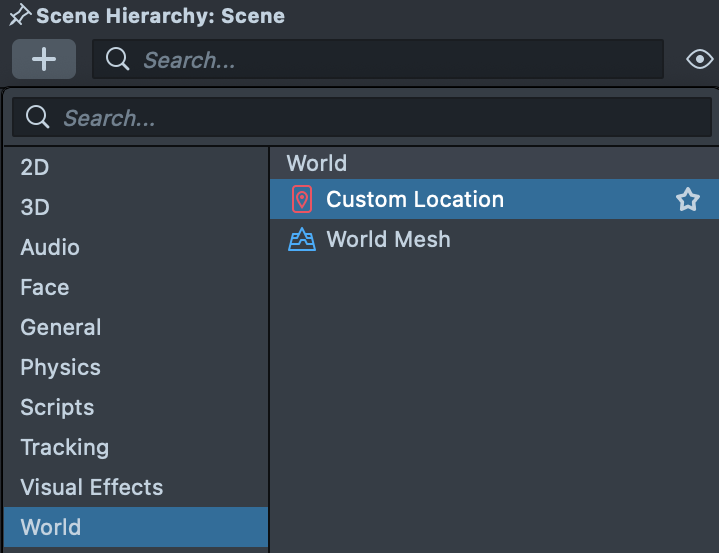
-
Select the newly created asset in
Asset Browserand enter your custom mesh ID.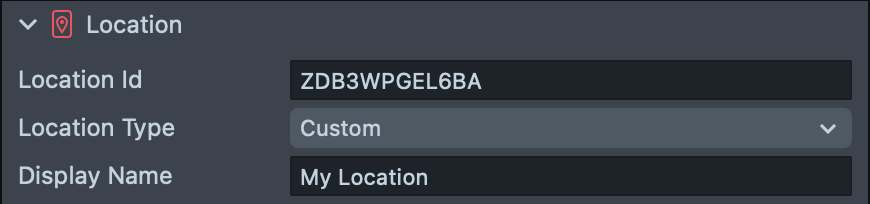
After you input the ID, you'll see the location mesh and its tracking asset in Lens Studio.
It is recommended that the scan mesh is not used as an asset in the output Lens, but rather just as a development tool for placing assets in the space. However, it is there and can be used however the developer sees fit.
Using your Location based Lens
A Sample project is available in the Spectacles-Sample github repository. In its README there is a step by step guide that creates an example Lens to demonstrate a potential use case.
Creating Location Groups
Multiple Custom Locations can be tied together into a Custom Location Group. Follow the above steps until you have at least two locations that are relatively close to each other. Locations that are less than 20m from each other work best.
- Select "New Group"
- Check all of the locations that you wish to gather together
- Press New Group
- One by one, select each of the locations and:
- Go to that location and await stabilization
- Select the next location
- Once all locations are stabilized, the "Finalize" button will appear
- On pressing this the group will be published and the ID will be presented
During grouping, selecting an already stabilized location will result in it being remapped. This could be useful if you believe the located position is incorrect.
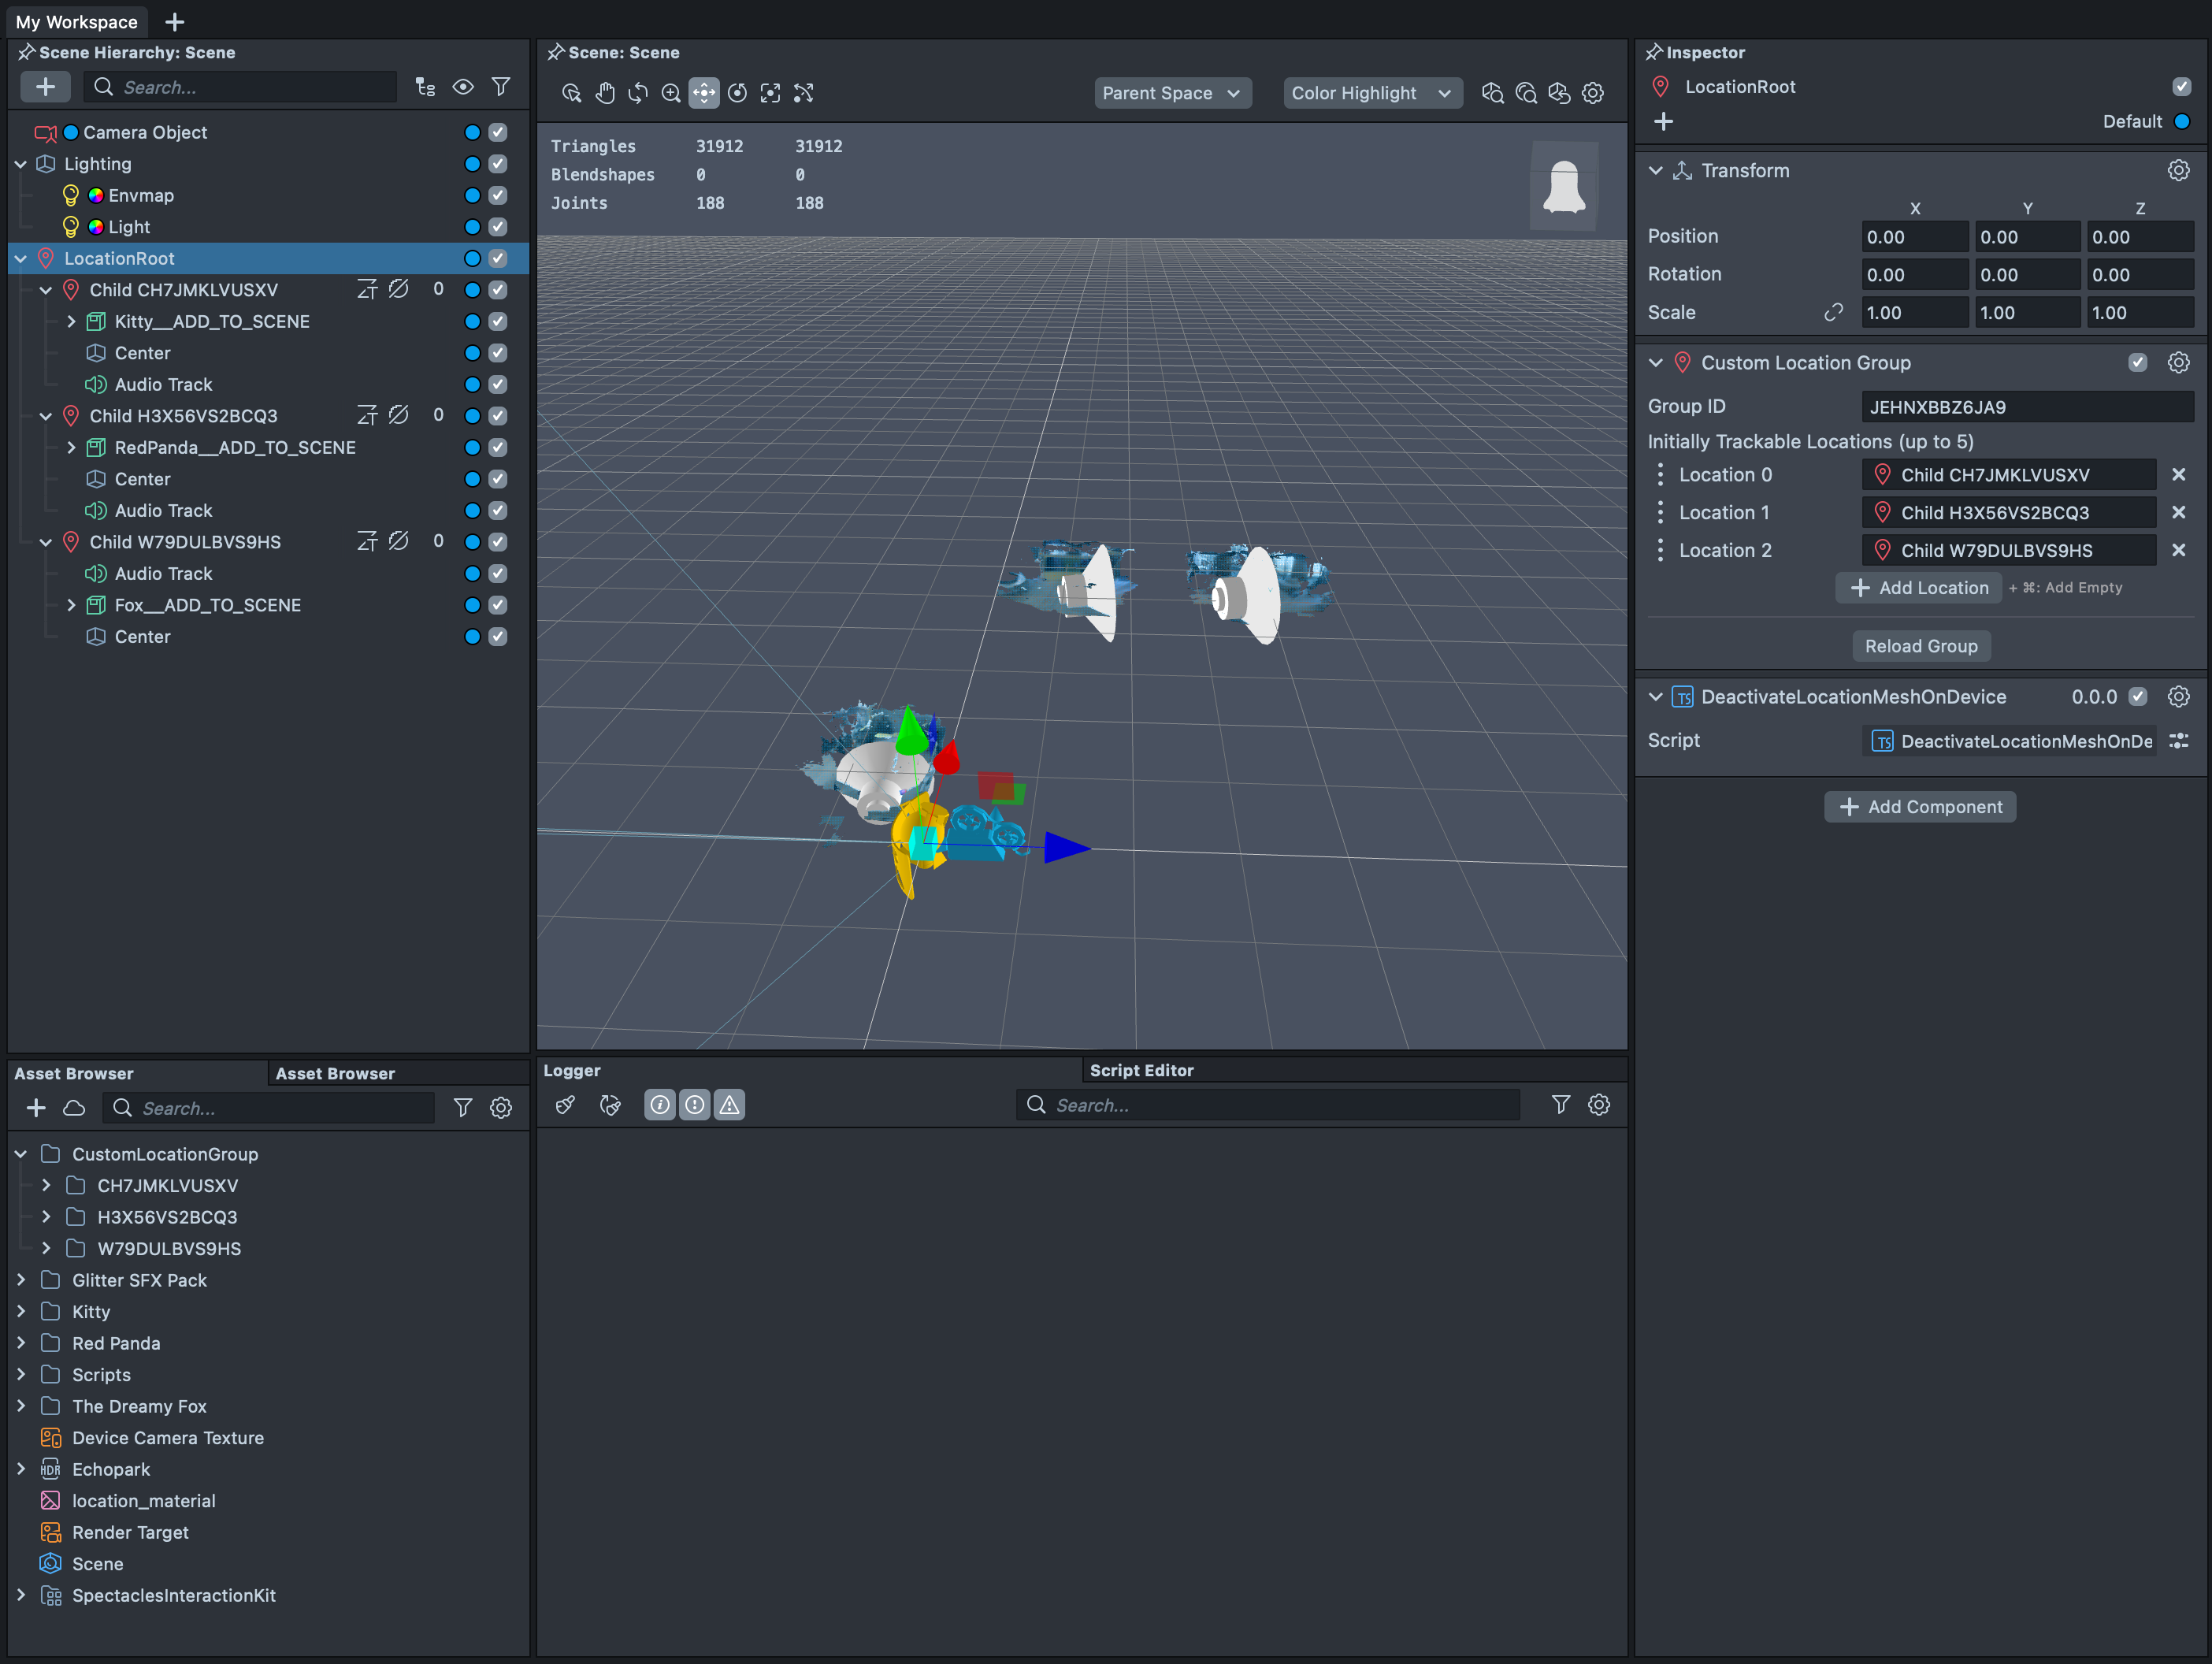
Importing Groups to Lens Studio
Once a group has been published, it is ready to be imported into Lens Studio.
- Create an empty scene object
- On the object, click "Add Component"
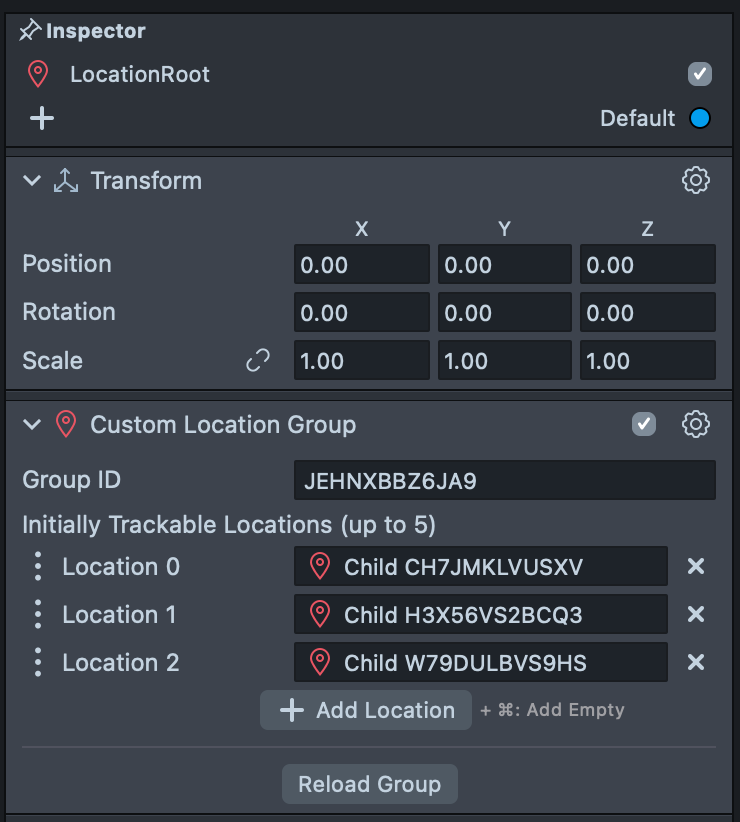
- Select "Custom Location Group"
- On the new component, enter the ID into the "Group ID" field
- Press "Reload Group"
- Lens Studio will now generate Custom Location children for every member of the group
Group Localization
The scanning Lens will only allow groups of up to 5 to be created at this time.
Incremental Scans
If an existing scan is deemed to not have enough viewpoints, an incremental scan can be created to add new viewpoints. The mesh will remain the same, and a new ID will be generated.
- Select
...on an existing scan within your Lens - Select
+and confirm - The user will be presented with the scanning prompt and must localize against the existing scan
- Once localized the "Finish Scan" button will appear
- Tap on this button to begin the incremental scan
- Now move around to the new localization points to gather new viewpoints
- Once completed, tap publish to receive the new ID
- In the Lens Studio project using the previous ID, replace the ID
- Publish the updated Lens with the updated localization scan
The new incremental scan will be created in the same coordinate frame as the original, so the placement of virtual objects will not need to be updated
Methods for Capturing Optimal Viewpoints
- Make sure that your device is in constant motion.
- Ideally, move in a steady “sweeping figure 8” motion for a few seconds, while moving around in the space you are scanning. This will significantly improve the quality of the mesh you are constructing.
- Avoid remaining still in space and rotating your head around one spot.
- Avoid extreme vertical viewing angles (pointing up and pointing down), and avoid fast camera motion.