Face Swap Component
The Face Swap Component allows you to transfer the face from one person to another, preserving the appearance of the first (Source) face while using position and expressions of the second (Target) face.
Using the Face Swap Component
To add the Face Swap Component to your Lens, go to the Asset Library and find Face Swap in the Custom Components section.
![]()
Once you click the Install button, you can find this component in the Asset Browser.
Put the component into a Scene Object with a Screen Transform within the Orthographic Camera. Make sure the render layer corresponds to the Orthographic Camera (green by default).
The quickest way to set up a Screen Transform hierarchy within an Orthographic Camera and Screen Region is by clicking the + button in the Scene Hierarchy panel and selecting Screen Transform.
Component Inputs
Swap On
When to start the face swap.
| Option | Description |
|---|---|
| Start | On lens start. Recommended mainly for testing as Users may not be looking directly at the camera when the effect first activates (e.g., while just browsing lenses). The user may miss the beginning of the face swap |
| Face Present (default) | When faces are present in source and target for the specified amount of frames. Defaults to 5, so faces can stabilize after movement, especially in low light environments |
| Manual | Use start(): Promise<Texture> method to start the face swap process manually. Ensure that faces are present before calling this method. Refer to the API section for more details |
Real-Time Mode
Determines whether the result is continuously updated in realtime. Makes the experience interactive, but may heavily impact performance on older devices.
Source
The texture containing the face to use as the source for the swap. Facial features are extracted from this texture. Source may also be referred to as an “identity”.
| Option | Description |
|---|---|
| Live Camera | Use Device Camera Texture as source |
| Texture | Use a texture from the project as source. Face index must also be specified |
Animated
For Real-Time Mode: Marks whether the Source texture is animated. May be useful for animated stylization.
Animated Source mode has extra impact on performance in use with Real-Time mode.
Target
The texture containing the face to use as the target for the swap. Position, orientation and expressions are extracted from the face in this texture. This texture will also be used as the background for the face swap result. Face index must also be specified.
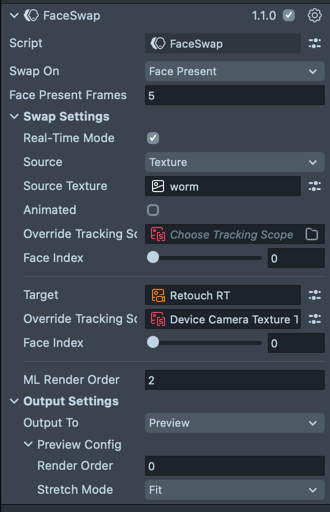
ML Render Order
Render order for the ML Component. If any of your textures are rendered, you may need to change it, so that face swap will occur after they are rendered.
When using rendered textures as the Source or Target (e.g., from a 2D or 3D render pass), you should override the associated Tracking Scope with a Texture Tracking Scope that uses the Device Camera Texture as its input.
This is necessary because tracking occurs before rendering, meaning that face tracking on a rendered texture will always be delayed by one frame. Without this override, you may see a “jello” effect as the tracked face lags behind the actual motion.
Output Settings
What to do with the result.
| Option | Description |
|---|---|
| None | Do nothing. Intended for use with Manual trigger, you can retrieve the result by calling start(): Promise<Texture>, or subscribing to the onResultReady event |
| Preview | Show the result in the Preview image. Place the component under a Screen Transform to ensure the result appears correctly in the Preview panel. Otherwise, it may look small or far away |
| Material Property | Set the result to a material property |
| VFX Property | Set the result to a property of VFX asset |
| Proxy Texture | Set the result to a proxy texture |
| Set Property | Set the result to a property of a Component |
| Call Method | Call a method with the result texture as the first and only argument |
Set Property and Call Method require you to specify the name of the property or method, which may also be a simple path expression,
e.g. mainPass.baseTex for Image component.
Default output is Preview. If you don't see the result, or it looks small, check that the component is in the Screen Transform hierarchy,
Swap On is set to Face Present and the Scene Object holding the component has correct render layer.
API
| Property/Method | Type | Description |
|---|---|---|
| sourceFacePresent (read-only) | Boolean | true if there is a face with expected index in the source |
| targetFacePresent (read-only) | Boolean | true if there is a face with expected index in the target |
| start() | Promise<Texture> | Start face swap process. May be called multiple times to restart the process. Does not require Swap On to be set to Manual, works with any trigger, but if faces are not present in the source or target for a few frames, the result will likely be incorrect |
Events
| Event | Type | Description |
|---|---|---|
| onSwapStarted | Event<void> | Triggers when face swap process starts |
| onResultReady | Event<Texture> | Triggers when face swap process finishes successfully. Value is the same as in the Promise returned by the start() method |
| onError | Event<Error> | Triggers when there is an error of any kind |
| onSourceFacePresent | Event<boolean> | Triggers when the face is found or lost on source |
| onTargetFacePresent | Event<boolean> | Triggers when the face is found or lost on target |
Examples
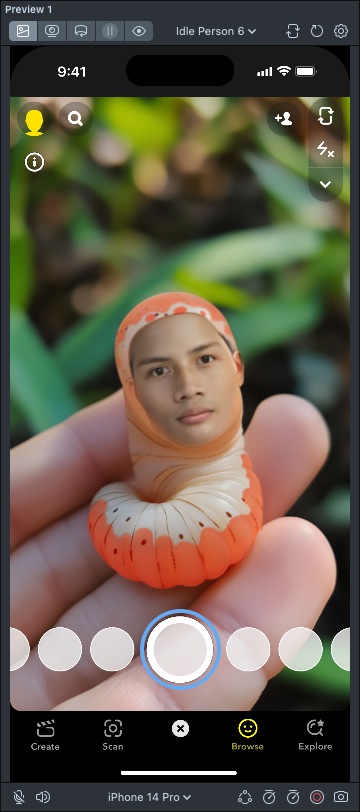
Put the User in a Different Context
Let's replace the face from this image with the user's face.

Steps
- Add the component to the scene as described in Using the Face Swap Component.
- Download the image above, or use any other image with a human face.
- Set the Target to the image you downloaded.
If everything is set up correctly, and the Preview has a face, you should see the target image at full screen, but with a different face.
Result
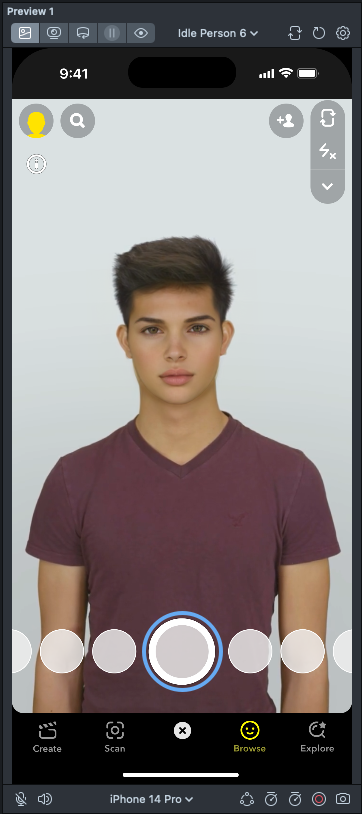
Replace the User's Face
Now let's swap the Source and Target from previous example.
Steps
- Follow the steps from the previous example.
- Set the Source to Texture and Source Texture to the image you downloaded.
- Set the Target to Device Camera Texture.
Result
Using the API
So far, our lenses have shown the swap result only once, without allowing users to retry, in case the result is not good enough. Let's fix that by restarting the process on a Tap event.
Steps
- Follow the steps from one of the previous examples.
- Create a JavaScript or TypeScript file by clicking + in the Asset Browser panel and selecting JavaScript File or TypeScript File.
- Edit the file and add the following code:
- JavaScript
- TypeScript
// @input Component.ScriptComponent faceSwap

script.createEvent('OnStartEvent').bind(() => {
  // Preview image, created by the Face Swap component:
  const preview = script.faceSwap.sceneObject.getComponent('Image');
  const onTap = script.createEvent('TapEvent');
  onTap.bind(() => {
    if (preview.enabled) {
      // when preview is shown – tap hides it
      preview.enabled = false;
    } else {
      // preview not shown – start the face swap,
      // it will enable its own preview when the result is ready.
      script.faceSwap.start();
      // prevent further triggers until the swap process completes
      onTap.enabled = false;
    }
  });
  // face swap is set to start when faces are present,
  // so need to start the logic until it shows the first result.
  onTap.enabled = false;

  script.faceSwap.onResultReady.add(() => {
    // enable retry logic
    onTap.enabled = true;
  });
});
@component
export class Retry extends BaseScriptComponent {
  @input('Component.ScriptComponent')
  faceSwap: IFaceSwap;

  onAwake() {
    this.createEvent('OnStartEvent').bind(() => {
      // Preview image, created by the Face Swap component:
      const preview = this.faceSwap.sceneObject.getComponent('Image');
      const onTap = this.createEvent('TapEvent');
      onTap.bind(() => {
        if (preview.enabled) {
          // when preview is shown – tap hides it
          preview.enabled = false;
        } else {
          // preview not shown – start the face swap,
          // it will enable its own preview when the result is ready.
          this.faceSwap.start();
          // prevent further triggers until the swap process completes
          onTap.enabled = false;
        }
      });
      // face swap is set to start when faces are present,
      // so need to start the logic until it shows the first result.
      onTap.enabled = false;

      this.faceSwap.onResultReady.add(() => {
        // enable retry logic
        onTap.enabled = true;
      });
    });
  }
}
Result
Learn more about scripting in Lens Studio in Script Overview section.
Your Lens is almost done! Add the Hint - Tap hint to your Lens from the Asset Library and update the template texture. You are now ready to publish!
Real-Time Mode
So far, our examples have only covered a static swap. Static swap looks good and performs well on a wide range of devices, but lacks interactivity. We can make it live with the Real-Time Mode setting!
Steps
- Follow the steps from Replace user's face
- Enable the Real-Time Mode setting.
It's a good start. If you want to take an extra step let's also add some retouch to the user's face!
Adding Face Retouch
These steps will also work for other ML effects, but be sure to set Render Orders as described below, to prevent lag.
- Select the default Camera and press the + button in the Scene Hierarchy panel and chose Face Retouch.
- Press the + button in the Asset Browser and chose Render Target, rename it to
Retouch RT. - Use the newly created Render Target in the default Camera, where Face Retouch was created.
- Set this Render Target as the Target in the Face Swap component.
- Press the + button in the Asset Browser and chose Texture Tracking Scope, set Device Camera Texture as its input.

- Use the newly created Texture Tracking Scope as Override Tracking Scope input for Target in the component.
If you skip steps 5-6, the face will lag behind the head, because tracking step is performed before rendering. By overriding the Tracking Scope we forced the component to use tracking from Device Camera Texture, which is available before Face Retouch is rendered. Face Retouch draws the face in the same place, so the tracking will match.
- Set the ML Render Order of the Face Swap component to 1 and Render Order of the Orthographic Camera to 3.
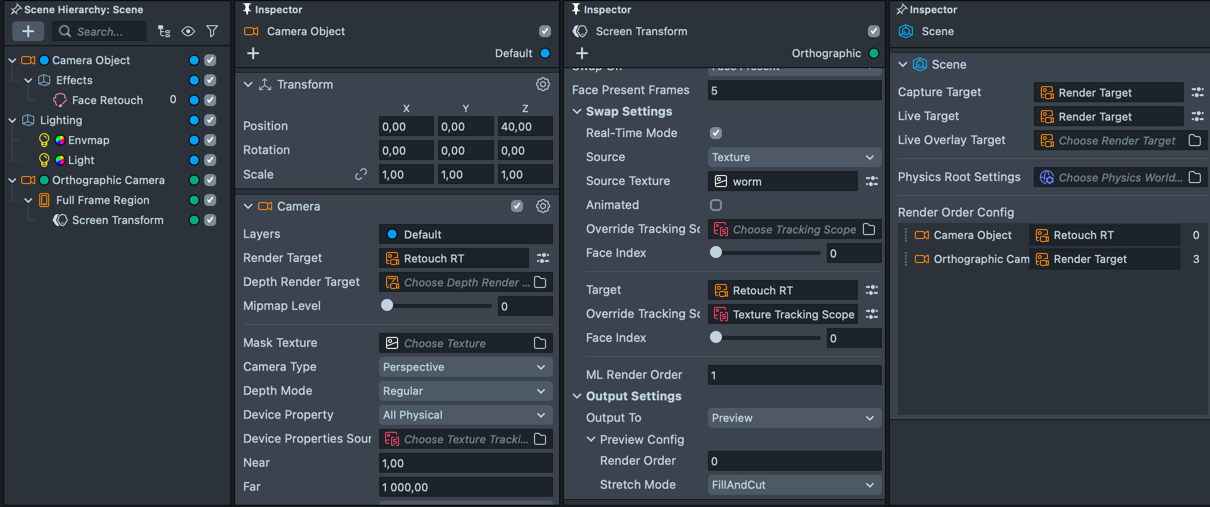
The Face Retouch component renders at a Render Order of -1, and the default Camera in a typical Lens setup renders at 0. To ensure the Face Swap component processes the frame after retouching has been applied, we assign the ML step of Face Swap a Render Order of 1, so it has access to the updated, retouched frame.
Because the Face Swap component renders in two stages—first the ML inference, then the final composition—we need two sequential render passes. This means the next available Render Order is 3, which is used for the Orthographic Camera that renders the final Face Swap output to screen.
If these render orders aren’t properly configured, the Lens may still technically work, but users will experience a one-frame delay in the face swap effect. This delay can be especially noticeable during movement or speech, and is more pronounced on slower devices. :::
Testing on Device
To preview your Lens in Snapchat, follow the Pairing to Snapchat guide.