SnapML on Spectacles
SnapML brings powerful machine learning capabilities to Spectacles, enabling computer vision, object detection, and more in your AR experiences. This guide walks you through a simplified generalized workflow to train and deploy a custom SnapML model using Paperspace and Roboflow.
Snap ML for Spectacles builds upon the established workflow used in the Snapchat App. While we recommend Paperspace and Roboflow for educational purposes in this tutorial, Snap does not endorse these services and they are mentioned solely for instructional purposes. You may use any alternative services that provide similar functionality.
For additional resources:
- Sample Projects: Complete examples including Python notebooks and Lens Studio projects
Overview
SnapML allows you to incorporate machine learning models into your Spectacles applications. This workflow demonstrates how to adapt the Multi-Object Detection template from the SnapML templates repository using cloud-based development environments and specialized tools for dataset management and training.
The complete workflow consists of these major phases:
- Setup: Prepare your development environment in Paperspace
- Data Preparation: Manage and export your dataset with Roboflow
- Training: Train a custom YOLOv7 model using your dataset
- Export: Convert your trained model to ONNX format for SnapML
- Deployment: Import your model into Lens Studio for use on Spectacles
Model Training Workflow
STEP 1
Setup Paperspace
STEP 2
Prepare Dataset
STEP 3
Setup YOLOv7
STEP 4
Train Model
STEP 5
Export to ONNX
STEP 6
Import to Lens Studio
Quick Start Guide
For those familiar with machine learning workflows, here's a condensed version of the steps:
Quick Start Workflow
# 1. Set up environment in Paperspace with PyTorch template
git clone https://github.com/Snapchat/snapml-templates.git
git clone https://github.com/hartwoolery/yolov7
cd yolov7
git checkout export-snapml
pip install -r requirements.txt

# 2. Download dataset from Roboflow in YOLOv7 format
pip install --upgrade roboflow
# Use Roboflow API to download your dataset

# 3. Download pre-trained weights
wget https://github.com/WongKinYiu/yolov7/releases/download/v0.1/yolov7-tiny.pt

# 4. Train model
python train.py --data your-dataset/data.yaml --cfg cfg/training/yolov7-tiny.yaml \
  --weights yolov7-tiny.pt --img 224 224 --batch-size 64 --epochs 200 \
  --name detection --device 0 --hyp data/hyp.scratch.tiny.yaml

# 5. Export to ONNX for SnapML
python export.py --weights runs/train/detection/weights/best.pt --grid \
  --simplify --export-snapml --img-size 224 224 --max-wh 224

# 6. Import ONNX model to Lens Studio and set up class mappings
# See detailed steps below
This guide will walk through each of these steps in detail, explaining the concepts and providing troubleshooting tips along the way.
Prerequisites
Before you begin, you'll need:
- A Paperspace account (or any alternative cloud-based development environment)
- A Roboflow account for dataset management and annotation (or any alternative dataset management tool)
Why This Workflow?
| Traditional ML Workflow | SnapML Workflow |
|---|---|
| Complex environment setup on local machine | Cloud-based development with pre-configured templates |
| Manual dataset preparation and augmentation | Automated dataset management with Roboflow |
| Full model training from scratch | Transfer learning with pre-trained weights |
| Additional conversion steps for mobile deployment | Direct export to SnapML-compatible ONNX format |
| Custom integration with AR platforms | Seamless integration with Lens Studio templates |
Workflow Steps
Advanced Topics
Understanding Non-Maximum Suppression (NMS)
When exporting models for SnapML, you may notice the --export-snapml flag which affects how Non-Maximum Suppression (NMS) is handled:
What is Non-Maximum Suppression?
NMS is not a trainable convolutional layer but a deterministic post-processing step applied to raw box predictions during inference. Its purpose is to:
- Collect all predicted boxes whose confidence (objectness × class score) exceeds your threshold
- Sort those boxes by confidence (highest to lowest)
- Keep only the best boxes by removing highly overlapping detections of the same object
When exporting a YOLO model to ONNX for SnapML, we exclude NMS from the graph and re-implement it in Lens Studio using JavaScript. This approach provides more control over the detection process and ensures compatibility with Spectacles.
Model Optimization Tips
When creating models for Spectacles, consider these optimization strategies:
- Use smaller variants like YOLOv7-tiny for real-time performance
- Reduce input image size to balance detection quality and speed
- Limit the number of classes to improve model efficiency
- Use quantization when exporting if possible
- Test thoroughly on-device to ensure real-time performance
Troubleshooting
Common Issues and Solutions
Kernel vs. Space Restarting in Paperspace
Restarting the kernel: Clears Python state without affecting installed packages or data files. Use after installing libraries with
%pip install.Restarting the space: Performs a full reset of your environment, including all files and installations. Only use when something at the system level has gone wrong.
GPU Out of Memory Errors
If you encounter GPU memory errors during training:
- Reduce the batch size
- Use a smaller model variant
- Reduce image resolution
Free up memory between operations with
torch.cuda.empty_cache()
Export Errors
Common export issues:
Ensure all required packages are installed at the correct versions
When using
--simplify, ensure you haveonnx-simplifierinstalledFor protobuf-related errors, try installing a specific version with
pip install protobuf==3.20.3
Frequently Asked Questions
Which types of models work best on Spectacles?
For optimal performance on Spectacles, prioritize models with:
Small size: Under 10MB for better loading times and memory usage
Low computational requirements: Models with fewer operations per inference
Quantized weights: 8-bit or 16-bit quantization reduces memory footprint
Simple architectures: Fewer layers and simpler operations are more efficient
YOLOv7-tiny and MobileNet-based architectures are particularly well-suited for Spectacles.
How many objects can SnapML detect simultaneously?
SnapML can technically detect as many objects as are present in the frame, but for performance reasons on Spectacles:
Recommended: Limit detection to 3-5 objects simultaneously
Maximum: Up to 10 objects can be detected with adequate performance
Performance impact: More tracked objects require more processing power
You can control this by adjusting the NMS threshold and maximum objects parameters in your Lens Studio implementation.
How can I improve detection accuracy?
To improve detection accuracy:
Increase training data: More diverse images of your target objects
Better annotations: More precise bounding boxes
Data augmentation: Apply transforms to increase dataset variability
Longer training: Try increasing the number of epochs
Model fine-tuning: Adjust hyperparameters like learning rate
Post-processing: Implement temporal smoothing and confidence thresholds
Can I train other types of ML models for Spectacles?
Yes! While this guide focuses on object detection, SnapML supports various model types:
Image classification: Identify what's in an image
Semantic segmentation: Identify each pixel's category
Style transfer: Apply artistic styles to images
Pose estimation: Track human body positions
The export process will differ slightly, but Paperspace and Lens Studio workflow remains similar.
Resources
- SnapML Templates GitHub Repository
- YOLOv7 GitHub Repository
- Roboflow Documentation
- Lens Studio ML Documentation
Conclusion
Incorporating machine learning into Spectacles experiences opens up powerful new possibilities for AR interaction. By following this workflow, you've learned how to train custom object detection models and deploy them to Spectacles using SnapML.
The combination of cloud-based training environments like Paperspace, dataset management tools like Roboflow, and the streamlined export process for SnapML makes it possible to create sophisticated machine learning features without requiring extensive ML expertise.
As you continue developing for Spectacles, experiment with different model architectures, datasets, and detection parameters to create increasingly engaging and responsive AR experiences.
Lens Studio Implementation
After you've exported your trained model to ONNX format, the next step is to implement it in Lens Studio for use on Spectacles. This section covers the complete workflow from importing your model into Lens Studio to creating custom logic for your AR experience. We have a sample you can follow along with in the SnapML Multi-Object Detection Template.
Script Architecture Overview
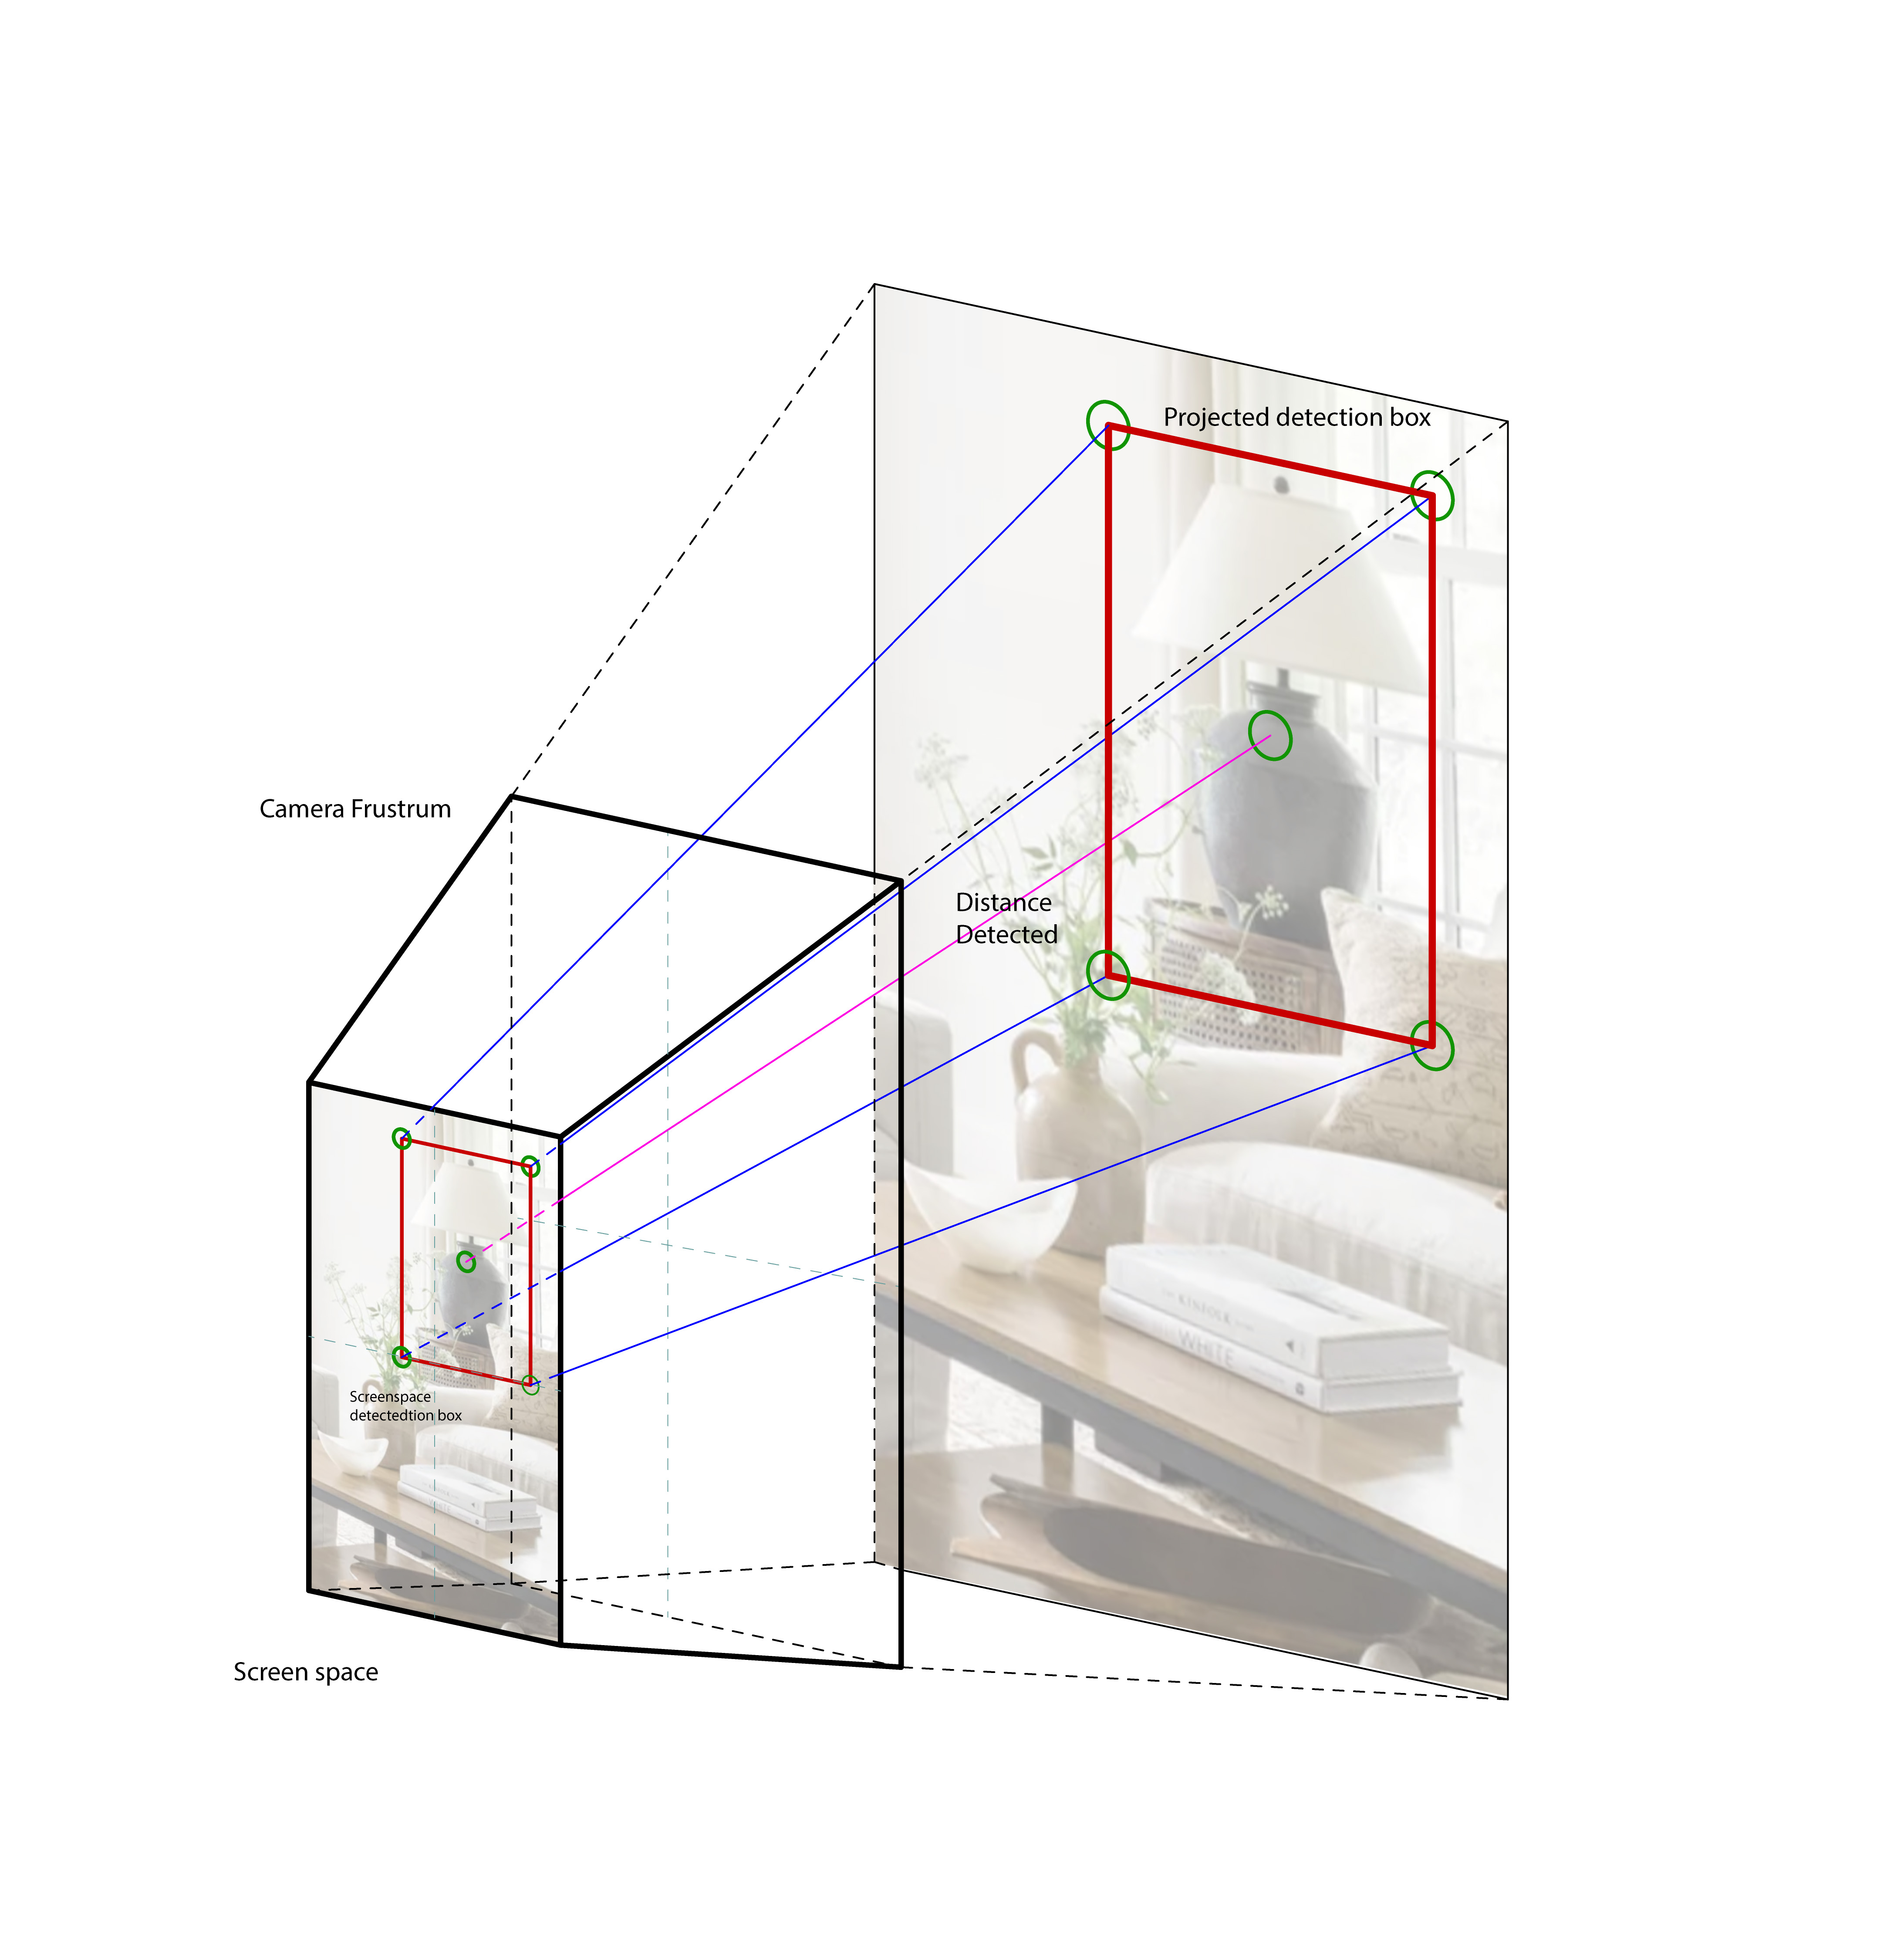
The SnapML framework for Spectacles consists of several specialized scripts that work together:
-
Core Detection Components
MLSpatializer: Main entry point that connects ML detection with 3D spaceYOLODetectionProcessor: Processes raw model outputs into usable detectionsDetectionVisualizer: Visualizes detections in 3D space
-
Camera and Spatial Awareness
PinholeCapture: Interfaces with the device cameraPinholeCameraModel: Mathematical model for 2D to 3D conversions
-
Positioning and Transformation
MatchTransform&MatchTransformLocal: Position objects relative to othersInBetween: Calculate positions between two objectsSmartTether: Intelligent object positioning based on user movement
Let's explore how these components work together in Lens Studio.
Complete Workflow Summary
STEP 1
Environment Setup
STEP 2
Dataset Prep
STEP 3
Model Training
STEP 4
ONNX Export
STEP 5
Import Model
STEP 6
Spatialization
STEP 7
Custom Logic
This comprehensive guide has walked you through the entire SnapML workflow for Spectacles, from environment setup and model training to Lens Studio implementation and custom interaction logic. By understanding both the ML pipeline and the script architecture, you can create sophisticated AR experiences that intelligently interact with real-world objects.
Resources
- SnapML Templates GitHub Repository
- YOLOv7 GitHub Repository
- Roboflow Documentation
- Lens Studio ML Documentation
- Spectacles Developer Documentation
Conclusion
Incorporating machine learning into Spectacles experiences opens up powerful new possibilities for AR interaction. By following this workflow, you've learned how to train custom object detection models and deploy them to Spectacles using SnapML, as well as how to implement the necessary scripts for spatialization, smoothing, and custom logic.
The combination of cloud-based training environments, dataset management tools, and the specialized script architecture in Lens Studio makes it possible to create sophisticated machine learning features without requiring extensive ML expertise.
As you continue developing for Spectacles, experiment with different model architectures, datasets, detection parameters, and interaction patterns to create increasingly engaging and responsive AR experiences.