Simple Canvas
The Simple Canvas template demonstrates several examples of using Canvas. The template comes with three different examples of using Canvas to layout elements on the screen. Additionally, it provides three different scene set ups (2 canvas, 1 screen) that you can try your layouts on.
Leveraging Canvas
You can find the different examples under the Examples [MOVE_ME] object.

To see Canvas in action, you can left-click and drag [MOVE_ME] underneath one of the [DRAG_TO_ME].
By dragging under the Canvas in 3D Hand Tracking, you can see now your effect is tracked to the hand. Try doing the same with Head Binding.
You can modify how the Canvas is shown by Selecting on the Canvas object. In the Inspector component, try changing some of the settings on the Canvas. For example: change the size of the Canvas so your entire ScreenTransform shows up bigger.
You can place Canvas anywhere you would any other object. For example, try placing your Canvas at the top level of the Scene Hierarchy panel, and then adding a Device Tracking component to the Camera object so that your Canvas will be tracked in the world!
Use the Interactive Preview to see this in action.
Camera Layers
To make this template easier to use and allow you to drag your Canvas between different camera setups, we’ve set the Camera object to also render the Orthographic layer. Once you’ve chosen which camera you want your Canvas to be rendered by, you should set your camera layers appropriately.
If you’re seeing things rendered more than once in the Preview panel, likely it’s because more than one camera is rendering the same content.
To select what each camera renders, select the Camera object. Then, in the Inspector panel, edit the Layer field.
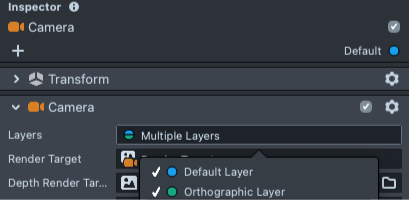
To select what layer an object is on, press the layer selector in the top right.

To learn more check out the Camera guide.
Since you can easily move between Canvas and Orthographic camera, one useful workflow is to lay out your setup in the Orthographic Camera, then bring it over into Canvas.
Examples
These examples are under the Examples object, which Contains a ScreenTransform. Just with other ScreenTransform, you need an unbroken child of ScreenTransform for your Screen transform to work properly. It’s just that it’s parent is a Canvas rather than an orthographic camera.
Which Are You
Which Are You example showcases how you can show an Image and Text inside a Canvas. Select the Examples object (the ScreenTransform containing the text and images), then double-click on the element, such as the Prompt object to focus your Scene panel on it. Now you can modify your layout and the text it says as usual.
Select the Which Are You object to modify what is shown in the image. The Image Randomizer script on this object randomly chooses an image in the list and applies it to the ImageDisplay. Then, the Behavior script calls randomizeStart on the script to kick off the image selection process.
You can try to make your own;
- Press the Add Value or X button in the ImageRandomizer script in the Inspector panel to add your own Images.
- Select the Prompt object.
- Modify the prompt in the Inspector panel.
Animated Rounded Box
Animated Rounded Box demonstrates how you can animate and move things within Canvas the same way you’d do with any Screen Transform. In this case the template uses Tween and resize a ScreenTransform.
Tip: Check the box next to each example to enable or disable them.
Select the Rounded Box object, and note in the Inspector panel, there is a TweenScreenTransform Script component which describes the position of the bounds of the ScreenTransform.
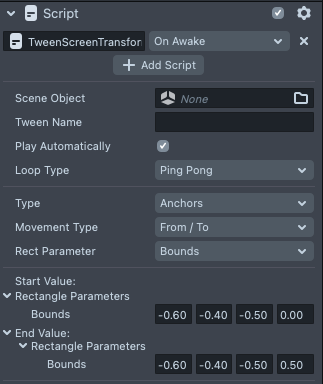
You can resize the rectangle in the scene panel, and copy the value of the Bounds in the Screen Transform component into the Bounds value in the TweenScreenTransform.
Under the Animated Rounded Box, note that there’s a ScreenTransform (Frame), containing several images. These images represented the corners and side of the boxes. You can change them to your own images by changing the Texture field in the Inspector panel.
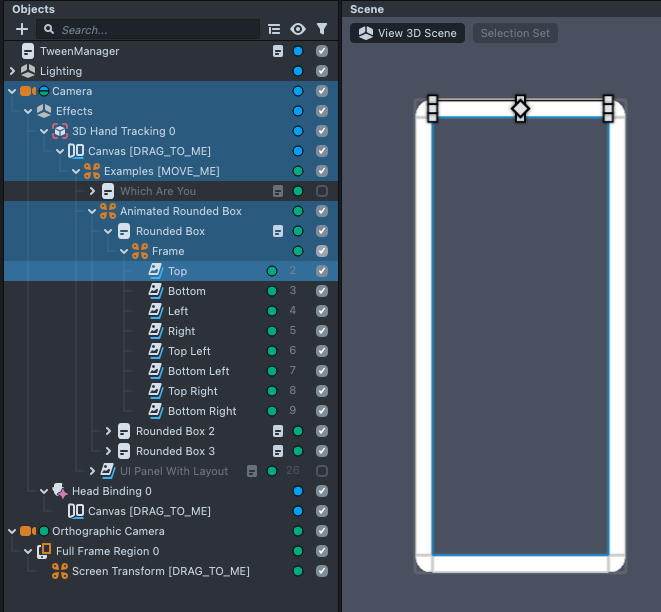
Because these Images are a child of the Rounded Box, the images will scale along with the Rounded Box.
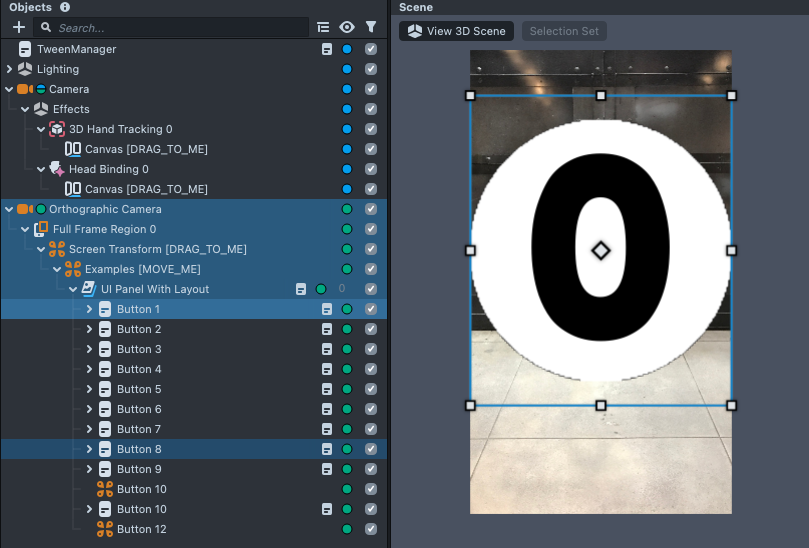
UI Panel With Layout
Like with the Animated Rounded Box example, this example showcases how you can use Canvas to layout UI elements. In this case, the template use the UI helper from the Asset Library to layout a series of buttons in a phone number like layout.
If you select the LayoutGrid you can see the options that set up the number buttons. Note that if you inspect each button individually, they are not positioned at all. This is because the LayoutGrid arranges them for you by calculating the bounds based on the total number of objects.
Notice button 10 and 12 are empty, so that the number "0" has padding to the left and right of it.
The UI panel detects touches on the button using the UIPanel found on the UI Panel with Layout. This script uses the containsScreenPoint to detect whether users are touching inside a button manually so that it can prevent pressing multiple buttons at once. To use the UIPanel, you must have your Canvas be under a Camera (i.e. so the Lens knows "whether you are touching the panel from a certain (camera) perspective".