Portal
The Portal asset lets you enter a portal or doorway into another world. It uses upgraded native tracking which allows the user to more freely move and look around the entire scene. The asset also includes custom events to trigger interactions when the user enters or leaves the portal.
Guide
Find the Portal asset in the Asset Library and import it into your project. Click here to learn more about how to use assets in the Asset Library.
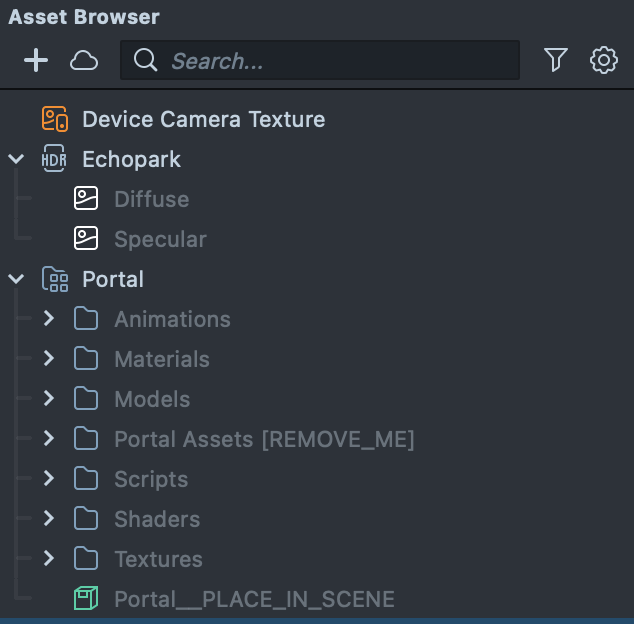
Once you import the asset from Asset Library, you can find the package in the Asset Browser.
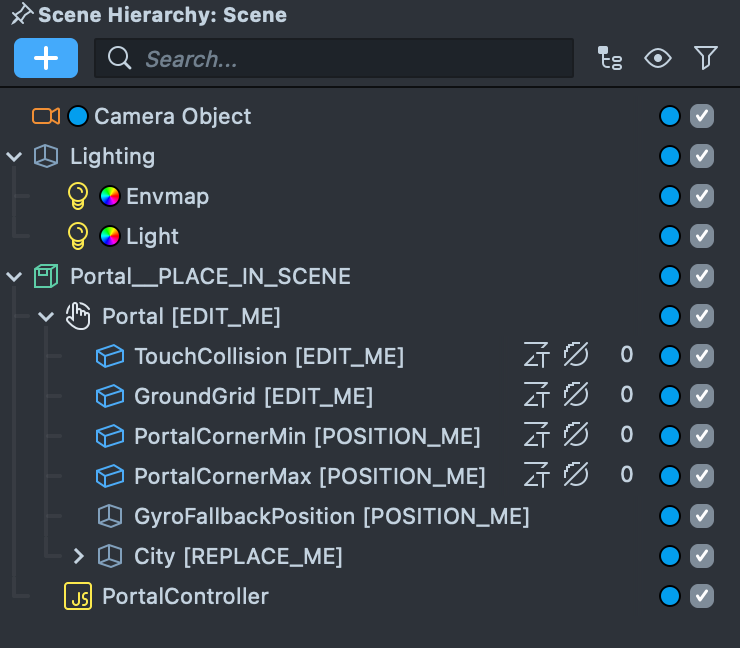
Follow the instructions and drag the prefab Portal into Scene Hierarchy to create a new Scene Object.
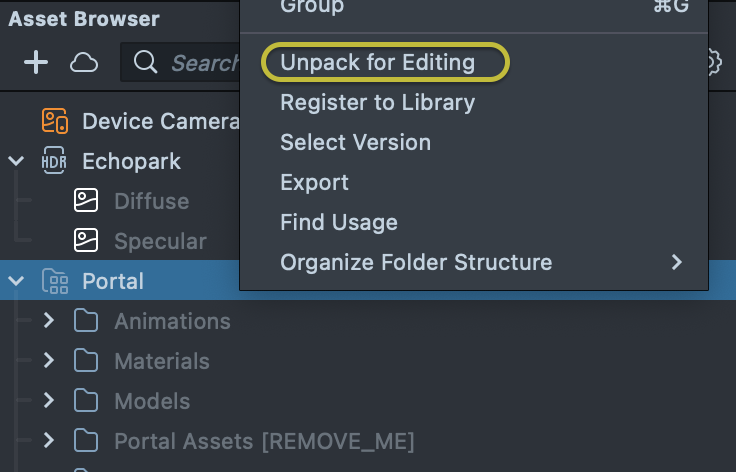
You can right-click and select Unpack for Editing from the drop-down menu to unpack all assets stored in the bundle. Click here to learn more about Asset Packages. Once you unpack the package, you can then edit its content.
Adding Device Tracking
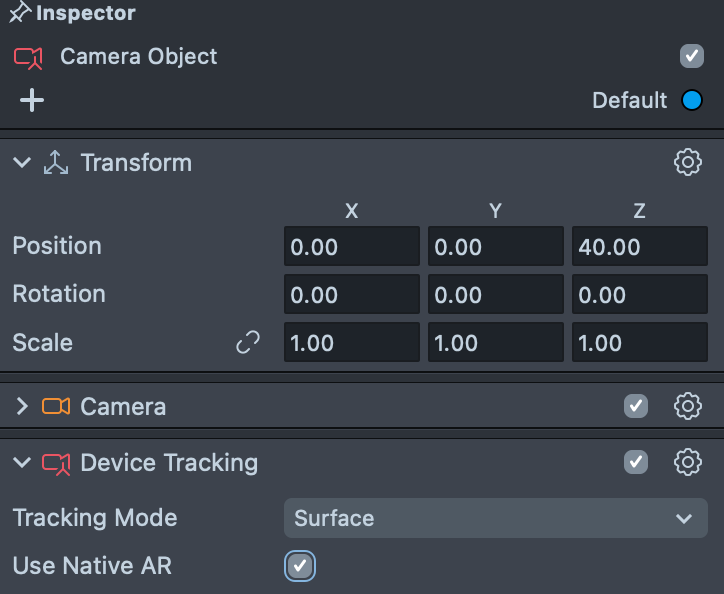
This asset requires a device tracking component. First, select the main Camera Object and add a Device Tracking component, then enable the Use Native AR option.
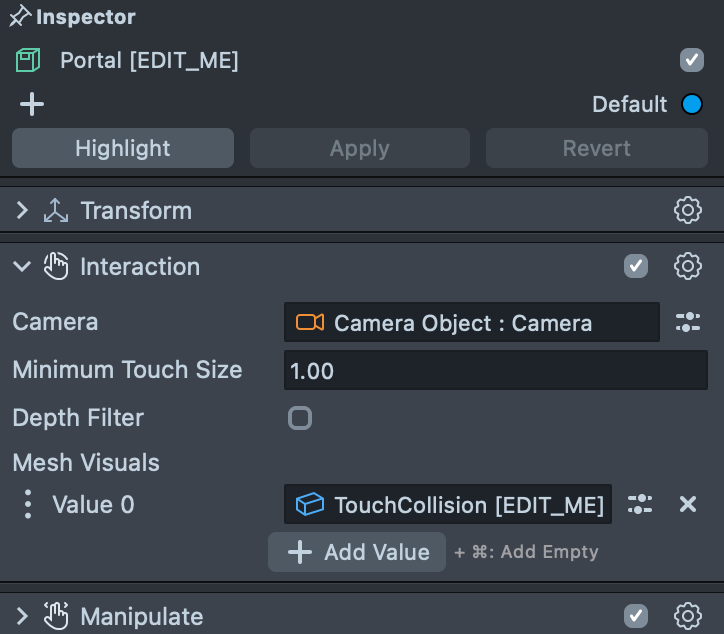
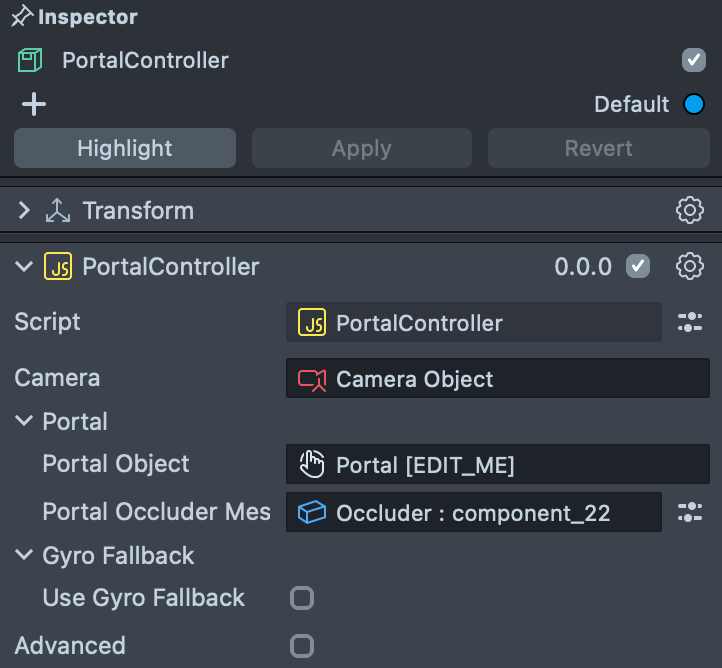
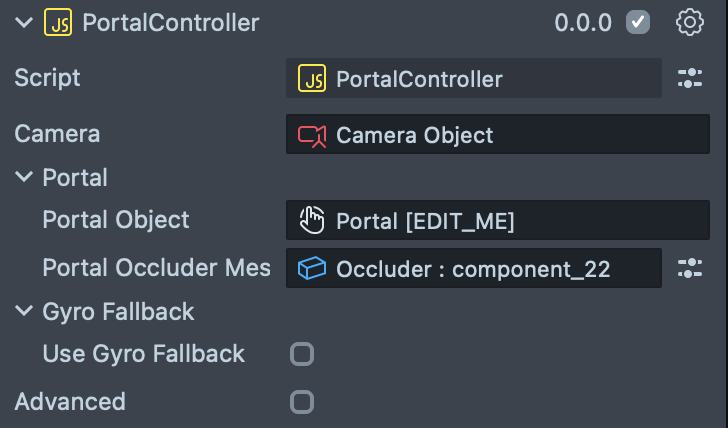
Next, ensure you assign the Camera to the camera field in both the Interaction Component on the Portal [EDIT_ME] scene object and the camera field in the PortalController script on the PortalController scene object.
Remove Example Content
Find the scene object City [REPLACE_ME] in the Scene Hierarchy panel and remove it from the scene.
Exporting 3D Content
The Portal asset assumes that you have 3D content which you'll be importing into Lens Studio. First you must export your object or objects to be Lens Studio ready. To do this, follow the 3D Object Export guide.
Importing 3D Content
Once you have your 3D object exported, follow the 3D Object Import guide to import your 3D object into Lens Studio. Then, parent your objects under the scene object labeled Portal [EDIT_ME]. You can do this by dragging and dropping your 3D object(s) on top of the Portal [EDIT_ME] object in the Scene Hierarchy panel.
Setup the Occluder
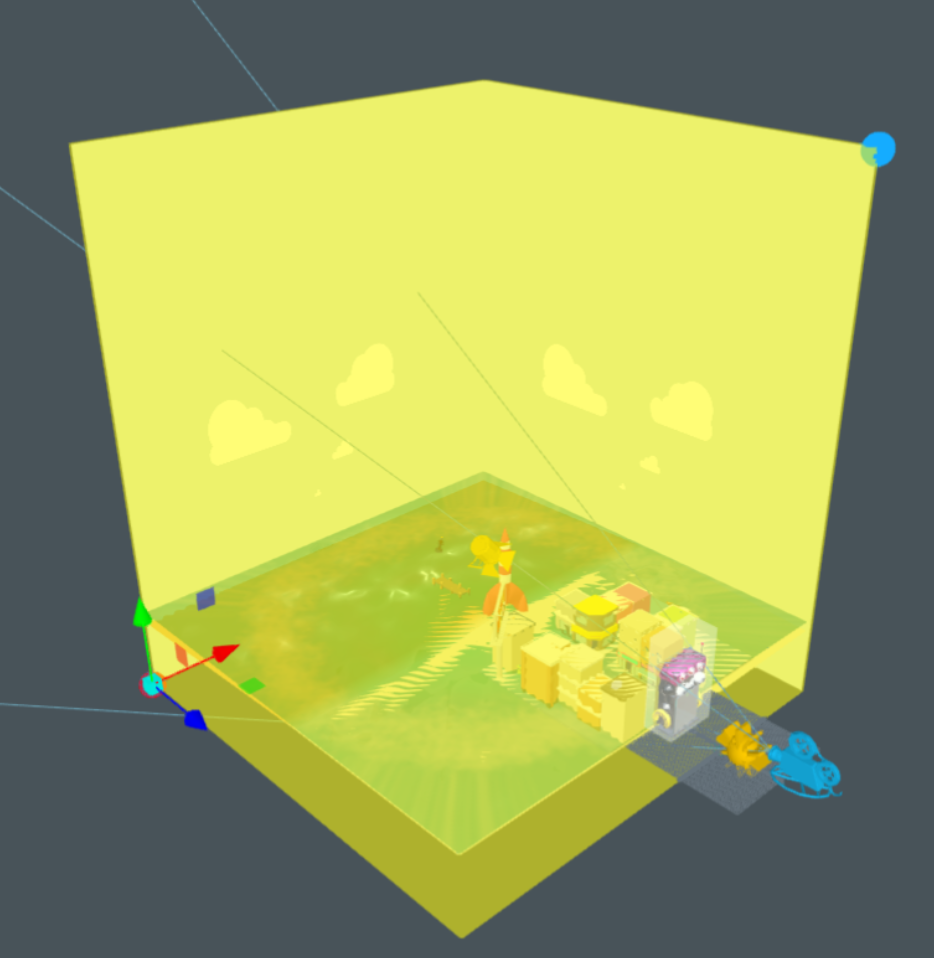
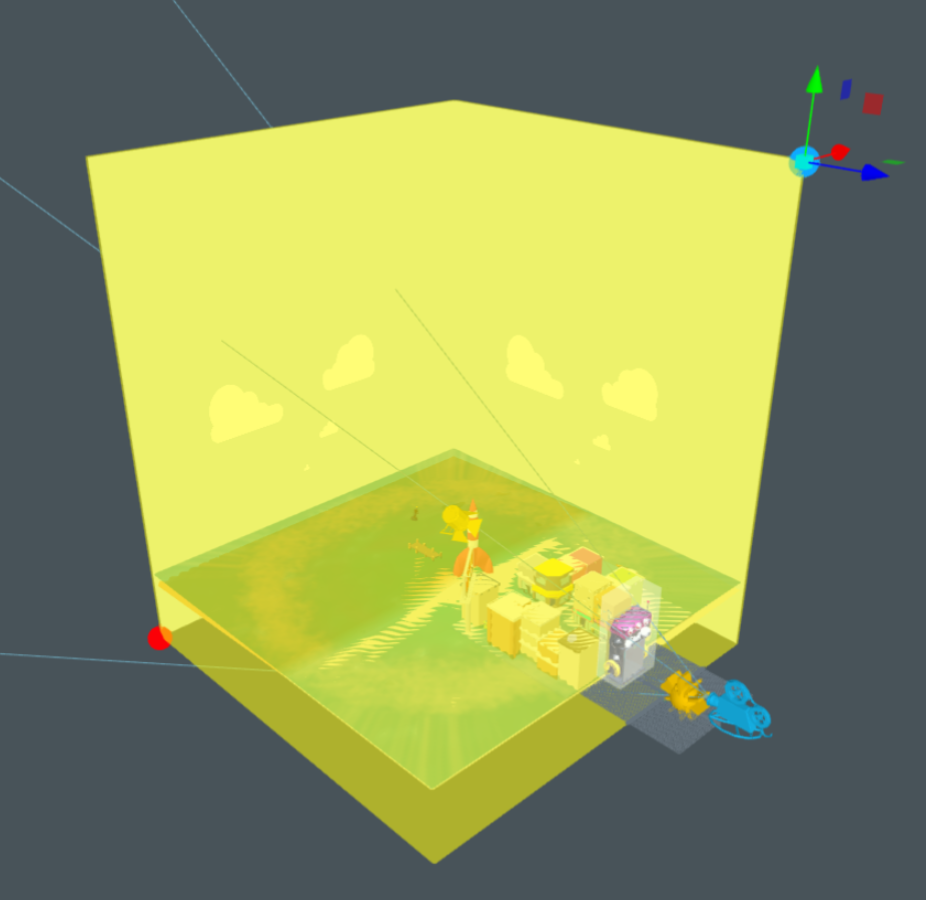
Your 3D content should include an occluder mesh. Its purpose is to completely surround and hide the inside of the portal. Your occluder mesh should have a hole in it where a user can enter. To assign the occluder, select the PortalController [EDIT_ME] object in the Scene Hierarchy panel. Then, set the Portal Occluder Mesh field to your occluder mesh.

In the above example, the occluder mesh is visualized in yellow and has an opening where the portal door is. This will hide everything from view except through the doorway opening.
To help visualize your occluder in the Scene panel, we recommend assigning it the included portal_bounds material which is semi transparent. During run time, the selected mesh will automatically be assigned an Occluder material overwriting whatever material was assigned to it (e.g. the portal_bounds material).
Setup Portal Corners (OPTIONAL)
The portal corners define the bounding area used to detect when a user enters or exits the portal, making them essential for triggering events (e.g., playing a sound or starting an animation). You’ll see two corner objects: PortalCornerMin [POSITION_ME] and PortalCornerMax [POSITION_ME].
If you don't need to trigger an interaction when the user enters or exits the portal, you can ignore the portal corners.
The object named PortalCornerMin [POSITION_ME] needs to be placed at the most negative Z and negative X position of the occluder mesh with respect to the camera (furthest bottom left corner of your portal).
The object named PortalCornerMax [POSITION_ME] needs to be placed at the furthest positive Y and positive X position of the occluder mesh with respect to the camera (closest top right corner of your portal).
By positioning these corners correctly, you define the exact region considered 'inside' the portal. When users move across these boundaries, the system will trigger any enter/exit interactions you've set up.
Gyro Fallback (OPTIONAL)
The portal asset utilizes Surface tracking with Use Native AR enabled. When available, the tracking is enhanced by the device's native tracking which allows the user to move more freely around, experience larger scale content and still move while looking away from the surface. If native tracking is not available, the experience will fall back to normal surface tracking by default.
If you prefer not to use standard surface tracking when native tracking is unavailable, you can configure the system to fall back on the gyroscope sensor (device rotation) as the tracking mechanism. This will place the camera at a specified position in the world and allow the user to look around (but not move around). To enable gyro fallback, select the PortalController [EDIT_ME] scene object in the Scene Hierarchy panel and enable Use Gyro Fallback. Then, you can edit the fallback position by adjusting the position of the GyroFallbackPosition [POSITION_ME] scene object.
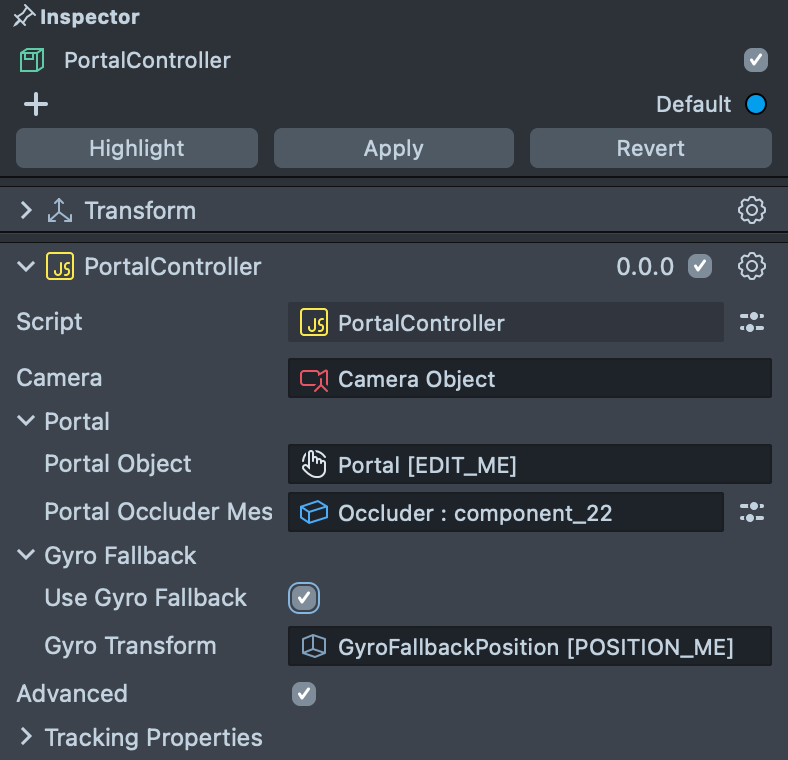
We recommend not enabling Use Gyro Fallback for most portal experiences as the default Surface fallback tends to work well. Only enable if you require your experience to utilize native tracking
Previewing Your Lens
You're now ready to preview your world Lens experience. To preview your Lens in Snapchat, follow the Pairing to Snapchat guide.