Developer Mode Using Claude Code
This guide will walk you through setting up Lens Studio's MCP server with Claude Code, allowing you to use AI-powered tools to control Lens Studio directly from the command line.
Agents and skills can accelerate your AI's ability to build a Lens. Take a look at CLAD for an example. These agents and skills are optimized for SPECS, but some of the core skills and agents will apply to any Lens Studio workflow (for example, scene building, scripting, and assets generation)
This guide is provided to support developers using Claude Code, as we've seen its growing popularity across our developer community. For official Claude Code MCP documentation, please refer to Claude Code's MCP Documentation.
Prerequisites
- Claude Code CLI installed on your system (installation guide)
- Lens Studio installed on your system
- Chat Tool Package installed from Asset Library (see Adding Additional Tools)
Setup Steps
You can give Claude Code access to the Lens Studio MCP server in two ways:
- Open the project directly: Launch Claude Code from a terminal in your Lens Studio project folder. Lens Studio exposes the MCP server from that folder, so Claude Code can connect automatically with no manual setup. See the Developer Mode overview for details.
- Copy the MCP config manually: Copy the configuration from Lens Studio and add it to Claude Code yourself, as described below.
The MCP server is per Lens Studio window. You can open another Lens Studio window, save your project in a different location, and have your AI work on multiple projects simultaneously.
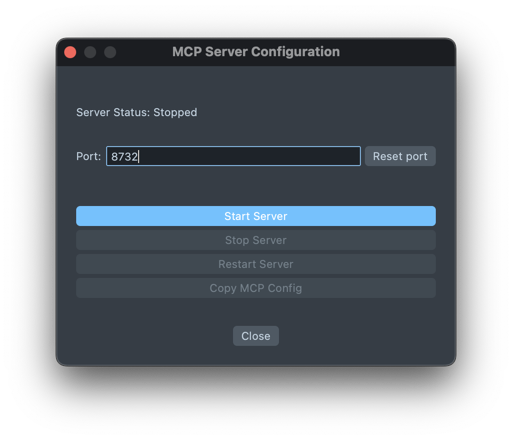
1. Start the MCP Server in Lens Studio
Go to Lens Studio and start the MCP server:
-
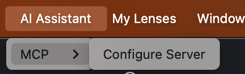
In the Lens Studio menu bar, click AI Assistant > AI Model Context Protocol (MCP) > Configure Server
-
In the popup window, click Copy MCP Config
2. Copy the MCP Configuration
This will copy configuration details that look like this:
{
  "mcpServers": {
    "lens-studio": {
      "headers": {
        "Authorization": "Bearer [your-auth-token]"
      },
      "type": "http",
      "url": "http://localhost:[your-port]/mcp"
    }
  }
}
You will need the URL and Authorization token from this configuration for the next step.
3. Add MCP Server via Claude Code CLI
Option 1: Add MCP Server using Claude
You can now provide the copied configuration directly to Claude Code to add the MCP server:
Please add the following MCP server: [your copied configuration].
Option 2: Add MCP Server manually
Open your terminal and run the following command, replacing [your-auth-token] and [your-port] with the token and port from your copied configuration:
claude mcp add --transport http lens-studio http://localhost:[your-port]/mcp \
  --header "Authorization: Bearer [your-auth-token]"
For example, if your copied configuration includes:
"Authorization": "Bearer FbyXG5Yq7-IJhLKrCVaTgvG-wbYM5iTM6o4EnrJcR_UqESBr_d4NR1uP-IVPB0h7"
"url": "http://localhost:50040/mcp"
Your command would be:
claude mcp add --transport http lens-studio http://localhost:50040/mcp \
  --header "Authorization: Bearer FbyXG5Yq7-IJhLKrCVaTgvG-wbYM5iTM6o4EnrJcR_UqESBr_d4NR1uP-IVPB0h7"

By default, the MCP server is added to your local scope (current project only). You can specify different scopes:
--scope local(default): Available only to you in the current project--scope project: Shared with everyone in the project via.mcp.jsonfile--scope user: Available to you across all projects
4. Verify the Connection
You can verify that the Lens Studio MCP server is connected by running:
claude mcp list
This will show all configured MCP servers, including lens-studio.
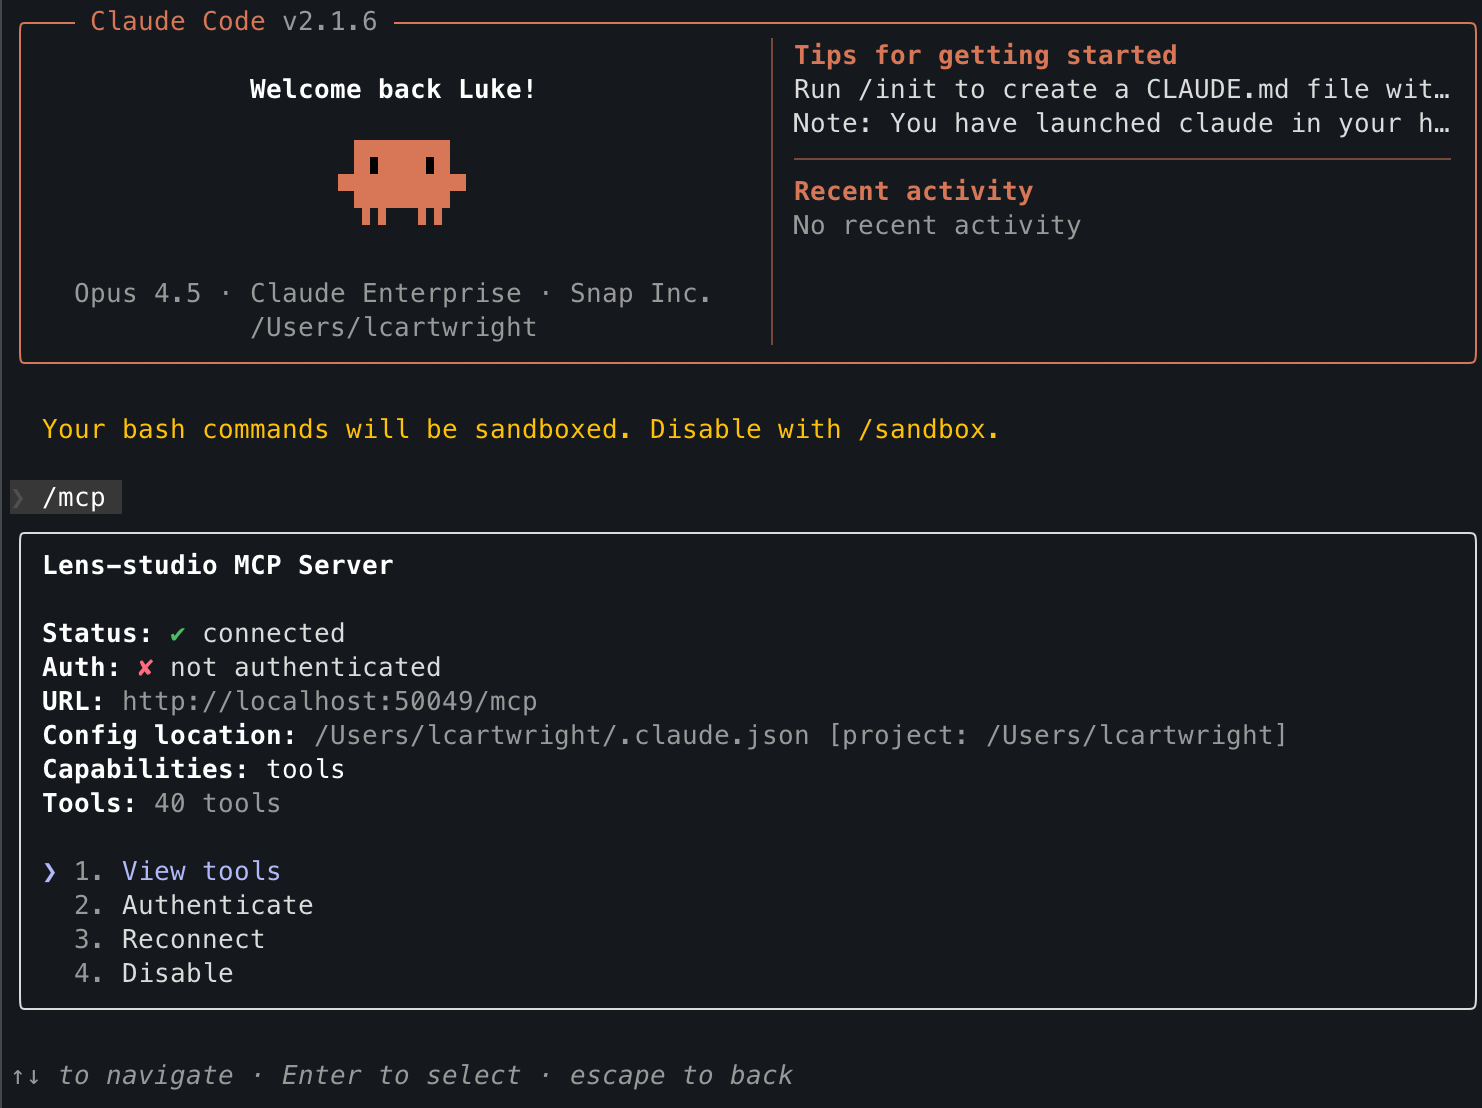
Once inside Claude Code, you can also use the /mcp command to check the status of your MCP connections:
/mcp
5. Start Using Lens Studio with Claude Code
Launch Claude Code and start interacting with your Lens Studio instance. Make sure your MCP server is still running in Lens Studio.
claude
Managing Your MCP Connection
View Server Details
To see details about your Lens Studio MCP configuration:
claude mcp get lens-studio
Remove the Server
If you need to remove the Lens Studio MCP server:
claude mcp remove lens-studio
Update the Authorization Token
When the authorization token expires or changes (for example, after restarting Lens Studio's MCP server), you'll need to update your configuration:
-
Remove the existing server:
claude mcp remove lens-studio -
Copy the new configuration from Lens Studio
-
Add the server again with the new token:
claude mcp add --transport http lens-studio http://localhost:[new-port]/mcp \
  --header "Authorization: Bearer [new-auth-token]"
Using a Custom Agent
Claude Code supports custom agents that can help improve the AI's performance when working with Lens Studio projects.
-
Create a
lens-studio-agent.mdfile in a.claude/agentsdirectory at the root of your project:mkdir -p .claude/agents
touch .claude/agents/lens-studio-agent.md -
Add your custom instructions to this file.
For optimal results, consider using the Example Prompt to help improve Claude Code's performance with Lens Studio. This prompt includes guidelines for working with Lens Studio's TypeScript API and MCP tools.
- Now when you send requests to Claude Code it can reference your agent instructions.
Next Steps
Now that you've connected Claude Code to Lens Studio, you can ask Claude Code to interact with your Lens Studio project. Here are some example prompts and tasks:
- "What objects are in my scene?"
- "Create a new 3D object called 'Cube' in my scene"
- "Add a ScreenTransform component to the selected object"
- "Search the Asset Library for face effects"
- Request modifications to objects and components
- Generate scripts and add interactivity
- Debug issues in your project
- Search and install assets from the Asset Library
The MCP server must be running in Lens Studio for the connection to work.
You might need to reconnect Lens Studio MCP in Claude if the plugin system has been restarted (for example: when adding a new ChatTool). You can do this by sending /mcp to Claude and ask it to reconnect, or sending it the Lens Studio MCP config again and asking the AI to add it.
Coordinating Multiple Agents with Agent Teams
Claude Code supports an experimental agent teams feature that lets you run multiple Claude Code sessions working in parallel, coordinated by a lead agent. This can be useful for larger projects where different parts of the work are independent—for example, when building a Snap experience that involves both Lens Studio and a backend web service.
In a Snap Cloud project, you might spawn a team where one agent focuses on the Lens Studio side (interacting with the scene via MCP), another handles the web service layer, and a third writes integration tests—all working simultaneously and sharing a task list.
Create an agent team to build a new AR try-on feature:
- A "lens-studio" teammate to set up the scene, shaders, and scripts in Lens Studio using MCP
- A "web-service" teammate to update the API endpoints that serve the try-on assets
- A "qa" teammate to write integration tests covering the full flow
Each teammate works in its own context window and can message the others directly. The lead coordinates tasks, synthesizes results, and manages the shared task list.
Agent teams are experimental and disabled by default. For full details on enabling the feature, display modes, best practices, and current limitations, see the official Agent Teams documentation.