VFX Crowds
VFX Crowds is an asset that enables you to make dynamic crowds capable of interacting with the user, each other, and the world!
This asset can be found on the Asset Library for Lens Studio version 5.7.0+. To use, download the package from the Asset Library and drag the VFX Crowds prefab into your scene.
This guide will cover:
- How the VFX Crowds asset works
- How to customize crowd behavior
- How to create and import your own custom crowd animations
Creating and importing new animations requires access to Houdini and knowledge of Vertex Animation Textures (VAT). For more information, visit the VAT Guide.
How It Works
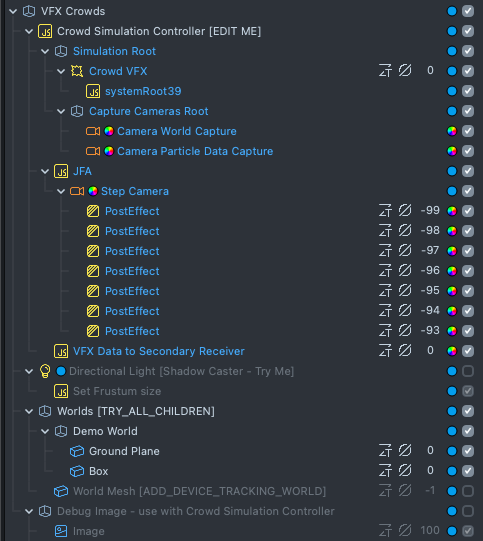
VFX Crowds utilizes a number of advanced rendering techniques to create the crowd effect, including offscreen cameras, depth render target, custom VFX attributes, Jump Flood Algorithm (JFA), and physics. The Crowd Simulation Controller script handles the set-up and implementation of these systems for you.
On a high level, the Crowd Simulation Controller sets the size and position of the Crowd Simulation. Then, it creates extra cameras to capture data about the world stored in a series of textures. The script also uses raycasting and physics to process data from Tap events, allowing users to interact with the crowds directly. Finally, the Crowd Simulation Controller sends all this data to the VFX Crowd asset. The VFX Crowd asset uses this data to calculate its position, velocity, and animation state (using VAT) for each member of the crowd independently within the VFX graph.
Using the Live Preview, you can see the set-up of this script in action.
Customizing Crowd Behavior
Crowds have a number of controls available for you to use. Additionally, those familiar with the VFX Graph and Lens Scripting can customize this asset even further.
Built-In Controls
Size / Mass:- The final particle size is determined by combining
SizebyMass.- This allows you to have smaller particles with smaller mass, and larger ones with bigger mass.
- Enabling
Mass Affects Velocitywill cause smaller particles to have a slower maximum speed, and larger particles a faster max speed.
- The final particle size is determined by combining
Movement:Velocitydetermines how fast particles can move (cm / s).Turn Speedis how quickly particles turn from each other to avoid collision (degrees / frame).Acceleration Ratecontrols how quickly particles return to max velocity after slowing down.Jump Forcegives the crowds a boost when they jump around in the world. Crowds jump up by combiningJump Forcewith the force needed to reach the height in front of them. (Only applied when usingWorld Interaction = Jump to Height).
Forces:Gravity Scaledetermines how strong gravity pulls particles back down to the ground. (Only applied when usingWorld Interaction = Jump to Height).Boundary Forceis the force applied to particles when they reach the edge of the simulation.Edge Bufferis an additional distance from the edge of the simulation at whichBoundary Forcewill be applied.
Tap BehaviorReaction Typedetermines how particles respond to taps in the world.Force (Attract / Repel)will use theHorizontal ForceandVertical Forceparameters to push or pull the particles within the tap’sRadius. Negative forces will attract particles, while positive ones will repel them.Play Animation (Jump)will cause all particles within the tap’sRadiusto play their Jump animation.
Tap Behavior uses raycasting to correctly place the tap in the world. Make sure to put Physics Colliders on all objects you want to be tappable.
SimulationStart Eventcontrols whether or not particles start automatically (Start Event = On Start), or wait for the user to tap the screen (Start Event = On Tap).Start Event = On Tapis useful when using World Mesh and Device Tracking World, as it allows users to build out the world mesh first before starting the particle system.
Simulation Sizeis the total width and depth of the particle simulation (cm).- By default, the simulation starts wherever the Main Camera is located. You can offset this value by adjusting
Start Position Offset. Usually a depth of at least half theSimulation Sizeensures particles are placed in front of the camera when the simulation starts. Min HeightandMax Heightcontrols the total height of the simulation, in worldspace. Usually a range within [-1000, 1000] is good.
Collision AvoidanceSearch Distanceis the distance (cm) that particles look in front of them for other nearby particles and changes in world height.- If another particle is detected nearby and is less than
Collision Distance(cm), then particles will begin turning away based onTurn Speedto avoid collisions. Stop Distanceis the distance (cm) at which particles will reach their minimum velocity (usually 0), and focus on turning away to avoid collision.
WorldInteraction Typedetermines how particles move in the world.Jump and Fallwill cause particles search in front of them based onSearch Distance, and if the next height is higher thanHeight Threshold, they will jump to the next height using a combinationJump Forceand the force needed to reach the next height.Stick to Groundlets particles use depth data to stick to the height of the ground beneath them. If there is no ground, then they will stick toMin Height.- The
Objectsarray contains a list of scene objects that you want the particles to be able to see using the heightmap.- enabling
Add All Childrenwill add the main object and all of its children into the array. Note that it uses recursion, so if you have a lot of nested objects, you may want to add objects one by one into the array instead for performance. - enabling
Update Every Framewill check every frame for new objects, which is useful for prototyping. Note that this only runs in Lens Studio.
- enabling
AnimationRandomize Start Framewill ensure that all particles start with a slightly different frame of their starting animation when loaded.Playback Speedis how quickly the animations play, defaulting to 30fps.- When particle speed is below the
Animation Jump Threshold, they will play theirJumpanimation.
Additional controls for appearance and Particle Count can be found on the VFX Asset:
-
Number of Particles
-
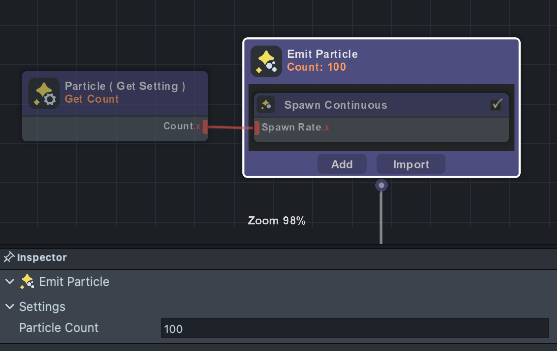
Change the number of particles by changing the
Particle Counton theEmitblock within the VFX graph. For more information about theEmitstage, see the VFX Guide. -
By default, the VFX Crowds system emits the max number of particles with a very long lifespan.
-
-
Appearance
-
Change the color of particles by adjusting the
Color RampMinandMaxvalues. This will randomize the appearance of each crowd member slightly.
-
Advanced Customization Tips
- World Mesh and World Tracking
- Particles can interact with the real world through the World Mesh and Device Tracking. Try this for yourself by make sure adding a Device Tracking component set to
Worldto your main camera. The, enable theWorld Meshexample under theWorlds [TRY_ALL_CHILDREN]scene object. Use the Live Preview to test particle interaction with the world.
- Particles can interact with the real world through the World Mesh and Device Tracking. Try this for yourself by make sure adding a Device Tracking component set to
Learn more about World Tracking by visiting the Device Tracking page.
- Shadows
- Shadows can be enabled with Directional and Spot lights in the scene. Check out the Light and Shadows guide for more info.
- To get accurate shadows you made need to customize the
Frustum SizeandPositionof your light. You can see an example of this on theDirectional Light [Shadow Caster - Try Me]scene object.
- Customizing Behavior
- Additional forces and interactivity can be added by editing the VFX Crowds asset in the VFX Graph.
When adding custom functionality to your VFX, make sure the Crowd Controller subgraph is always last in the order in the Update container. VFX behavior is calculated from left to right, top to bottom, so ensuring all other forces have been applied lets the Crowd Controller use these forces while still ensuring Crowds stay within simulation bounds and avoid collisions. You can see an example of this in the Tap Behavior section of the graph.

Debugging Resources
The World Mesh and Debug Image materials can be helpful for adjusting your Crowd behavior. These visualizers have also been added to the Debug -> Data Visualiztion section of the Crowd Simulation Controller Script. You can change which visualization is being applied by using the drop-down menu associated with each visual.
Particle Search Distance: visualizes the Search and Collision distances used by particles.Collision Distanceis shown as a red circle, andSearch Distanceis shown as a blue circle.Voronoi: creates a Voronoi diagram using Particle ID. Particle colors will match the “Debug (Voronoi)” option on Crowd VFX asset.World Height: shows the world height texture.Particle Data Tex: shows the Particle Data Texture. This is the location of each particle in the simulation from a top-down view.- Particles will always try to take up 1-2 pixels of data on the texture, so you may not see it if you have a very large Particle Data Tex size and a small image.
JFA Packed Value: shows the raw JFA value calculated by the JFA script, which is used as a distance field.
Adding Custom Crowd Animations
You can create your own VFX Crowd characters and animations using Houdini and VAT. To learn more about VAT, check out the Vertex Animation Textures Guide.
Quick Start Guide
- Export your animation sequences from Houdini using VAT
- Use the
Deforming Objectshelf tool to convert your animation into a simulation - Export using the
Softbodysettings
- Use the
- Import VAT resources (mesh & textures) into Lens Studio
- Enable
Edit Animation Dataon the Crowd Simulation Controller script. - Assign the VAT resources and and update the export info.
- Adjust the
Frame Datato match your animations
Exporting Animations from Houdini
- Ensure your animations are correctly set up and stored in a single FBX.
- Keep your animations as short as possible.
- Animations should be 30fps, which is the default FPS for Snapchat and Lens Studio.
- Prepare the mesh for export.
- VAT exports need to be a single mesh. If you have multiple meshes, you can combine them using a Merge node in Houdini.
- Make any additional adjustments, such as reducing the scale or adding extra UV sets.
- Convert the mesh into a simulation.
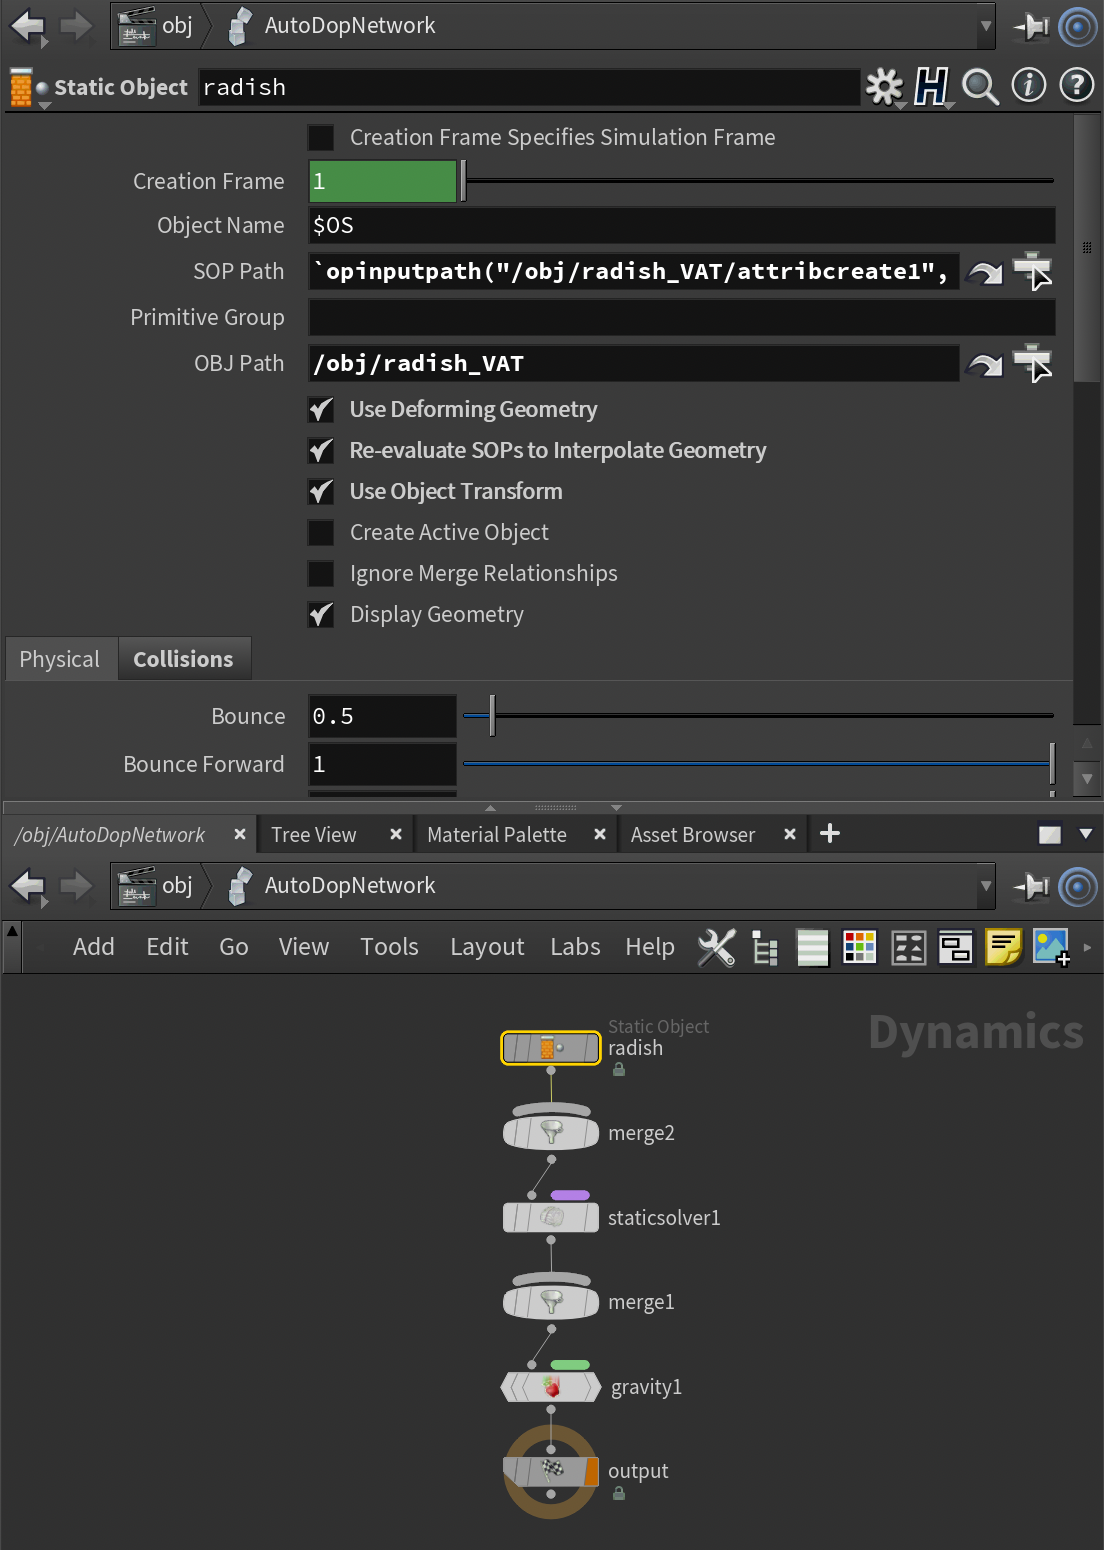
- Select your mesh using the
Deforming Objectshelf tool. - This should create a
Static Objectnode which already has the settingsUse Deforming Geometry,Re-evaluate SOPS to Interpolate Geometry,Use Object Transformenabled.
- Select your mesh using the
- In the Output menu, export your animation as a
SoftbodyAnimation.
Importing Animations into Lens Studio
- Import the resources created by Houdini. Make sure the textures are set to
Optimization = None - Enable
Edit Animation Dataon the Crowd Controller Script - Assign the information from Houdini to the script: mesh, position map, normal map,
BBOX info, andNumber of Frames. - Adjust the frames for each animation sequence under
Animation Data -> Frame Dataon the Crowd Simulation Controller script. - (Optional) Test your animations.
-
This setting will cause the VFX to only play the selected test sequence.
-
Additionally, a test mesh will be created so you can get a better view of each animation.
-
Tips, Tricks, and Troubleshooting
- Storing additional mesh data:
UV0andUV2-UV7will be automatically exported by Houdini.UV1is used by VAT export, and should not be overridden.
- Vertex Color can be added using the attributes
Cd_vandAlpha_v.
- Optimization:
- When creating new animations, try to use as low of a vertex count as is possible. More vertices and longer animations results in larger VAT textures, which cannot be compressed. The example Radish model has 2k vertices, which is a good benchmark.
- Try to reduce the scale of your animation in Houdini before exporting.
- Houdini tends to create large meshes, which can cause precision loss during playback in Lens Studio. Usually a size that results in a
BBOX Max/Minof [-100,100] is good.
- Houdini tends to create large meshes, which can cause precision loss during playback in Lens Studio. Usually a size that results in a
- Increasing the size of the
Data Tex SizeandJFA Width(Crowd Controller Script -> Advanced) settings will increases the amount of pixels drawn and processing passes needed to run JFA, respectively. These things can which can slow performance. Try to use the lowest values possible to achieve your goal. - Due to the graphical complexity of the asset, VFX Crowds may not be suitable for low end devices.
- Common issues:
- Particle collision is acting weird:
- using the Debugging tools to view how big each area is.
- adjust the collision values: particles could be either failing to see other particles in front of them, or checking so far ahead that they are essentially always colliding.
- increase the
JFA Widthor reduce theData Tex Sizesettings; it could be that there are not enough passes for JFA to provide accurate data for the particles to calculate collision.
- Particles seem to jitter as they move in the world, instead of moving smoothly:
- the World Texture size may not be big enough to provide accurate data; try increasing the size using the
Advanced -> World Tex Sizesetting. - Adjust the
Height Limitsetting to be a little higher: particles could be trying to jump every frame and immediately landing.
- the World Texture size may not be big enough to provide accurate data; try increasing the size using the
- Particle Size is acting strange (jittering or vanishing):
- your exported mesh could be too big
- you may need to adjust the precision of the Particle Size attribute in the VFX graph.
- Particle collision is acting weird: