Head Mesh
The Head Mesh is created by enabling the Skull property in the Face Mesh asset. The Skull property provides a 3D mesh that mimics the user's skull as well as having all the features that we know from Face Mesh.
You can download the following template to learn more about what you can do with the Head Mesh.
- Head Decal: Shows different examples of Material Editor materials on a head mesh to take a full advantage of the mesh
- Fit to Head: Uses the skull property to dynamically fit and place a skinned mesh on a user's head
- Move on Head: Uses the skull property to dynamically place any object (regardless of whether it's rigged or not) on a user's head
Head Decal
This template demonstrates how you can take advantage of custom materials made with Material Editor to create effects on top of the user’s head.
Skull Property
Before we modify the material, let’s take a look at the Head Mesh which will display the material. The Head Mesh consists of a Face Mesh with the Skull property enabled.
To find the Skull property in the template, select the Face Mesh resource in the Asset Browser panel. Then, in the Inspector panel you will see the Skull checkbox.

You can use the checkbox to enable or disable the skull part of the head. This is the same as other features like Eye Geometry and more.
You can quickly add the Face Mesh with the Skull option by going to the Scene Hierarchy panel and adding Head Mesh directly:

Changing Skull material
This template comes with different custom materials that you can apply to Face Mesh. To try the other materials, select the Face Mesh [SWAP_MATERIALS] object in the Scene Hierarchy panel and in the Inspector panel click on the material 1 input and select any of the example materials provided in the materials folder.
You can also create your own custom materials or use any pre-made materials available in Lens Studio. Double click on any Graph materials to open them in the Material Editor to see how they work.
Check out the Material Library for other example materials. See more details of how to use Material Editor here
If you want to add a simple texture to the head, you can use the default PBR or Unlit material as well. Make sure to reference the UV maps below so that your texture can be properly applied to the face.
Mapping Textures to the face
One important note is that a Face Mesh with the Skull property enabled has a different UV layout than one with the skull property disabled as it contains additional polygons.
On the left you can see how the UV looks like for Face Mesh with Skull property disabled, and on the right what it looks like with the Skull property enabled.

A UV channel/map defines how a 2D image should be laid out onto a 3D mesh. It sets a map between the 2D coordinates of a pixel in the image and the 3D coordinates of a point on the mesh.
Since the two options use two different UV layouts, it is important to set a corresponding mapping for the Face Mesh to achieve correct positioning.
You can select which UV layout to use for your material in two ways. For non-Graph materials that support multiple UV layouts you can change the Texture UV parameter in the texture parameter's option.

For Graph Materials you can use the relevant Surface UVCoord node.
Fit to Head Template
This template shows how you can automatically fit and place a 3D skinned mesh on the user’s head. It comes with a helper script to help you attach any rigged model to a Face Mesh. The section below shows how the 3D model is set up and how to use a custom script to attach a rigged model to a head.
Visor Model
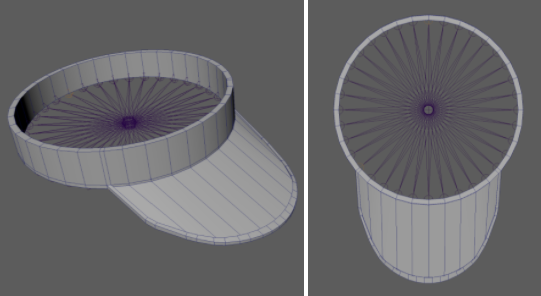
The template comes with an already rigged visor model. This skinned model contains 36 joints which are mapped around the circumference of the visor. Each of these joints will then be pinned to different sections of the Face Mesh so that the hat will fit around the user’s head.
You can download the model and see how the rig is set up in any 3D modeling tool.
Fit Joints To Head
The FitJointsToHeadController script is the main script of this template. This script can be applied to the root bone of the rigged model.
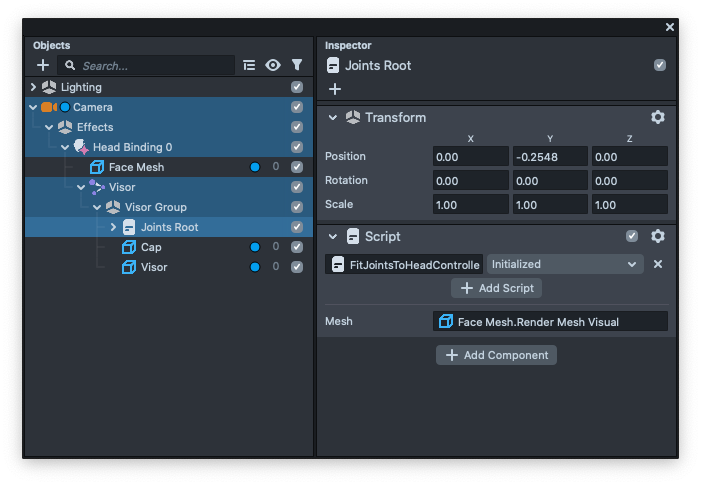
When this script is attached to the root joint, it will automatically find all other joints and place them around the Face Mesh. This positioning of joints to the Face Mesh is done with the help of the Pin To Mesh component.
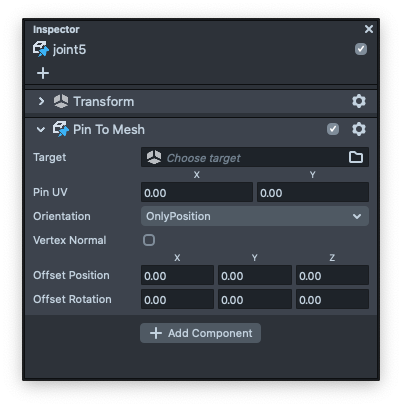
This Pin To Mesh component is automatically added to each joint by the FitJointsToHeadController script and pins the joints to the UV position of the Head Mesh.
The adding of components is done in run time and the Pin to Mesh component itself will not be visible in the Inspector panel.
If you want to learn more about the PinToMesh component, please refer to the Pin To Mesh guide.
This template comes with a small controller that allows you to rotate the visor scene object.
Move on Head
The Move on Head template shows how you can attach a 3D object to the Face Mesh. Like before, it uses Pin to Mesh to understand the shape of the skull. However, instead of reshaping the hat to those points, it uses it to modify the orientation of the hat, as well as its scale.
This example does not require a rigged model or a skinned mesh to attach to the skull, in contrast to the template above. The trade off here is that you get less precision compared to the Visor template, but you can apply it to any 3D model.
Fit Object To Head
The FitObjectToHeadController script is the main script of the template.
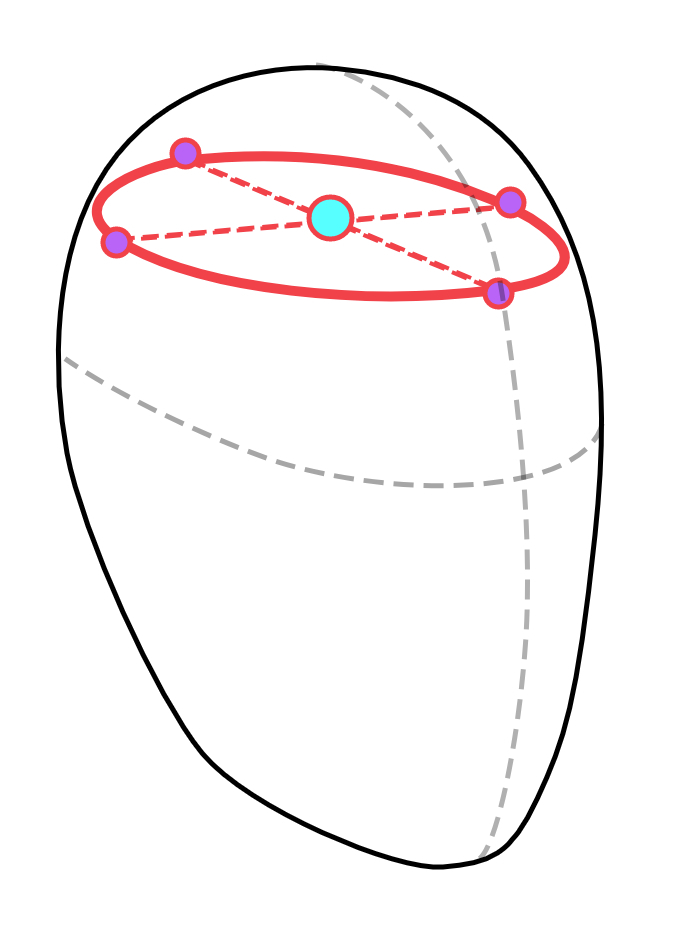
This script creates four reference points which are pinned to each side of the skull, to calculate the size of the skull and adjust the size to the cap according to it. The points are named Left, Right, Front, and Back. The cap is placed in the centroid of the reference points and approximately aligned with the normal of the plane propagating through these reference points.
If you want to adjust size of the object you want to pin, you can use the parameters below like width, depth and the vertical offset:

Cap Placement
The fact that we can move these reference points around the head, allows us to create some unique interactivity. If you tap and drag around in the Preview panel you will be able to “place” the cap in real time. This is why we aligned cap rotation with the normal of the four reference points plane. In other words, when you move your fingers, you are moving the four cubes which are pinned to the head, thereby changing the orientation of the hat.
As you can see this new feature allows you to achieve interesting results by sticking objects to the Face Mesh, or by applying creative materials and textures to it.
Previewing Your Lens
You’re now ready to preview your Lens! To preview your Lens in Snapchat, follow the Pairing to Snapchat guide.